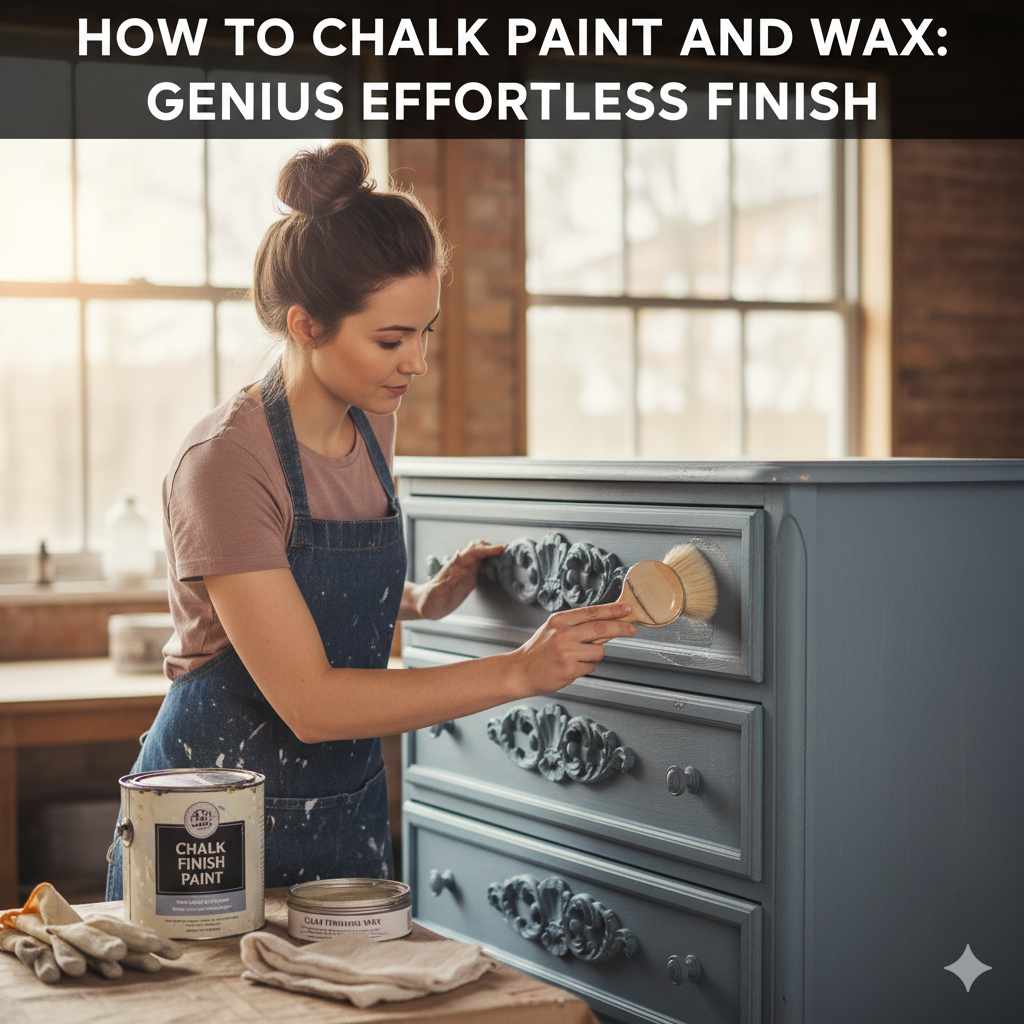
How to Chalk Paint and Wax: Genius Effortless Finish
Get a beautiful, matte, and durable finish on furniture and decor with chalk paint and wax. This easy-to-learn technique requires minimal prep and delivers a gorgeous, vintage look that’s perfect for DIYers of all skill levels. Follow these simple steps for effortless results!
Have you ever looked at a piece of furniture and thought, “I wish I could give that a whole new look, but I’m afraid I’ll mess it up”? You’re not alone! Many of us admire those perfectly painted makeovers but feel a little intimidated by the process. The good news? There’s a fantastic, forgiving method that’s practically designed for beginners: chalk painting and waxing.
This technique has become incredibly popular because it’s simple, versatile, and can transform tired old items into stunning showpieces with hardly any sanding or priming. If you’ve ever felt overwhelmed by complicated painting projects, prepare to be delighted. We’ll walk you through every step, making it easy to achieve that coveted effortless finish.
Ready to give your furniture a gorgeous makeover? Let’s dive into how to chalk paint and wax like a pro, even if you’re just starting out!
Your Essential Guide: How to Chalk Paint and Wax for a Genius, Effortless Finish
Chalk paint is truly a DIY miracle. Its unique formulation adheres to almost any surface – wood, metal, laminate, even fabric – with very little surface preparation. This means no tedious sanding or priming! Combined with furniture wax, it creates a durable, velvety-smooth finish that’s both beautiful and protective. It’s the perfect way to breathe new life into old furniture or create a custom look for new pieces.
As your woodworking mentor, I’m here to show you just how approachable this project is. We’ll break down everything you need and every step you’ll take, ensuring you feel confident from start to finish. Let’s get your materials ready!
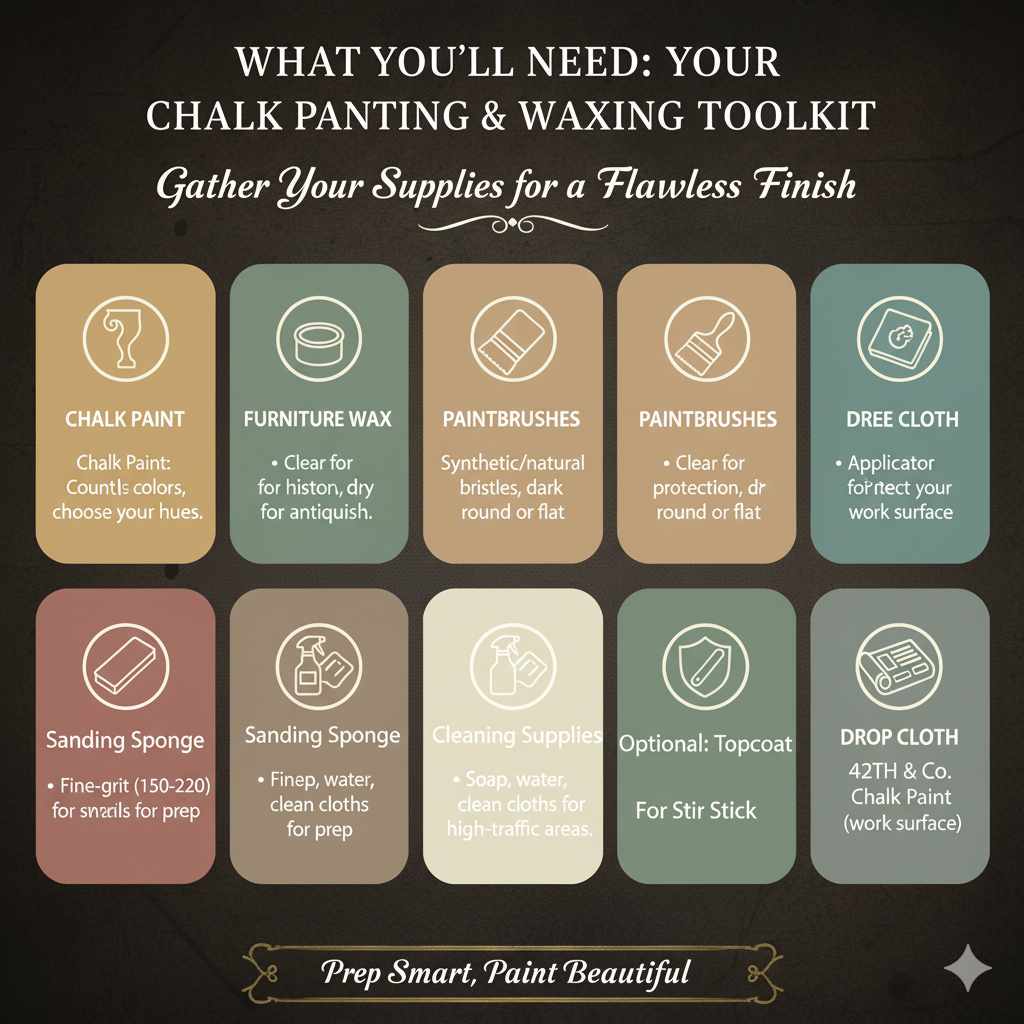
What You’ll Need: Your Chalk Painting & Waxing Toolkit
Gathering the right supplies is the first step to success. Don’t worry; most of these are readily available at craft stores, hardware shops, or online. Here’s what you’ll want to have on hand:
- Chalk Paint: Available in countless colors. Choose one or more hues for your project.
- Furniture Wax: Typically clear or sometimes dark for an antiqued look.
- Paintbrushes: A good quality synthetic or natural bristle brush works well. Some people prefer round brushes for chalk paint application.
- Applicator Pucks or Cloths: For applying wax. Lint-free cloths work best.
- Drop Cloth or Newspaper: To protect your work surface.
- Sanding Sponge or Fine-Grit Sandpaper (150-220 grit): For light distressing if desired.
- Cleaning Supplies: Mild soap, water, and clean cloths for prepping your piece.
- Optional: Topcoat (like polycrylic or lacquer): For high-traffic areas or extra durability.
- Optional: Stir Stick: To thoroughly mix your chalk paint.
The Step-by-Step Process: How to Chalk Paint and Wax
Ready to transform that tired dresser or outdated chair? Follow these straightforward steps to achieve that gorgeous, effortless chalk painted and waxed finish. I’ll guide you through each stage, making it simple and enjoyable.
Step 1: Prepare Your Piece
This is where chalk paint truly shines! Unlike traditional paints, extensive prep work is usually not required. However, a clean surface is crucial for good adhesion.
- Clean Thoroughly: Wipe down your furniture piece with a damp cloth and mild soap to remove any dust, dirt, grease, or grime. If using a cleaner with degreaser, make sure to rinse well with plain water.
- Dry Completely: Let the piece air dry completely before you proceed.
- Check for Loose Parts or Flaking Paint: If there are any areas of old paint that are peeling or loose, gently scrape them away. You don’t need to sand the entire piece smooth, just address any obvious issues.
If your piece has a very slick, glossy finish (like some melamine or laminate surfaces), a light scuff-sand with fine-grit sandpaper can improve adhesion. But for most common furniture finishes, a good cleaning is all you need!
Step 2: Stir Your Chalk Paint
Chalk paint can separate in the can, with pigment settling at the bottom. It’s important to mix it thoroughly to achieve an even color and consistency.
- Open the can of chalk paint.
- Insert a stir stick ( or a clean piece of wood, or a paint stirrer) and stir gently but thoroughly, making sure to scrape the bottom and sides of the can. Keep stirring for a minute or two until the paint is a uniform color and texture.
Step 3: Apply the First Coat of Chalk Paint
Now for the fun part! Chalk paint offers a matte finish and can be applied in thin or thicker coats, depending on the look you want.
- Apply Thinly: Dip your brush into the paint, and remove any excess. Apply the paint in thin, even strokes. Don’t worry about getting perfect coverage on the first coat; chalk paint is known for its matte, sometimes slightly streaky appearance after the first coat, which is totally normal and adds to its character.
- Work in Sections: Paint one section at a time (e.g., a drawer front, a leg, or a small panel).
- Let Dry: Allow the first coat to dry completely. Chalk paint dries quite quickly, usually within 30 minutes to an hour.
Remember, chalk paint is very forgiving. If you get a drip or a brush mark you don’t like, you can often just brush it out while it’s wet, or lightly sand it once dry before applying the next coat.
Step 4: Apply Additional Coats (If Needed)
Depending on the color of your paint and the original color of the piece, you may need more than one coat for full coverage and an even look.
- Inspect Coverage: Once the first coat is dry, look at your piece in good light. Are there any thin spots? Is the color uniform?
- Apply Second Coat: If needed, apply a second coat of chalk paint, using the same method as the first. Again, apply thinly for best results.
- Dry Completely: Let the final coat dry thoroughly. This is crucial before waxing.
Some people love the slightly imperfect look of two coats, while others prefer three for a solid, opaque finish. It’s all about the aesthetic you’re aiming for!
Step 5: Distressing (Optional, but Popular!)
This step is what gives many chalk painted pieces that beautiful, aged, vintage charm. If you prefer a clean, modern look, you can skip this!
- Use a Sanding Sponge: Once the paint is completely dry, take your fine-grit sandpaper or sanding sponge.
- Sand Edges and High Points: Gently sand along the edges, corners, and any raised details of your furniture. Focus on areas that would naturally show wear over time.
- Wipe Away Dust: Use a clean, dry cloth to wipe away any dust created by sanding.
You can control how much distressing you do. A little goes a long way for a subtle look, while more aggressive sanding can create a more heavily weathered effect.
Step 6: Apply the Furniture Wax
Wax is the secret ingredient for sealing and protecting your chalk paint finish. It also gives the paint a soft, luxurious sheen.
- Open the Wax: Stir the wax gently if needed.
- Apply with a PUCK or Cloth: Dip a wax brush, applicator puck, or lint-free cloth into the wax. You don’t need a lot at first.
- Work in Small Sections: Apply the wax in thin, even coats over the painted surface. Spread it like you’re polishing. Work in small areas at a time, maybe a leg or a drawer front.
- Feather the Edges: Blend the wax as you go. Don’t leave thick globs.
- Buff: After a few minutes (the wax should start to feel slightly tacky, not wet), use a clean, lint-free cloth to buff the surface in a circular motion. This brings out the sheen and removes excess wax.
Important Waxing Tip: It’s much better to apply multiple thin coats of wax than one thick, heavy coat. This prevents the wax from becoming sticky or cloudy.
Step 7: Apply a Second Coat of Wax (For Durability)
For the best protection, especially on high-traffic items like tabletops or dresser tops, a second coat of wax is highly recommended.
- Wait Time: Allow the first coat of wax to dry and cure for at least a few hours, or ideally, overnight. The paint and wax need time to harden.
- Apply Second Coat: Apply another thin coat of wax using the same method as before.
- Buff Again: Buff thoroughly with a clean cloth until you achieve your desired sheen.
The surface will become more durable and water-resistant as the wax cures over the next several days. You can learn more about protecting furniture finishes from the National Park Service, which offers guidance on conservation techniques broadly applicable to preserving surfaces: NPS Conservation Guide.
Step 8: Consider a Topcoat (Optional, for Maximum Durability)
While wax provides good protection, for pieces that will see very heavy use (like kitchen tables or high-traffic entry consoles), a water-based polycrylic or a durable lacquer topcoat can add an extra layer of protection over the wax.
- Ensure Wax is Cured: Make sure your wax has been on for at least 24-48 hours to cure.
- Apply Topcoat Sparingly: Apply 1-2 thin coats of a water-based polycrylic or a clear lacquer. Follow the manufacturer’s instructions for application and drying times.
- Mistakes Happen: If you get brush marks or drips with the topcoat, don’t worry too much. You can often lightly sand them down with very fine sandpaper (400 grit or higher) once dry and reapply.
This step ensures your beautiful finish stands up to daily life for years to come.
Dark Wax vs. Clear Wax: Achieving Different Looks
The type of wax you use can significantly impact the final appearance of your chalk painted piece. Understanding the difference will help you achieve the exact look you’re going for.
Clear Wax
Clear wax is your all-purpose sealer. It protects your chalk paint and gives it a soft, matte or satin sheen. It’s the standard choice for maintaining the original color of your paint and is excellent for achieving a clean, timeless look. It also allows you to buff to a lovely subtle glow.
Dark Wax
Dark wax (often a brown or black tone) is used to create an antiqued or aged effect. It’s typically applied after a coat of clear wax, or can be used on its own on certain surfaces.
- Application: Apply dark wax sparingly, focusing on recessed areas, corners, and details. It settles into crevices, highlighting the texture and shape of the furniture.
- Wipe Off Excess: The key is to wipe off the excess thoroughly with a clean cloth. You want the dark wax to create shadows and depth, not to look like a muddy stain.
- Highlighting: After applying dark wax and wiping off the excess, you can sometimes go back over raised areas with a bit of clear wax to bring out the original paint color.
Using dark wax effectively requires a good balance of application and removal. It’s a fantastic tool for mimicking the patina of age on a piece. You can even combine them for a unique look – apply clear wax, distress, and then use dark wax in the distressed areas for a truly vintage feel.
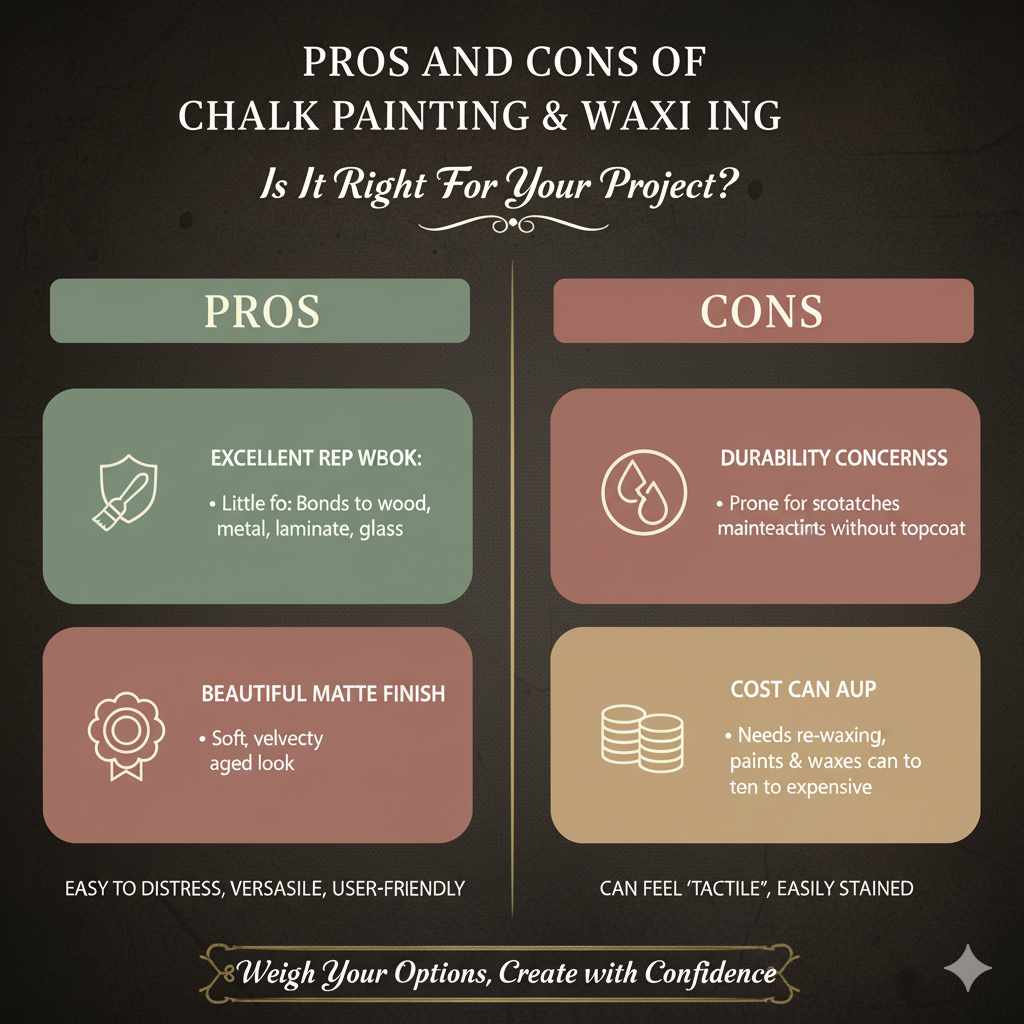
Pros and Cons of Chalk Painting and Waxing
Like any DIY technique, chalk painting and waxing have their upsides and potential drawbacks. Knowing these can help you decide if it’s the right method for your project.
Pros
| Advantages | Description |
|---|---|
| Minimal Prep Work | Little to no sanding or priming required for most surfaces. |
| Excellent Adhesion | Bonds to a wide variety of materials (wood, metal, laminate, glass, fabric). |
| Beautiful Matte Finish | Achieves a soft, velvety, chalk-like appearance. |
| Easy to Distress | Allows for easy creation of a vintage, aged look. |
| Versatile | Can be layered, glazed, or distressed to create many different looks. |
| User-Friendly | Forgiving for beginners; mistakes are often easy to correct. |
Cons
| Disadvantages | Description |
|---|---|
| Durability Concerns (Without Topcoat) | Chalk paint alone can be prone to scratching and scuffing; waxing or a topcoat is usually necessary. |
| Wax Requires Maintenance | Waxed surfaces may need occasional re-waxing or buffing, especially in high-use areas. |
| Can Be Prone to Water Stains | Without a proper topcoat, chalk paint and wax can be susceptible to water rings or staining. |
| Can Feel “Tactile” | Some people find the matte, chalky feel of the paint to be undesirable before waxing. |
| Cost Can Add Up | High-quality chalk paints and waxes can be more expensive than standard paints. |
Frequently Asked Questions (FAQ) About Chalk Painting and Waxing
Q1: Do I really need to sand before chalk painting?
For most surfaces, no! Chalk paint is designed to adhere with minimal preparation. A good cleaning is usually all you need. However, if you have a very slick or glossy surface, a quick scuff with fine-grit sandpaper can help the paint grip better.
Q2: How many coats of chalk paint should I use?
It depends on the color you’re using and the original color of the piece. Often, one or two coats are sufficient for good coverage. Some light colors might need a third coat to achieve a solid, opaque finish. Always let each coat dry fully before applying the next.
Q3: How do I know when to apply wax?
You should only apply wax after your chalk paint has completely dried. Ideally, wait at least 24 hours after your final coat of paint for it to cure a bit before waxing for the best adhesion and finish.
Q4: How much wax should I use?
Less is more! Apply wax in thin, even coats. It’s much easier to add another thin layer later than to remove excess wax that’s become sticky or cloudy. Think of it like polishing your car – you want a thin, even spread.
Q5: How long does the wax need to cure before I can use the furniture?
The wax will feel dry to the touch within a few hours. However, it needs 24-72 hours (or even longer, depending on humidity) to fully cure and harden. During this curing time, try to be gentle with the piece and avoid heavy use or moisture exposure.
Q6: Can I use chalk paint on outdoor furniture?
Chalk paint is better suited for indoor projects. While you can use it outdoors, its matte finish and wax sealant are not as durable or weather-resistant as outdoor-specific paints and sealers. For outdoor pieces, consider adding multiple layers of a durable, weather-proof topcoat over the chalk paint and wax, or opt for an exterior-grade paint.