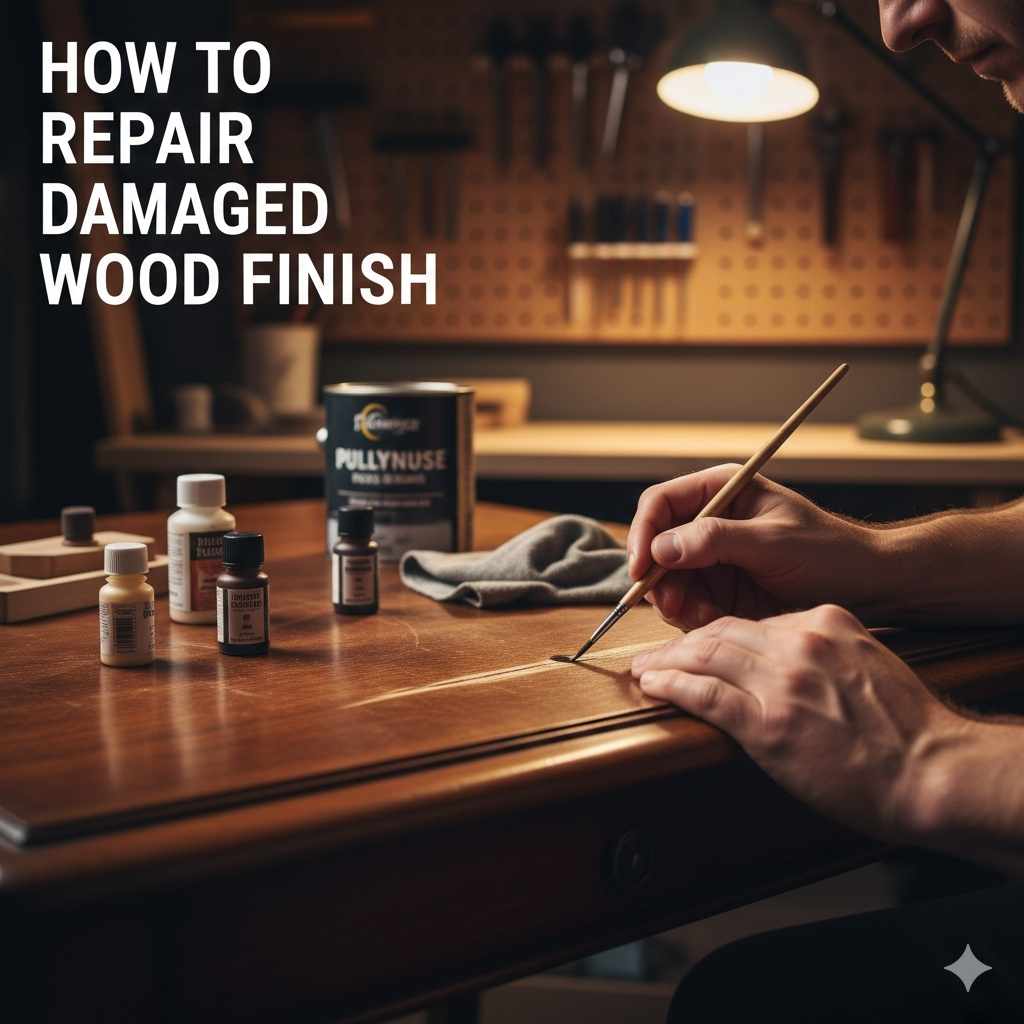
How To Repair Damaged Wood Finish: Proven Best Steps
Repairing a damaged wood finish is completely achievable for any hobbyist! Use fine-grit sandpaper to remove the damage, clean thoroughly, apply matching stain or color correction to the raw wood, and seal with a new topcoat like polyurethane or furniture wax for a professional repair that restores your beautiful piece.
Have you ever dreaded looking at a new scratch or dull spot on your favorite wooden table? Many homeowners freeze when they notice blemishes on polished wood, thinking that any repair job requires a pricey expert visit and specialized chemicals. But don’t you worry! I’m Md Meraj, and I find that fixing a dinged or scraped piece of antique furniture provides one of the most satisfying wins in DIY. It’s much easier than you might think. This comprehensive guide breaks down exactly how to approach whatever flaw has appeared, using simple steps anybody can follow to bring the luster back to your wood. Let’s get those favorite pieces loving the fresh look again!
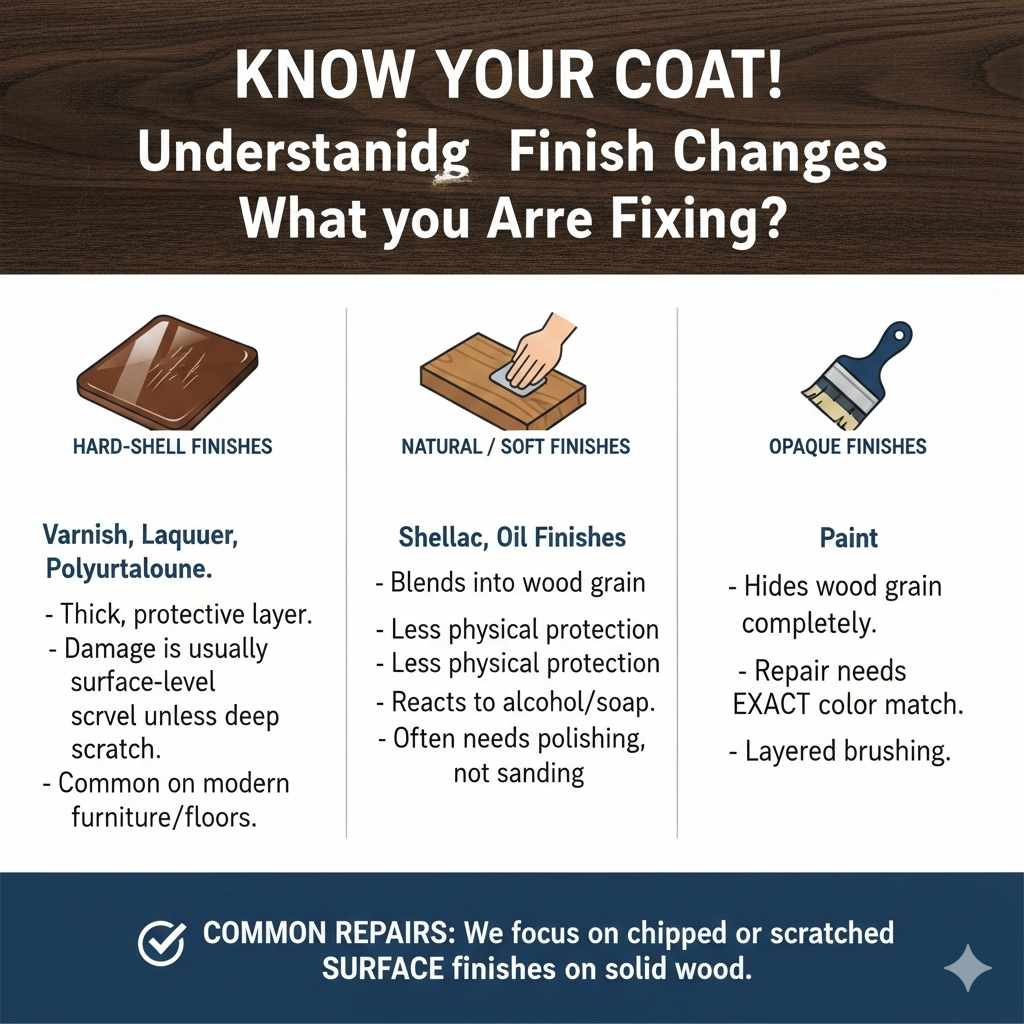
Understanding Wood Finishes: What Are You Fixing?
Before we grab any sandpaper or varnish, we must know what we are fixing. Calling out “wood finish repair tools” still needs us to know what kind of coat we mess-ed up! Are you working with true solid hardwood, or is it veneer over particleboard? Is the protection thick like glass (polyurethane), or thin and soft like beeswax?
Knowing the finish determines the repair method:
- Varnish, Lacquer, and Polyurethane: These create a hard, protective shell on top of the wood. Damage here is usually only skin-deep unless the scratch is deep enough to hit the actual wood below. These are most common on modern furniture and floors.
- Shellac and Oil Finishes: These blend more into the wood, offering less physical protection. They react easily to soaps and alcohol. They may need simple polishing rather than full sanding routines.
- Paint or Opaque Finishes: These hide the wood grain altogether. Repair involves matching the exact paint color and often brushing in layers.
We are focusing most heavily on chipped or scratched surface finishes, as these are the most common frustrations for homeowners bringing life back to older solid wood pieces or protecting current heirlooms worldwide.
Prep Work: Gather Your Essential Toolkit
Good projects succeed before the work even begins—it happens during the setup! For surface-level finish touch-ups, you don’t need the heavy artillery usually required for stripping entire tables, but some basic supplies are essential for clean results.
Essential Supplies for Touching Up Wood Finishes
Keeping things on hand simplifies things immensely if you notice damage in the future. I recommend keeping these basic items in one dedicated repair kit:
- Cleaners: Mild soap (dish soap often works best), naphtha (or mineral spirits for tough grease buildup).
- Abrasives: A range of sandpaper, particularly 220, 320, and 400 grit. Always place your material somewhere you’ll know where else can look online what resources you have.
- Color Correction: Wood stain markers, gel stain that matches your existing color, or small pots of colored wax filler sticks.
- Appliculators and Finish Materials: Clear polyurethane (wipe-on versions are easiest for small areas), paste wax, or furniture polish.
- Clean Cloths: Lint-free microfiber cloths or soft cotton rags destined for the trash after use.
Safety Check! Always work in a well-ventilated space when smelling any chemical involved, like steel wool or mineral spirits. Safety goggles guard your eyes from little flying dust flakes. Simple steps keep big injuries away every time.
Step-by-Step Guide: How to Repair Minor Scratches Using Blending Markers
This method is your secret weapon for tiny nicks—the kind caused by keys, rings sliding by, or cat claws on decorative mouldings. Don’t jump straight to sanding until you see how far a color correction pen can take you!
- Cleanse the Area Thoroughly: Mix a tiny bit of mild dish soap with water. Wipe the entire area spanning the scratch and a few inches beyond it. Finish by wiping it down once more with lukewarm clear water. Let it dry completely—airflow from a nearby fan helps this speed process.
- Test Color Markers: Get specialized wood repair markers. They often look unnerving right out of the package: one side should be light and one side dark! On a scrap piece of comparable wood (or even the unfinished underside of the piece you are repairing under a table skirt), test various shades until you find a match close to covering the exposed light grain of the scratch.
- Apply the Marker Vertically: Keeping your hand slow and steady, carefully draw inside the line of the scratch, moving only on direction—following the wood grain pattern. Do not try carving wide brush strokes. You aren’t filling—you are replacing what an eye sees as shadowed color. Erase immediately to check the blend.
- Gentle Heat Setting (Caution!): After the marker seems close, many pros gently wave a warm—not hot—hair drying attachment over the area or press with an extremely clean, slightly warm iron over waxed paper covering the repair. This can help penetrate fillers but use absolute caution; too much heat burns lacquer in seconds.
- Seal the Spot: If the color blend satisfies you, the physical scratch outline remains. Finish by wiping a tiny bit of clear paste wax over the line. Rub it in gently with a soft cloth. This fills the small indent while creating a subtle sheen differential you blend using polishing motions.
Advanced Repair for Deeper Gouges or White Haze Marks
What happens when that scratch goes deep? Or maybe your grandmother’s perfume bottle left white, cloudy eyes on an antique table surface? This requires mild abrasion and surface renewal rather than just camouflage.
Tackling White Haze (Heat Marks or Water Rings)
White marks where the top finish has absorbed moisture (like forgotten condensation rings) are fixable because they haven’t usually broken through the protective coating past the surface finish; they’ve just clouded it.
- Method A: Slow Heat. Place a clean, thick cotton t-shirt or a few paper towels over the entire ringed area. Set an iron on its LOWEST setting (No Steam. Ever!). Press down very fleetingly for 1-2 seconds contacts. Move the iron up and repeat immediately. The idea is to draw the moisture out just enough for the finish to cool and clear again. Test in increments after every touch—you can reverse charring, but it is vastly harder than reversing steam discoloration!
- Method B: Gentle Oil Rub. If the iron method scares you (and that is okay!), mix a heavy-bodied paste of mayonnaise (yes, mayonnaise!) or petroleum jelly, or even specialized furniture polish like Old English oil. Cut three steel wool pads. Rub the selected paste lightly onto the visible ring structure in very small circular movements. The light oils lubricate the scratch, and sometimes the non-abrasive surface of the #000 finest steel wool manages to buff away only the lightest surface watermark.
Repair Methods for Truly Visible Deep Scratches
Here is where sanding transitions from optional to necessary. We want minimal sanding depth!
| Defect Type | Best Repair Filling Agent | Tool Pairing |
|---|---|---|
| Shallow V-Cut Scratch | High-quality blend wax filler sticks (melting wax) | Clean cloth, light heat source |
| Medium Depth Blemish hitting raw wood | Finishing Gunstock oil dyed exactly to match species/stain | 320/400 Grit Sandpaper (used only at the edge of the repair) |
| Chip or Missing Finish Section (1/4 inch wide minimum) | Two-part epoxy filler specially formulated for furniture. | Small putty spatula or craft stick |
The Process of Damage Minimization Sanding
If you need color underneath your stain spot (a raw wood show-through), minimal, controlled sanding cleans the wound and prepares it for fillers.
- Sand Only the Depressed Spot: Using a flexible backing (like a small cloth wrapped around your finger versus using a hard sanding block), apply 220 grit paper dry. Rub only lightly, aiming to gently feather the torn edge around the scratch until you expose slightly more flat wood next to the scratch. Stop the second the topcoat looks flush again.
- Move to Smoother Grades: Switch immediately to 320 grit on the slightly rough area you just touched. Feather this out an even bigger circumference than the first pass. This removes the deeper scratch created by the 220, leaving you with a surface ready nearly smooth. Finish with 400 grit wet-sanding around the immediate vicinity. At this point, the flaw itself should be almost imperceiverable depth but definitely show a matte color change.
- Cleaning the Profile: Use alcohol spray or naphtha to definitively remove the residue. Any dust remaining underneath your patch color seals the failure in place. This step must be truly clean.
Refinishing Sections: Using Touch-Up Stain for Deep Damage
When sanding reveals wood underneath fresh primer, shellac protectors, or an old dye application is now lighter. We must put the color back consistently to match the patina of age the rest of the piece enjoys.
Learning about how wood surfaces absorb dyes helps significantly. Denser or clearer pieces absorb more opaquely than open grain materials like oak at a basic wood grain absorbency workshop understanding portal on dye action.
We match materials! If you are restoring Victorian dining furniture finished probably with shellac and pigmented alcohol dyes, stop immediately looking at water-based maple factory stains. They will never blend properly.
When to Apply a Tinted Varnish (Gel Stain Trick for Experienced DIYers)
For successful repairs, stained lumber demands the staining product mimics either the liquid dye applied originally, or it requires a heavy coating designed for hard penetration.
We love gel stains, even if matching perfectly color-wise:
- Ensure your area (where the sand went in, around the blemish) is completely dull and receptive. If the rest of the finish looks super glossy, you may need to lightly scratch the surrounding 1 inch with 400 grit paper so any tiny bit of stain you rub further catches evenly, not just into the patch area.
- For extremely small jobs, take a dab of deep brown or medium walnut gel stain onto a rag or foam applicator tip. Rub it across your repair area just like applying polish. Your goal is not to darken the wood dramatically but to pull the slightly lighter sanded area closer to the surrounding depth.
- Wipe away the excess immediately. Gel stain holds pigment well, meaning it layers without disappearing into the raw sandpaper mark quickly. You will see improvement immediately. Let this set for twelve hours.
If the color still isn’t quite right, repeat step 2 softly. This allows gradual layering! Always prefer many thin layers/wipes over trying to slam volume into the deep scrape in one go away technique or try application approach!
Protecting Your Hard Work: The Final Sealing Coat
This might be the most critical part. You have cleaned it, blended the raw wood showing through. Now, you must cover it for long-term defense against future water spills or scrapes. You need continuity in thickness with the original tabletop finish.
Selecting the Right Topcoat Product
Using clear satin polyurethane on top of a glossy lacquer spot is sometimes visible later on. Aim for textural equivalence whenever possible. For minor touch-ups on existing smooth finishes, wipe-on topcoats are less noticeable.
Comparison for Selecting a New Topcoat Look
| Finish Type | Best Look Achieved | Difficulty/Closeness to Average Home Finish |
|---|---|---|
| Wipe-On Polyurethane | Satin to Semi-Gloss (Easier blending) | Beginner Friendly (Builds thin layers nicely.) |
| Spray Can Lacquer | High Gloss, hard finish | Intermediate (Easy to get ‘runs’ or saguas). Check Federal resources on ventilation performance standards for aerosols and air quality in home workshops. |
| Paste Wax (Tuttle or Howard’s) | Low Sheen, almost undetectable blend | Very Beginner Friendly (Requires regular re-waxing often.) |
Clear Finish Application Protocol
- Determine If You Need Heavy Thickness or Thin Sheen. Generally, for tiny touchups, the wipe-on polyurethane or paste wax offers the path of immediate visual least resistance.
- Use Small Brrushes: If using poly or lacquer, load a tiny artist’s detail brush (round tip) with clear protectant only.
- Keep Layers Razor Thin: Touch only the area you sanded or stained. The goal is to slowly build the missing thickness barrier matching the level of the existing finish next to it incrementally. Too much liquid catches the light differently against existing, fully cured coat; a hairline brush stroke vanishes better as dust accumulates naturally years into its life
- Curing time is Crucial: Observe curing guidelines provided on the specific product you bought—patience lets the repair bond nicely both chemically (to dry) and molecularly into the surrounding shell.
- Follow up with additional light application touches after allowing the first application touch to sit undisturbed for at minimum 24 hours. One thick swipe seals failure. Several light leveling swips seals success.
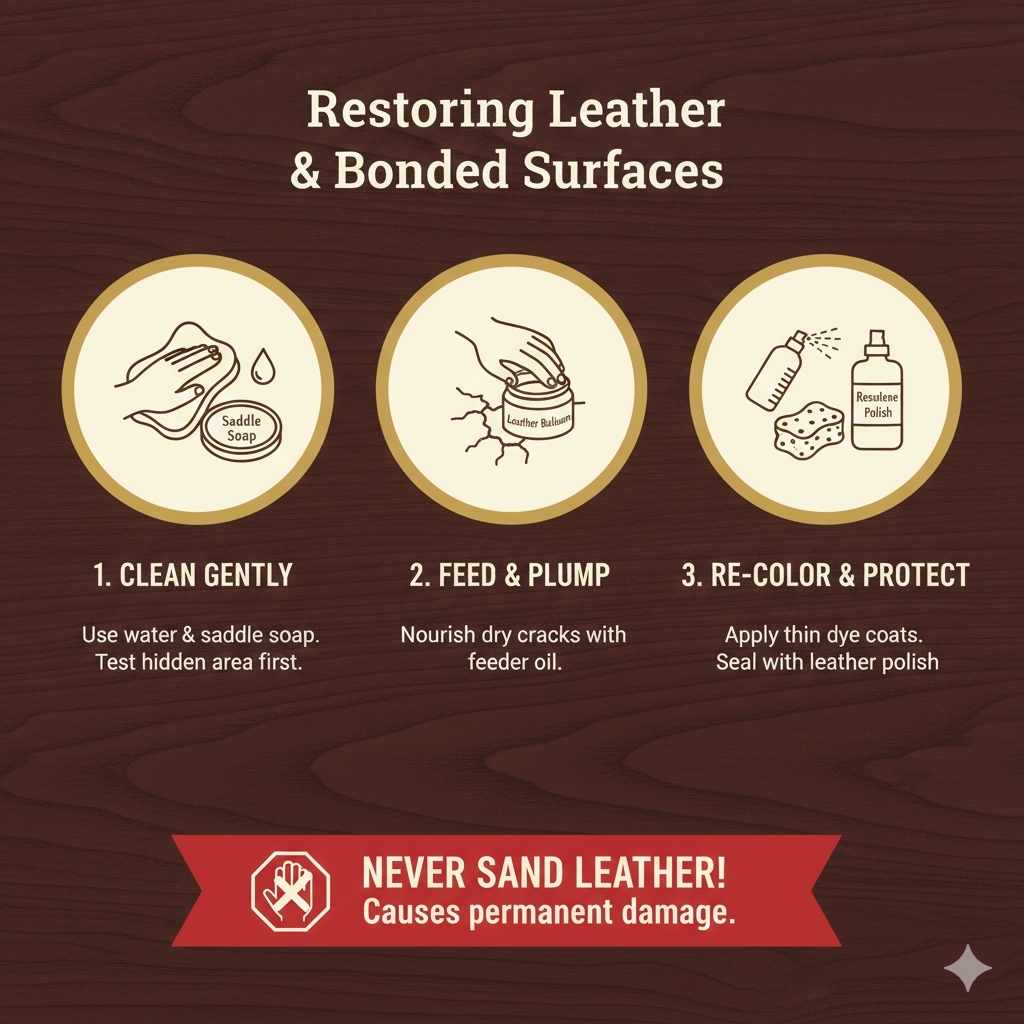
Restoring Leather or Bonded Surface Tops (The Non-Wood Layer)
Many old desks or executive tables feature leather inlays bound into wood frames or carved wood sections that are stained but sealed differently. If your damage happens here while scrubbing, the whole approach changes.
For deeply stressed leather or coated vinyl writing surfaces, your repair moves from shellac to leather-specific dye systems.
- Clean Leather Gently: Only water and saddle soap (very sparingly!). Test a hidden curve inside a drawer base first.
- Feed the Dry Skin (Dry Cracks): Use leather balsam or special feeder oils specifically sold for furniture leather renewal. Oil temporarily plumps up cracked surfaces, giving softer looks and delaying deep surface splits.
- Re-Color Slowly: Many high-end leather sprays or conditioning kits use dyes that chemically set into the fibers. Apply an ultra-even thin spray coat right over the faded-but-not-shredded spots after feeding the color into the surrounding skin mass seems more consistent visually side-byf-sided compared to application results. Once colored, protective finish options are leather-unique polishes (like resolene used heavily professionally) or leaving entirely bare shine where suitable for that specific chair/set.li>
In short: Sanding risks permanently ruining bonded leather or vinyl inlay areas while trying to manage wood sheen dynamics with it—stick mostly only to dyes or direct specialized treatments once surface abrasions appear.
Frequently Asked Questions (FAQ) About Wood Finish Repair
What is the fastest way to hide a black scratch on dark wood?
For quick fixes on glossy surfaces, black ink can surprisingly hide a small linear scratch. Test first on paper or the underside edge! Feather the very tip of a ballpoint pen into line; it fills a visible void perfectly. Follow immediately with a smudge of clear paste wax to dull the high gloss of the pure ink intrusion away from repaired cut, settling blend.
Can I completely refinish just a small area as opposed to the whole piece?
Yes, you absolutely can! The secret is “feathering” where you sand an area much broader than the actual blemish, going down in finer and finer grits (starting shallow). This gradual slope between the patch location and the original untouched clear coat prevents any visible step underneath reflected light (a mirror check). Allow liberal curing time between touch-up coats.
How do I match a unique, older stain color exactly? Stains often look different when fresh.
Older color takes on character, darkening, sun bleaching, and picking up natural resins. If you bought a house color-matched pre-stain color, apply super thin layers and let each air-dry to its full eventual dark result before applying the next coat five years later seems normal to experts. Take any removed small item piece to hardware shops that hold color scanning gear—many large centers can read raw dye needs.
Why does my burn mark look red inside the white sanded repair area?
Wood grain opens differently depending upon density. If you sanded past all the colored grain and reached porous raw soft wood base wood, that base naturally shows reddish tones before it interacts with stain/primer components. It means two things: stop sanding now! And you definitely need the subsequent thin stain layer rather than just aiming for clear top coat material alone onto this particular soft bottom surface.
Does liquid car wax substitute polished furniture sealants during a light repair?
Mild car waxes contain some silicones. While they will offer shine and can temporarily buff small whirls, continual use can build up layers that mess with proper re-finishing later when you want genuine polyurethane applied across furniture items. Use non-silicone specific furniture treatments—furniture requires food-safe, harder natural sealant solutions that are compatible and easily strip-able year after for any further professional attempts.
When sanding fine woods, what depth measurement should beginners use?
Do not use specialized micrometers unless you must! Focus instead on technique—use the lightest possible pressure when you lift into Pencils Fine Grid (approximately 5/0 grade). If sandpaper grit leaves soft visible scratches itself, back up immediately to the next higher numerical value or slightly less friction application/movement technique—it’s your eye determining actual tactile structural failure across many complex materials.
Preventative Maintenance: Keeping Future Damage at Bay
Successfully repairing one scratch is great, but ensuring the piece stays beautiful brings ongoing satisfaction. Finishing lasts many seasons only if correctly maintained within common conditions of the domicile the piece occupies.
Best Practices for Long-Term Finish Care
The primary threats to wood finish are exposure difference across large surfaces: rapid fluctuation in ambient conditions, direct sunlight exposure across prolonged time spans, massive liquid spill pooling, drastic localized surface heat application, especially upon delicate items!
- Maintain Humidity: Keep major solid heirloom type pieces within typical comfort range around relative atmospheric dampness. Rapid drying leads cracking in wood, forcing sealant splits on contact areas. The Lawrence Berkeley National Laboratory advises stability on elemental home environments for historic conservation practices spanning many material types found within traditional building envelopes used worldwide.
- Use Coasters—Always: Even if water rings didn’t seem solvable initially, you were lucky to get away minimally scratched—do not test durability fate again. Apply protection.
- Clean with Recommended Care: Only use pH-neutral or wood-appropriate cleaning agents unless actively doing targeted spot removal treatment protocols specified above. Wax once a year maintains resilience across often-handled contact areas across shelving and tabletop areas.
Conclusion: You’ve Got This, Mentor in the Making!
If something in your home shines after a nick is removed this cleanly it brings pride unlike anything simple painting can render into your favorite area!
Look, woodworking and home repair aren’t about following difficult paths shown online—they concern gentle, systematic iteration until you see the fix staring back accurately. Start with the light marker trick you now know; if necessary, practice progressive abrasion until you feel visually matched color integration followed by a protective top-shell coat reapplied carefully with tiny artistic motions.
The important task isn’t about perfection down to millionth micron of measurement—it centers around the repair disappearing under the light the eye catches in your home. Go dust off that scratchy corner drawer or fix that dining chair leg! You have the blueprint, and trust yourself: the result of careful, repeated gentle working triumphs over hasty powerful fixing every single time.