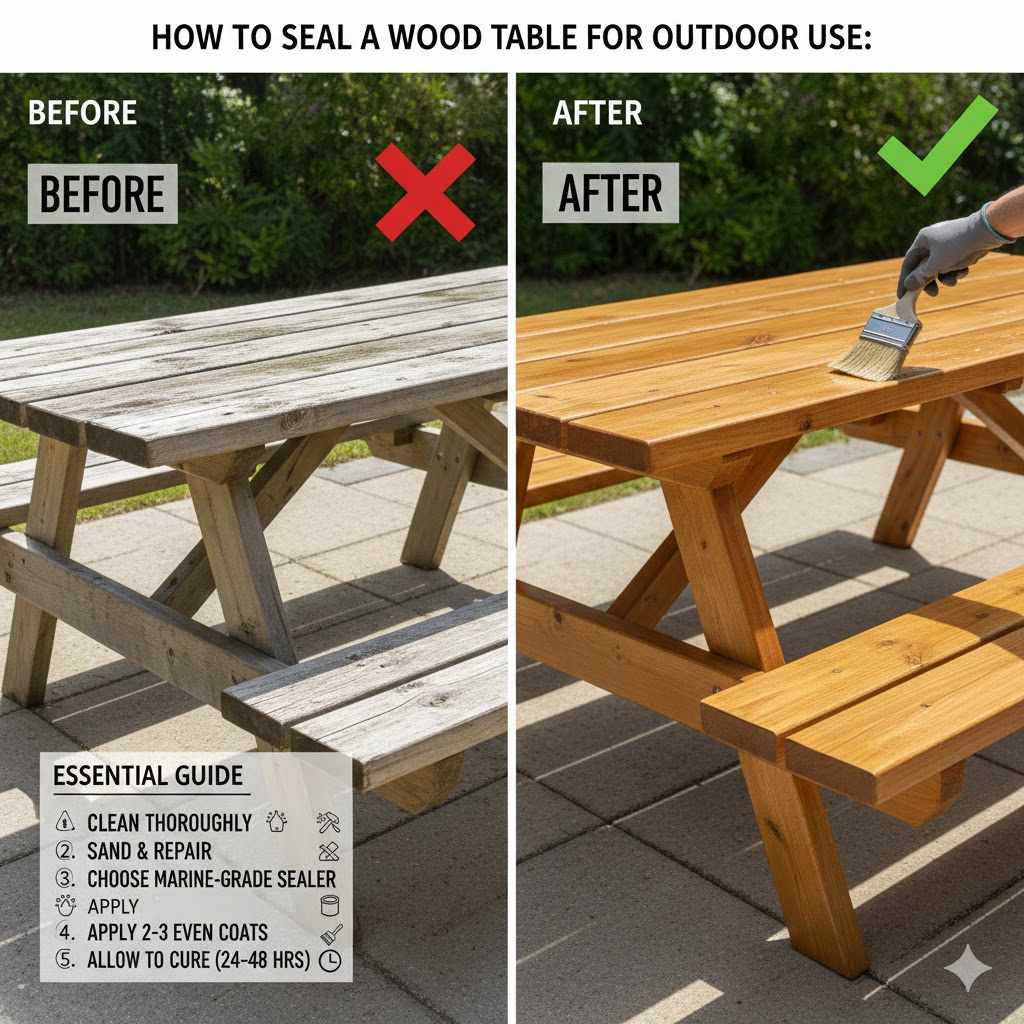
How To Seal A Wood Table For Outdoor Use: Essential Guide
To successfully seal a wood table for outdoor use, thoroughly clean and sand the wood, then apply multiple thin coats of a high-quality exterior marine varnish or spar urethane. This shields the wood from sun, rain, and temperature changes, ensuring lasting beauty and durability for your outdoor furniture.
Does your beautiful new wood patio table already look tired? Leaving your lovely wood furniture outside without protection is a fast way to welcome graying, cracking, and mildew. It’s frustrating when you invest in great pieces only to see them ruined by the weather! Don’t worry; protecting that wood is easier than you might think. With the right steps and products, we can turn your backyard table into a durable, weather-resistant centerpiece.
We are going to walk through every single step. I’ll show you exactly what you need, how to prep the wood right, and which finish will give you the longest-lasting protection. You absolutely have the skills to tackle this project. Let’s get that outdoor table sealed up tight!
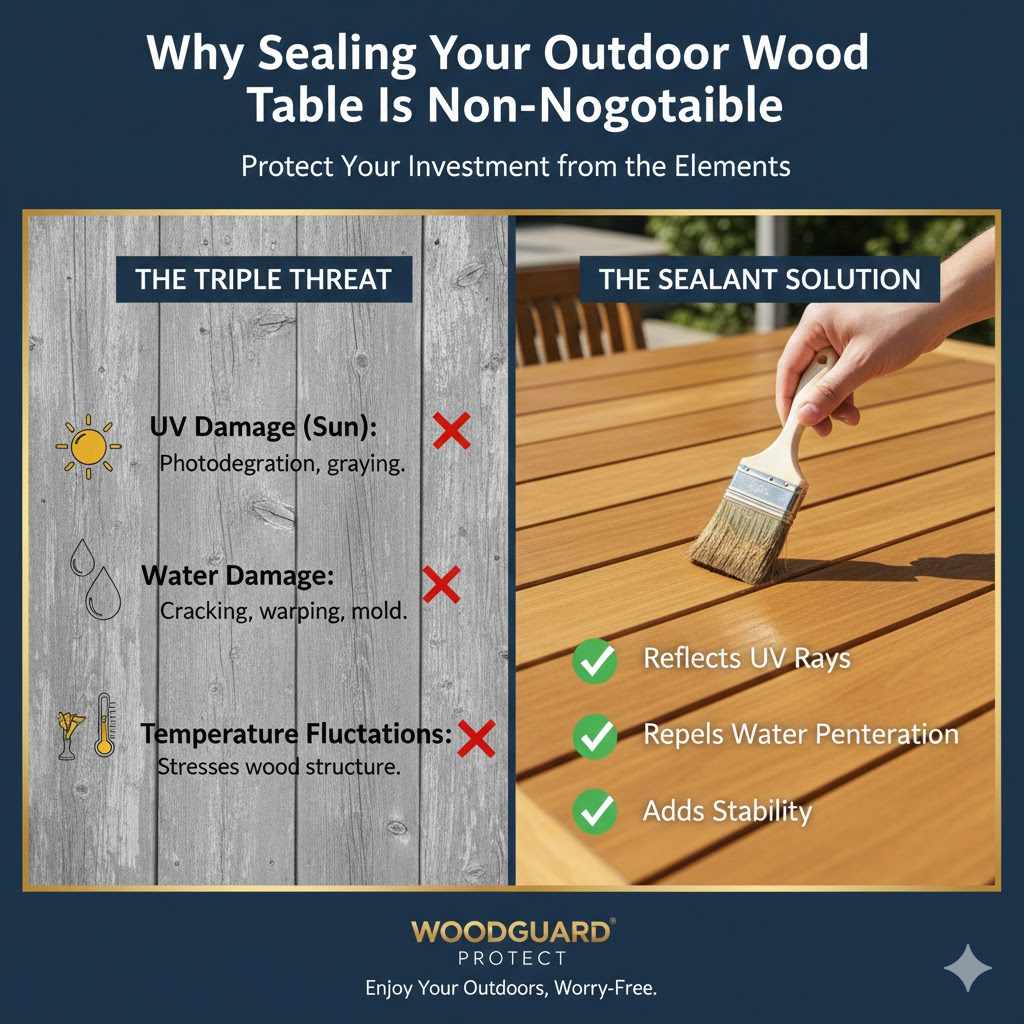
Why Sealing Your Outdoor Wood Table Is Non-Negotiable
Wood is naturally wonderful, but outside, it faces some tough enemies. Understanding what you are protecting against helps you choose the best sealing method. Think of the sealant as a rain jacket and sunglasses for your table all in one!
The Triple Threat: Sun, Water, and Temperature Swings
Outdoor environments attack wood in three main ways:
- UV Damage (Sun): Sunlight, specifically ultraviolet (UV) rays, breaks down the natural lignin in the wood cells. This causes the wood to turn gray or silver, a process called photodegradation.
- Water Damage: Rain and humidity cause the wood fibers to swell (when wet) and shrink (when dry). This constant movement leads to checking (small cracks) and eventual warping or splitting. It also creates a perfect home for mold and mildew.
- Temperature Fluctuations: Hot days followed by cool nights expand and contract the wood rapidly, stressing the structure and the finish over time.
A good outdoor sealant acts as a barrier against all three of these threats. It reflects UV rays, repels water penetration, and adds stability to the wood’s surface.
Step 1: Gathering Your Supplies – What You Need
Before diving in, let’s gather our tools. Having everything ready makes the job flow smoothly. Remember, when we seal a wood table for outdoor use, we are using specific products designed to handle tough conditions. Skip the indoor polyurethane—it won’t last!
Essential Tool and Material Checklist
- Mild soap (like dish soap) and clean water
- Stiff-bristled brush or clean rag
- Sanding sponges or sandpaper (Grit sequence: 80, 120, 180, 220)
- Orbital sander (optional, but makes things faster!)
- Tack cloth or microfiber cloth
- High-quality exterior wood sealant (See recommendations below)
- High-quality natural bristle brush or foam applicator for staining/sealing
- Personal Protective Equipment (PPE): Safety glasses and nitrile gloves
Choosing the Right Exterior Finish
This is the most crucial decision you’ll make. For beginners, oil-based finishes often penetrate better and are more forgiving if you miss a spot. Water-based formulas dry faster but require perfect prep.
Here are the top choices for how to seal a wood table for outdoor use:
| Finish Type | Pros (What it does well) | Cons (Watch out for this) | Best For |
|---|---|---|---|
| Spar Urethane (Marine Varnish) | Maximum UV and moisture resistance; highly durable. | Longer dry times; can yellow slightly over many years. | Tables constantly exposed to direct sun and rain. |
| Exterior Oil Finish (Tung Oil or Linseed Oil blends) | Penetrates deep; easy to reapply and repair; natural look. | Requires frequent reapplication (yearly); less initial protection. | Wood like Teak or Cedar that needs nourishment. |
| Deck/Patio Sealers (Semi-Transparent Stain/Sealant) | Includes mildewcides; easy maintenance; good color options. | Can sometimes look cloudy if applied too thickly. | Larger tables or budget-friendly projects needing quick protection. |
Mentor Tip: For maximum protection and a professional look that lasts several seasons, spar urethane is my go-to recommendation for beginners learning how to seal a wood table for outdoor use.
Step 2: Essential Preparation – The Foundation of Durability
You cannot seal a dirty, fuzzy, or greasy table and expect good results. Preparation might take the longest, but it guarantees the finish sticks correctly. Remember this phrase: “The finish is only as good as the surface underneath!”
Safety First
Always wear safety glasses when sanding to protect your eyes from flying dust. If using an oil-based product, work in a well-ventilated area, as fumes can be strong.
Cleaning the Existing Finish (If Applicable)
If your table already has an old, failing finish, we need to remove it or strip it back to bare wood. If the old finish is peeling or flaking, sanding alone won’t work; you must use a chemical stripper first, following all label directions.
If the table is unfinished or the old finish is sound but dirty, use this simple cleaning process:
- Mix a small amount of mild soap with warm water.
- Using your stiff brush or rag, gently scrub the entire table surface, paying close attention to crevices and joints where grime collects.
- Wipe down thoroughly with clean water to remove all soap residue. Soap left behind will block your sealant from sticking.
- Let the table dry completely. This can take 24 to 48 hours, depending on humidity. Make sure it’s bone dry!
Sanding: Creating Tooth for Adhesion
Sanding roughs up the surface so the sealant has microscopic ‘teeth’ to grip onto. This step is vital for longevity.
- Start Coarse (80 Grit): If the wood is very rough or you removed an old finish, start with 80 grit. This quickly removes major imperfections. Sand with the grain direction.
- Move to Medium (120 Grit): This removes the deeper scratches left by the 80 grit paper. Keep the pressure even.
- Refine the Surface (180 Grit): This smooths the surface nicely. At this point, the table should feel smooth to the touch but still have enough texture for the finish to hold.
- Final Pass (220 Grit): This is your finishing sand. It creates the best smooth surface before applying your final sealant coat.
For tricky legs or curved areas, use sanding sponges or wrap sandpaper around a small block of wood. Work carefully around edges, as sanding too much in one spot can thin the wood significantly.
Dust Removal
This is where many DIY projects fail! You must remove 100% of the sanding dust.
- Use your vacuum cleaner with a brush attachment to remove all large debris.
- Wipe the entire surface down using a tack cloth. A tack cloth is slightly sticky and pulls up the fine dust particles that remain invisible. (Check out the This Old House website for more pro tips on finishing prep, a great resource for homeowners!)
Step 3: Applying the Exterior Sealant – Technique Matters
We are now ready for the main event! When applying sealants for outdoor use, think thin coats, not thick blobs. Thin coats dry faster, cure harder, and look much more professional.
Prep the Finish Environment
Choose a dry, dust-free day. High humidity can prevent oil-based finishes from curing properly, while strong wind blows debris onto your wet surface.
Ideally, apply the sealant in mild temperatures—check the specific product requirements, but usually between 50°F and 80°F is perfect.
Application Process for Varnish or Urethane
We will use multiple coats to build up a protective shell. You need three to five coats on the top surface, as it takes the brunt of the weather.
- Coat 1 (The Sealer Coat): Thin your first coat slightly (check your product instructions; sometimes thinning with mineral spirits is recommended). This first coat soaks into the wood fibers the most. Apply evenly with a good brush, moving with the grain. Don’t over-brush. Let it dry fully according to the can’s instructions (often 4–8 hours).
- Light Sanding (Between Coats): Once dry, gently “de-nib” the surface. Use very fine sandpaper (220 grit or higher) or a fine synthetic sanding pad. This smooths down any raised grain or dust nibs caught in the first coat. Wipe clean with a tack cloth immediately afterward.
- Coat 2 and Subsequent Coats: Apply the second coat at full strength. These coats build the actual protective layer. Maintain light, even coverage.
- Focus on the End Grain: The end grain (the cut ends of the slats or tabletop edges) absorbs moisture much faster than the flat faces. Apply an extra thin coat to the end grain of every board—this prevents wicking and cracking later.
- Finishing Coats: Repeat the light sanding and coating process until you have built up 3–5 solid coats on the top and at least 2–3 coats on the sides and bottom.
Curing vs. Drying Time
Pay attention to the label! A finish might be “dry to the touch” in a few hours, but it takes days or even weeks to fully “cure” (harden completely). Avoid heavy use of the table until the curing process is finished to prevent dings.
Alternative Approach: Using Exterior Wood Stain with Sealant
If you prefer to change the color of your table while sealing it, using a high-quality, oil-based, semi-transparent exterior stain with UV protection is a fantastic option. This combines color application and sealing into one step, saving time for beginners.
Stain-Sealant Benefits
Exterior stains typically contain pigments that naturally block UV rays—which is why they last longer than clear finishes in the sun. They also often contain mildewcides, offering broader protection.
How to Apply Stain-Sealant
- Preparation is Identical: You must still clean and sand the wood down to a consistent level (usually 120 or 180 grit for stains).
- Apply the Stain: Using a quality foam or natural bristle brush, apply the stain liberally. Work in small sections so the stain doesn’t dry before you can wipe the excess.
- Wipe Off Excess: Within 10 to 20 minutes (check label times!), use clean, lint-free rags to wipe off all the excess stain sitting on the surface. This prevents sticky patches.
- Re-coat for Protection: For maximum outdoor longevity, most stain manufacturers recommend following up with one or two thin topcoats of clear spar urethane over the dried stain. This layering provides both color/pigment protection and a robust, waterproof barrier.
For longevity data on wood finishes, the U.S. Forest Service often publishes research related to exterior wood durability, which is helpful when deciding between oil-based and water-based protective coatings for demanding outdoor environments.
Long-Term Care: Making Your Sealant Last
Sealing a wood table is not a “set it and forget it” job. Even the best spar urethane will eventually wear down, especially on the seating surface where elbows and drinks sit.
Annual Inspection Schedule
Make a habit of inspecting your table before and after the peak outdoor season.
- Spring Check: Look for areas where water might be pooling or beading less effectively. If water stops beading up and starts soaking in, that area needs attention.
- Spot Repair is Key: Don’t wait until the whole top looks gray to recoat. Lightly sand (220 grit) only the compromised spots (usually the center or high-traffic areas). Wipe clean and apply one fresh, thin coat of your exterior sealant just to those areas. Blend the edges slightly with the surrounding area.
- Full Strip and Re-Seal: After 3 to 5 years, depending on sun exposure, you might need to completely strip the old finish, sand back to bare wood (back to Step 2), and reapply all necessary coats.
Covering When Not in Use
The absolute best way to extend the life of any seal job is by covering your table when you aren’t using it for long stretches, especially during the rainy or snowy off-season. A quality, breathable outdoor furniture cover takes the stress off your finish significantly.
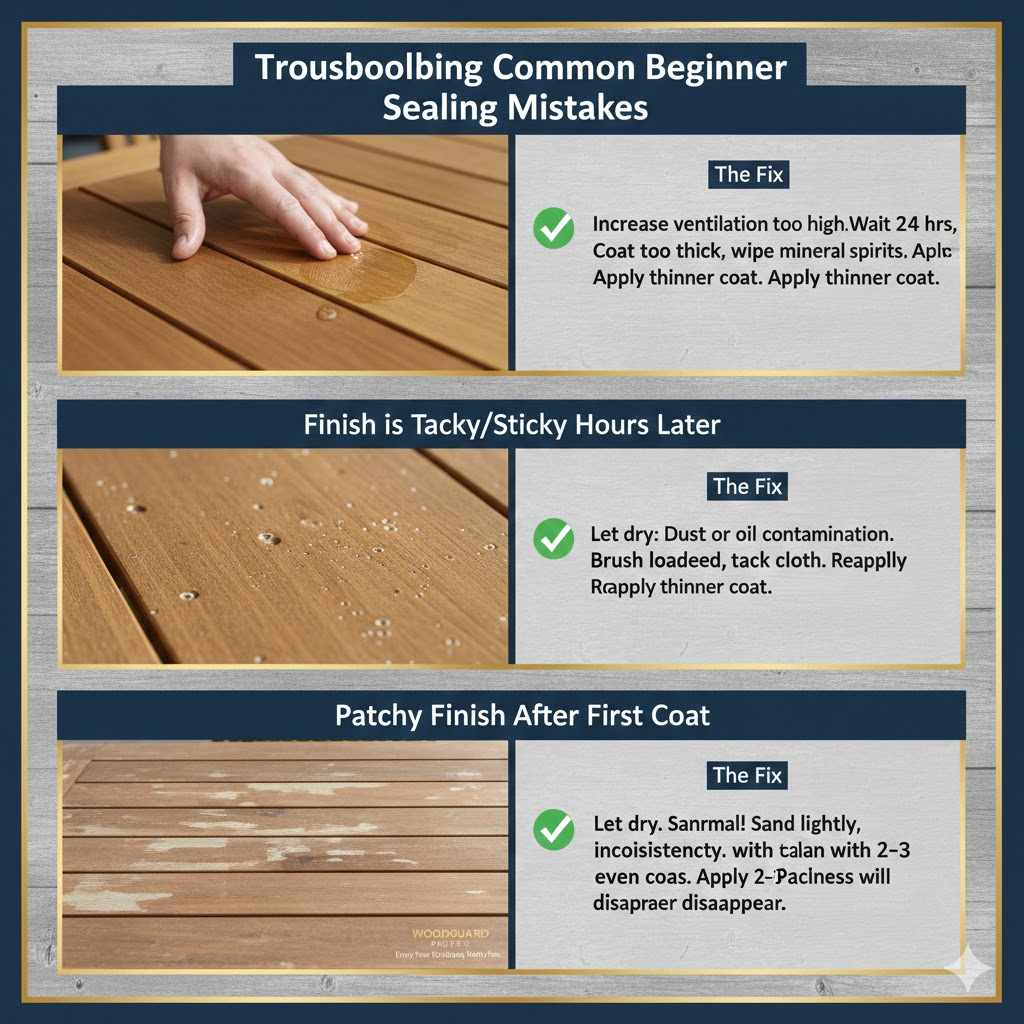
Troubleshooting Common Beginner Sealing Mistakes
It’s okay if things aren’t perfect the first time. Here are common bumps in the road and how to fix them, keeping you confident in your ability to master sealing wood!
| The Problem | Likely Cause | The Fix |
|---|---|---|
| Finish is Tacky/Sticky Hours Later | Humidity was too high, or the coat was too thick, preventing proper curing. | Increase ventilation. If very soft, wait 24 hours, then gently wipe down with a rag barely dampened with mineral spirits (for oil-based) and try applying a much thinner coat after 48 hours. |
| Bubbles or Fish Eyes Appear | Dust or oil contamination on the wood surface, or the brush was loaded too heavily. | Let the coat fully dry. Sand the affected area smooth (220 grit), clean thoroughly with a tack cloth, and reapply a thinner coat using a cleaner brush. |
| Patchy Finish After First Coat | Sanding inconsistency or applying the sealer coat too thin in spots. | This is normal for the first coat on bare wood! Sand lightly, ensure the next coat is applied evenly, and the patchiness will disappear after coat 2 or 3. |
FAQ: Beginner Questions About Sealing Outdoor Wood
Q1: Should I seal the bottom of the table?
A: Yes, definitely! Water vapor rises from the ground or deck surface. Sealing the bottom (even with one or two coats) slows down moisture absorption from below, which helps prevent warping and cupping.
Q2: What grit sandpaper should I use if my wood is already smooth and unfinished?
A: If the wood is already relatively smooth, you can skip the coarse grits. Start with 120 grit for initial surface preparation and finish with 180 or 220 grit to create a perfect surface for the sealer to grip.
Q3: Can I use regular interior polyurethane on my patio table?
A: No. Interior polyurethane does not contain the specialized UV blockers and moisture stabilizers found in exterior spar urethane or marine varnish. It will break down, crack, and yellow very quickly outdoors, offering minimal real protection.
Q4: How long do I have to wait between the last coat and using the table?
A: While the finish might be dry to the touch in a day, for tables that will hold drinks or food, wait at least 3 to 7 days before heavy use. This allows the finish to reach maximum hardness (full cure) and prevents immediate damage.
Q5: Is teak oil a good sealant for all outdoor woods like pine or maple?
A: Teak oil and similar pure oil finishes are wonderful for naturally oily, dense hardwoods like teak, Ipe, or shorea. For softer woods like pine or maple, they offer less stand-alone protection against heavy rain and sun. You should apply an oil finish followed by a coat of spar urethane on softer woods.
Q6: Does staining require a sealer on top, or is the stain itself the final seal?
A: If you are using a quality semi-transparent exterior deck stain, the pigments offer good UV defense. However, for the best, hardest protection against standing water on a dining table surface, applying one or two thin topcoats of spar urethane over the fully cured stain is the superior method.
Conclusion: Enjoying Your Weatherproof Project
Taking the time to learn how to seal a wood table for outdoor use is one of the best things you can do for your investment. You followed the steps: you cleaned diligently, sanded methodically, and chose a finish built for the outdoors. That might seem like a lot of detail, but remember, preparation is just the blueprint for a lasting result.
Now you have a table not only protected from rain and sun but one that shows off the natural beauty of the wood grain because you treated it right. Keep up with that quick annual check-up, and you’ll be enjoying beautiful, durable outdoor dining for many seasons to come. You did great work—enjoy your protected piece!