How To Stain A Treated Wood Deck The Right Way (Full Guide)
Staining a treated wood deck correctly involves proper cleaning, sanding, and applying a quality stain. Patience during the drying process is key. Following these steps ensures a beautiful and durable finish for your outdoor living space.
Understanding Treated Wood and Staining
Treated wood is wood that has been preserved. This helps it resist rot and insects. It’s a great choice for outdoor projects like decks.
But treated wood can be tricky to stain. This is because of the chemicals used in the treatment process. These chemicals can prevent stain from soaking in.
They can also affect how the stain looks.
When wood is treated, it often contains a lot of moisture. This moisture needs to time to dry out. If you stain too soon, the water pushes the stain out.
This leads to peeling and flaking. It’s a common mistake that many people make. They are eager to finish their deck.
But rushing this step causes problems later.
So, knowing when your treated wood is ready is important. Most experts say to wait. The wait time can be long.
It depends on the type of treatment. It also depends on the weather. Usually, it’s at least a few weeks.
Sometimes, it might be several months.
The goal of staining is not just looks. It also protects the wood. Stain can block UV rays from the sun.
This stops the wood from turning gray. It also helps keep water out. This prevents cracking and splitting.
Choosing the right stain matters a lot too. There are different types. Some offer more protection.
Others give a richer color.
When is Your Treated Wood Deck Ready to Stain?
This is perhaps the most critical step. Staining too early is a recipe for disaster. You’ll waste time and money.
You’ll also be frustrated. So, how do you know for sure?
There’s a simple test. It’s called the “water test.” Grab a small cup of water. Pour a little bit onto the wood.
If the water beads up, it’s not ready. The wood is still too wet. Or the treatment chemicals are still present.
It needs more time to dry out. If the water soaks into the wood, it’s a good sign. It means the wood is ready for stain.
The time it takes for treated wood to dry varies. New wood might need 30 days. In humid or cool weather, it might take longer.
Hot, dry, sunny weather speeds things up. Many people try to stain too soon. They might think a few weeks is enough.
But the water test is your best friend here. Don’t skip it.
Also, look at the wood itself. Does it still look very wet? Does it have a greenish tint?
These can be signs it’s not dry enough. The wood should look more natural. It should have a duller appearance, not shiny.
This test is a must for a good outcome.
Quick Check: The Water Test
What to do: Sprinkle a little water on the deck.
If it beads: The wood needs more drying time.
If it soaks in: The deck is likely ready.
Tip: Test in a few different spots. Some areas might dry faster.
Essential Preparation Steps
Once you know your deck is dry, don’t just grab a brush. Proper prep work makes a huge difference. It ensures the stain adheres well.
It also helps create a smooth finish.
Cleaning Your Deck
Your deck needs to be clean. Dirt, dust, and mildew must be removed. Use a deck cleaner made for treated wood.
Follow the product instructions. Most cleaners involve wetting the wood first. Then you apply the cleaner.
You might need to scrub with a stiff brush. A garden hose is usually enough to rinse. Avoid pressure washers.
They can damage the wood fibers. They can make the wood fuzzy. This can affect how the stain looks.
Mildew is common on decks. It looks like black or green spots. Deck cleaners help kill mildew.
Make sure to rinse thoroughly. You don’t want cleaner residue left behind. Residue can interfere with the stain.
Clean on a cloudy day. Or clean when the deck is not in direct sun. This stops the cleaner from drying too fast.
Let the deck dry completely after cleaning. This might take a day or two.
Sanding the Deck
Sanding is often overlooked. But it’s very important. It smooths out rough spots.
It removes any fuzzy bits left from cleaning. It also opens up the wood pores. This helps the stain soak in better.
Use a medium-grit sandpaper. A grit of 60 to 80 is usually good. You can use a pole sander.
Or you can use a sanding block. Wear a dust mask. Sanding creates a lot of dust.
Pay attention to the edges of the boards. These areas can get rough. Sand in the direction of the wood grain.
After sanding, sweep or vacuum all the dust away. You want a clean surface for staining. If you skip sanding, the stain might look uneven.
Some areas might absorb more than others. This can lead to a splotchy look.
Contrast Matrix: Sanding Importance
Myth: Sanding treated wood is unnecessary.
Reality: Sanding creates a smooth surface. It helps stain penetrate better. This leads to a more even and lasting color.
Myth: Any sandpaper will do.
Reality: Use medium-grit sandpaper (60-80). Too fine a grit might not remove roughness. Too coarse can damage the wood.
Repairs and Maintenance
Before you start staining, fix any issues. Look for loose boards. Check for popped nails or screws.
Hammer down any nails. Replace any rotten or split boards. Tighten loose screws.
Make sure the deck is structurally sound. Staining won’t fix underlying problems.
Also, protect surrounding plants. Cover nearby bushes and flowers with plastic sheets. Stain can drip and damage them.
Sweep up any leaves or debris. You want a clean workspace. Think about the weather too.
Avoid staining if rain is expected. High humidity can also slow drying. Look for a few days of good weather.
Choosing the Right Stain
There are many types of deck stains. They come in different forms and colors. Understanding them helps you pick the best one.
Types of Deck Stains
1. Transparent Stains: These offer the least color. They let the wood grain show through the most.
They provide some UV protection. They are good if you like the natural wood look. They don’t hide imperfections well.
2. Semi-Transparent Stains: These add more color. They still allow some wood grain to be visible.
They offer better UV protection than transparent stains. This is a popular choice for many decks. It adds color without looking like paint.
3. Solid Color Stains: These look very similar to paint. They hide the wood grain completely.
They offer the most UV protection. They can last a long time. They can be a good option for older decks with imperfections.
They might peel if not applied correctly.
4. Oil-Based vs. Water-Based Stains: Oil-based stains tend to penetrate the wood better.
They often last longer. They can be easier to apply in cooler weather. Water-based stains are easier to clean up.
They dry faster. They are also more environmentally friendly. Many modern water-based stains perform very well.
Consider your deck’s condition. If it’s in great shape, a semi-transparent stain might be ideal. If it’s older and has some wear, a solid stain might cover it better.
Think about the look you want. Do you want to see the wood grain? Or do you want a bold new color?
Quick-Scan Table: Stain Types
| Stain Type | Wood Grain Visibility | UV Protection | Best For |
| Transparent | High | Low | Newer wood, natural look |
| Semi-Transparent | Medium | Medium | Most decks, balanced color and grain |
| Solid Color | None | High | Older decks, significant color change |
The Staining Process: Step-by-Step
Now for the main event. Follow these steps carefully. This is where the magic happens.
Applying the First Coat
Start at one end of the deck. Work in small sections. This prevents the stain from drying too quickly.
Use a good quality brush or roller. Some people prefer a pad applicator. These work well for decks.
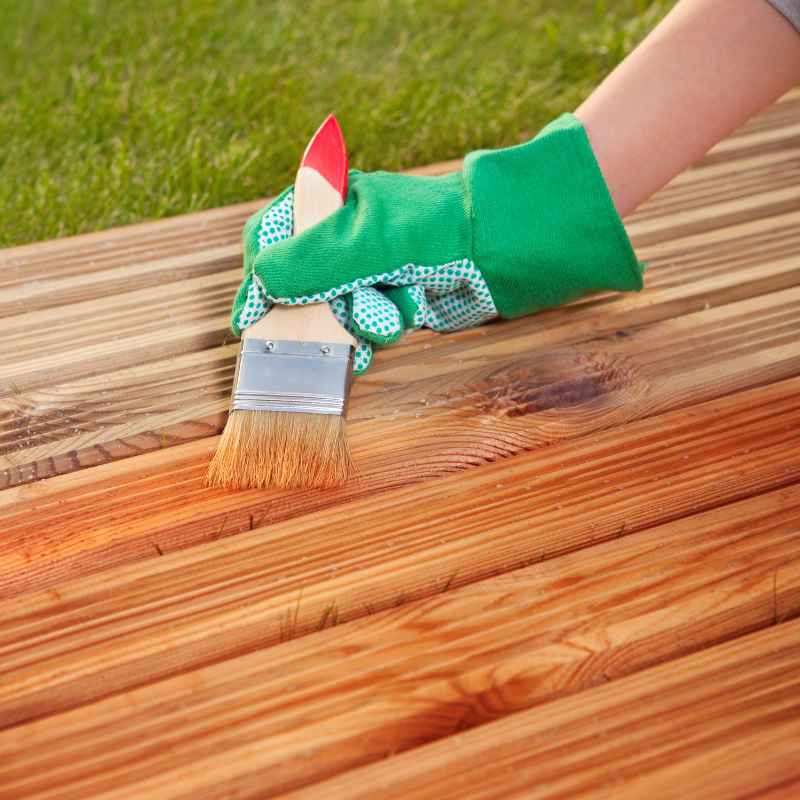
Brush or roll the stain on. Apply it evenly. Always brush or roll in the direction of the wood grain.
This is very important for a natural look.
Don’t let stain pool on the surface. If you see puddles, spread them out. You want an even coat.
Try to maintain a “wet edge.” This means you keep working into the area you just stained. This helps avoid lap marks. Lap marks are lines where one section of stain dried before the next was applied.
They are hard to fix later.
If you’re using a brush, a 4-inch wide brush works well. For larger areas, a roller with an extension pole can speed things up. Some products suggest back-brushing.
This means after rolling, you brush over the rolled area. This helps ensure even coverage. It also pushes the stain into the wood fibers.
I remember my first deck staining project. I was so excited to get it done. I rushed the first coat.
I left some puddles. Then I stepped away for lunch. When I came back, the puddles had dried.
They left dark spots. It was a mess. I had to wait for it to dry fully and then try to fix it.
It taught me a valuable lesson about patience.
Drying Time Between Coats
This is another crucial waiting period. Read the stain manufacturer’s instructions. It will tell you how long to wait.
This can range from a few hours to 24 hours. Do NOT rush this. The first coat needs to dry properly.
This allows the wood to absorb the stain. It also lets the stain set.
If you apply the second coat too soon, the stain might not adhere. It could lift off the first coat. This will ruin your hard work.
It’s frustrating, but the wait is worth it. Use this time to clean your brushes and rollers. Get any tools ready for the second coat.
Applying the Second Coat (If Needed)
Most decks benefit from two coats of stain. The second coat deepens the color. It adds extra protection.
Apply the second coat the same way you applied the first. Work in small sections. Maintain a wet edge.
Brush or roll in the direction of the wood grain. Ensure even coverage. Again, avoid letting stain pool.
Some stains only need one coat. This is usually true for solid color stains. But semi-transparent and transparent stains almost always look better with two.
The second coat really brings out the richness of the color. It also ensures all the wood is protected.
Observational Flow: Staining Steps
- Prep the Deck: Clean, sand, and make any repairs.
- Test the Wood: Ensure it’s dry using the water test.
- Choose Your Stain: Select the right type and color.
- Apply First Coat: Work in sections, following the grain.
- Wait for Drying: Follow manufacturer’s drying times strictly.
- Apply Second Coat: If needed, repeat step 4.
- Allow Full Cure: Let the stain cure for 24-72 hours before use.
Real-World Context and Scenarios
Think about your deck’s environment. This affects how it ages and how you should stain it.
Sun Exposure
Decks that get a lot of direct sunlight need more protection. The sun’s UV rays can fade the stain. They can also dry out and damage the wood.
If your deck is in full sun, consider a stain with high UV blockers. Solid color stains offer the best protection here. Regular reapplication might also be necessary.
Conversely, a deck in a shaded area might not fade as quickly. But it might be more prone to mildew. Ensure you clean thoroughly to remove any existing growth.
The stain will still protect it from moisture.
Weather Conditions
If you live in an area with harsh winters, your deck takes a beating. Freezing and thawing cycles can cause damage. Moisture gets into the wood.
Then it freezes and expands. This can lead to cracking. A good stain acts as a barrier against this.
It keeps water out.
In very humid climates, mold and mildew are constant threats. Regular cleaning and a quality stain are vital. The stain helps the wood dry out faster after rain.
It also resists mildew growth.
Foot Traffic and Wear Patterns
Areas where people walk the most will wear down faster. The center of the deck might show wear more than the edges. High-traffic areas might need more frequent touch-ups.
Solid stains tend to wear more evenly than semi-transparent ones. If wear is a concern, solid stain might be a better choice.
Think about furniture placement. If you move chairs often, those spots might wear. Try to place furniture on rugs.
This can help protect the stained surface. Regular inspection of high-traffic zones is wise.
What This Means for You
Understanding these factors helps you choose the right approach. It also helps you set expectations.
When is it Normal for Stain to Wear?
It’s completely normal for deck stain to show wear over time. No stain lasts forever. Factors like sun, rain, snow, and foot traffic all contribute to this.
Expect to reapply stain every 1-3 years. This depends heavily on the product used and your climate.
Transparent and semi-transparent stains will fade and wear more noticeably. Solid stains might peel or chip. But even solid stains will eventually need reapplication.
The key is regular inspection. Look for signs of wear before it becomes a major problem.
When Should You Worry?
Worry if the stain starts peeling or flaking significantly. This often means it was applied over wet wood. Or the wood was not prepped correctly.
It could also be a sign of a low-quality stain. If you see extensive mildew or rot, that’s a structural issue. Staining won’t fix that.
You’ll need to address the underlying wood problems.
If the stain looks very splotchy or uneven after drying, that’s also concerning. It might mean the application was uneven. Or the wood was too porous in some areas.
This can sometimes be corrected with another coat. But it’s usually a sign that the prep or application wasn’t ideal.
Simple Checks You Can Do
The Water Test (Again): Even after staining, check occasionally. If water beads up on a stained deck, it’s a good sign. It means the stain is still providing protection.
If it soaks in, the stain might be wearing off.
Visual Inspection: Walk your deck. Look for faded areas. Check for any peeling or cracking.
Run your hand over the surface. Does it feel rough or splintery in spots?
Mildew Check: Look for any signs of green or black spots. If you find them, it’s time for a cleaning and possibly re-staining.
Stacked Micro-Sections: Stain Lifespan Factors
Sun Exposure: High sun means faster fading.
Weather: Harsh winters or constant rain shorten lifespan.
Foot Traffic: Busy decks wear down faster.
Stain Quality: Premium stains often last longer.
Application: Proper prep and application are key.
Quick Fixes and Tips
Sometimes you just need a few pointers to make the job easier and better.
Using the Right Tools
Invest in good quality tools. A cheap brush will leave bristles behind. A worn-out roller will apply stain unevenly.
A wide brush makes it faster. A pad applicator can give a very smooth finish. Consider an extension pole for your roller or brush.
This saves your back.
For cleaning, a garden hose is best. Avoid high-pressure washers. For sanding, an orbital sander or pole sander saves time and effort.
Make sure your safety gear is good too. Goggles, gloves, and a mask are important.
Working with the Grain
I cannot stress this enough. Always work with the wood grain. This applies to cleaning, sanding, and staining.
Staining against the grain will look obvious. It can lead to a streaky, unprofessional finish. When brushing, make long, even strokes in the direction of the grain.
Dealing with Drips and Puddles
If you notice a drip or puddle while the stain is wet, fix it immediately. Use your brush to spread it evenly. Wipe up any excess stain.
This is where working in small sections helps. It gives you time to catch mistakes before they dry.
Weather Considerations
Always check the weather forecast. Pick a period with no rain expected. Avoid staining in direct, hot sun.
The surface can get too hot. This makes the stain dry too fast. It can cause lap marks.
Overcast, mild days are ideal. Around 60-80°F is perfect for most stains.
High humidity can also slow drying. Make sure the stain is fully dry before allowing foot traffic. Some stains need 24-72 hours to “cure.” This means they reach their maximum hardness.
Check the product label for cure times.
Frequent Questions
How long does treated wood need to dry before staining?
It depends, but most treated wood needs to dry for at least 30 days. Some may need up to 60 days or even longer, especially in humid or cool weather. Always perform the water test to be sure.
If water beads up, it’s not ready.
Can I use a paint sprayer to stain my deck?
Yes, you can use a paint sprayer, but it requires careful technique. You’ll need to thin the stain according to the manufacturer’s instructions. Always follow up with a brush to back-brush the stain.
This pushes it into the wood and ensures an even coat. Spraying alone can lead to uneven coverage and drips.
What’s the difference between deck stain and deck paint?
Deck stain penetrates the wood to protect it and add color. It usually allows some of the wood grain to show through. Deck paint sits on top of the wood like a coating.
It covers the wood grain completely. Stains are generally preferred for decks because they wear more naturally. Paint can chip and peel more easily.
How do I prepare my deck if it’s already stained or painted?
If your deck is already stained or painted, you’ll need to strip it first. Use a deck stripper product to remove the old coating. Then, you’ll need to sand the wood thoroughly.
After stripping and sanding, clean the deck well. Then, perform the water test to ensure it’s ready for new stain.
Can I stain my deck in cool weather?
Most deck stains work best in mild temperatures, typically between 60°F and 80°F. Some oil-based stains can be applied in slightly cooler temperatures, but always check the product label. Staining in very cold weather can prevent proper drying and adhesion, leading to poor results.
How often should I re-stain my treated wood deck?
You should plan to re-stain your deck every 1 to 3 years. This frequency depends on the type of stain used, the amount of sun and weather exposure, and the amount of foot traffic. Inspect your deck annually for signs of wear, fading, or peeling, and reapply stain as needed.
Conclusion
Staining your treated wood deck is a rewarding project. It protects your investment. It makes your outdoor space look beautiful.
By taking your time and following these steps, you can achieve great results. Remember to be patient with the drying times. Prep work is key.
Choose the right stain for your needs. And always work with the grain. Your deck will thank you for it.