Proven Candle Wax Removal: Effortless Coffee Table Fix
Effortlessly remove candle wax from your wood coffee table with simple heat and scraping methods. This guide provides proven, beginner-friendly techniques to restore your table’s smooth finish without damage.
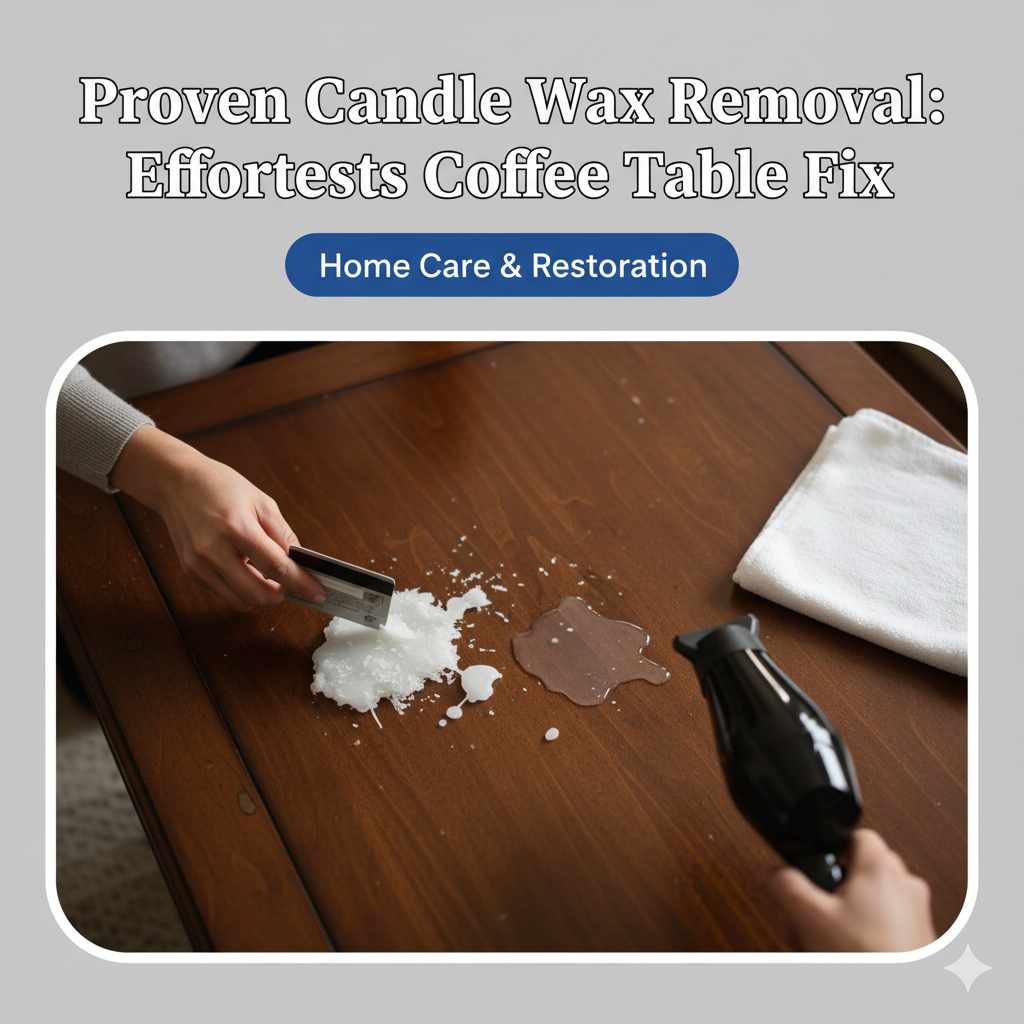
Oh, that dreaded moment! You’re enjoying a cozy evening, and oops – a glob of melted candle wax has landed squarely on your beautiful wood coffee table. It happens to the best of us, and it can feel frustrating, especially when you worry about damaging the finish. But don’t fret! As your woodworking mentor, I’m here to show you that removing candle wax from wood is a surprisingly simple fix. With a few common household items and gentle techniques, you can restore your coffee table to its former glory.
We’ll walk through each step clearly, ensuring you feel confident and achieve a flawless result. Throughout this guide, we’ll focus on methods that are safe for your wood and easy for anyone to follow. Get ready to say goodbye to wax spots and hello to a pristine coffee table!
Why Candle Wax Can Be Tricky on Wood
Candle wax, especially when melted, has a way of gripping onto wood surfaces. Its composition can vary, but most waxes are oil-based, which means they can seep slightly into the wood’s pores if left for too long. This is why simply wiping it away often doesn’t work and can even smear the wax, making the problem worse. The real challenge is removing the wax without scratching the wood or stripping away its protective finish, like varnish or lacquer. Different wood finishes react differently, and gentle methods are key to preserving the integrity of your coffee table.
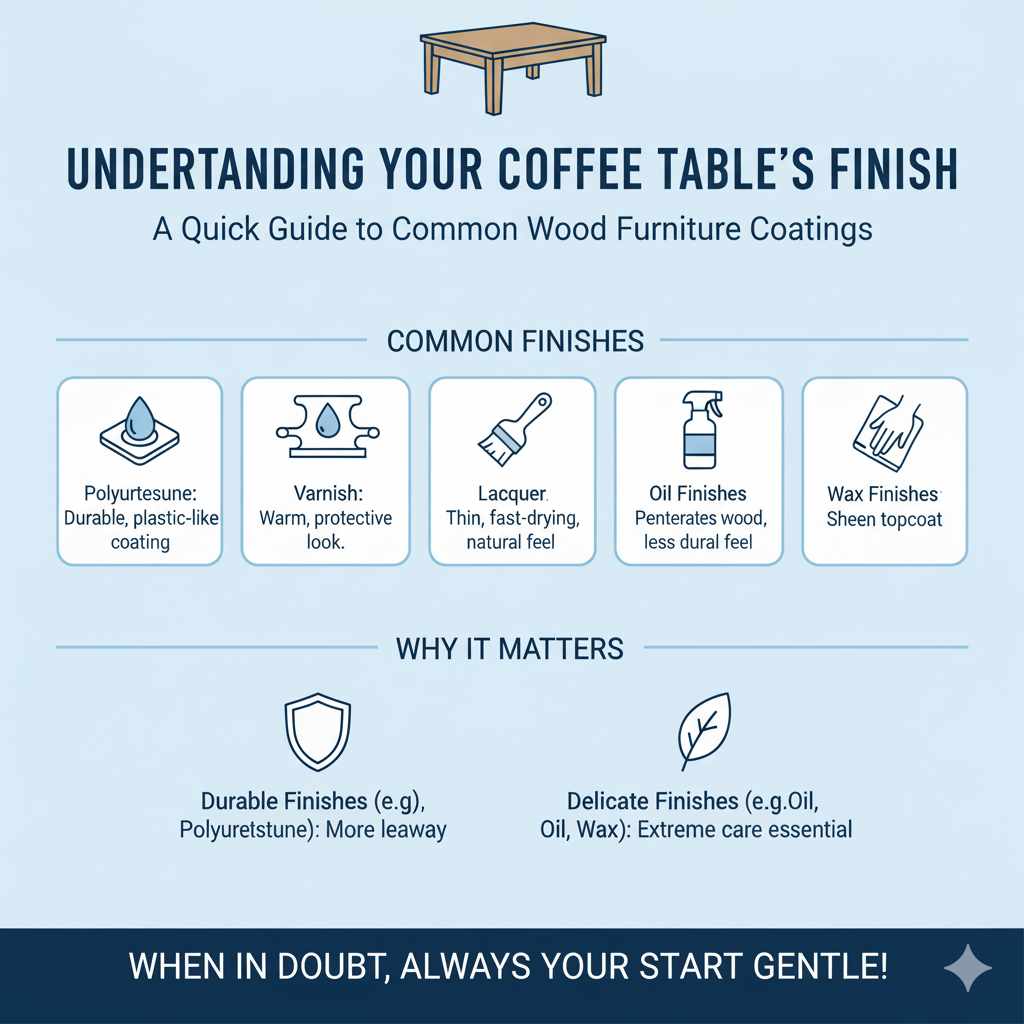
Understanding Your Coffee Table’s Finish
Before we dive into wax removal, it’s good to have a general idea of your coffee table’s finish. Most modern wooden furniture has a protective coating. Common finishes include:
- Polyurethane: A very durable, plastic-like coating.
- Varnish: Similar to polyurethane but often with a slightly warmer look.
- Lacquer: Thinner and faster-drying, it can be less durable than polyurethane.
- Oil Finishes: These penetrate the wood, offering a more natural feel but less surface protection.
- Wax Finishes: Sometimes used as a topcoat over other finishes for added sheen.
Knowing this helps you choose the gentlest approach. For durable finishes like polyurethane, you have a bit more leeway. For less robust finishes like oil or wax, extreme care is essential. If you’re unsure, always start with your gentlest method. For more details on wood finishes, resources like The Wood Database’s finishing section offer excellent insights.
Tools and Supplies You’ll Need
The great news is that you likely already have most of the tools needed right at home! Let’s gather what you’ll need for wax removal:
- Hair dryer (on a low to medium heat setting) OR an iron (on a low setting, no steam)
- Absorbent material: Plain brown paper bags (no ink or heavy prints), paper towels, or a clean cotton cloth
- Plastic scraper, credit card, or a dull butter knife
- Mild soap and water
- Soft, clean cloths for drying and buffing
- Optional: Wood cleaner or furniture polish (for post-cleaning touch-ups)
Having these items on hand will make the process smooth and efficient. We’re aiming for simplicity and effectiveness, so don’t feel you need specialized equipment.
Method 1: The Gentle Heat and Absorb Method (Most Recommended)
This is often the most effective and safest method for removing melted wax from wood. It uses gentle heat to soften the wax, allowing it to be absorbed by paper, preventing spread and residue.
Step-by-Step Guide:
- Let the Wax Harden: Resist the urge to touch the melted wax. Let it cool and harden completely. This makes it easier to manage and less likely to smear.
- Gently Scrape Excess (Optional but helpful): Once hardened, use your plastic scraper, credit card, or a dull butter knife to gently lift away as much of the hardened wax as possible. Hold the scraper at a low angle to the wood to avoid scratching. Work carefully, especially if the wax has seeped into any wood grain.
- Prepare Your Absorbent Material: Take a sheet of plain brown paper bag or a thick paper towel. Avoid anything with colored inks that could transfer to your wood. If using a cloth, ensure it’s a plain, light-colored cotton rag.
- Apply Gentle Heat:
- Using a Hair Dryer: Set your hair dryer to a low or medium heat setting. Hold it a few inches away from the wax spot. Move the dryer constantly to avoid overheating any one area of the wood. The goal is to soften the wax, not melt and spread it widely.
- Using an Iron: Set your iron to the lowest heat setting with NO STEAM. Place a sheet of your absorbent paper over the wax. Hover the iron just above the paper, or gently press it down for a few seconds at a time. Immediately lift the iron and check. Be very cautious not to scorch the paper or damage the wood finish.
- Absorb the Softened Wax: While the wax is still warm and soft, place your absorbent paper (brown bag or paper towel) directly over the area. Press down gently with a clean part of the paper. The heat will have softened the wax, and the paper will begin to soak it up.
- Repeat as Necessary: Continue applying gentle heat and blotting with fresh sections of your absorbent paper until no more wax is transferring onto the paper. You might need to repeat this process several times. If using a hair dryer, you can apply heat and then immediately press your paper down. If using an iron, apply heat through the paper.
- Clean Up Any Residue: Once all the visible wax is gone, there might be a slight, waxy film left. Dampen a clean, soft cloth very lightly with water and a tiny drop of mild dish soap. Gently wipe the area. Be sure not to saturate the wood. Immediately follow with a dry, soft cloth to remove any moisture.
- Final Touches: Once the area is dry, you can buff it lightly with a clean, dry cloth. If the finish looks a little dull, a tiny bit of furniture polish or wood cleaner suitable for your table’s finish can help restore the shine. Always test polish in an inconspicuous spot first.
This method is incredibly effective because it draws the wax out of the wood pores rather than pushing it further in or scraping aggressively.
Method 2: The Ice Cube Chill and Scrape
This method is useful if the wax is particularly thick or difficult to soften with heat, or if you’re concerned about using heat on a sensitive finish. The idea is to make the wax brittle and easier to break away.
Step-by-Step Guide:
- Apply Ice: Place an ice cube in a plastic bag to catch any water. Hold the bagged ice directly onto the hardened wax for 5-10 minutes. The goal is to make the wax as cold and brittle as possible.
- Scrape Carefully: Once the wax is thoroughly chilled and brittle, use your plastic scraper, credit card, or dull butter knife. Gently chip or pry away the hardened wax. Work from the edges inwards. Be patient, as brittle wax can break into smaller pieces. You are aiming to lift the wax without digging into the wood. This is where a clean break is ideal.
- Address Remaining Residue: If there’s any stubborn residue left, you can then move to the heat and absorb method (Method 1) for any thin films that remain. Often, after chilling and scraping, only a light film is left needing gentle treatment.
- Clean and Polish: As with Method 1, clean the area with a slightly damp cloth if needed, then dry thoroughly. Buff to restore shine.
This method is excellent for thick drips and provides a good first step before using heat, as it removes bulk without heat-induced risks.
What NOT to Do When Removing Candle Wax
To ensure you don’t accidentally cause damage, here are a few common mistakes to avoid:
- Using sharp metal tools: Knives, chisels, or scrapers with sharp edges can easily gouge, scratch, or cut into your wood finish and even the wood itself.
- Scraping aggressively: Even with a plastic scraper, too much force can dull the finish or scratch the surface.
- Using excessive heat: Too much heat from a hairdryer or iron can damage the wood finish, causing it to bubble, discolor, or melt. Always keep heat moving and on a low setting.
- Using harsh chemicals: Solvents like nail polish remover, paint thinner, or abrasive cleaners can strip the finish right off your coffee table. Stick to mild soap and water for any final cleaning.
- Rubbing wet wax: This will only spread the wax and make a messier problem. Always let wax harden or use heat to soften it for absorption.
- Using a steaming iron: Steam can introduce too much moisture, which is harmful to wood finishes. Always ensure your iron is set to NO steam.
Safety and gentleness are your best friends here. A little patience goes a long way in preserving your furniture’s beauty.
Dealing with Different Wax Types and Colors
Some waxes are easier to remove than others. Here’s a quick rundown:
| Wax Type | Ease of Removal | Specific Tips |
|---|---|---|
| Paraffin Wax | Moderate | Often leaves a slightly oily residue. Method 1 (heat/absorb) works well. |
| Soy Wax | Easy | Generally softer and easier to scrape/melt. Method 1 is ideal. |
| Beeswax | Moderate | Can be slightly harder to remove; might require more scraping before heat. |
| Colored Wax | Can be tricky | Colored waxes, especially dark or vibrant ones, can sometimes leave a faint stain if they’ve soaked in. The heat/absorb method is crucial here. If a faint color remains after wax removal, a very mild wood cleaner or a specialized furniture stain remover might be needed, but always test in an hidden area first. For persistent stains on finished wood, sometimes a light reapplication of furniture polish can help mask minor discoloration. Darker wood finishes are generally more forgiving with minor color marks than very light finishes. This guide to removing stains from wood offers further options for more severe issues, though remember your primary goal is wax FIRST. |
Remember that the wood’s finish plays a big role. A well-sealed finish will repel wax better and be easier to clean. Age and wear on the finish can make it more susceptible to wax penetration.
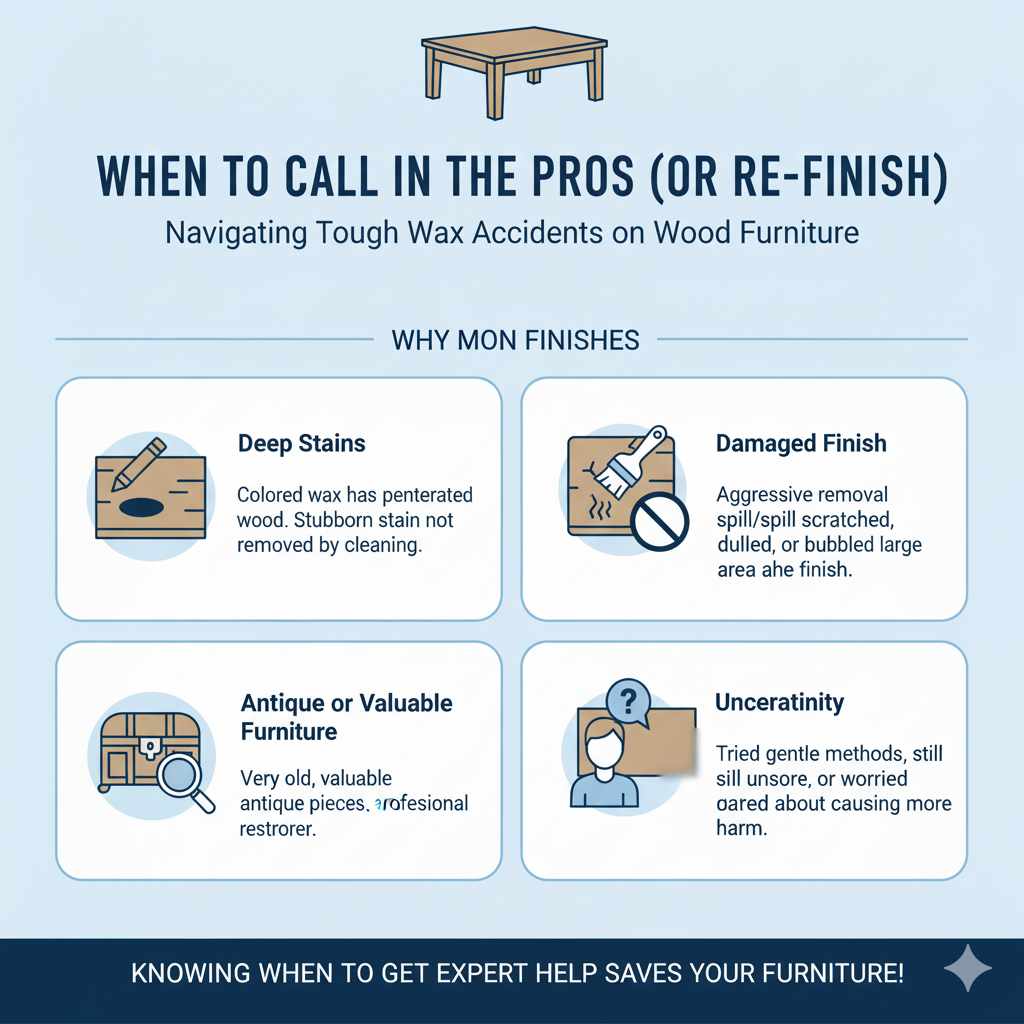
When to Call in the Pros (or Re-finish)
While these DIY methods are highly effective for surface wax removal, there are times when you might consider professional help or even re-finishing your table:
- Deep Stains: If the colored wax has truly penetrated the wood and left a deep, stubborn stain that cleaning methods can’t touch.
- Damaged Finish: If the wax was removed aggressively (or the spill itself was damaging) and the finish is noticeably scratched, dull, or bubbled in a large area.
- Antique or Valuable Furniture: For very old, valuable, or antique pieces, it’s often best to consult a professional furniture restorer. They have specialized knowledge and tools for delicate repairs without compromising the piece’s value.
- Uncertainty: If you’ve tried the gentle methods and are still unsure or worried about causing more harm, a professional assessment is wise.
Most coffee table wax accidents, however, fall well within the scope of these simple DIY solutions. The key is knowing when to push a little harder with the steps and when to pause and consider if the damage might be more than just wax.
Frequently Asked Questions (FAQ)
Q1: How do I know if I’m using too much heat on my coffee table?
A: If you see the wood finish start to look dull, change color (especially darker or whiter spots), or begin to bubble or soften excessively, you are using too much heat. Reduce the heat setting or move the heat source further away. Always keep the heat moving.
Q2: Can this method remove wax from unfinished wood?
A: For unfinished wood, the heat and absorb method is still generally safe, but be extra cautious. Unfinished wood is more porous, so wax might penetrate faster. You’ll need to work quickly and gently. It’s also more susceptible to water stains, so use minimal moisture when cleaning any residue.
Q3: Will this work on a high-gloss coffee table finish?
A: Yes, but you need to be extra careful with high-gloss finishes as they can be more prone to showing scratches. Use your gentlest scraping tools (like a credit card) and avoid any abrasive cleaners. The heat and absorb method is your best bet here.
Q4: My coffee table has a very dark wax spill. Will it stain?
A: Dark wax can potentially stain if left for a long time, as the color can seep into the wood grain. Act as quickly as possible. Use the heat and absorb method thoroughly. If a faint stain remains after wax removal, you might need to try a very mild wood cleaner or furniture polish designed to enhance wood color, but always test first.
Q5: How quickly should I try to remove the wax?
A: It’s always best to address a wax spill as soon as possible, after allowing it to harden. The longer wax sits, especially colored wax, the more likely it is to penetrate the finish and potentially stain the wood.
Q6: What if I don’t have a hairdryer or iron?
A: While these are the most common recommendation, a clean, warm (not hot!) metal spatula held carefully above the wax and then used to quickly transfer softened wax to paper can work in a pinch, but this requires significant caution to avoid burning or scratching. The ice cube method is a good alternative if heat is not an option.
Conclusion
Dealing with a candle wax spill on your beloved coffee table doesn’t have to be a disaster. With these tried-and-true methods, you have the power to restore its smooth, pristine surface. Remember to work gently, use heat sparingly if you opt for that method, and always let the wax cool and harden before attempting any scraping. Whether you choose the effective heat and absorb technique or the brittle-scraping approach of chilling the wax, patience and the right tools will lead you to a beautiful, damage-free result.
Your coffee table plays a central role in your living space, and keeping it looking its best is part of the joy of homeownership and DIY. Don’t let a little accident dim its shine. With these simple steps, you can tackle candle wax with confidence and maintain the craftsmanship of your furniture for years to come. Happy fixing!