What Is Vinyl Spackle Used For? (3/4-Inch Depth Limit Explained)
Vinyl spackle is a ready-to-use patching paste that fills interior holes and cracks up to 3/4 inch deep, using elastic polymers that resist cracking as they dry. Apply more than 1/4 inch in a single pass and it can shrink or crack, so DAP recommends building it up in layers instead. This guide covers vinyl spackle versus lightweight spackle and joint compound, exactly how deep you can go, and whether it holds up outdoors.
What Vinyl Spackle Is Made For
Vinyl spackle is a pre-mixed patching compound made from vinyl polymers suspended in a water-based paste, designed to fill holes, dents, and cracks in drywall, plaster, and wood before painting. Unlike joint compound, it comes ready to use straight from the tub – no mixing required – and its flexible, plastic-like binder is what lets it fill deeper repairs than lightweight spackle without crumbling.
It’s the product to reach for when a nail hole or ding is too deep for a lightweight spackle to handle in one pass, but the damage doesn’t call for a full skim coat of joint compound. Common jobs include filling picture-hook holes, smoothing dents in drywall corners, patching small cracks in plaster ceilings, and repairing gouges in wood trim or baseboards before repainting.
Vinyl Spackle vs. Lightweight Spackle vs. Joint Compound
These three patching products get confused constantly because they all come in similar tubs, but they’re built for different depths of damage. Here’s how they actually compare:
| Product | Best Repair Depth | Dry / Cure Time | Best For |
|---|---|---|---|
| Lightweight Spackle | Nail holes, hairline cracks under 1/8″ | ~30 minutes | Fast touch-ups right before painting |
| Vinyl Spackle | Holes and cracks up to 3/4″ deep (layered) | 1–5 hrs to touch, 24 hrs to cure | Deeper interior holes; painted exterior touch-ups |
| Joint Compound | Drywall seams, large patches, skim coats | ~24 hrs per coat | New drywall seams and large wall areas |
If your repair is a large seam or you’re finishing new drywall rather than patching a hole, joint compound is the better tool for the job, even on a plywood substrate.
As an Amazon Associate we earn from qualifying purchases.
How to Prepare the Surface
Clean the area before touching it with a putty knife. Remove dust, loose paint, and any grease with a mild soap solution, rinse with clean water, and let the surface dry completely – spackle applied over dust or moisture won’t bond and will pop loose later.
| Tool | Use |
|---|---|
| Flexible putty knife | Applying and smoothing the spackle |
| Fine-grit sandpaper (220-grit) | Smoothing the dried patch |
| Clean, damp cloth | Wiping dust from the surface before and after |
| Primer | Sealing the patch so paint doesn’t flash |
How to Apply Vinyl Spackle (Step by Step)
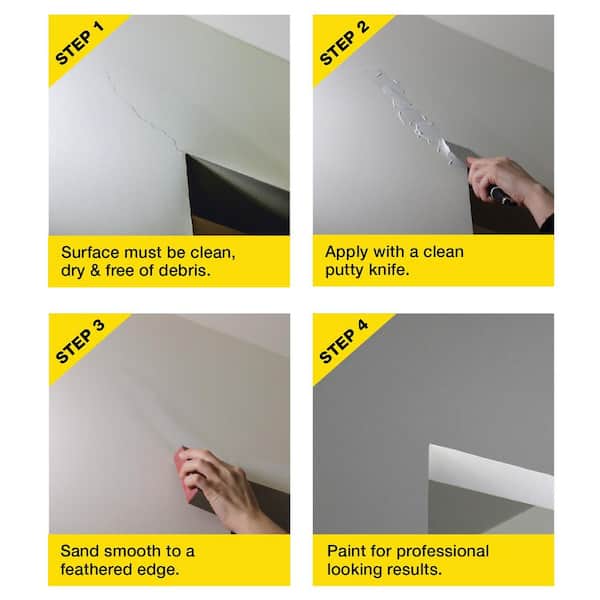
- Clean and dry the surface: Wipe away dust, loose paint, and debris from the hole or crack, and let the area dry completely before applying anything.
- Load the putty knife and fill the repair: Press a small amount of vinyl spackle into the hole with a flexible putty knife, working it flush with the surrounding surface.
- Layer repairs deeper than 1/4 inch: For deeper holes, apply one 1/4-inch layer at a time and let each layer dry before adding the next, instead of filling the whole depth in one pass.
- Smooth and feather the edges: Draw the knife across the patch to level it, feathering the outer edge so the repair blends into the surrounding wall once painted.
In my own repairs, trying to fill anything deeper than a quarter inch in one pass has almost always left a hairline crack once it dried – building it up in two thin layers instead has never failed me. — Our team
How Long Vinyl Spackle Takes to Dry and Cure
Vinyl spackle is usually dry to the touch and ready to sand within 1 to 5 hours, depending on how deep the fill is and how humid the room is – thin layers on a shallow repair dry fastest. Full cure, when the patch has hardened all the way through and is safe to paint, takes about 24 hours.
📊 Repairs deeper than 1/4 inch filled in a single pass are the most common cause of shrinkage cracking in DIY vinyl-spackle patches. — Source: DAP Vinyl Spackling product page
Sanding and Painting the Finished Patch
Once the patch has cured, sand it with fine-grit sandpaper in light, circular motions – pressing too hard just gouges the surrounding wall. Wipe away the dust with a damp cloth, let it dry, then prime the patch before painting so it doesn’t absorb more paint than the surrounding wall and flash through the finish coat.
Can You Use Vinyl Spackle Outdoors?
Standard vinyl spackle is not waterproof on its own, but that doesn’t make it strictly an indoor-only product. DAP rates its vinyl spackling for both interior and exterior repairs, as long as the finished patch gets a coat of paint over it – the paint is what actually blocks the moisture, not the spackle itself. Left bare outdoors, it will absorb water and eventually fail, so skip it for any exterior repair you don’t plan to paint, and use a purpose-built exterior patching compound instead if that’s the case.
Vinyl Spackle on Wood and Other Surfaces
Vinyl spackle sticks well to bare or primed wood, brick, and stone in addition to drywall and plaster. On wood trim and baseboards, it fills nail holes, small dents, and scratches, sands flush with the surrounding grain, and takes paint the same way it does on drywall – though it won’t take wood stain the way a color-matched wood filler will. For dents and holes in hardwood flooring specifically, a filler made for floors handles foot traffic better.
Common Mistakes That Make Vinyl Spackle Crack or Fail
- Filling too deep in one pass: anything over 1/4 inch applied at once is the top cause of shrinkage cracks – build it up in layers instead.
- Skipping the primer: painting directly over bare spackle often leaves a visible dull or shiny patch (“flashing”) where the paint sheen doesn’t match the wall.
- Sanding before it’s fully cured: sanding a patch that’s only dry to the touch, not cured, tends to gum up the sandpaper instead of powdering off cleanly.
- Leaving it unpainted outdoors: vinyl spackle isn’t waterproof on its own, so an exterior patch left bare will absorb water and eventually fail.
- Applying over dust or grease: spackle bonds to the surface, not to dirt sitting on top of it, so an unwashed patch area is prone to popping loose later.
Storing Vinyl Spackle So It Doesn’t Dry Out
An unopened tub of vinyl spackle keeps for roughly 9 to 12 months, and once opened it’s usually good for another 2 to 6 months if it’s resealed properly. Scrape any dried spackle off the inside of the lid and container walls before closing it, press a piece of plastic wrap directly onto the surface of the remaining spackle to cut down on air exposure, then snap the lid on tight and store it somewhere cool and dry – a garage that regularly freezes will shorten its usable life. Spackle that has developed mold, a sour smell, or a hard, rubbery texture should be thrown out regardless of how long it’s been sitting.
Frequently Asked Questions
What is vinyl spackle used for?
Vinyl spackle is used to fill small-to-medium holes, cracks, dents, and nail holes in interior drywall, plaster, and wood before painting. Its elastic, vinyl-based formula resists shrinking and cracking as it dries, which is why it works on deeper repairs than lightweight spackle can handle.
How deep can you apply vinyl spackle?
Vinyl spackle is rated for holes and cracks up to 3/4 inch deep. For anything deeper than 1/4 inch, apply it in layers, letting each layer dry before adding the next, since a single thick application is more likely to shrink or crack as it cures.
How long does vinyl spackle take to dry and cure?
Vinyl spackle is typically dry to the touch and ready to sand in 1 to 5 hours, depending on the depth of the fill and the humidity in the room. Full cure, when the patch has hardened completely and is ready for paint, takes about 24 hours.
Can vinyl spackle be used on wood?
Yes. Vinyl spackle sticks well to bare or primed wood and works for filling small dents, nail holes, and scratches on trim, baseboards, and furniture. It sands smooth and takes paint the same way it does on drywall.
Is vinyl spackle waterproof, and can you use it outside?
Standard vinyl spackle is not fully waterproof on its own, but it is not strictly an indoor-only product either. DAP rates its vinyl spackling for interior and exterior repairs as long as the patch is sealed with paint afterward; left unpainted, it will absorb moisture and can fail outdoors.
Conclusion
Vinyl spackle earns its place in a toolbox for anything a lightweight spackle can’t handle in one pass – holes and cracks up to 3/4 inch deep – without going all the way to joint compound. Layer it in 1/4-inch passes on deeper repairs, give it a full 24 hours to cure, and paint over any patch that will see the outdoors. Achieve flawless, feather-edged repairs by respecting those two limits and it will outperform most other patching products on the shelf.
For more repair and prep techniques before painting a project, see the full wood maintenance guides on this site.
Sponsored / affiliate links. As an Amazon Associate I earn from qualifying purchases. I may earn additional commission from eligible campaigns.