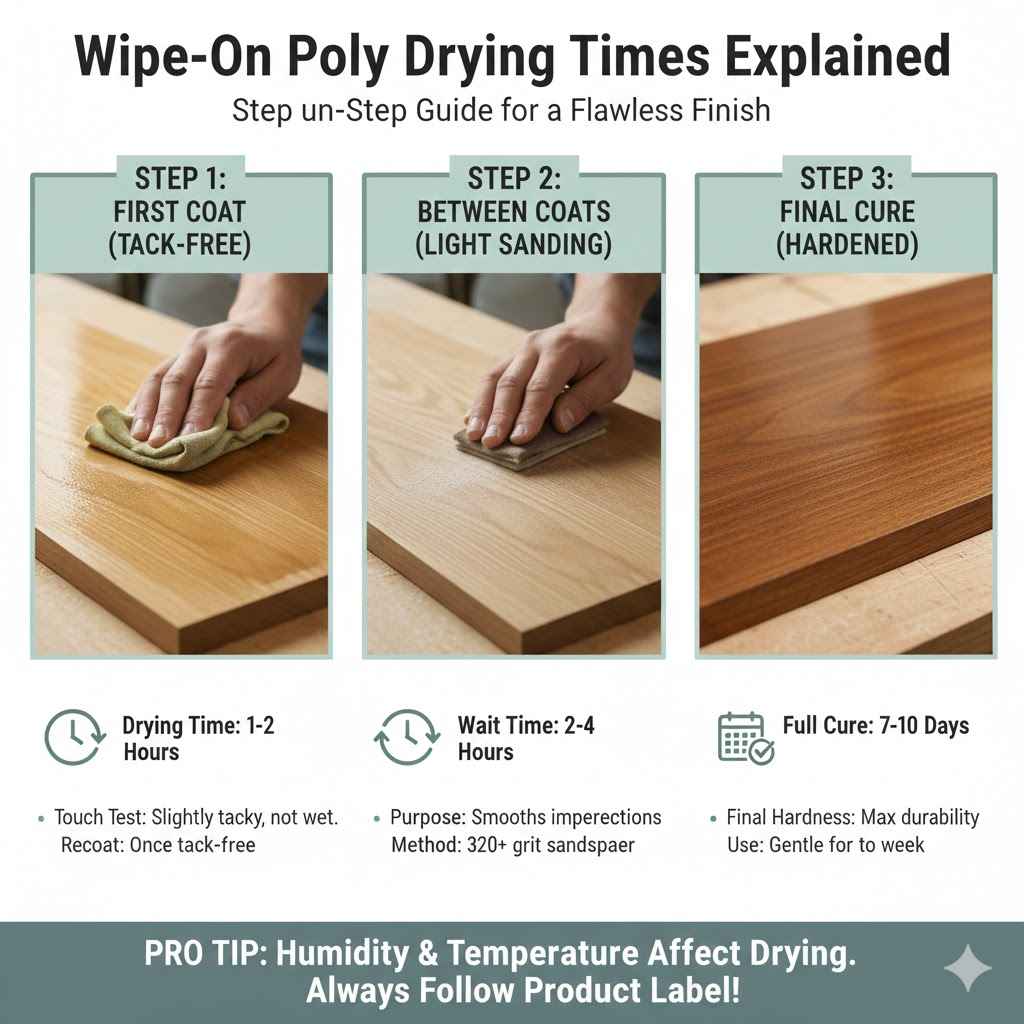
Wipe-On Poly Drying Times Explained
Many people find it a bit tricky to know exactly when to apply the next coat of wipe-on polyurethane. This is a common question because getting the timing right is super important for a smooth, beautiful finish on your projects. Don’t worry though!
We’re going to break down the Wipe-On Poly Time Between Coats Explained in a way that’s easy to follow. We’ll walk through everything step-by-step so you can feel confident with your next finishing project.
Understanding Wipe-On Poly Drying And Curing
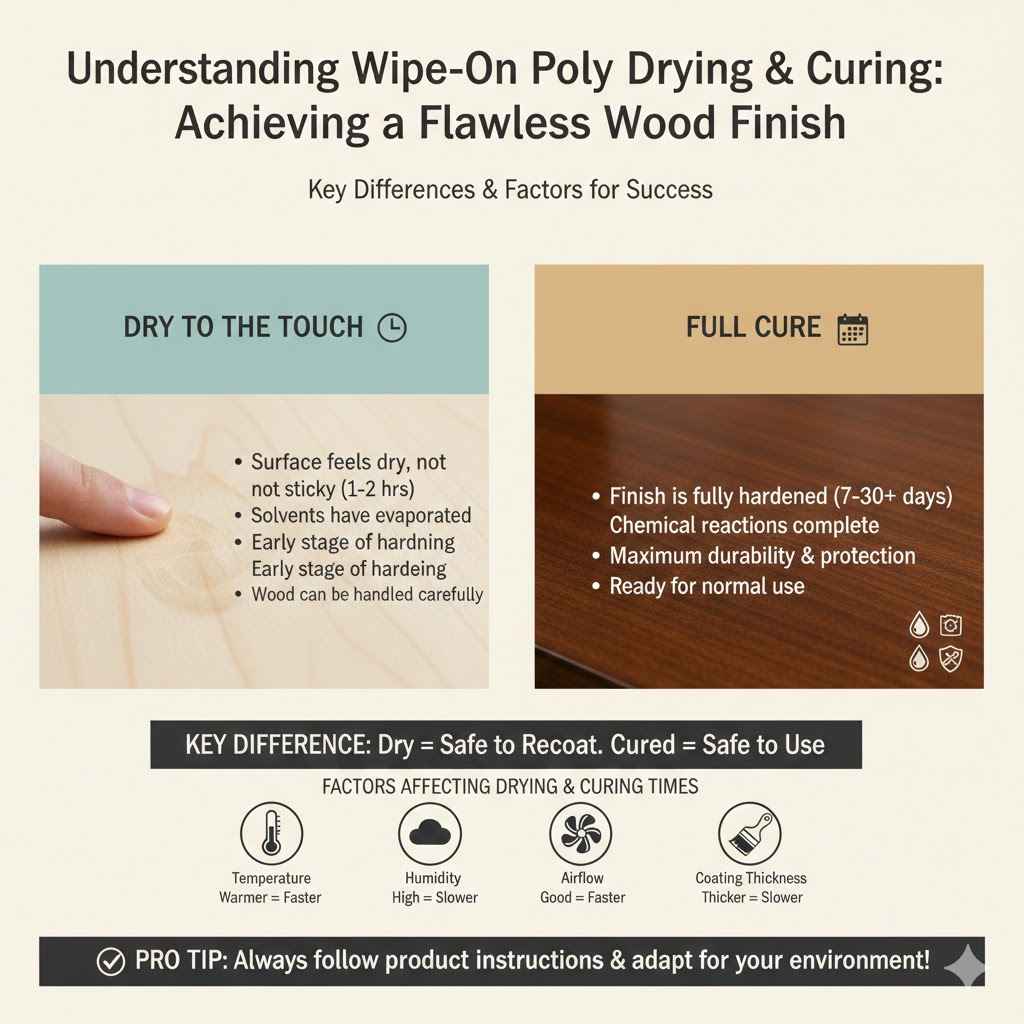
Understanding how wipe-on polyurethane dries and cures is the first big step to mastering your finishing projects. This isn’t just about waiting for the surface to feel dry; it’s about letting the finish harden properly so the next coat can bond well and you avoid problems like peeling or a dull appearance. Many beginners get confused because “dry to the touch” doesn’t mean “ready for the next coat.”
What Does Dry To The Touch Mean
When a finish is “dry to the touch,” it means the surface has set enough that you can lightly run your finger over it without the finish sticking to your skin or leaving a mark. This usually happens relatively quickly with wipe-on poly, often within an hour or two, depending on the conditions.
This initial dryness is mostly due to solvents evaporating. Think of it like water drying from a puddle; the water disappears, but the puddle itself is still there. With finishes, the solvents leave, and the film-forming components start to link up, but it’s a very early stage of that process.
It’s tempting to move on to the next step as soon as it feels dry, but this is where many projects can go wrong. Applying another coat too soon can trap those solvents underneath, leading to problems later on. It’s like trying to put a new layer of paint on a wall that’s still wet underneath; the new paint won’t adhere well.
The Curing Process Explained
Curing is the much longer process where the polyurethane fully hardens and reaches its maximum durability. This involves chemical reactions where the polymers in the finish link together and create a strong, protective layer. This can take days, weeks, or even longer depending on the product and environmental factors.
During curing, the finish develops its full hardness, chemical resistance, and abrasion resistance. A finish that is only “dry to the touch” is still quite soft and can be easily damaged. It’s still forming its strongest bonds at this stage.
For many common finishes, including some wipe-on poly formulations, full cure can take up to 30 days. This is why it’s often recommended to handle cured pieces gently for the first month. This long-term hardening is what gives your furniture and other items the protection they need against everyday wear and tear.
Factors Affecting Drying And Curing Times
Several factors can significantly impact how quickly your wipe-on polyurethane dries and cures. Understanding these variables helps you adjust your expectations and workflow to get the best results, especially when you’re trying to figure out the Wipe-On Poly Time Between Coats Explained.
- Temperature: Warmer temperatures generally speed up solvent evaporation and chemical reactions, leading to faster drying and curing.
- Humidity: High humidity can slow down drying. Water vapor in the air can interfere with solvent evaporation and the curing process.
- Airflow: Good ventilation helps carry away evaporated solvents, promoting faster drying. Stagnant air can prolong drying times.
- Coating Thickness: Thicker coats take longer to dry and cure because solvents have further to travel and more material needs to react.
- Product Formulation: Different brands and types of wipe-on poly have slightly different chemical compositions, leading to variations in drying and curing times.
For example, if you’re working in a cool, damp basement, your finish might take twice as long to dry as it would in a warm, dry workshop with good airflow. This variability is why relying solely on a clock can be misleading.
It’s always best to consult the product’s specific instructions, but also to pay attention to the actual conditions in your workspace. You might need to be patient if the environment isn’t ideal.
Determining The Correct Time Between Coats
Figuring out the right amount of time to wait between applying coats of wipe-on polyurethane is key to a smooth, professional-looking finish. It’s a common sticking point for people new to finishing, as the Wipe-On Poly Time Between Coats Explained can seem a bit mysterious. The good news is, there are simple tests and guidelines to follow.
The Rule Of Thumb
A widely accepted rule of thumb for most oil-based wipe-on polyurethanes is to wait at least 4 to 6 hours between coats. Some water-based formulas might dry faster, sometimes as little as 1 to 2 hours, but it’s always best to check the manufacturer’s instructions. This waiting period allows the solvents to evaporate and the film to set up enough for the next layer.
This 4-6 hour window is a safe bet for oil-based products. It’s long enough for the initial drying to occur without being so long that the surface becomes overly resistant to bonding with the next coat.
However, this is just a guideline. The actual time you should wait can change based on the factors we just discussed, like temperature and humidity. Never rush this process.
Performing A Light Sanding Test
A more reliable method than just watching the clock is to do a light sanding test. After the recommended waiting period, try to lightly sand a small, inconspicuous area with very fine-grit sandpaper (like 220 or 320 grit). If the finish gums up the sandpaper or feels soft and sticky, it’s not ready for another coat.
If the sandpaper glides smoothly and collects fine dust without clumping, the finish is likely ready. This test is a practical way to gauge the actual hardness of the surface.
Imagine trying to sand a sticky piece of tape; it just makes a mess. The same principle applies here. The sandpaper should cut the finish cleanly, indicating it has solidified sufficiently.
The Tack Test
Another simple test is the “tack test.” Gently touch a corner or edge of the finished surface with your knuckle or the back of your fingernail. If it feels tacky or leaves any residue, it needs more time. If it feels hard and dry, it’s probably ready.
This test is less aggressive than sanding and can be done more frequently. It’s a quick way to check if the surface has lost its tackiness.
You’re looking for a solid feel, not a slight stickiness. This might take a few tries to get a feel for, but it becomes intuitive with practice.
Overnight Waiting For Best Results
For the best possible adhesion and a smooth finish, many woodworkers prefer to wait overnight between coats, especially for the first few coats. This ensures that each layer has plenty of time to dry and set properly, reducing the risk of issues like solvent entrapment or adhesion problems.
Waiting overnight provides a significant buffer against environmental variations. Even if conditions aren’t perfect, giving it the full night allows for more complete drying.
This is particularly beneficial for the initial coats, which lay the foundation for the entire finish. A solid base means subsequent coats will adhere better and create a more durable final product.
Troubleshooting Common Issues Related To Timing
When you’re working with wipe-on polyurethane, not adhering to the proper drying times between coats can lead to a few common and frustrating problems. Understanding these issues helps you avoid them in the future and achieve the smooth, durable finish you want. The Wipe-On Poly Time Between Coats Explained in a practical sense means preventing these headaches.
Soft or Gummy Finish
This often happens when a new coat is applied before the previous one has fully dried or cured. The solvents in the new coat can soften the layer beneath, causing it to become gummy. This traps solvents, and the finish might never harden properly, leading to a surface that feels soft, sticky, or can be easily damaged.
This is one of the most common mistakes. You end up with a finish that doesn’t protect your wood well. It might also develop an uneven sheen or become cloudy.
To fix this, you might need to scrape off the affected areas and reapply the finish after allowing proper drying time. In severe cases, you might have to strip the finish entirely and start over, which is why getting the timing right is so crucial.
Poor Adhesion and Peeling
If you wait too long between coats, especially if the surface has been exposed to a lot of wear or contaminants, the new coat might not adhere properly to the old one. The finish can start to peel or flake off in sections. This is more common with very old or improperly prepared surfaces, but it can also happen if the curing process has significantly hardened the previous layer.
This is frustrating because it means your hard work is starting to come undone. You want a finish that acts as one continuous protective layer.
Proper preparation and scuff sanding between coats (explained later) can help prevent this by creating a surface the new coat can grip. If peeling occurs, you’ll need to remove the loose finish and reapply, ensuring good adhesion.
Cloudy or Hazy Finish
A cloudy or hazy appearance can sometimes be related to timing issues. If solvents are trapped due to insufficient drying time, they can create micro-bubbles or interfere with the clarity of the finish. It can also happen if moisture gets into the finish during application or drying.
This is particularly noticeable on darker woods or glossy finishes where clarity is important. It makes the wood look less vibrant and appealing.
While sometimes a mild haze can be buffed out with rubbing compound, significant cloudiness may require sanding back and reapplying. This highlights the importance of the Wipe-On Poly Time Between Coats Explained for clarity.
Scuff Sanding Between Coats
To ensure proper adhesion and a smoother final finish, it’s often recommended to lightly scuff sand between coats. Use a fine-grit sandpaper (220-320 grit) or a synthetic steel wool pad (like #0000). This removes any dust nibs and provides a slightly roughened surface for the next coat to grip.
This step is incredibly important for building up a smooth, even finish. It’s not about removing the previous coat, but about preparing its surface.
Always wipe away all sanding dust thoroughly with a tack cloth or a slightly damp rag before applying the next coat. This step is crucial for preventing adhesion issues and ensuring a glass-like smoothness.
Practical Tips For Applying Wipe-On Poly
Applying wipe-on polyurethane is generally considered easier than traditional brushing poly, but there are still a few tricks to get the best results. Following these practical tips, especially concerning drying times, will ensure your project looks fantastic. Understanding the Wipe-On Poly Time Between Coats Explained is one part, but application technique is the other.
Preparation Is Key
Before you even open the can, make sure your wood surface is clean, smooth, and free of any dust, grease, or old finishes. Sand the wood progressively through finer grits (up to 220 or 320 grit) for a smooth base. Always wipe down the surface with a tack cloth to remove any lingering dust just before applying the first coat.
A clean surface is the foundation of a great finish. Any imperfections in the wood will be magnified by the finish.
This preparation step is non-negotiable. It ensures the polyurethane bonds well and that you don’t trap dirt or dust within the finish layers, which can ruin the final look.
Application Technique
Use a clean, lint-free cloth or a high-quality foam applicator. Apply the polyurethane in thin, even coats, working in the direction of the wood grain. Avoid applying too thickly, as this can lead to runs, drips, and longer drying times. Wipe off any excess polyurethane immediately.
Think of it as spreading a very thin layer of oil. You want consistent coverage without puddles or thick build-up.
This technique helps solvents evaporate more quickly and allows the finish to cure evenly. Thin coats build up better over time than one thick, gloppy coat.
Working In A Controlled Environment
Try to work in a well-ventilated area that is free from dust, drafts, and extreme temperatures. Dust is the enemy of a smooth finish. Cover your work area with drop cloths and consider wearing a dust mask. Maintaining a consistent temperature (ideally 65-75°F or 18-24°C) will help the finish dry and cure properly.
Dust particles settling on a wet finish are very difficult to remove. A clean environment is as important as good technique.
Drafts can also cause uneven drying or potentially pull dust onto the surface. A stable environment allows the chemistry of the polyurethane to do its job as intended by the manufacturer.
Don’t Forget The Curing Time
While the time between coats is important for application, remember the total curing time. Even after the final coat, the finish will need time to reach its maximum hardness and durability. Handle the piece gently for the first few days, and avoid placing heavy or abrasive items on it for at least a week, ideally longer.
The finish might feel hard to the touch after a day or two, but it’s still very vulnerable during the initial curing period.
This long-term curing is what gives your project its lasting protection. Being patient now prevents damage later and ensures your beautiful finish lasts for years.
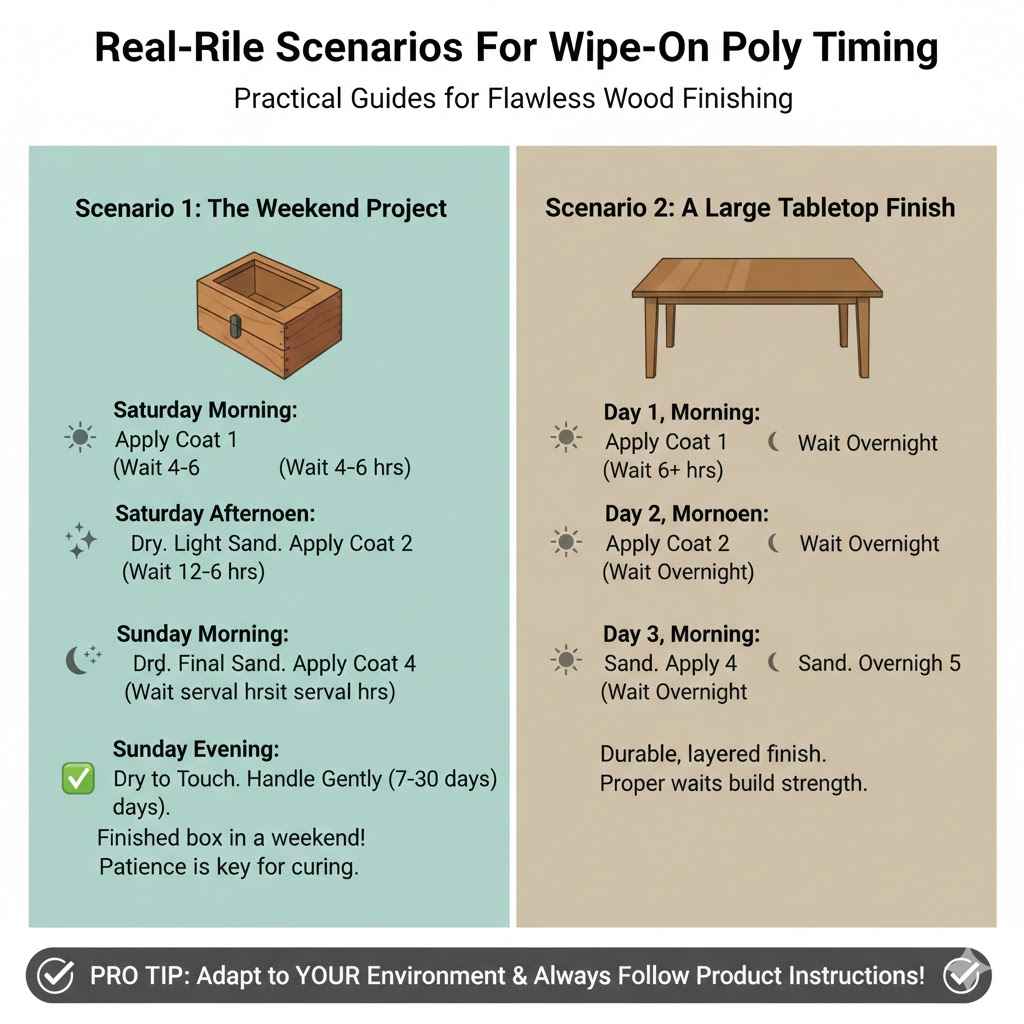
Real-Life Scenarios For Wipe-On Poly Timing
Let’s look at a couple of common scenarios where understanding wipe-on poly drying times is crucial. These examples show how practical application of the Wipe-On Poly Time Between Coats Explained makes a real difference.
Scenario 1 The Weekend Project
Imagine you want to finish a small wooden box over a weekend. You apply the first coat of oil-based wipe-on poly on Saturday morning.
- Saturday Morning: Apply Coat 1.
- Saturday Afternoon (around 4-6 hours later): The surface feels dry to the touch. You perform a light sanding test, and it goes smoothly, collecting fine dust. You apply Coat 2.
- Saturday Evening (4-6 hours after Coat 2): The surface is dry again. You sand lightly and apply Coat 3.
- Sunday Morning (overnight after Coat 3): You’ve waited 12+ hours. The surface is hard. You do a final light sanding and apply the last coat (Coat 4).
- Sunday Evening: The final coat has been on for several hours. It feels dry to the touch. You let it sit undisturbed.
By Sunday night, you have a finished box. You’ll still need to be gentle with it for a few weeks as it fully cures, but the application steps were timed correctly for a good result within your timeframe.
Scenario 2 A Large Tabletop Finish
Finishing a large table might involve more coats and require careful planning. You’re using oil-based poly and want a very durable finish.
- Day 1, Morning: Apply Coat 1. Allow 6+ hours.
- Day 1, Afternoon: Apply Coat 2. Allow overnight.
- Day 2, Morning: Lightly scuff sand Coat 2. Wipe clean. Apply Coat 3. Allow 6+ hours.
- Day 2, Evening: Apply Coat 4. Allow overnight.
- Day 3, Morning: Lightly scuff sand Coat 4. Wipe clean. Apply Coat 5. Allow overnight.
This approach, with at least 6-8 hours (and often overnight) between coats, especially after scuff sanding, builds up the finish properly. It allows each layer to harden sufficiently before the next is applied, preventing the issues mentioned earlier and ensuring a beautiful, lasting finish for the tabletop.
Frequently Asked Questions
Question: Can I use water-based wipe-on poly and what are its drying times?
Answer: Yes, water-based wipe-on poly is available and typically dries much faster than oil-based. You might be able to apply a new coat as soon as 1-2 hours after the previous one, but always check the product label. It’s still wise to perform a light sanding or tack test.
Question: What happens if I apply wipe-on poly when it’s too cold or humid?
Answer: Cold temperatures and high humidity will significantly slow down the drying and curing process. The finish may remain tacky for much longer, increasing the risk of dust contamination, trapping solvents, and poor adhesion between coats. It’s best to work in conditions recommended by the manufacturer.
Question: Should I always scuff sand between coats?
Answer: While not always strictly necessary for every single coat, light scuff sanding (with 220-320 grit) between coats is highly recommended for most projects. It ensures excellent adhesion between layers and helps create a smoother final surface by removing any imperfections like dust nibs or slight ridges.
Question: How do I know if my wipe-on poly is fully cured?
Answer: Full cure can take up to 30 days for oil-based polyurethanes. The finish will feel very hard and resistant to scratches and dents. Even after it feels dry to the touch and ready for use after a few days, it continues to harden over weeks.
Avoid harsh cleaning or heavy use during this period.
Question: Can I speed up the drying time of wipe-on poly?
Answer: You can help speed up drying by ensuring good ventilation and a warm, dry environment. Avoid applying very thick coats, as thin coats dry faster. Using a fan to circulate air can also help, but avoid directing it directly onto the wet finish, as this can cause uneven drying or dust issues.
Conclusion
Getting the wait time right between wipe-on poly coats is key for a smooth, durable finish. Follow the 4-6 hour rule of thumb for oil-based poly, but always test for dryness. Light sanding between coats ensures good adhesion and a better final look. Patience with the drying and curing process prevents soft finishes and peeling. Apply thin coats in a clean, dry, and warm area.