How to Make a Wood Burning Emblem: Design, Transfer, and Burn Guide
A wood burning emblem is a crest, monogram, or symbol burned into wood with a standard pyrography pen—not the high-voltage “fractal burning” technique used for lightning-shaped patterns. This guide covers picking a pen and wood, transferring a clean design, burning it at the right heat for your wood, and sealing the finished piece so it holds up.
Choosing the Right Pen and Wood for an Emblem
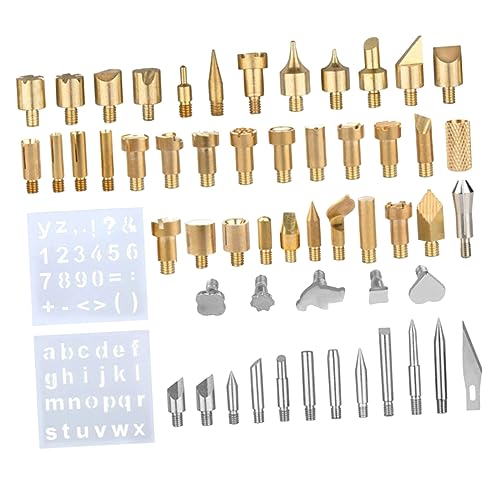
Two kinds of pyrography pens are sold for hobby use. A wire-nib pen, like the kit below, heats a thin loop of nichrome wire and reaches temperature fast but takes a few seconds to cool between tip changes. A solid-brass-tip pen (often called a “fixed-tip” or “professional” unit) holds heat more evenly for long shading passes but costs more and heats up slower. For a first emblem, an adjustable wire-nib kit with interchangeable tips covers outlining, shading, and lettering without buying three separate tools.
Wood choice matters as much as the pen. Basswood and birch plywood are the easiest starting points: fine, even grain that chars a consistent dark brown without much smoke. Pine works but its soft/hard grain bands burn unevenly, which can blur a crisp emblem outline. Save oily or resinous woods like cedar, teak, and rosewood for later—their natural oils smoke more and can make the burn line inconsistent until you’ve got some hours of practice in.
Best Adjustable-Heat Pen For Emblem Detail
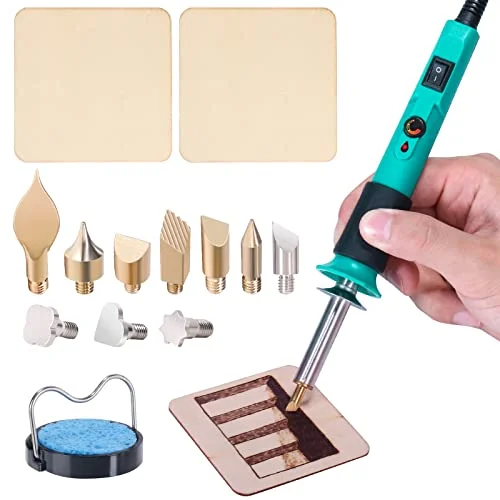 |
YIHUA 930-IV Pyrography Wood Burning Pen Kit – $15.99 A dial-adjustable pen with 10 swappable brass tips gives you the temperature range and tip variety an emblem needs, from fine outlines to broad shading fills.
|
Whatever blank you pick, sand it before you draw anything on it. Start at 150-grit to knock down mill marks, then finish with 220-grit so the surface is smooth enough that the pen tip glides instead of catching on the grain. Wipe off the dust with a barely damp cloth and let it dry fully—burning over damp wood produces steam pockets that pit the surface.
Transferring Your Emblem Design Onto the Wood
Print or sketch your emblem at the exact size you’ll burn it—resizing after transfer means redoing this step. The most reliable low-tech method is graphite transfer paper: place the paper graphite-side down on the sanded wood, lay your printed design on top, and trace every line with a ballpoint pen and firm, steady pressure. Lift a corner to check the line came through before you remove the whole sheet.
If you own a laser printer or have access to a toner-based copier, a toner transfer gives a cleaner, more exact line for symmetrical emblems like crests or monograms. Mirror-image the design in your print settings, print it, then press it face-down onto the wood and rub the back firmly and evenly with the back of a spoon for a minute or two. Peel back a corner to check the toner released before lifting the whole sheet. This only works with toner-based printing—inkjet ink won’t release onto wood, which is the most common reason this method “doesn’t work” for people trying it the first time.
Burning the Emblem Step by Step
Clamp or weigh down the wood so it can’t shift mid-line, and test your pen’s heat on a scrap piece of the same wood before touching the actual emblem. Start with the outline using a fine or skew tip, holding the pen like a pencil rather than a marker. Let the heat do the work—pressing harder doesn’t burn darker, it just digs a groove and makes the line uneven.
Work the outline first, then fill in shading and texture from the center of the design outward, so your hand never has to rest on an area you’ve already burned. Every minute or two, wipe the tip on a damp sponge or brass-bristle brush; carbon buildup on the tip drags across the wood and blurs edges that were clean a moment ago. If a line comes out too light, you can go back over it once the wood has cooled slightly—burning over a warm line usually looks worse than a light line that’s simply slower to darken.
Shading and Texture Techniques That Make an Emblem Pop
Value in pyrography comes from dwell time and temperature, not pressure. Holding the tip in one spot longer, or raising the dial a notch, gives you a darker mark; lifting and touching down quickly gives you a lighter one. For a smooth gradient fade across a shield or banner shape, work in overlapping short strokes and lighten your dwell time as you move outward, rather than trying to drag one continuous stroke from dark to light.
- Cross-hatching: Layer two sets of parallel lines at an angle to fake mid-tone shading on curved surfaces like a crest’s border.
- Stippling: Touch the tip down in dots rather than lines—useful for a stone or leather texture inside an emblem’s shield shape.
- Flat-tip fills: Swap to a wider spoon or flat tip for large background fills so you’re not re-tracing the same small area with a fine tip.
Grain direction changes how a burn looks even at the same settings. A line burned with the grain tends to stay thin and crisp; the same line burned across the grain spreads slightly and can look fuzzier. Test both directions on your scrap piece so you know what to expect before you commit to the final emblem.
Pyrography Safety: What a Wood-Burning Pen Can (and Can’t) Do
A standard wood-burning pen plugs into a regular household outlet and heats a metal tip you control by hand, the same basic idea as a soldering iron. Burn in a ventilated space, keep a respirator rated for fine particulates on hand if you’re burning for more than a few minutes at a time (a cloth dust mask doesn’t filter pyrolysis smoke), and unplug the pen before changing tips since the metal shank stays hot well after the switch is off. Work on a fireproof surface and keep the cord clear of your burning hand.
It’s worth being clear about what this technique is not. The branching, lightning-shaped pattern you may have seen called “fractal burning” or Lichtenberg wood burning is a completely different process—it runs thousands of volts from a stepped-up transformer through a conductive liquid on the wood’s surface, and it has caused real, documented electrocution deaths, including from setups built around wiring a microwave transformer for the job. None of the techniques in this guide involve that kind of voltage, and that branching pattern isn’t something a standard pyrography pen can safely produce—don’t try to combine the two.
Sealing and Displaying Your Finished Emblem
Let the finished piece sit uncovered for a day so any lingering smoke smell dissipates, then lightly knock down any raised grain with 320-grit sandpaper before sealing. A water-based polyurethane or polycrylic keeps the burned lines a true black; an oil-based finish ambers over months and can make dark burn lines look muddier against the wood. Apply two to three thin coats with a foam brush, sanding lightly between coats, rather than one thick coat that can pool in the recessed burned lines.
For display, a round or shield-shaped emblem mounts cleanly with a sawtooth picture hanger on the back, or you can set it into a shadow-box style frame if you want it to sit forward from the wall. If you plan to give it as a gift, a simple plate stand for tabletop display avoids putting nail holes in someone else’s wall.
Frequently Asked Questions
What is a wood burning emblem?
A wood burning emblem is a crest, monogram, or symbol burned into a wood surface using a pyrography pen, rather than carved or painted. The pen’s heated metal tip chars the wood fibers to create dark lines and shading, so the design becomes a permanent part of the wood grain instead of sitting on top of it.
How do you transfer an emblem design onto wood before burning?
Print or draw the emblem at the size you want, then slide a sheet of graphite transfer paper (dark side down) between the design and the sanded wood and trace over every line with a ballpoint pen to leave a light graphite outline to burn over. If you have access to a laser printer or toner-based copier, you can also use a toner transfer: print the design mirror-imaged, press it face-down onto the wood, and rub the back firmly with a spoon so the toner releases onto the surface. This only works with toner-based printing, not inkjet, because inkjet ink will not transfer.
What temperature should I use to burn a wood-burning emblem?
Start in the low-to-mid range of your pen’s dial, roughly 550 to 700 degrees Fahrenheit, on a piece of scrap from the same wood you’re using for the emblem. Soft woods like basswood and pine burn dark at lower settings, while harder woods like maple or walnut need more heat and a slower pass to get the same shade. Raise the temperature gradually rather than starting at maximum, since too much heat produces fuzzy, charred edges instead of crisp lines.
Is a wood-burning-pen emblem the same as fractal or Lichtenberg wood burning?
No, and the difference matters for safety. A standard pyrography pen used for emblem work plugs into a regular household outlet and burns with a hot metal tip you control by hand, the same way a soldering iron works. Fractal or Lichtenberg wood burning uses a stepped-up high-voltage transformer, sometimes wired from parts like a microwave transformer, to send thousands of volts through a conductive liquid on the wood, which is what produces the lightning-shaped branching pattern. That method has caused documented deaths from electrocution and should never be attempted; a standard wood-burning pen and the technique in this guide never involve that kind of voltage.
Conclusion
A wood burning emblem comes down to four things done in order: a wood that takes an even burn, a design transferred cleanly before you pick up the pen, heat and dwell time matched to that specific wood, and a finish that protects the contrast you worked for. None of it requires the high-voltage equipment sometimes associated with wood burning—a basic adjustable pen and a piece of basswood are enough to get a clean first crest or monogram.
Sponsored / affiliate links. As an Amazon Associate I earn from qualifying purchases. I may earn additional commission from eligible campaigns.