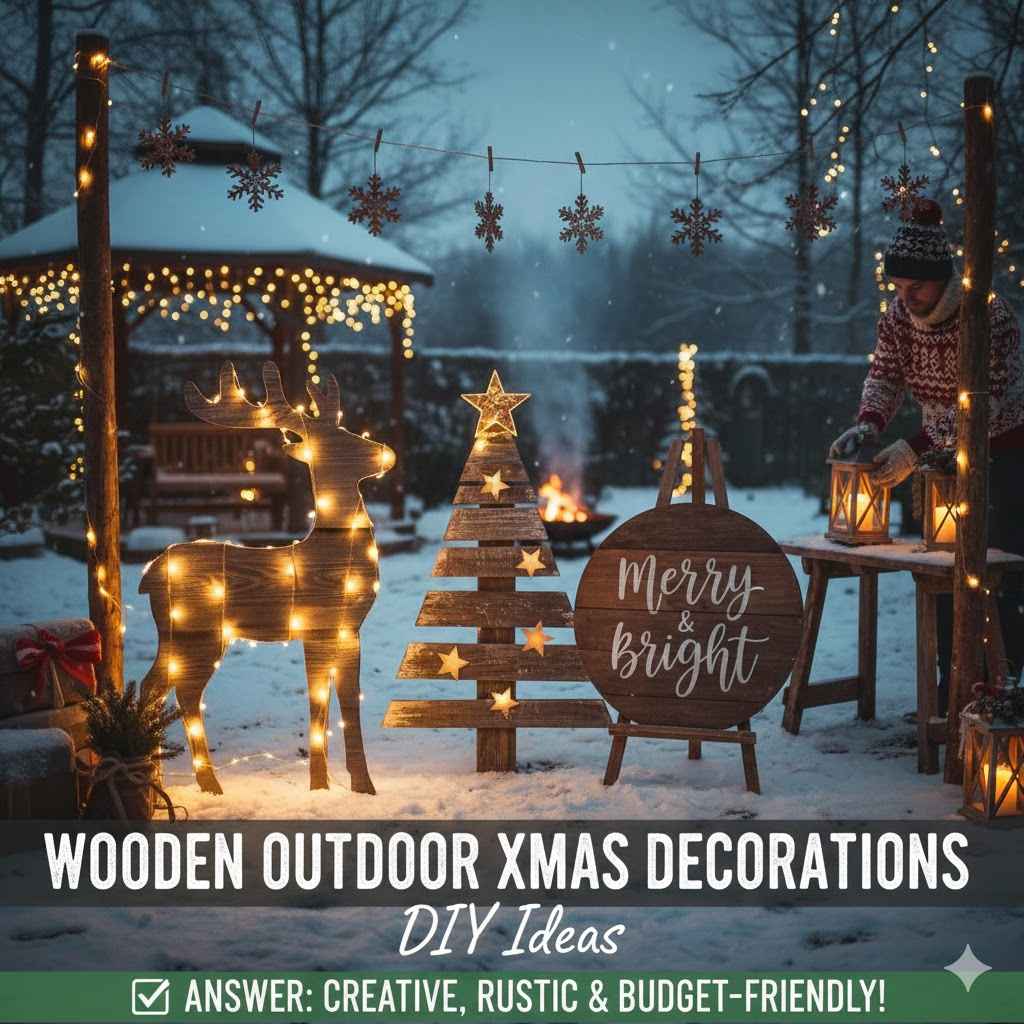
Wooden Outdoor Xmas Decorations: DIY Ideas
Making your yard festive for the holidays can be a lot of fun. If you’re thinking about Wooden Outdoor Xmas Decorations: DIY Ideas, you might wonder where to start. Sometimes, getting creative with wood can seem a bit tricky, especially if you’re new to crafting.
But don’t worry! This guide will show you how easy it can be with simple steps. We’ll go through everything you need to know to make beautiful wooden decorations that will light up your home.
Creating Festive Wooden Outdoor Xmas Decorations
Making your own outdoor Christmas decorations from wood can bring a unique charm to your home. It’s a rewarding way to add a personal touch to your holiday display. You can create decorations that perfectly match your style and budget. This section covers the basics of selecting wood, essential tools, and safety tips for your DIY projects.
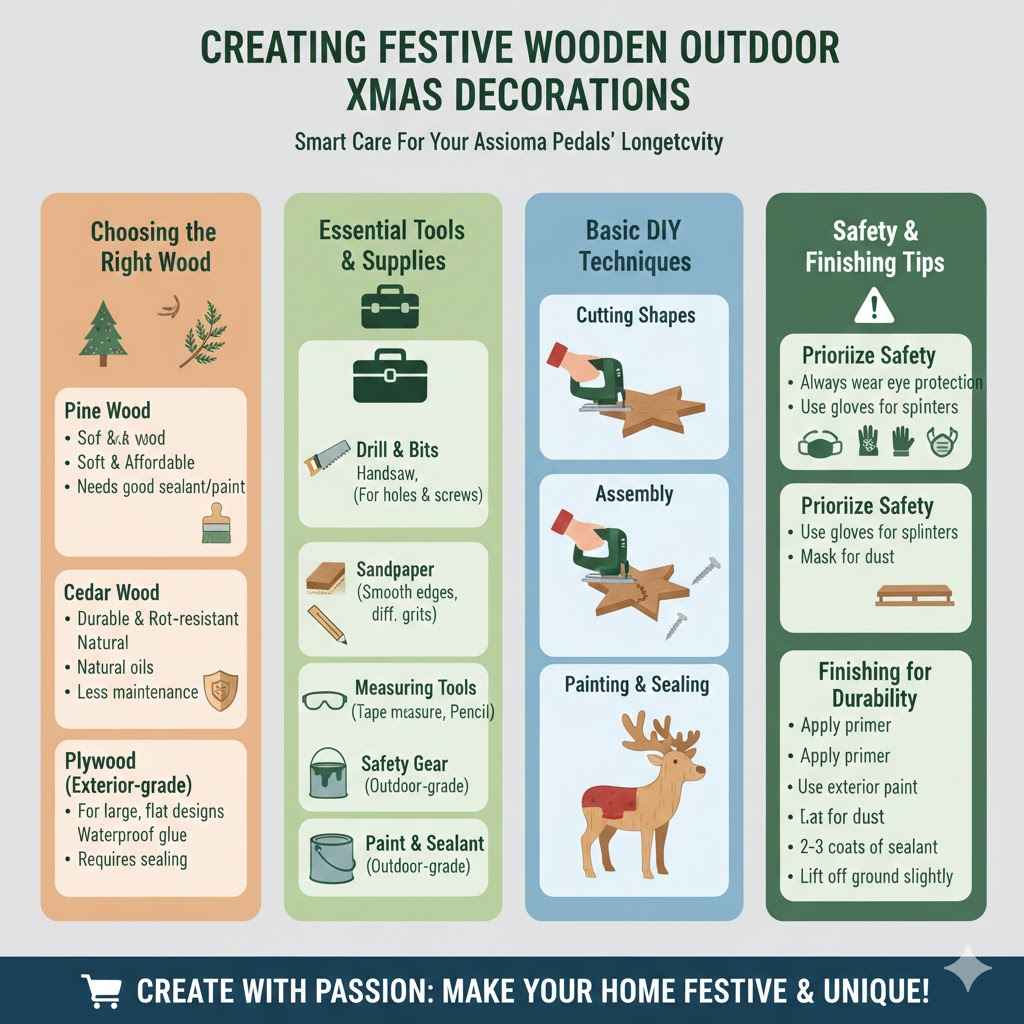
Choosing the Right Wood for Outdoor Decorations
Selecting the correct type of wood is key to ensuring your decorations last through the winter weather. You want wood that can withstand moisture, temperature changes, and the elements. Pine and cedar are popular choices because they are readily available and have natural resistance to rot and insects.
Pine Wood
Pine is a softwood that is lightweight and easy to work with, making it ideal for beginners. It’s also quite affordable. However, pine needs to be sealed properly to protect it from moisture. Without good sealing, it can absorb water and start to decay. This makes primer and outdoor-grade paint or sealant very important.
Cedar Wood
Cedar is a more durable option. It has natural oils that make it resistant to rot and insects. While it costs a bit more than pine, cedar requires less maintenance for outdoor use. Its natural beauty also means it can look great even with a simple clear sealant.
Plywood
Exterior-grade plywood can also be used for larger, flatter designs like signs or cutouts. It’s important to get a type specifically made for outdoor use, as it has waterproof glue and layers that resist delamination when wet. Like pine, it needs thorough sealing.
Essential Tools and Supplies
To start creating your wooden Christmas decorations, you’ll need a few basic tools. Having the right equipment will make the process smoother and safer.
Saws
A handsaw is a good start for smaller projects. For faster cutting and more complex shapes, a jigsaw or a circular saw can be very helpful. Always ensure your saw blades are sharp for clean cuts.
Drill and Bits
A drill is useful for making holes to hang decorations or to screw pieces together. You’ll need various drill bit sizes for different tasks.
Sandpaper
Sandpaper is essential for smoothing rough edges and surfaces. Having a few different grits, from coarse to fine, will help you achieve a polished finish.
Measuring Tools
A tape measure and a pencil are needed for marking and measuring your wood before cutting. Accuracy here helps ensure your pieces fit together well.
Safety Gear
This is very important. Always wear safety glasses to protect your eyes from sawdust and wood chips. Gloves can protect your hands, and a dust mask is recommended when sanding.
Paint and Sealant
Outdoor-grade acrylic paints are great for adding color. For protection, a clear outdoor sealant or varnish is a must to shield the wood from rain and snow.
Popular Wooden Outdoor Xmas Decorations: DIY Ideas
There are many classic and creative wooden decorations you can make. These ideas range from simple to slightly more involved, perfect for any skill level. Let’s explore some popular choices and how to approach them.
Simple Wooden Snowflakes
Snowflakes are a wonderful symbol of winter and can be made easily from wooden planks or craft sticks. You can create them in various sizes to hang from trees or place along walkways.
Materials Needed
- Wooden planks or large craft sticks
- Wood glue
- Sandpaper
- Outdoor paint (white, silver, or blue)
- Clear outdoor sealant
- String or wire for hanging
Step-by-Step Guide
- Cut your wood into desired lengths for the snowflake arms. For a classic six-pointed snowflake, you’ll need six equal pieces.
- Smooth all the cut edges with sandpaper.
- Arrange the pieces in a snowflake pattern. You can glue them together at the center or add smaller decorative pieces at the tips.
- Let the glue dry completely.
- Paint the snowflake in your chosen colors. You might want to add glitter for extra sparkle.
- Once the paint is dry, apply a coat of clear outdoor sealant to protect it from the weather.
- Attach a string or wire to the top for hanging.
Example Scenario
Imagine you have some leftover fence pickets. Cut them into 8-inch lengths. Arrange six of these in a starburst pattern, gluing the ends where they overlap at the center. After painting them white and letting them dry, brush on a sealant. You can then hang these from tree branches for a charming, rustic look that catches the light beautifully.
Rustic Wooden Reindeer
A wooden reindeer adds a whimsical touch to your outdoor Christmas display. These can be made from various wood scraps and are quite forgiving if your cuts aren’t perfectly straight.
Materials Needed
- Scrap wood pieces (e.g., pallet wood, branches)
- Wood screws or nails
- Wood glue
- Saw (handsaw or jigsaw)
- Drill
- Sandpaper
- Outdoor paint (brown, black, red for nose)
- Clear outdoor sealant
Step-by-Step Guide
- Cut out basic shapes for the body, legs, neck, and head from your scrap wood. You can find templates online for inspiration.
- Use a jigsaw for more curved shapes like the head and body.
- Sand all the pieces smooth.
- Assemble the reindeer using wood glue and screws or nails. Start with the body, then attach the legs, neck, and head.
- For the antlers, you can use bent branches or cut out antler shapes from thinner wood. Attach these to the head.
- Paint the reindeer brown, leaving space for a red nose.
- Once dry, paint the nose red.
- Apply a protective outdoor sealant.
Real-Life Example
A family used old fence posts and branches to build a life-sized reindeer. They cut a large oval for the body, four sturdy posts for legs, and a smaller piece for the neck and head. They found naturally twisted branches for the antlers. After assembling and painting it a deep brown, they added a bright red nose made from a painted wooden disc. It became a beloved centerpiece in their yard, welcoming guests.
Charming Wooden Candy Canes
These oversized candy canes can be a fun and colorful addition to your garden path or porch. They are simple to make and add a playful, traditional element.
Materials Needed
- Wooden dowels or straight planks
- Red and white outdoor paint
- Wood glue
- Clear outdoor sealant
- Jigsaw (optional, for a curved shape)
Step-by-Step Guide
- Cut your wood into long, straight pieces for the main cane shape. If using planks, you can cut them into a wide strip.
- If you want a curved candy cane shape, you might need to cut a curve into the wood, or join two pieces at an angle. A simple straight cane is also effective.
- Paint the wood with alternating red and white stripes. Apply them evenly, ensuring good coverage.
- Let the paint dry thoroughly between coats and colors.
- Once fully painted and dry, apply a clear outdoor sealant to protect the paint and wood.
- If you want to stand them up, you might need to attach a base or stake to the bottom.
DIY Wooden Christmas Trees
You can create stylized Christmas trees from wood in various ways, from stacked pieces to simple flat cutouts. These add a festive silhouette to your yard.
Stacked Wood Trees
Use different sizes of triangular wooden pieces and stack them. Start with the largest at the bottom and progressively smaller ones on top. Secure them with glue or screws. Paint them green and decorate with small wooden star toppers.
Flat Cutout Trees
Cut out tree shapes from plywood or wider planks. These can be painted in various shades of green or even left natural. You can add carved details or paint on ornaments for a unique look.
Materials Needed
- Wood boards or plywood
- Saw (handsaw or jigsaw)
- Sandpaper
- Outdoor paint (greens, browns)
- Wood glue or screws
- Clear outdoor sealant
Step-by-Step for Flat Cutout Trees
- Draw your tree shape onto the wood. You can make simple triangles or more elaborate evergreen shapes.
- Carefully cut out the tree shape using a jigsaw or handsaw.
- Sand all edges until smooth.
- Paint the tree. You can use solid green, or create depth with darker and lighter shades of green. Add painted ornaments or strings of lights.
- Apply a good coat of outdoor sealant for protection.
- For stability, you might need to attach a wooden stake to the back to place it in the ground.
Wooden Gift Boxes and Presents
These decorative “presents” add a charming, whimsical touch to your outdoor Christmas scene. They are often made from plywood or scrap wood and painted to look like wrapped gifts.
Materials Needed
- Plywood or scrap wood boards
- Saw
- Sandpaper
- Wood glue or screws
- Outdoor paints (various bright colors)
- Outdoor sealant
- Ribbon or twine (optional, for decoration)
Step-by-Step Guide
- Cut wood into rectangular or square pieces to form the sides and tops of your gift boxes. You can make them different sizes to look like a pile of presents.
- Assemble the boxes using wood glue and screws. Make sure they are sturdy.
- Sand all the surfaces and edges smooth.
- Paint each box in a bright, festive color.
- Once dry, paint on details like ribbons and bows, or glue on actual outdoor-safe ribbon or twine.
- Apply a clear outdoor sealant to protect them from the elements.
- Stack them in your yard or on your porch for a festive display.
Sample Scenario
A homeowner wanted to create a focal point on their porch. They built three wooden boxes of varying sizes, like large, medium, and small. They painted the large box bright red with a yellow bow, the medium box a shimmering blue with a white ribbon, and the small box emerald green with a gold bow. Stacked together, they looked like giant, festive gifts waiting to be opened.
Decorating Techniques for Wooden Outdoor Xmas Decorations
Once you have your basic wooden shapes, you can enhance them with various decorating techniques. These methods can make your DIY creations stand out and last longer.
Painting and Staining Wooden Decorations
Paint is your best friend for adding color and personality to wooden decorations. For outdoor items, it’s crucial to use paints designed for exterior use. These paints are more durable and can withstand sunlight, rain, and temperature fluctuations.
- Outdoor Acrylic Paints
These are water-based and easy to clean up. They come in a huge range of colors and dry relatively quickly. For best results, apply a primer first, especially on raw wood. - Exterior Stains
Stains can enhance the natural beauty of wood while providing protection. They come in various colors, from light natural tones to deep browns and even festive colors like green or red. - Techniques
Consider simple techniques like sponging for a textured look, dry brushing for a distressed finish, or stenciling for precise patterns like snowflakes or stars.
Weatherproofing Your Wooden Creations
Protecting your wooden decorations from the weather is essential for their longevity. This means sealing them thoroughly.
- Priming
Always start with an exterior-grade primer. This helps the paint adhere better and provides an extra layer of protection against moisture. - Top Coats
After painting or staining, apply at least two coats of a clear, waterproof outdoor sealant. Polyurethane or a spar varnish are good choices. Ensure each coat is completely dry before applying the next. - Maintenance
Even with good sealing, it’s a good idea to inspect your decorations annually. Touch up any chipped paint or reapply sealant as needed, especially after harsh weather seasons.
Adding Embellishments
Embellishments can take your wooden decorations from simple to spectacular. Think about adding elements that enhance the festive theme.
- Faux Snow and Glitter
Use outdoor-safe glitter or fake snow spray to add sparkle. Apply it to painted areas or edges for a magical winter effect. - Garland and Lights
Small strands of outdoor-safe LED lights can be wrapped around larger decorations like trees or reindeer for a warm glow. Faux evergreen garland can also be attached. - Metal Accents
Small metal stars, bells, or hooks can be attached to wooden pieces for added texture and detail. Ensure they are rust-resistant.
Case Study: The Community Christmas Village
A neighborhood group decided to create a collaborative outdoor Christmas village using only wooden decorations. They organized workshops where residents of all ages could contribute. Some built simple wooden houses and churches from plywood. Others focused on creating wooden figures like snowmen and carolers. They used exterior paints and sealants extensively, with many decorations lasting for years. The project fostered community spirit and resulted in a charming, personalized display that locals looked forward to each year.
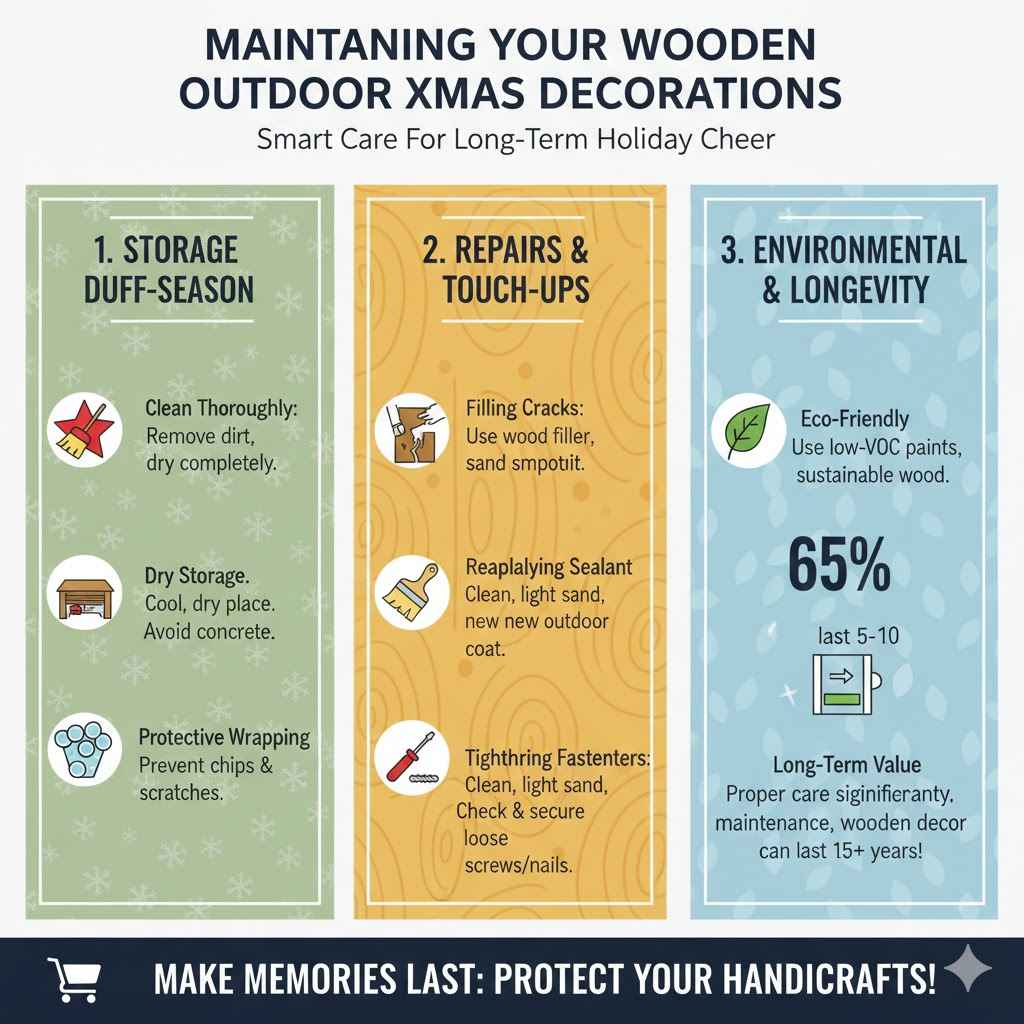
Maintaining Your Wooden Outdoor Xmas Decorations
To ensure your beautiful wooden decorations last for many holiday seasons, proper maintenance is key. This involves protecting them when not in use and making small repairs.
Storage During Off-Season
Storing your wooden decorations properly when the holidays are over can significantly extend their lifespan.
- Clean Thoroughly
Before storing, brush off any dirt, leaves, or debris. If they are particularly dirty, a gentle wash with mild soap and water, followed by thorough drying, might be needed. - Dry Storage
Store decorations in a dry, cool place. A garage, attic, or shed is usually suitable, but ensure it’s protected from moisture and extreme temperature swings. Avoid storing them directly on concrete floors, which can draw moisture. - Protective Wrapping
Wrap delicate or painted items in bubble wrap or old blankets to prevent chipping or scratching. Avoid using plastic wrap directly on painted surfaces, as condensation can form.
Repairs and Touch-Ups
Over time, weather can take its toll. Small repairs can keep your decorations looking their best.
Filling Cracks
Minor cracks or dents can be filled with wood filler. Once dry, sand it smooth and touch up the paint to match the surrounding area.
Reapplying Sealant
If you notice the sealant looks dull or is peeling in spots, it’s time for a refresh. Clean the surface, lightly sand it if necessary, and apply a new coat of outdoor sealant.
Tightening Fasteners
Check any screws or nails periodically. If they become loose due to wood expansion and contraction, tighten them to maintain the decoration’s structural integrity.
Environmental Considerations
When choosing materials and paints, think about the environment. Opt for low-VOC (volatile organic compound) paints and sealants when possible. Sustainable wood sources are also a good choice.
Statistic on Outdoor Decor Longevity
According to a survey on home holiday decorating, approximately 65% of outdoor decorations are expected to last for 5-10 years. However, this number significantly increases with proper maintenance and weatherproofing, with wooden decorations often lasting upwards of 15 years when cared for diligently.
Frequently Asked Questions
Question: What is the best type of wood for outdoor Christmas decorations?
Answer: Cedar and redwood are excellent choices due to their natural resistance to rot and insects. Pine and exterior-grade plywood can also be used if properly sealed and painted.
Question: Do I need to seal wooden decorations even if I paint them?
Answer: Yes, sealing is crucial. Paint can chip or wear away, exposing the wood. A good outdoor sealant provides a waterproof barrier that protects the wood and paint from moisture and UV damage.
Question: How can I make my wooden decorations stand up in the yard?
Answer: For flat decorations, you can attach wooden stakes to the back using screws or strong adhesive. For freestanding items like reindeer or trees, ensure they have a stable base, or weigh them down with rocks or sandbags hidden at the bottom.
Question: What kind of paint should I use for outdoor wooden decorations?
Answer: Exterior-grade acrylic paints are a great choice. They are durable, come in many colors, and are relatively easy to clean up. Always apply a primer first for best adhesion and protection.
Question: How can I store my wooden decorations to make them last longer?
Answer: Store them in a dry, cool place away from direct sunlight and moisture. Wrap them in protective material like bubble wrap or old blankets to prevent damage and keep them clean until next year.
Summary
Making your own Wooden Outdoor Xmas Decorations: DIY Ideas offers a creative and fulfilling way to celebrate the holidays. You’ve learned about choosing the right wood, gathering essential tools, and tackling popular projects like snowflakes, reindeer, and gift boxes. Remember to paint with exterior-grade products and seal everything well for lasting beauty. Simple maintenance will keep your handmade decorations charming year after year. Get creative and enjoy bringing your festive vision to life outdoors!