Best Way To Kill Wood Bees: Proven Solution
Quick Summary: The best way to kill wood bees involves proactive sealing of entry holes and targeted insecticide application, ideally during cooler mornings or evenings when they are less active. A DIY approach can be highly effective with the right tools and safety precautions.
Did you know that those busy bees you see buzzing around your wooden structures might be carpenter bees, and they can cause damage over time? It’s a common problem for homeowners, especially those with decks, eaves, or wooden fences. Seeing those perfectly round holes appear in your favorite wood can be frustrating, but don’t worry! As your woodworking mentor, I’m here to guide you through the most effective methods to tackle these industrious, yet sometimes destructive, visitors. We’ll explore proven solutions that are safe, straightforward, and designed for DIYers like you. Let’s get those bees handled so your wood can stay beautiful and intact!
Understanding the Carpenter Bee Problem
Carpenter bees are often mistaken for bumblebees, but they have a distinctive shiny, black abdomen (bumblebees have hairy abdomens). While they play a role in pollination, their tunneling habits can cause structural issues in wooden elements of your home. They drill perfectly round holes, about ½ inch in diameter, into soft, unpainted, or weathered wood. These holes are not for nesting in the traditional sense but are entry points for their tunnels, where they lay eggs. Over successive years, these tunnels can deepen and widen, weakening the wood and making it susceptible to rot and further insect infestation.
This tunneling behavior makes them a significant concern for homeowners. It’s not just about the visual damage; it’s about the long-term integrity of your wooden structures.
Why Carpenter Bees Tunnel into Wood
Nesting Sites: Female carpenter bees excavate wood to create galleries for their eggs.
Unfinished Wood: They prefer bare, unfinished, or weathered wood because it’s easier to drill into. Painted or stained surfaces are generally less appealing.
Sunlight and Warmth: They are often found in areas that receive plenty of sunlight, as this helps incubate their eggs.
Structural Weakness: Over time, repeated tunneling can weaken lumber, leading to potential structural problems.

The Most Effective Way to Kill Wood Bees: A Step-by-Step Guide
Tackling a carpenter bee infestation requires a combination of immediate action and preventative measures. Here’s a proven, beginner-friendly approach you can follow:
Step 1: Identify the Infestation and Entry Points
Before you do anything, it’s crucial to confirm you’re dealing with carpenter bees and locate their active tunnels.
Observation: Look for those tell-tale ½-inch perfectly round holes in wooden surfaces. You might also see fine sawdust accumulating directly below the holes, which is a byproduct of their drilling.
Active Bees: Observe the area during warmer parts of the day. You’ll likely see adult carpenter bees hovering around the holes or on the wooden surfaces. They are generally not aggressive when outside their tunnels but can become defensive if you disturb their nesting sites directly.
Timing is Key: The best time to identify active tunneling or apply treatments is during cooler parts of the day, such as early morning or late evening, or on cooler, overcast days. This is when the bees are less active and more likely to be inside their tunnels.
Step 2: Choose Your Treatment Method
There are several effective ways to eliminate carpenter bees. The “best” method often depends on the severity of the infestation and your comfort level with different approaches.
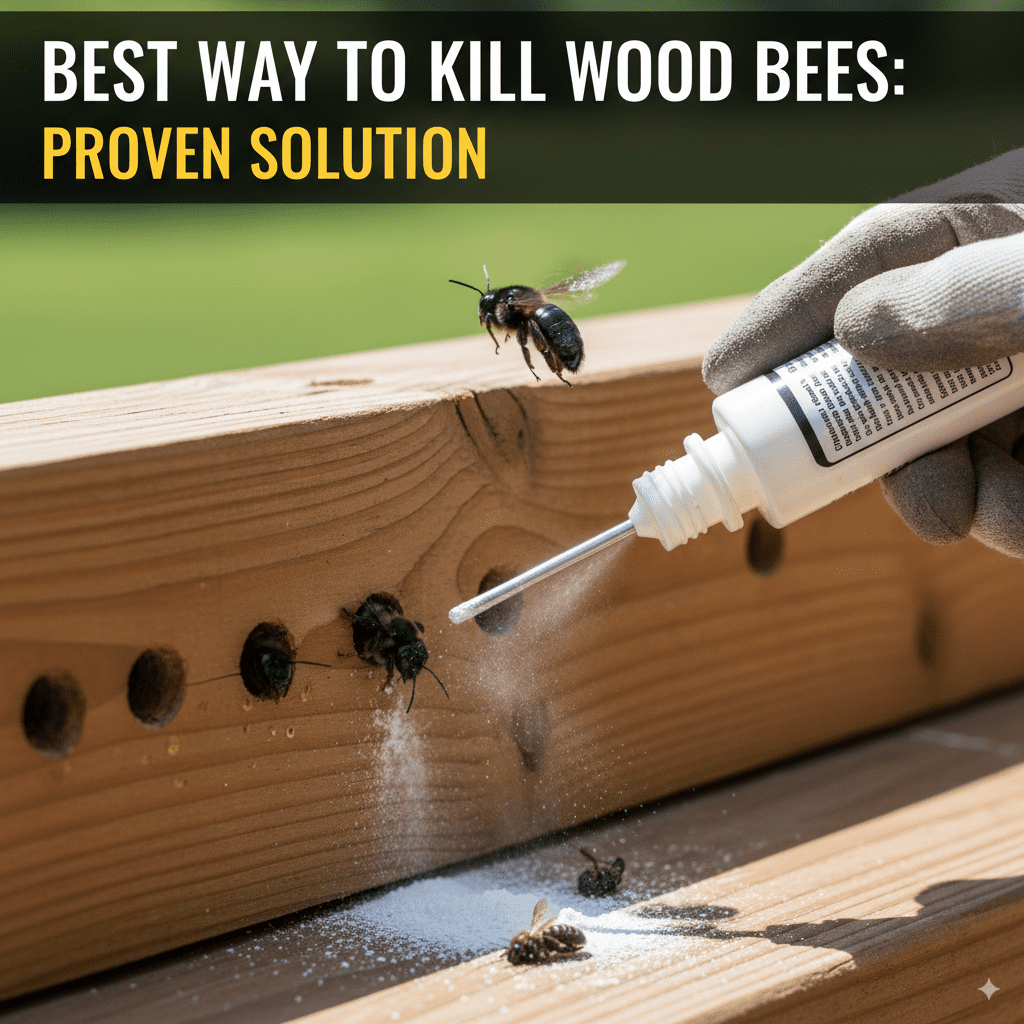
Method A: Insecticide Dusts and Sprays
This is often the most direct and effective way to kill carpenter bees present in their tunnels.
Tools and Materials:
Insecticide Dust: Such as boric acid, diatomaceous earth (food-grade is safe but less effective for bees), or specialized insecticidal dusts. Look for products containing pyrethroids like permethrin or cypermethrin, as these are highly effective against bees.
Dust Applicator (Bellows Duster): This allows you to puff the dust precisely into the entrance holes.
Safety Gear: Gloves, long sleeves, eye protection, and a dust mask or respirator.
Caulking Gun and Wood Filler/Caulk: For sealing the holes after treatment.
Procedure:
1. Gear Up: Put on your safety glasses, gloves, and mask.
2. Apply Dust: Using the dust applicator, puff a generous amount of insecticide dust directly into each visible entrance hole. Ensure the tunnels are well-filled. The bees will track the dust deeper into the tunnel and become exposed to it.
3. Wait and Observe: Leave the holes open for a few days to allow bees to come into contact with the dust. You might see dead bees near the holes.
4. Seal the Holes: Once you are confident the infestation is mostly eliminated (usually after a week or so), use your caulk gun to apply wood filler or caulk to seal the holes permanently. This prevents new bees from using the old tunnels and deters future nesting.
Important Note on Insecticides: Always read and follow the label instructions carefully. Some insecticides require specific application times or have limitations on where they can be used. For a more environmentally conscious option, consider Boric Acid, which is a natural mineral but still requires careful handling and application to avoid harming beneficial insects excessively. You can learn more about responsible pesticide use from the EPA’s Safe Pest Control webpage.
Method B: Natural and DIY Solutions
For those who prefer to minimize chemical use, several DIY options can be effective.
1. Boric Acid and Sugar Solution:
Mix: Combine 1 part Boric Acid powder with 3 parts powdered sugar.
Apply: Use a small spoon or brush to lightly dust this mixture into the entrance holes. The sugar attracts the bees, and they ingest the Boric Acid.
Follow-up: Seal the holes after a few days as described above.
2. Essential Oils (Less Proven, More Repellent):
Some essential oils, like citrus, tea tree, or peppermint oil, are believed to repel carpenter bees. While these are unlikely to kill an active infestation, they can be used as a deterrent in areas where you want to prevent future nesting.
Dilute: Mix 10-15 drops of essential oil with a cup of water.
Spray: Spray around potential nesting sites and existing (but treated/sealed) holes. Regular reapplication is necessary.
3. Household Soapy Water:
A simple mixture of liquid dish soap and water can be effective when applied directly to active bees or their tunnels.
Mix: Combine about 1 tablespoon of dish soap with 2 cups of water in a spray bottle.
Apply: Spray directly onto bees if you see them entering or exiting their holes. You can also try to spray it into the tunnel itself. The soap breaks down the bees’ exoskeleton, leading to dehydration.
Method C: Sealing and Prevention (The Long-Term Solution)
Once active bees are dealt with, preventing them from returning is crucial.
Seal All Holes: This is the most important step. Thoroughly caulk or wood-fill all existing and treated holes. Ensure a tight seal.
Paint or Stain: Carpenter bees dislike treated wood. Applying a fresh coat of paint or stain to all exposed wood surfaces can make them less attractive for future nesting. Pay close attention to undersides of eaves, railings, and any exposed end grain.
Use Hardwoods: If possible, when building new structures or making repairs, opt for hardwoods like oak or redwood, which are more resistant to drilling.
Install Barriers: Consider covering vulnerable wooden areas with metal flashing or screens, especially around the edges of decks and eaves.
Step 3: Post-Treatment and Prevention
After applying your chosen treatment and sealing the holes, your work isn’t entirely done.
Monitor: Keep an eye on the treated areas for any signs of renewed activity in the coming weeks and months.
Maintain Wood Surfaces: Regularly inspect your home’s wooden features for damage or areas that need re-sealing, painting, or staining. This proactive maintenance is your best defense against carpenter bees.
Tools and Materials at a Glance
Here’s a quick rundown of what you might need, depending on your chosen method:
| Item | Purpose | Notes |
|---|---|---|
| Insecticide Dust (e.g., Permethrin, Boric Acid) | Kills bees residing in tunnels | Choose based on effectiveness and preference for chemicals. |
| Dust Applicator (Bellows Duster) | Precisely applies dust into holes | Essential for dust treatments. |
| Caulking Gun | Applies caulk or wood filler | For sealing entry holes permanently. |
| Wood Filler or Exterior Caulk | Seals drilled holes | Choose a durable, paintable option. |
| Safety Gear (Gloves, Eye Protection, Mask) | Personal protection from dust and chemicals | Crucial for safe application. |
| Spray Bottle | For soapy water or natural repellents | For DIY solutions. |
| Paint or Stain | Prevents future nesting | Maintain wooden exteriors. |
When to Call a Professional
While DIY methods are often effective, there are situations where professional help is recommended:
Severe Infestations: If you have a widespread problem with hundreds of bee holes across multiple structures, a professional pest control service might be more efficient and safer.
Difficult-to-Reach Areas: If the nesting sites are in high places or areas that are unsafe to access, it’s best to hire an expert.
Allergies: If you or anyone in your household has bee sting allergies, avoid dealing with active bees yourself.
Structural Concerns: If you suspect the tunneling has caused significant structural damage, a professional can both treat the infestation and assess any necessary repairs.
Proactive Maintenance: Your Best Defense
The “best way to kill wood bees” also incorporates preventing them from coming back. Think of it as a two-pronged attack: eliminate the current problem and fortify your defenses for the future. Regular checks of your wooden structures, especially in spring when new bees are born, can save you a lot of trouble down the line.

Frequently Asked Questions (FAQ)
Q1: Are carpenter bees dangerous?
While carpenter bees can sting, they are generally docile. The female carpenter bee can sting, but she rarely does so unless directly threatened or handled. Males, which are often seen buzzing around aggressively, cannot sting. However, it’s always wise to maintain a respectful distance and wear protective gear when treating them.
Q2: How do I know if my wood is infested?
Look for perfectly round, ½-inch diameter holes in unpainted or weathered wood surfaces, especially horizontal ones like decks, fences, railings, and eaves. You might also notice fine sawdust directly beneath these holes. Active bees hovering around these spots are another clear sign.
Q3: Can I just ignore carpenter bees?
Ignoring them is not recommended, especially if the infestation is significant. Over time, repeated tunneling by new generations of bees can weaken wood structures, making them susceptible to rot and further damage. It can also lead to a cumulative weakening of the wood, compromising its integrity.
Q4: How long does it take for insecticide treatments to work?
Most insecticidal dusts and sprays begin working within 24-48 hours. You should see a reduction in bee activity within a few days to a week. However, it’s important to leave the holes open for about a week after application to ensure bees carrying pollen or returning to the nests ingest or contact the pesticide effectively.
Q5: Is it safe to seal the holes immediately after spraying insecticide?
It’s generally recommended to wait about a week after applying insecticide dust before sealing the holes. This allows the bees returning to the nest to come into contact with the dust. Sealing too soon might trap some bees inside, but others could emerge to create new holes or attempt to escape. The dust needs time to work on all bees that use the tunnel.
Q6: What is the most natural way to get rid of carpenter bees?
A natural approach involves sealing all wooden surfaces with paint or stain, as bees prefer raw wood. You can also use a mixture of Boric Acid and powdered sugar dusted into holes, or a strong soapy water solution sprayed directly into tunnels and onto active bees. Regular monitoring and maintenance are key to natural prevention.
Q7: Will sealing the holes kill the bees inside?
No, sealing the holes will not kill the bees inside. It will trap them, which could cause them to chew their way back out. The best practice is to treat the holes with an insecticide first, allowing the bees to come into contact with it, and then seal the holes once you are confident the infestation is under control.
Conclusion
Dealing with carpenter bees doesn’t have to be a daunting task. By understanding their behavior and employing the right strategies, you can effectively manage and prevent these wood-boring insects. Remember, the “best way to kill wood bees” is a combination of immediate, targeted treatment and long-term preventative measures. Always prioritize safety by wearing protective gear and following product instructions. With a little effort and the right approach, you can protect your wooden investments and enjoy your home without the worry of bee damage. Keep your tools ready, your caulk gun loaded, and your wood surfaces well-maintained – you’ve got this!