Can I Wash Paint Rollers in the Sink? Best Local DIY Hacks
Many people wonder, “Can I Wash Paint Rollers in the Sink? Best Local DIY Hacks” especially when they are new to painting projects. It can seem like a tricky step to clean your tools after painting.
Will it make a mess? Is it even okay to do? Don’t worry!
It’s actually a common question, and there’s a super simple way to handle it. We’ll walk through it step by step so you can get your rollers clean and ready for your next project without any fuss.
Can I Wash Paint Rollers in the Sink Best DIY Methods
This section is all about answering that big question: Can I Wash Paint Rollers in the Sink? Best DIY Methods for keeping your painting tools in good shape. Washing paint rollers the right way helps them last longer and ensures your next paint job looks smooth and professional.
We will explore why cleaning is important, how to do it safely, and what supplies you might need. This will help you save money and avoid buying new rollers every time.
Why Cleaning Paint Rollers Matters
Keeping your paint rollers clean after each use is important for a few reasons. First, it helps your rollers last much longer. When paint dries on the roller, it becomes stiff and less effective.
This can lead to uneven paint application on your walls. It also means you’ll have to buy new rollers more often, which costs money and creates waste.
Clean rollers ensure that you don’t mix old paint colors with new ones. Imagine painting a wall a light color, but traces of dark blue paint from your last project are still on the roller. This can ruin your fresh paint job.
Proper cleaning means your next paint job will be clean and true to the color you choose.
It’s also about the quality of your work. A well-maintained roller glides smoothly across surfaces. This gives you a professional-looking finish that you can be proud of.
Neglected rollers can leave streaks, bumps, or lint from the fabric, making your hard work look messy.
Saving Money and Resources
Think about how much money you spend on painting supplies over time. Rollers, while not the most expensive item, add up. By cleaning your rollers, you are essentially extending their life.
This means fewer trips to the store and more money saved for other parts of your home improvement projects. It’s a small step that has a big financial impact.
Beyond saving money, cleaning rollers is also good for the environment. Many disposable items end up in landfills. By reusing your rollers, you reduce the amount of waste you produce.
This is a simple way to be more eco-friendly in your home improvement habits. Every bit counts!
Furthermore, clean rollers perform better. A roller that has been properly cleaned will absorb paint evenly and apply it smoothly. This means less frustration for you and a better finish on your walls.
You’ll get the results you want without having to constantly touch up or redo sections.
What You Need to Wash Paint Rollers
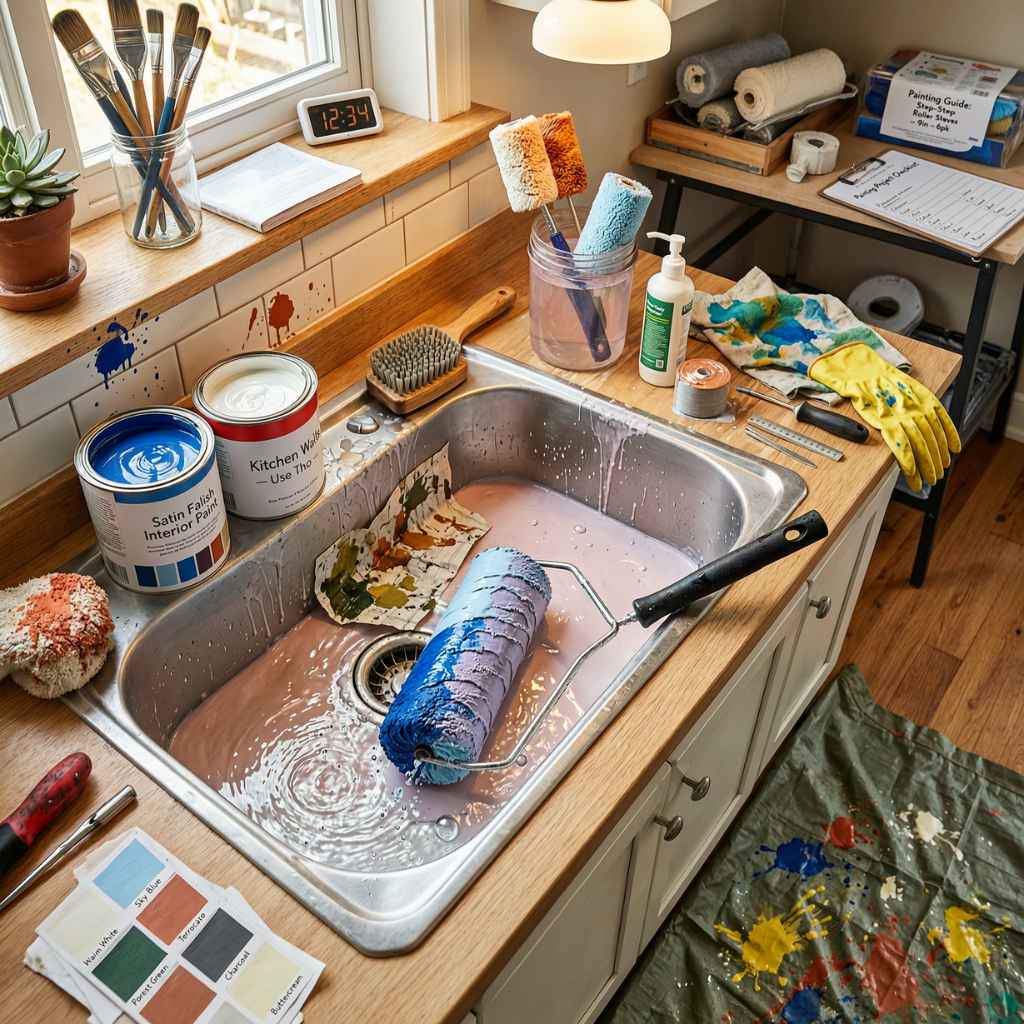
To successfully wash your paint rollers, you won’t need a lot of fancy tools. Most of the items you’ll need are probably already in your home. Having the right supplies makes the job much easier and more effective.
Let’s look at what will help you get the job done right.
Essential Supplies for Roller Cleaning
- Water Source: This is your primary tool. You’ll need access to running water, ideally from a faucet in a sink or utility tub. Cold or lukewarm water usually works best for most paint types.
- Sponge or Rag: You’ll use this to wipe off excess paint. A clean sponge or an old, lint-free rag works perfectly for this initial step.
- Scraper Tool: A putty knife or a dedicated paint roller scraper can be very helpful. It allows you to gently scrape off as much paint as possible before washing.
- Bucket or Container: A small bucket or even a sturdy plastic tub is useful for rinsing. This keeps the paint from immediately going down the drain in large clumps.
- Mild Soap or Detergent: For water-based paints like latex or acrylics, a little dish soap or a general-purpose detergent can help break down the paint.
- Gloves (Optional): If you prefer not to get your hands dirty, wearing a pair of disposable gloves is a good idea.
- Old Towels or Drop Cloths: You’ll need these to dry the rollers or protect your work area from drips.
Having these items ready makes the entire cleaning process smooth and efficient. You can tackle the task without needing a special trip to the hardware store.
Understanding Different Paint Types
The way you clean a paint roller depends heavily on the type of paint you used. Different paints have different bases and require different cleaning methods. Knowing your paint type is the first step to a successful cleanup.
This ensures you use the right approach and the right cleaning agents.
Water-Based Paints (Latex, Acrylic): These are the most common types of interior paints. They are water-soluble, meaning they can be cleaned up with water while they are still wet. This makes them the easiest to clean from rollers.
A little soap and water is usually all you need.
Oil-Based Paints (Enamel, Alkyd): These paints are more durable and often used for trim, doors, or high-traffic areas. They are not water-soluble. Instead, they require mineral spirits, paint thinner, or a specialized solvent for cleanup.
These solvents can be more harsh and require good ventilation.
Other Specialty Paints: Some paints, like epoxy or chalk paint, might have unique cleaning instructions. Always check the paint can for specific advice on cleanup for these types of products.
The key takeaway here is to identify your paint type before you start cleaning. This will guide your choice of cleaning agents and techniques, ensuring you don’t damage your roller or make the cleaning process harder than it needs to be.
Can I Wash Paint Rollers in the Sink Safely
Now that we know why cleaning is important and what we need, let’s talk about how to do it safely. Washing paint rollers in the sink is perfectly okay if you do it the right way. The main concern is preventing paint from clogging your pipes or creating a big mess.
By following a few simple steps, you can ensure your sink stays clean and your rollers get a good wash.
Step-by-Step Guide to Washing Rollers
Cleaning a paint roller is a straightforward process. It involves removing as much paint as possible before washing. This prevents excess paint from going down your drain.
Let’s walk through each step so you can achieve a clean roller every time.
- Scrape Off Excess Paint: Before you even think about water, grab a scraper tool or a putty knife. Gently scrape as much wet paint as you can from the roller cover. Work from the center outwards. You can scrape the paint into a trash can or a designated container.
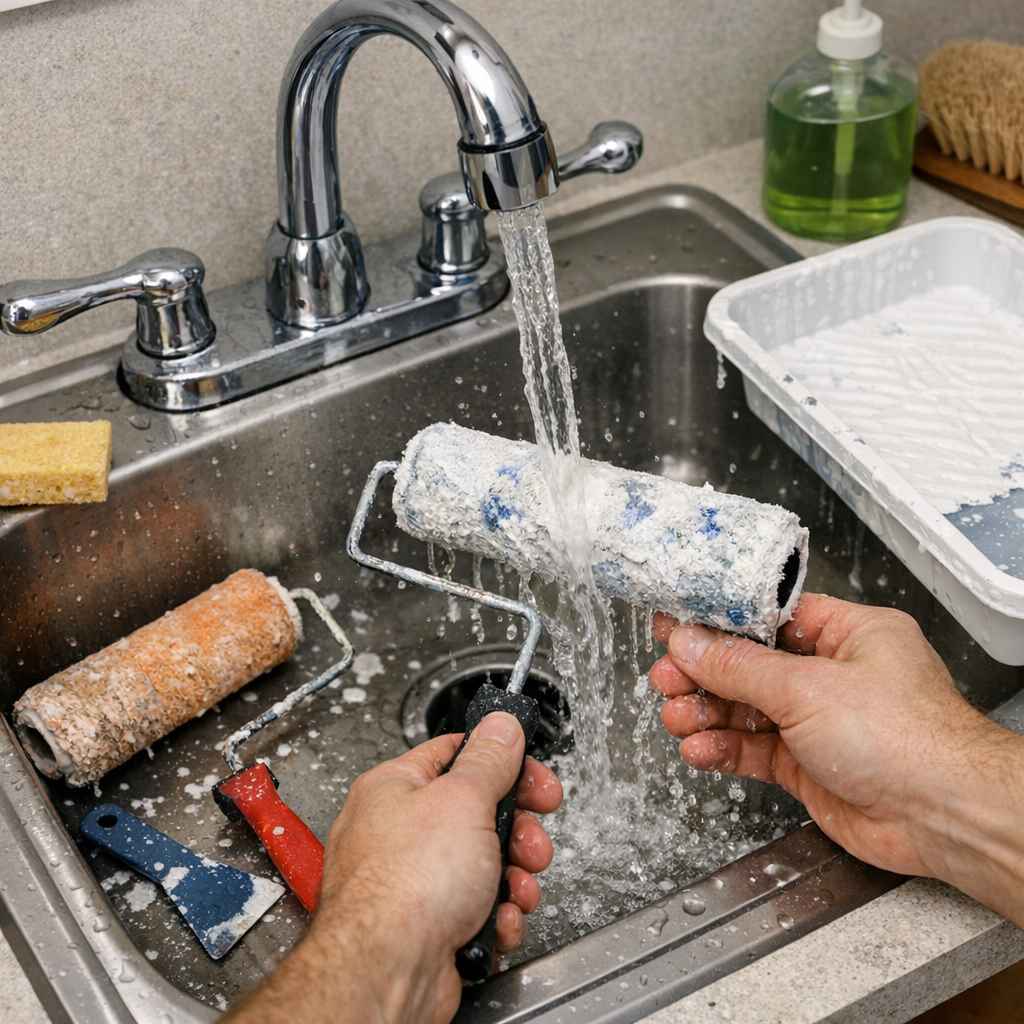
- Rinse with Water: Take the roller to your sink. Run water over it. Use your hands or a sponge to work the water through the roller fibers. You want to get out as much of the remaining paint as possible.
- Use Mild Soap (for Water-Based Paints): If you used latex or acrylic paint, add a small amount of mild dish soap to the wet roller. Gently work it in with your hands. Rinse thoroughly again. You should see the water run clear.
- Use Solvent (for Oil-Based Paints): For oil-based paints, you’ll need mineral spirits or paint thinner. Place the roller in a bucket with the solvent. Swirl it around. Use a rag to wipe off the dissolved paint. This may take a few rounds. Dispose of the solvent properly (never down the drain!).
- Final Rinse and Dry: Once the paint is gone, give the roller a final thorough rinse. Squeeze out as much water as possible. Then, roll the clean, damp roller over an old newspaper or a clean rag to absorb remaining moisture. Let it air dry completely.
Following these steps ensures that you remove most of the paint before washing. This protects your plumbing and makes the cleaning process much more effective.
Protecting Your Plumbing
A common worry is that washing paint rollers will clog your pipes. This is a valid concern if you just wash them directly without any preparation. The key is to remove the bulk of the paint before water gets involved.
Paint solids can accumulate and create serious blockages in your drains.
The scraping step is crucial here. By getting most of the paint off the roller into a trash can, you significantly reduce the amount of paint that goes down the drain. For water-based paints, the soap helps emulsify any remaining paint, making it easier to rinse away without clumping.
However, it’s still best to avoid washing large amounts of paint down the drain.
For oil-based paints, never pour the solvent or the paint-laden solvent down the drain. This can damage pipes and is bad for the environment. Instead, collect the dirty solvent in a sealable container.
Many local hazardous waste disposal sites accept used paint thinner. Check with your local municipality for proper disposal methods.
Consider using a rinse bucket for the initial wash. You can let the dirty water settle, then carefully pour off the clearer water, and dispose of the paint sludge in the trash. This provides an extra layer of protection for your plumbing.
Ventilation and Safety Precautions
When dealing with any painting supplies, safety is important. This is especially true when using solvents like mineral spirits or paint thinner for oil-based paints. These products release fumes that can be harmful if inhaled in large quantities or in poorly ventilated spaces.
Always ensure you are working in a well-ventilated area. Open windows and doors to allow fresh air to circulate. If you are working indoors and ventilation is limited, consider wearing a respirator mask designed for organic vapors.
This will protect your lungs from harmful fumes.
Gloves are also recommended, especially when working with solvents. They protect your skin from irritation and absorption of chemicals. Disposable nitrile gloves are a good choice for painting and cleaning tasks.
If you get paint or solvent on your skin, wash it off immediately with soap and water. If irritation occurs, seek medical attention. Always read the labels on your paint and cleaning products for specific safety warnings and handling instructions.
Dealing with Different Roller Covers
Not all roller covers are created equal, and some are easier to clean than others. The material and nap of the roller cover can affect how much paint it holds and how well it rinses out. Knowing the type of cover you have will help you clean it more effectively.
Woven vs. Woven Sleeves
Woven roller covers are generally more durable and can be cleaned and reused many times. They have a textured surface that holds paint well. When cleaning woven covers, ensure you work the water and soap (or solvent) deep into the fibers to remove all paint residue.
Woven sleeves are often made of synthetic fibers and are designed for specific finishes. They might be smoother and can be more delicate. These also clean well but require a gentle touch, especially when dealing with solvents, to avoid degrading the material.
The nap length also plays a role. Longer naps hold more paint, meaning you’ll have more to clean off. Shorter naps are easier to rinse but may require more passes to get all the paint out.
Foam and Specialty Rollers
Foam rollers are often used for smooth finishes and can be tricky to clean completely. While some can be washed, others are considered more disposable. If you choose to clean a foam roller, be gentle, as foam can break down easily.
You might need to rinse it multiple times to remove all paint from the pores.
Specialty rollers, like those for epoxy or textured finishes, might have unique cleaning needs. Always refer to the manufacturer’s instructions for these types of rollers. Some might be designed for single use after a certain point, making cleaning less practical or effective.
For most standard painting jobs with latex or acrylic paint, woven roller covers are the easiest to clean and reuse. They offer a good balance of performance and washability.
Tips for Extending Roller Life
To get the most out of your paint rollers, proper cleaning is key. But there are other little tricks that can help them last even longer. These tips focus on maintenance and storage.
- Clean Immediately: Don’t let paint dry on the roller. The sooner you clean it after painting, the easier it will be. Dried paint is much harder to remove.
- Use the Right Tools: A good scraper and a roller cleaner tool can make a big difference. These tools are designed to efficiently remove paint from the roller fibers.
- Proper Storage: After washing and drying, store your rollers properly. Some people wrap them in plastic wrap or put them in a sealed bag. This keeps dust and debris off the fibers.
- Inspect Regularly: Before each use, check your roller for any loose fibers or damage. Remove any debris that might be stuck in the nap.
By following these simple tips, your paint rollers will remain in great condition for many projects to come. This saves you money and ensures consistent quality in your painting.
Best Local DIY Hacks Can I Wash Paint Rollers in the Sink
This section focuses on practical, everyday solutions for cleaning your paint rollers. When you’re in the middle of a DIY project, you want simple, effective methods. We’ll look at some clever “hacks” that make washing rollers less of a chore and more of a quick task.
These are the tricks that seasoned DIYers use.
The “Bag and Swish” Method for Water-Based Paints
This is a fantastic hack for latex and acrylic paints. It’s quick, easy, and minimizes mess. It’s perfect for when you want to clean a roller without a lot of fuss or direct scrubbing.
Here’s how it works: After scraping off as much paint as possible, place the roller into a sturdy plastic grocery bag or a sealable plastic bag. Add a few inches of warm water to the bag, along with a small squirt of dish soap. Seal the bag tightly, making sure there’s some air inside to allow for movement.
Then, get ready to swish! Hold the bag and swirl it around vigorously. You can also gently press and knead the bag with your hands, allowing the water and soap to work into the roller fibers.
The motion will help dislodge the paint. After a minute or two of swishing, you should see the water turn milky with paint. Carefully open the bag, remove the roller, and give it a final rinse under running water until the water runs clear.
This method keeps the paint contained and makes for a much cleaner washing experience.
This hack is particularly useful because it prevents paint from splashing around your sink or tub. It also uses the movement of the water and soap to do most of the work for you. It’s a great way to get the roller clean enough for reuse without a lot of manual effort.
Just remember to dispose of the dirty water responsibly, perhaps after letting the paint solids settle to the bottom of the bag before discarding the water.
Using a Roller Cleaner Tool
For those who paint frequently, investing in a dedicated roller cleaner tool can be a smart move. These tools are designed specifically to make cleaning rollers easier and more thorough. They work by simulating the action of washing the roller without you having to touch the dirty surface directly.
A typical roller cleaner tool consists of a handle and a series of specialized brushes or combs. You fit the roller onto the tool and then move it up and down the cleaning mechanism. This action scrapes and brushes away the paint residue from the roller fibers.
Many tools also have a way to attach a hose for rinsing, allowing you to clean the roller while it’s still on the tool.
Using a roller cleaner tool can speed up the cleaning process considerably. It also helps to get the roller cleaner than manual washing, removing more paint and leaving the fibers less clogged. This can lead to a longer lifespan for your rollers and better performance on future projects.
If you’re serious about DIY and painting, a roller cleaner tool is a worthwhile addition to your toolkit. It takes the guesswork out of cleaning and ensures a more professional result every time. Remember to still scrape off excess paint first for the best results.
What Not to Do When Washing Rollers
There are a few common mistakes people make when trying to wash paint rollers. Avoiding these will save you time, effort, and potential damage to your plumbing or your tools. Here are some things to steer clear of.
- Pouring Large Amounts of Paint Down the Drain: This is the biggest no-no. Paint, especially latex paint once it starts to dry, can form a plastic-like coating that will clog your pipes. Always scrape and dispose of the bulk of the paint in the trash.
- Using Harsh Solvents on Water-Based Paints: There’s no need to use mineral spirits on latex or acrylic paint. Water and mild soap are sufficient and much safer. Using solvents unnecessarily can degrade the roller fibers.
- Scrubbing Too Vigorously on Delicate Rollers: Foam rollers or rollers with very fine naps can be damaged by aggressive scrubbing. Be gentle to preserve their structure and effectiveness.
- Leaving Rollers to Dry in a Damp State: This can lead to mildew or the paint residue hardening into an unusable mess. Ensure rollers are completely dry before storing them.
- Not Wearing Gloves (When Using Solvents): Solvents can irritate or dry out your skin. Always protect your hands when working with these materials.
By remembering these points, you can avoid common pitfalls and ensure your paint roller cleaning efforts are successful and safe.
Disposal of Dirty Water and Paint Residue
The proper disposal of paint residue and dirty wash water is crucial. It protects your plumbing and the environment. For water-based paints, you can often let the paint solids settle in a bucket.
Once the water clears, carefully pour the water into the sink or toilet. Then, the dried paint sludge in the bottom of the bucket can be scraped into the trash. Never pour undried paint sludge down the drain.
It’s better to err on the side of caution and dispose of paint solids in the solid waste.
For oil-based paints, disposal is more critical. Used solvents should never go down the drain. Collect the dirty solvent in a sealed, approved container.
You can often take this to a local household hazardous waste collection site. Check with your local waste management services for specific instructions. Some paint stores or hardware stores may also offer collection programs for paint-related waste.
Allowing paint to dry in a bucket before disposal is also a good strategy. Once the paint is solid, it can usually be thrown away with regular trash, provided it is not mixed with hazardous chemicals. This prevents it from becoming a liquid hazard in your garbage.
Can I Wash Paint Rollers in the Sink with Different Paints
The question “Can I Wash Paint Rollers in the Sink?” takes on different answers depending on the paint. The method of cleaning is heavily influenced by whether you are using a water-based or oil-based product. Understanding these differences is key to successful and safe cleaning.
Cleaning Water-Based Paints
When dealing with latex or acrylic paints, washing paint rollers in the sink is generally straightforward and safe. These paints are water-soluble, which means water is your primary cleaning agent. Start by scraping off as much excess paint as possible into a trash can.
Then, run the roller under cool or lukewarm water.
You can use your hands or a sponge to work the water through the roller fibers. A little bit of mild dish soap can help break down any remaining paint residue. Rinse thoroughly until the water runs clear and no more paint comes out.
You can use a roller cleaner tool for a more efficient wash. Ensure you squeeze out as much water as possible before air drying the roller completely. Properly cleaned, water-based paint rollers can be reused many times.
A common DIY hack for this type of paint is the “bag and swish” method mentioned earlier. It’s an effective way to contain the mess and use the agitation of the water to clean the roller. This method is very popular among home painters for its simplicity and effectiveness.
Cleaning Oil-Based Paints
Cleaning rollers used with oil-based paints (like enamels or alkyds) requires a different approach. These paints are not water-soluble and need solvents for cleanup. Common solvents include mineral spirits or paint thinner.
It’s crucial to use these products in a well-ventilated area, wearing gloves and possibly a respirator mask. Never pour these solvents down the drain.
After scraping off excess paint, you’ll need to use a solvent. Place the roller in a bucket with the solvent and swirl it around. Use a rag to wipe away the dissolved paint.
This process might need to be repeated several times until the roller is clean. The used solvent should be collected in a sealed container and disposed of properly as hazardous waste. After cleaning with solvent, some people like to give the roller a final rinse with soap and water to remove any lingering solvent smell and residue, ensuring it’s ready for the next use without the odor impacting a new paint job.
This type of cleaning requires more effort and caution.
A useful tip here is to use a separate container for the initial solvent wash, and then a second container with soapy water for a final rinse. This helps keep your main washing area cleaner and ensures all traces of solvent are removed. Always check the paint can for specific cleaning recommendations.
When to Consider Disposing of a Roller
While cleaning and reusing rollers is economical and eco-friendly, there are times when it’s better to let go. If a roller cover is heavily damaged, the fabric is unraveling, or it has become so stiff that it’s impossible to clean effectively, it’s time to replace it. Trying to salvage a roller that’s beyond repair will only lead to frustration and a poor paint finish.
For very inexpensive, disposable rollers, the effort of cleaning might not be worth it, especially if they’re already showing signs of wear. If you’ve used a roller with a very dark or vibrant color and are now painting a light color, even after thorough cleaning, a faint tint might remain. This could potentially transfer to your new paint job, especially if you don’t use a primer.
In such cases, a new roller might be the best option to guarantee a flawless finish.
Ultimately, trust your judgment. If a roller looks like it has seen better days and cleaning doesn’t restore its performance, it’s probably time for a new one. However, for most standard uses, proper cleaning will extend its life significantly.
Frequently Asked Questions
Question: Can I wash paint rollers in my kitchen sink?
Answer: Yes, you can wash paint rollers in your kitchen sink, but it’s important to do it correctly. Always scrape off as much excess paint as possible first. For water-based paints, use plenty of water and mild soap, and ensure you don’t pour large amounts of paint down the drain.
For oil-based paints, use solvents in a well-ventilated area and never pour the solvents down the drain.
Question: How do I know if a paint roller is clean enough to reuse?
Answer: A paint roller is clean enough to reuse if the fibers are free of paint residue and it feels pliable. When you rinse it, the water should run clear. If there’s still visible paint, or if the roller feels stiff, it needs more cleaning or might be beyond reuse.
Question: What happens if I don’t clean my paint rollers?
Answer: If you don’t clean your paint rollers, the paint will dry and harden on the fibers. This makes the roller stiff, ineffective, and difficult to use for future projects. It can lead to an uneven paint application and a poor finish on your walls.
Question: Can I reuse foam paint rollers after washing them?
Answer: Some foam rollers can be washed and reused, but they are often more delicate than fabric rollers and can degrade over time with cleaning. Be gentle when washing them, and if the foam starts to break down or become misshapen, it’s best to use a new one.
Question: How should I dispose of paint thinner used for cleaning oil-based paint rollers?
Answer: Paint thinner and other solvents used for oil-based paints should never be poured down the drain. Collect the used solvent in a sealed container and take it to a local household hazardous waste disposal site. Check with your local waste management services for specific disposal guidelines.
Summary
Cleaning paint rollers is a simple process that saves money and improves your painting results. By scraping off excess paint and using the right method for your paint type, you can easily wash rollers in the sink. Water-based paints clean up with soap and water, while oil-based paints need solvents.
Proper cleaning and storage will make your rollers last much longer, ready for your next DIY project.