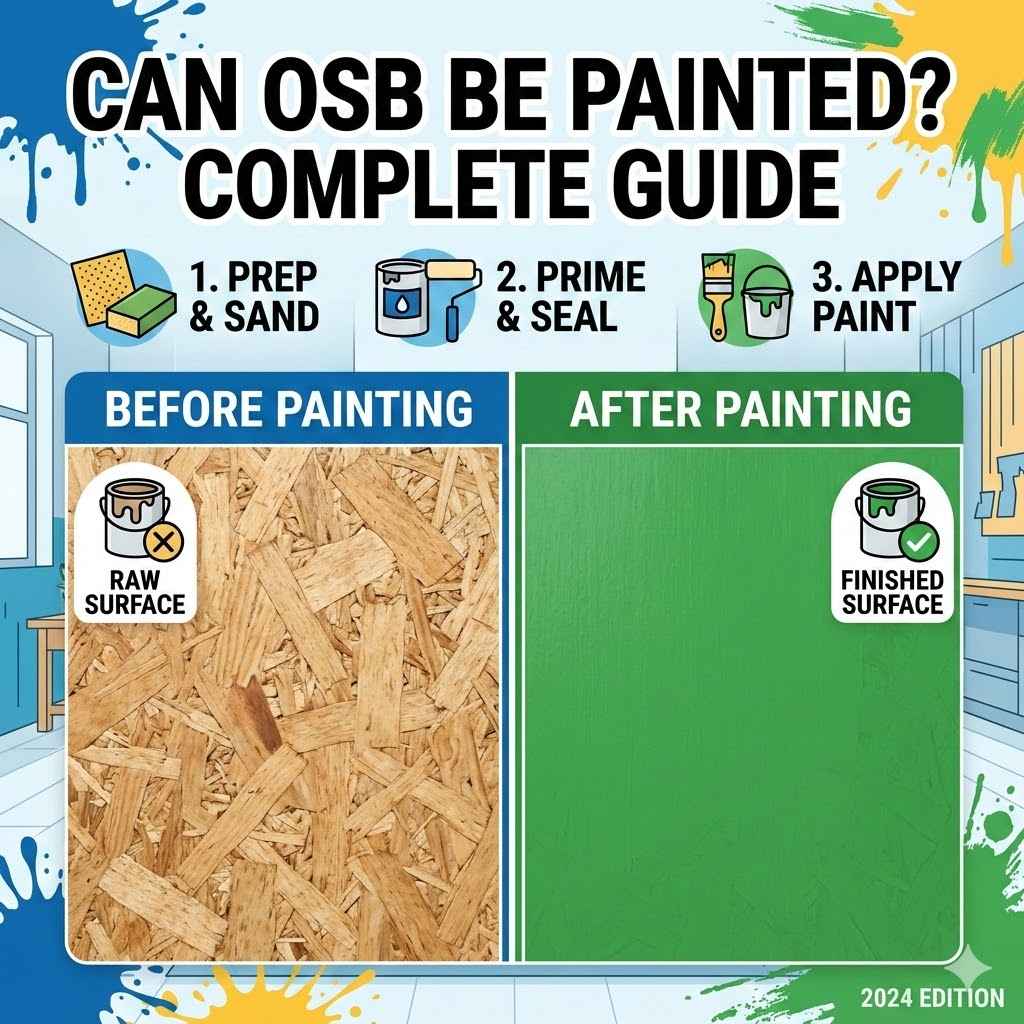
Can OSB Be Painted? Complete Guide
Many folks wonder if they can paint oriented strand board, or OSB. This is a common question, especially for DIYers starting new projects. Some people think OSB is too rough or uneven to look good with paint.
But it doesn’t have to be a tricky job. With the right steps, painting OSB can be simple and give you great results. Let’s walk through exactly how to do it, and you’ll see it’s easier than you think.
We’ll cover everything you need to know.
Painting OSB A Complete Guide
Oriented Strand Board, often called OSB, is a popular building material made from wood strands glued together. It’s strong and affordable, making it a go-to choice for subfloors, walls, and even furniture projects. However, its unique texture can make people hesitant about painting it.
The wood strands and the glue give it a rough, uneven surface that might seem difficult to cover smoothly. This guide will show you that with a few key techniques, you can achieve a beautiful painted finish on your OSB. We will explore preparation, priming, and painting methods.
What Is OSB And Why Paint It
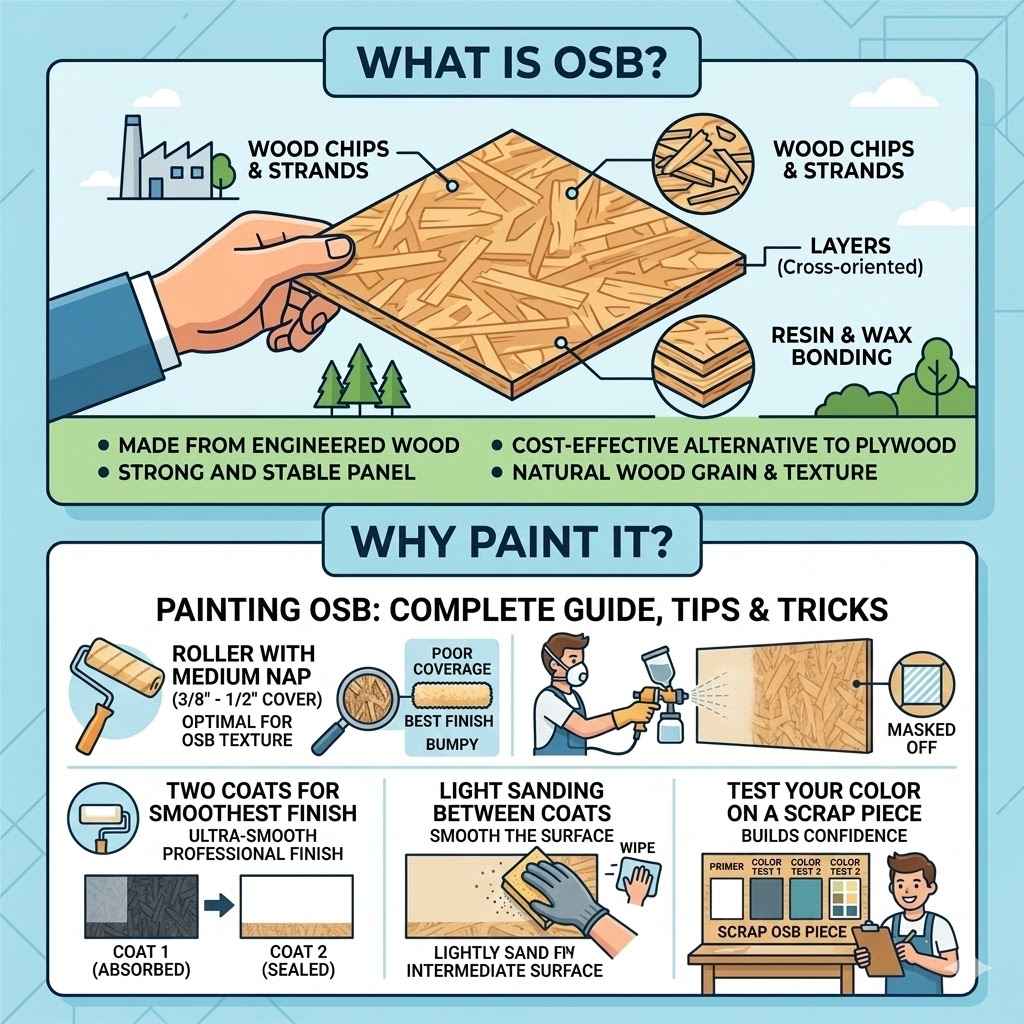
OSB is made from wood chips and strands that are arranged in layers and bonded with resin and wax. These strands are oriented in specific directions to create a strong, stable panel. It’s often seen as a less “finished” material compared to plywood, which can lead to questions about its suitability for decorative applications.
People choose to paint OSB for several reasons. It can transform a utilitarian surface into a decorative feature. Painting can also help seal the wood, offering some protection against moisture and wear.
Many DIYers want to use OSB for its cost-effectiveness and durability but desire a more polished look for their projects. For example, building shelving units or accent walls with OSB can save money. However, the raw OSB appearance might not fit the desired aesthetic.
Painting provides a solution to bridge this gap between affordability and visual appeal. It allows for customization in color and finish, making it adaptable to various design styles. The goal is often to achieve a smooth, uniform color that hides the underlying wood grain and strand patterns.

Preparing OSB For Painting
Getting OSB ready for paint is the most important step. Without proper prep, your paint job might not stick well or look smooth. This involves cleaning, sanding, and filling any gaps.
Skipping these steps can lead to peeling paint, an uneven texture, and a finish that looks unprofessional. Think of it like getting a canvas ready before you paint a masterpiece; the better the surface, the better the final artwork.
Cleaning The OSB Surface
Before you do anything else, make sure your OSB is clean. Dust, dirt, and any grease can prevent paint from sticking. You can clean it with a damp cloth or a mild detergent solution.
Just be sure to let it dry completely afterward. If the OSB is for an outdoor project, you might need to use a stronger cleaner to remove mildew or grime. Always test your cleaning solution in a small, inconspicuous area first.
For indoor projects, a simple wipe-down is usually enough. Use a cloth that doesn’t leave lint behind. If you’re cleaning a large area, a sponge mop can be helpful.
The key is to remove all loose debris. Once you’ve cleaned it, let the OSB air dry thoroughly. This is crucial because moisture can affect how the paint adheres later on.
Sanding For A Smoother Finish
OSB has a rough texture from the wood strands. Sanding helps to smooth this out. You don’t need to make it perfectly smooth like fine furniture, but a good sanding makes a big difference.
Use medium-grit sandpaper, like 100-grit, to start. Sand in the direction of the wood strands as much as possible.
After using the medium grit, you can follow up with a finer grit, like 150 or 220-grit sandpaper. This will help create a surface that the primer and paint can grip onto more effectively. Electric sanders, like orbital sanders, can speed up this process significantly, especially for larger areas.
Wear a dust mask and safety glasses while sanding to protect yourself from wood dust. Clean up all the dust after sanding; a vacuum with a brush attachment works well.
Filling Gaps And Imperfections
OSB panels can have small gaps or rough edges. You can use a wood filler or spackling paste to fill these. Apply the filler with a putty knife, pressing it into the imperfections.
Smooth it out so it’s level with the surface. Once the filler dries, you’ll need to sand that spot smooth. This creates a more uniform surface for painting.
For larger holes or gouges, you might need to use a wood filler that is designed for more substantial repairs.
When using wood filler, it’s important to let it dry completely according to the product’s instructions. This can take a few hours, depending on the depth of the fill and the humidity. Once dry, lightly sand the filled areas.
The goal is to make the repaired spots blend in seamlessly with the rest of the OSB surface. If you’re painting a dark color, minor imperfections might not be as noticeable, but for lighter colors, good filling is essential.
Priming OSB For Best Results
Priming is a vital step when painting OSB. It seals the wood, prevents it from soaking up too much paint, and creates a uniform surface for the topcoat. OSB is quite porous, meaning it can absorb a lot of liquid.
Without a good primer, you might end up using a lot more paint than you planned, and the finish might still look uneven.
Choosing The Right Primer
You need a good quality primer that will block stains and adhere well to wood. An oil-based primer or a stain-blocking primer is often recommended for OSB. These primers are excellent at preventing any tannins from the wood from bleeding through your paint color.
They also provide a good base for adhesion, meaning your paint is less likely to chip or peel later.
Water-based primers can also work, but ensure they are specifically designed for priming wood and offer good coverage. Look for terms like “stain-blocking” or “high-hiding” on the primer can. For a smoother finish, a primer with a finer consistency might be preferred.
Some people even use a drywall primer-sealer, as it can fill in some of the texture of the OSB and provide a good surface. Always read the primer can to make sure it’s suitable for wood panels.
Applying The Primer
Apply the primer in thin, even coats. Use a paintbrush for edges and corners, and a roller for larger flat areas. A medium-nap roller usually works well for OSB.
Make sure to cover the entire surface of the OSB, including any edges or cut ends. If the OSB is very porous, you might need two coats of primer to get complete coverage and sealing.
Allow each coat of primer to dry completely before applying the next, or before painting. This is crucial for proper adhesion. Lightly sand any rough spots after the primer has dried, then wipe away the dust.
This creates an even smoother surface for your paint. For a truly smooth finish, you might even consider using a spray primer, which can get into all the nooks and crannies.
Painting Your OSB Project
Once your OSB is properly prepared and primed, it’s time to paint. The actual painting process is similar to painting any other surface, but keeping a few things in mind will help you get the best look.
Selecting Paint Types
You can use various types of paint on primed OSB. Latex or acrylic-based paints are common and work well for interior projects. For areas that might see more wear, such as a garage floor or a workshop wall, consider using a durable paint like an enamel or a floor paint.
These offer extra protection against scuffs and moisture.
If you want a very smooth finish, satin or semi-gloss paints tend to hide imperfections better than matte finishes. However, if you want to embrace the texture of the OSB, a matte finish can be quite appealing. The choice of paint also depends on the final look you are trying to achieve.
For a rustic look, you might use a chalk paint or a milk paint, which are designed to work well with textured surfaces.
Techniques For Application
Apply your paint in thin, even coats. Just like with primer, using a roller for large areas and a brush for details is effective. Avoid applying paint too thickly, as this can pool in the texture and create an uneven look.
Two or three thin coats are usually better than one thick coat. Always allow each coat to dry thoroughly before applying the next.
For a really smooth, modern look, you might consider using a fine-foam roller, which can provide a more uniform finish. If you are aiming for a textured or deliberately rustic look, you can experiment with different brush strokes or even a rag-rolling technique. The goal is to build up the color and coverage gradually until you achieve your desired outcome.
Remember to clean your tools immediately after use with water for latex paints.
Achieving Different Finishes
You can create a variety of finishes on OSB. A solid color paint job is the most common and can make the OSB look like any other painted wall or furniture piece. For a more unique look, consider painting the OSB in a color that contrasts with the natural wood tones, or even a bold, vibrant shade to make a statement.
Another option is a two-tone effect, where you might paint the strands in one color and the base material in another, although this is very labor-intensive. For a more industrial or modern feel, you could paint the OSB a dark color like black or charcoal gray. Alternatively, for a farmhouse or rustic style, you might use a whitewash or a light, airy color that still allows some of the OSB texture to show through.
Experimentation is key to finding the look you love.
Can OSB Be Painted Complete Guide Examples
Let’s look at some real-world applications of painting OSB. Many people have successfully transformed this humble building material into stylish features in their homes and projects. These examples show the versatility and potential of a well-executed OSB paint job.
DIY Shelving Units
Many DIY enthusiasts use OSB to build custom shelving units. Instead of leaving the OSB raw, they prime and paint it. This turns what could be a purely functional item into a piece of furniture that matches their decor.
For instance, a blogger painted a series of OSB shelves in a bright blue to add a pop of color to a garage workshop. The shelves were sanded smooth, primed with an oil-based primer, and then coated with two layers of semi-gloss latex paint. The result was a durable and attractive storage solution that cost significantly less than buying pre-made shelves.
Another example involved building a media console. The builder used OSB for the main structure and then painted it a deep charcoal gray. After thorough sanding and priming, they applied three coats of acrylic paint.
They even added a protective clear coat to the top surface to prevent scratches. The finished console looked like a high-end piece, proving that OSB can be dressed up to look very sophisticated. The key was the careful preparation and application of multiple thin coats of paint.
Accent Walls And Paneling
Using OSB for accent walls is a growing trend. When painted, it can mimic the look of shiplap or other types of wood paneling, but at a fraction of the cost. A common technique is to install OSB panels, fill the seams between them with caulk, and then paint the entire wall a uniform color.
This creates a seamless, modern paneled look.
One homeowner transformed a plain bedroom wall by installing OSB sheets horizontally. They filled the joints between the sheets with spackling paste, sanded it smooth, and then applied a matte white paint. The result was a textured, visually interesting wall that provided a neutral backdrop for their furniture.
This project highlights how painting can completely disguise the utilitarian nature of OSB and elevate it to a decorative element. The texture provided a subtle visual interest that plain drywall would not offer.
Furniture And Cabinetry
OSB can also be used for making simple furniture pieces like coffee tables, benches, or even cabinet doors. For these applications, a very smooth finish is often desired. This requires extra attention to sanding and priming.
A common scenario is using OSB for cabinet doors in a workshop or garage. These doors are then painted to match the surrounding cabinets or to provide a clean, uniform look.
A furniture maker used OSB to create the sides and top of a desk. They painstakingly sanded the surface to achieve a near-smooth finish, applied several coats of primer, and then finished it with a durable enamel paint in a vibrant green. This created a custom desk that was both sturdy and stylish, demonstrating that OSB can be used for visible furniture parts with the right finishing techniques.
The finished desk looked as professional as any piece made from more expensive materials.
Can OSB Be Painted? Complete Guide Pros And Cons
Painting OSB offers a lot of advantages, but it’s also good to be aware of potential drawbacks. Understanding these can help you decide if it’s the right choice for your project and manage your expectations.
Advantages Of Painting OSB
- Cost-Effectiveness: OSB is generally much cheaper than plywood or solid wood. Painting allows you to use this budget-friendly material for visible applications without sacrificing aesthetics. You get a finished look for less money. This makes it accessible for DIYers and those on a tight budget. The savings can be significant, especially for large projects like accent walls or built-in furniture.
- Versatility In Design: Once painted, OSB can be any color you desire. This allows for complete customization to match your home’s decor or your personal style. You are not limited by wood grain patterns or natural wood colors. Whether you want a bold statement color, a subtle neutral, or a specific shade to complement other elements in the room, painting gives you that freedom.
- Uniform Appearance: With proper preparation and priming, painting can create a smooth, uniform surface that hides the visible wood strands and glue. This is ideal for achieving a modern, clean look, especially when compared to the natural, somewhat rough appearance of unfinished OSB. It can make OSB look like any other finished building material.
- Protection And Durability: A good paint job can offer some protection to the OSB, making it more resistant to moisture and minor wear and tear. While not as durable as some specialized finishes, it certainly improves the longevity of the material for many interior applications. The paint acts as a barrier, sealing the wood surface.
Challenges When Painting OSB
- Surface Texture: The inherent texture of OSB, with its visible wood strands, can be challenging to fully conceal. Even with sanding and priming, a slight texture might remain, which may not be desirable for everyone. Achieving a perfectly smooth, glass-like finish can require extensive sanding and multiple coats of primer and paint, adding time and effort to the project.
- Porosity: OSB is very porous. This means it will absorb a lot of primer and paint. You’ll likely need more product than you would for smoother materials like drywall or pre-finished wood. This can increase the overall cost of materials, though it often remains less expensive than alternatives. Planning for extra paint and primer is essential.
- Potential For Swelling: OSB can be sensitive to moisture. If it gets too wet during the preparation or painting process, it can swell and warp. It’s important to control humidity and ensure the material is dry between steps. This is particularly true if you are using water-based products. Avoid applying excessively wet coats of primer or paint.
- Edge Treatment: The edges of OSB panels can be quite rough and absorbent. They require careful filling and sanding to look neat, and often need extra attention with primer and paint to ensure they are fully covered and don’t look unfinished. The exposed wood fibers on the edges can absorb paint differently than the face of the panel.
Painting OSB Complete Guide Tips And Tricks
Here are some extra tips to help you get the best possible paint job on your OSB projects. These are based on common experiences and can make a big difference in the final outcome.
- Use a Quality Roller With A Medium Nap: For applying both primer and paint, a roller with a medium nap (around 3/8 to 1/2 inch) is usually best. This helps to get into the slight texture of the OSB without applying too much paint at once. Avoid rollers that are too short, as they might not cover the texture well, and avoid very long naps, which can create an overly “bumpy” finish.
- Consider Spraying For The Smoothest Finish: If you have access to a paint sprayer and are comfortable using one, this can provide the smoothest, most professional-looking finish on OSB. Spraying allows for very thin, even coats that can easily cover the texture and leave a consistent surface. Remember to mask off surrounding areas carefully to avoid overspray.
- Two Coats Of Primer Are Often Necessary: Don’t skimp on primer. Because OSB is so absorbent, a second coat of primer will often seal the surface much better, ensuring a more uniform color and reducing the number of paint coats needed. This is especially true if you are painting over a very dark OSB or trying to achieve a very light color.
- Light Sanding Between Coats: After each coat of primer and each coat of paint (except the final one), lightly sand the surface with a fine-grit sandpaper (220-grit or higher). This will knock down any tiny bumps or drips and create an even smoother surface for the next coat. Be sure to wipe away all dust after sanding.
- Test Your Color On A Scrap Piece: Before you paint your main project, get a scrap piece of OSB and go through all the preparation, priming, and painting steps. This allows you to test your color choice, practice your technique, and ensure you are happy with the final look without risking your main project. It’s a great way to build confidence.
Frequently Asked Questions
Question: Can I paint OSB directly without priming
Answer: While you can technically paint OSB without priming, it is strongly discouraged. OSB is very porous and will absorb a lot of paint, leading to an uneven finish and higher paint consumption. Priming is essential to seal the surface, prevent bleed-through, and ensure good adhesion for a lasting paint job.
Question: What kind of paint is best for OSB
Answer: For most interior projects, latex or acrylic-based paints work well. For areas requiring more durability, consider enamel paints or floor paints. Satin or semi-gloss finishes tend to hide imperfections better than matte finishes.
Always ensure the paint is suitable for wood surfaces.
Question: How do I deal with the rough texture of OSB
Answer: Proper preparation is key. Sand the OSB to smooth it down. Use a good quality primer to seal the surface.
Applying multiple thin coats of paint, and potentially light sanding between coats, will help achieve a smoother finish. Some texture might remain, depending on the level of preparation.
Question: Can I use OSB for outdoor projects and paint it
Answer: OSB is not ideal for continuous outdoor exposure as it can degrade when exposed to moisture and weather. However, if it’s for a covered area or a project that will be thoroughly sealed and painted, it might be possible. You would need to use exterior-grade primers and paints, and ensure the OSB is properly protected from direct water contact.
Question: Will paint cover the wood strand pattern on OSB
Answer: Yes, with proper priming and multiple coats of paint, the wood strand pattern can be effectively covered. The goal of priming is to create a uniform surface, and good quality paint applied in thin layers will obscure the underlying texture and pattern.
Summary
Yes, you absolutely can paint OSB. This comprehensive guide shows you how to prepare the surface, prime it effectively, and apply paint for a beautiful finish. By following these steps, you can transform OSB into a decorative material for walls, furniture, and more.
Your projects will look great and last longer with a proper paint job. So go ahead and give it a try!