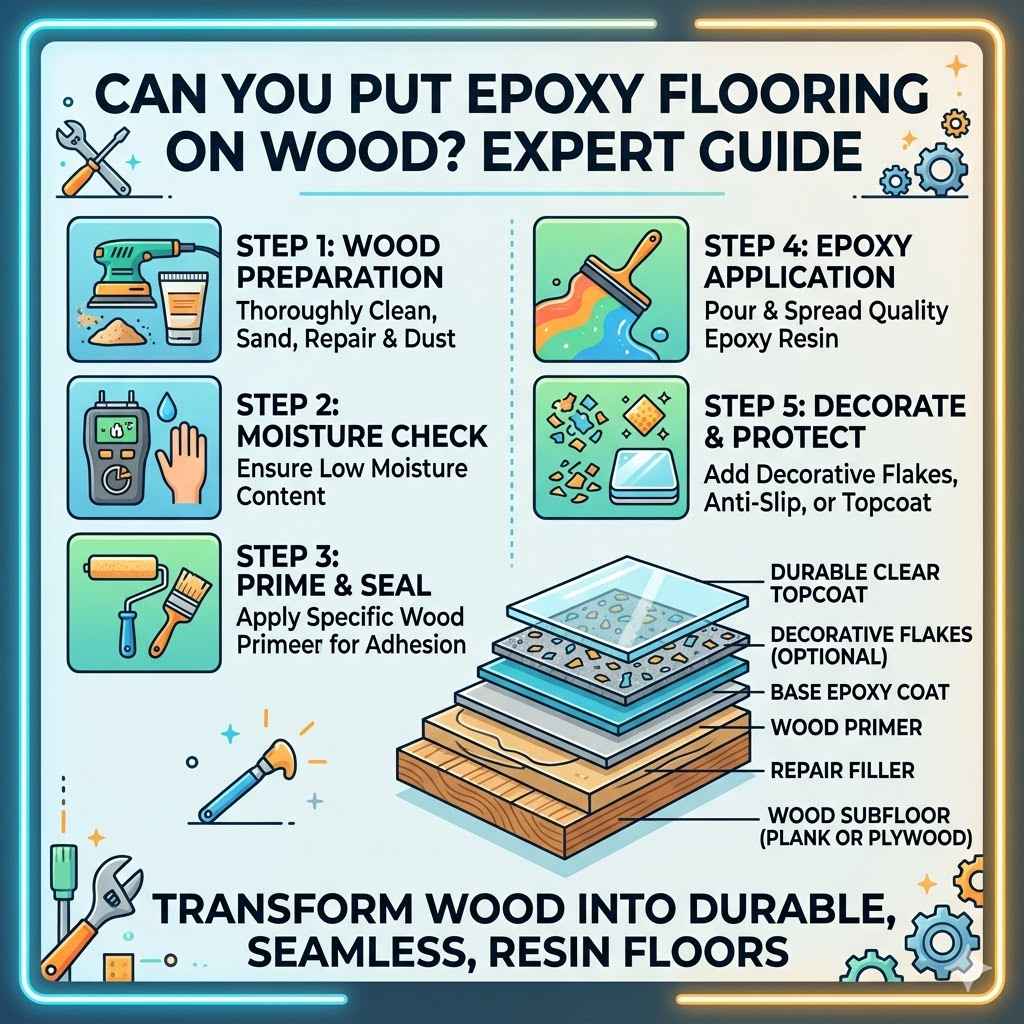
Can You Put Epoxy Flooring on Wood? Expert Guide
Lots of folks wonder if they can add that shiny, tough epoxy finish to their wood floors. It sounds like a great idea, right? But sometimes, mixing new things with old things can seem a bit tricky, especially for someone just starting out.
Don’t worry, though! This guide is here to make it super simple. We’ll walk you through every step, making sure you know exactly what to do.
Get ready to learn how easy it is to make your wooden surfaces look amazing with epoxy.
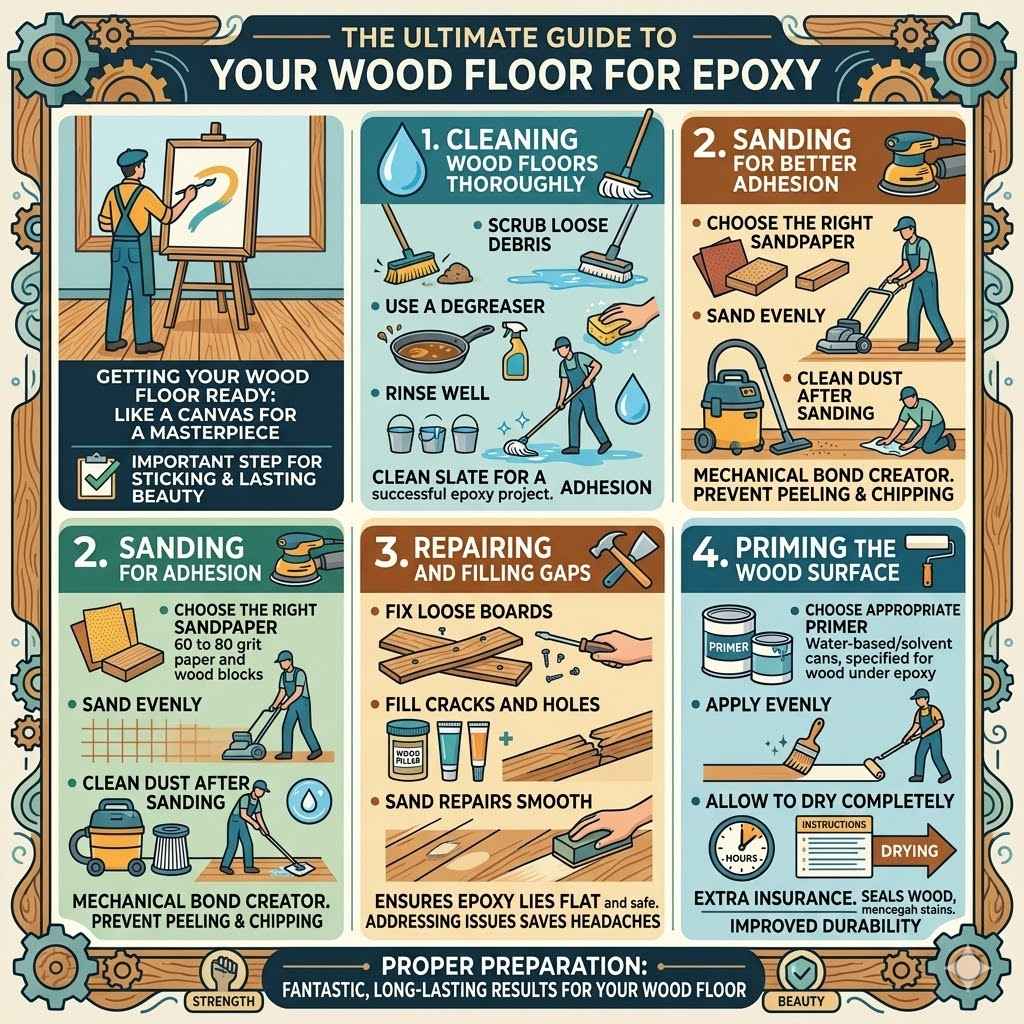
Preparing Your Wood Floor for Epoxy
Getting your wood floor ready is the most important step. It’s like getting a canvas ready before you paint a masterpiece. If you don’t prep well, your epoxy might not stick right or could end up looking bumpy.
We need to make sure the wood is clean, smooth, and ready to bond with the epoxy. This part makes sure your new floor lasts a long, long time and looks fantastic.
Cleaning Wood Floors Thoroughly
Before anything else, your wood floor needs a really good cleaning. Think of it as giving it a bath to wash away all the dirt, grease, and old wax. If there’s anything on the surface, the epoxy won’t be able to stick well.
We want a clean slate for our new floor finish.
- Scrub away any loose debris. This means sweeping up dust bunnies and stray bits of wood or anything else that might be on the floor. Use a stiff broom or a good vacuum cleaner.
- Use a degreaser. Kitchens and garages often have grease. A special degreaser made for floors will cut through that oily layer. Follow the product instructions carefully.
- Rinse well. After using any cleaner, you must rinse the floor completely. Any soap residue left behind will stop the epoxy from sticking. Use a clean mop and fresh water several times.
A clean floor is the first big step to a successful epoxy project. It’s simple but makes a huge difference in how well your epoxy adheres.
Sanding for Better Adhesion
Sanding is like creating a rough surface so the epoxy has something to grip onto. Smooth, glossy wood is too slick for epoxy. Sanding makes tiny scratches that the epoxy can get into, forming a strong bond.
This process helps prevent peeling and chipping later on.
- Choose the right sandpaper. For most wood floors, a grit of 60 to 80 is a good starting point. You want it rough enough to create a good surface but not so rough that it leaves deep gouges.
- Sand evenly. Go over the entire floor with a floor sander or a good orbital sander. Make sure you cover every spot. Overlap your sanding strokes to avoid missing any areas.
- Clean dust after sanding. Sanding creates a lot of fine dust. Use a shop vacuum with a good filter to pick it all up. You might need to wipe the floor down with a tack cloth afterwards to catch the last bits of dust.
- Sanding is key. It’s the mechanical bond creator. If you skip this, your epoxy project is much more likely to fail, meaning it might start to peel or lift off the wood surface over time.
Repairing Damage and Filling Gaps
Wood floors often have small issues like cracks, holes, or loose boards. These need to be fixed before you apply epoxy. Epoxy is a coating, not a filler that fixes structural problems.
Addressing these problems now saves you headaches later.
- Fix loose boards. If any boards are wobbly, secure them with screws or nails. Make sure the fasteners are sunk below the wood surface.
- Fill cracks and holes. Use a wood filler or a strong wood epoxy putty. Choose a product that dries hard and can be sanded smooth. For larger gaps, you might need multiple applications.
- Sand repairs smooth. Once the filler is dry, sand it down so it is level with the rest of the floor. This ensures a smooth, even surface for the epoxy coating.
These repairs are vital. They ensure the epoxy lies flat and that the finished floor is smooth and safe. Small issues, if ignored, can become big problems under a hard epoxy coating.
Priming the Wood Surface
A primer is like a special base coat that helps the epoxy stick even better. It also seals the wood, preventing stains or tannins from bleeding into the epoxy. Think of it as extra insurance for a long-lasting finish.
Not all epoxy kits require a primer, but it’s often recommended for wood.
- Choose an appropriate wood primer. Look for a water-based or solvent-based primer that is designed for use under epoxy coatings. Some epoxy systems have their own recommended primers.
- Apply the primer evenly. Use a roller and brush to apply a thin, even coat of primer. Avoid puddles or thick spots.
- Allow primer to dry completely. Follow the manufacturer’s instructions for drying times. This might take a few hours or even overnight, depending on the product and conditions.
A primer can greatly improve the durability and appearance of your epoxy floor. It’s an extra step that pays off. It ensures a uniform surface for the epoxy to bond to and helps prevent discoloration.
Understanding Epoxy Types for Wood
Not all epoxy coatings are the same. For wood, you need to pick the right kind to make sure it works well and lasts. The type of epoxy you choose will affect how it looks, how strong it is, and how easy it is to apply.
Let’s look at the common options.
Water-Based vs. Solvent-Based Epoxy
This is a key choice. Water-based epoxies are easier to clean up with water and have less fumes. Solvent-based epoxies are usually tougher and more resistant but require special solvents for cleanup and have stronger smells.
- Water-based epoxy. These are good for DIY projects because they are less harsh. They are applied with rollers and brushes, and spills can be wiped up with water. They offer good durability for home use.
- Solvent-based epoxy. These are often found in industrial settings due to their superior strength and chemical resistance. They have a stronger odor and require mineral spirits or other solvents for cleanup.
For most home applications on wood, a high-quality water-based epoxy can be a great choice. It offers a good balance of performance and ease of use. Always check the product description to see if it’s suitable for wood and your intended use.
100% Solids Epoxy Systems
These are the most durable types of epoxy. They contain very little or no water or solvents. This means they form a very thick, strong, and protective layer.
They are often used in garages and workshops where heavy traffic and chemicals are common.
- Thick and durable. 100% solids epoxy creates a much thicker coating than water-based systems. This makes it more resistant to chips, cracks, and wear.
- Professional application. These are often harder for beginners to apply because they cure quickly and require careful mixing. They can be more forgiving with careful planning.
- Excellent chemical resistance. If you need a floor that can withstand oils, gasoline, or other harsh chemicals, 100% solids epoxy is usually the best option.
When considering Can You Put Epoxy Flooring on Wood? Expert Guide, understanding these differences helps you select the right product. A 100% solids epoxy is a fantastic, long-lasting choice for wood if you are prepared for a more involved application process.
Garage Floor Kits and Their Suitability
Many kits sold for garages work well on wood too. They usually come with the epoxy, hardener, and sometimes decorative flakes. These kits are designed to be user-friendly, making them a good option for DIYers.
- Convenience. Garage floor kits are convenient because they include most of what you need. They often have clear instructions that are easy to follow.
- Standard performance. Most garage kits offer good durability and a nice finish for typical home use. They are designed to handle foot traffic and light vehicle weight.
- Check wood suitability. Always ensure the kit is suitable for application on wood. Some kits might have specific instructions or warnings for wood surfaces.
Using a garage floor epoxy kit can simplify the process of applying epoxy to wood. They are formulated for performance and often provide a very attractive result. They are a good starting point for learning about epoxy application.
The Application Process for Wood Floors
Applying epoxy to wood requires careful steps to ensure a smooth, strong finish. It’s a bit like painting, but with a much tougher outcome. We need to mix, apply, and let it cure properly.
This section breaks down the actual steps.
Mixing the Epoxy Components
This is a critical step. Epoxy comes in two parts: the resin and the hardener. You must mix them in the exact ratio recommended by the manufacturer.
Mixing incorrectly can lead to the epoxy not hardening properly, or curing too fast.
- Read instructions carefully. Every epoxy product has specific mixing ratios and times. Do not guess; follow the label exactly.
- Use clean containers. Mix the epoxy in a clean bucket or container. Using a dirty container can introduce contaminants that affect the cure.
- Mix thoroughly. Use a mechanical mixer attached to a drill or a stir stick. Mix for the recommended time, scraping the sides and bottom of the container to ensure all components are fully incorporated.
Improper mixing is one of the most common reasons for epoxy failure. Take your time with this step. It’s better to mix a little longer than not long enough to ensure a good, hard cure.
Applying the Epoxy Coating
Once mixed, you need to apply the epoxy quickly and evenly. You usually work in sections to avoid the epoxy hardening before you can spread it. A roller is typically used for most of the floor.
- Work in small sections. Pour out a manageable amount of mixed epoxy onto the floor. Then, use a roller to spread it thinly and evenly across that section.
- Maintain a wet edge. As you move to the next section, overlap the edge of the previously coated area while it is still wet. This helps avoid visible lines or seams in the finished floor.
- Use a brush for edges. For areas along walls or around fixtures, use a good quality brush to apply the epoxy neatly.
The application must be consistent. Uneven application can lead to an uneven finish. Work steadily and with purpose to get the best results.
The goal is a smooth, uniform layer over the entire surface.
Adding Decorative Flakes or Anti-Slip Additives
Many people like to add decorative flakes or an anti-slip additive for both looks and safety. Flakes are broadcast into the wet epoxy, while anti-slip grit is mixed in or broadcast over a topcoat.
- Broadcast flakes for looks. If you are using decorative flakes, toss them into the wet epoxy coating. Don’t overload the floor; a light, even distribution looks best.
- Apply anti-slip for safety. For areas that might get wet, like a workshop, adding an anti-slip agent is wise. It creates a textured surface that provides better traction.
- Consider topcoat needs. Some flakes and additives require a clear topcoat for protection and to seal them in place. Check your product’s instructions.
These additions enhance the functionality and appearance of your epoxy floor. They transform a basic coating into a custom finish. This is where your floor starts to really shine.
Curing Time and Conditions
Epoxy needs time to harden and become strong. This is called curing. You must let it cure fully before walking on it or putting heavy items on it.
The temperature and humidity also play a big role.
- Follow manufacturer’s guidelines. Curing times vary greatly depending on the epoxy type and brand. Typically, you can walk on it in 24 hours, but it can take 5-7 days or more to reach full hardness.
- Maintain proper temperature. Most epoxies cure best in temperatures between 60-80°F (15-27°C). Avoid applying or curing in very cold or very hot conditions.
- Ensure good ventilation. Proper airflow helps the epoxy cure correctly and allows fumes to dissipate.
Patience is key during the curing phase. Rushing this process can damage the new floor. It’s essential to respect the curing time for a durable, long-lasting finish.
Can You Put Epoxy Flooring on Wood? Considerations
So, you’re still wondering: Can You Put Epoxy Flooring on Wood? Expert Guide. Yes, you absolutely can, but there are important things to think about.
Wood is different from concrete, and this affects how the epoxy behaves. Let’s look at what makes wood a unique surface.
Wood’s Natural Movement
Wood expands and contracts with changes in temperature and humidity. This natural movement can put stress on the epoxy coating. If the epoxy is too rigid, it might crack or delaminate from the wood surface over time.
- Flexibility of epoxy. Some epoxy formulations are more flexible than others. Look for epoxies that are described as having some flex or that are specifically recommended for wood.
- Proper surface prep. A well-prepared and primed surface is more likely to tolerate minor wood movement. Good adhesion is your first line of defense.
- Consider expansion joints. For very large wood floors or areas with significant moisture swings, you might need to plan for expansion joints. These are small gaps that allow the wood to move without stressing the epoxy.
Wood’s inherent movement is the biggest challenge. Understanding this helps you choose the right products and methods to ensure your epoxy floor on wood stays intact for years to come.
Moisture Content of Wood
Moisture is the enemy of most coatings, and epoxy is no exception. If your wood floor has too much moisture, the epoxy might not bond properly, or it could trap moisture, leading to mold or rot. It’s vital to ensure the wood is dry.
- Test moisture levels. Use a moisture meter to check the wood’s moisture content. Most epoxy manufacturers recommend a moisture content of 12% or less.
- Allow wood to acclimate. If the wood has been exposed to moisture, allow it to dry out completely. This might take days or even weeks in a controlled environment.
- Ventilation is important. Good airflow around the wood helps keep moisture levels down. If your wood floor is in a basement, consider a dehumidifier.
Too much moisture will cause your epoxy to fail. It’s a common problem that can be avoided with careful testing and preparation. Ensure your wood is dry before you even think about starting the epoxy project.
Types of Wood and Their Impact
Not all wood is created equal when it comes to applying epoxy. Softwoods like pine can be more porous and might require more prep than hardwoods. Engineered wood also behaves differently.
- Hardwoods are often better. Denser hardwoods like oak or maple provide a more stable surface. They are less prone to excessive expansion and contraction.
- Porous woods need sealing. Very porous woods might absorb too much of the epoxy, affecting the finish. A good quality primer is especially important for these types.
- Engineered wood considerations. Engineered wood, like plywood, can sometimes delaminate if not properly prepared and sealed. Ensure the layers are well-bonded.
The type of wood matters. It influences how much prep work is needed and what kind of epoxy might be best. Knowing your wood helps you plan a more successful application.
This is a key part of the Can You Put Epoxy Flooring on Wood? Expert Guide.
Existing Finishes on Wood
If your wood floor already has a finish like paint, varnish, or wax, it needs to be removed. These finishes will prevent the epoxy from bonding correctly. They create a barrier that the epoxy cannot penetrate.
- Strip old finishes. Mechanical stripping with a floor sander is usually the best method. Chemical strippers can also be used, but ensure all residue is removed.
- Test for residue. After stripping and cleaning, you can do a simple test. Apply a small amount of water to the floor. If the water beads up, there’s still finish or wax present.
- Ensure a clean, bare surface. The goal is to reach the raw wood. This gives the epoxy the best chance to bond directly to the wood fibers.
Existing finishes are a major obstacle. They must be completely removed. Ignoring this step will almost certainly lead to the epoxy peeling off the wood.
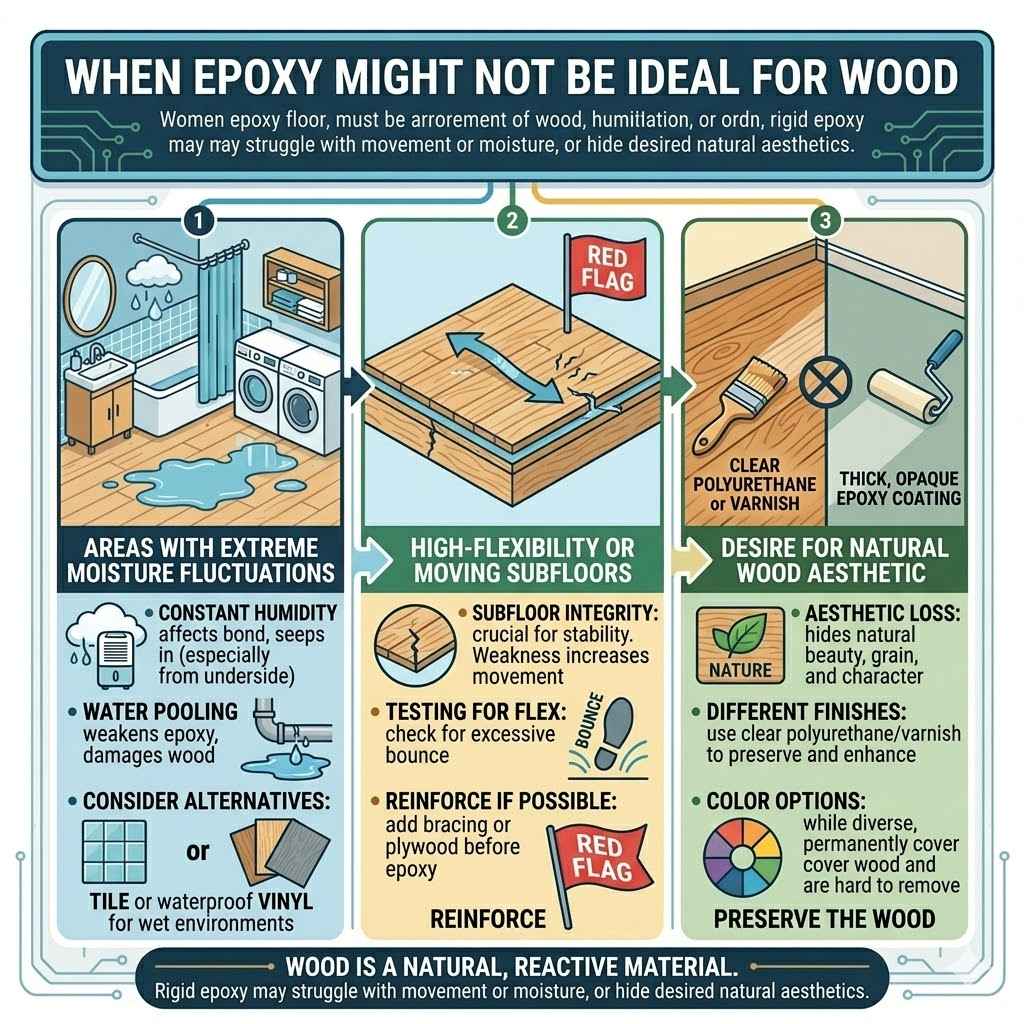
When Epoxy Might Not Be Ideal for Wood
While you can put epoxy flooring on wood, it’s not always the best solution for every situation. There are times when another flooring option might be a better fit for your needs and the wood’s characteristics.
Areas with Extreme Moisture Fluctuations
If your wood floor is in a bathroom or a laundry room that experiences frequent, heavy moisture, epoxy might struggle. The constant wetting and drying can cause the wood to expand and contract a lot, which can stress the epoxy.
- Constant humidity. High humidity levels can seep into the wood and affect the epoxy’s bond. This is especially true for the underside of the wood if it’s in a damp crawl space.
- Water pooling. If water is likely to pool on the floor for extended periods, it can weaken the epoxy and potentially damage the wood underneath.
- Consider alternatives. For areas with such extreme moisture, tile or a specialized waterproof vinyl might be more suitable. These materials are designed to handle wet environments better.
Wood is a natural material that reacts to its environment. If that environment is very wet or experiences wild swings in humidity, epoxy might not be the most durable choice.
High-Flexibility or Moving Subfloors
Wood floors can sometimes have a bit of give or flex, especially if the subfloor isn’t very rigid. If the wood floor itself moves a lot, this movement can tear at the epoxy coating. This is similar to the natural expansion and contraction issue, but on a larger scale.
- Subfloor integrity. A strong, stable subfloor is crucial for any floor covering. If the subfloor is weak, the wood floor above will also move more.
- Testing for flex. Try walking on different parts of the floor. If you notice a lot of bouncing or give, the subfloor might be an issue.
- Reinforce if possible. In some cases, you might be able to reinforce the subfloor before applying epoxy. This could involve adding bracing or another layer of plywood.
Significant subfloor movement is a red flag. It means the wood itself will be unstable, making it very hard for any rigid coating like epoxy to hold up over time.
Desire for Natural Wood Aesthetic
If you love the natural beauty and warmth of your wood floors, applying a thick, opaque epoxy coating will hide that completely. Epoxy creates a manufactured look, not a natural wood appearance. You will lose the grain and character of the wood.
- Different finishes exist. If you want to protect your wood but keep its natural look, consider a clear polyurethane or a durable varnish. These seal the wood while letting its natural beauty show through.
- Color options. While epoxy comes in many colors, it will permanently cover the wood. If you want to refinish the wood later, it will require extensive work to remove the epoxy.
- Preserve the wood. For floors where the original wood is a key feature, it’s often best to preserve it with products designed for wood rather than cover it entirely.
Sometimes, the best way to treat wood is to enhance it, not cover it. If the goal is to showcase the wood, epoxy is probably not the right choice for you.
Frequently Asked Questions
Question: Can I apply epoxy directly over my existing wood finish?
Answer: No, you cannot apply epoxy directly over an existing wood finish like paint, varnish, or wax. These finishes must be completely removed by sanding or stripping to ensure the epoxy can properly bond to the raw wood surface. This preparation is critical for durability.
Question: How long does epoxy on a wood floor typically last?
Answer: When applied correctly to a properly prepared wood surface, epoxy flooring can last many years, often 10 to 20 years or more. Longevity depends on the quality of the epoxy, the amount of traffic, and how well it’s maintained. Proper surface prep and the right epoxy type are key.
Question: Will epoxy make my wood floor slippery?
Answer: Epoxy floors can be slippery, especially when wet. To prevent this, you can add an anti-slip additive to the epoxy mixture or to the clear topcoat. These additives create a textured surface that provides better traction and safety.
Question: What is the difference between epoxy and polyurethane for wood floors?
Answer: Epoxy is a two-part system that creates a very hard, durable coating with excellent chemical resistance. Polyurethane is typically a single-part product, often used as a clear finish on wood. It offers good protection but is generally less resistant to heavy chemicals and abrasion than epoxy.
Epoxy covers the wood, while polyurethane usually seals and protects the natural wood surface.
Question: Can I use a two-part penetrating epoxy sealer on wood floors?
Answer: Yes, two-part penetrating epoxy sealers are specifically designed for wood. They soak into the wood fibers, hardening them and providing a strong base layer. These are often used as a primer or as a stand-alone protective coating before applying other finishes, offering excellent stability and moisture resistance.
Conclusion
Yes, you can put epoxy flooring on wood. With careful preparation and the right product, you can achieve a durable and attractive finish. Always clean, sand, and repair the wood first.
Choose an epoxy suitable for wood, considering moisture and movement. Proper application and curing are vital. Follow these steps for a beautiful and lasting epoxy floor on your wood surface.