Can You Stain OSB Board? Honest Results You Should Know
Many people wonder if staining OSB board is possible, especially for projects where they want a rustic or unique look. The answer is yes, you can stain OSB, but it requires a bit more preparation and understanding than staining traditional wood. You won’t get the same smooth, even finish as with fine-grained lumber. The results can be less predictable due to the varied wood strands and glue binder. However, with the right approach, OSB can take stain for a distinctive appearance.
Understanding OSB and Stain
OSB, or oriented strand board, is made from wood chips and strands pressed together with glue. This gives it strength and stability. But this structure is also why staining can be tricky.
The wood strands are different sizes. They are also arranged in different directions. Glue is spread between them.
This means stain can soak in unevenly. Some areas might get very dark. Others might stay lighter.
It’s not like staining a smooth piece of pine.
Think of it like trying to paint a bumpy wall versus a smooth one. The paint behaves differently. Stain works on a similar principle.
It’s a liquid that seeps into the wood. It gives it color. The more uniform the surface, the more uniform the color.
OSB’s unique makeup creates a pattern of light and dark. This can be a look some people really love. Others find it challenging to achieve a consistent look.
The type of stain you use matters too. Oil-based stains tend to penetrate better than water-based ones. They can sometimes create a richer color.
However, both can be used. It just depends on the final look you’re aiming for. Always test your stain on a scrap piece first.
This is crucial for OSB. You need to see how it will react to that specific board.
My Experience Staining OSB for a Project
I remember facing this exact problem a few years back. I was building a custom shelving unit for my workshop. I wanted something sturdy but also visually interesting.
I had a few sheets of OSB left over from a different job. I thought, “Why not use this? It’s strong and cheap.” I pictured this warm, slightly rustic stained look.
It would match the industrial vibe of the workshop.
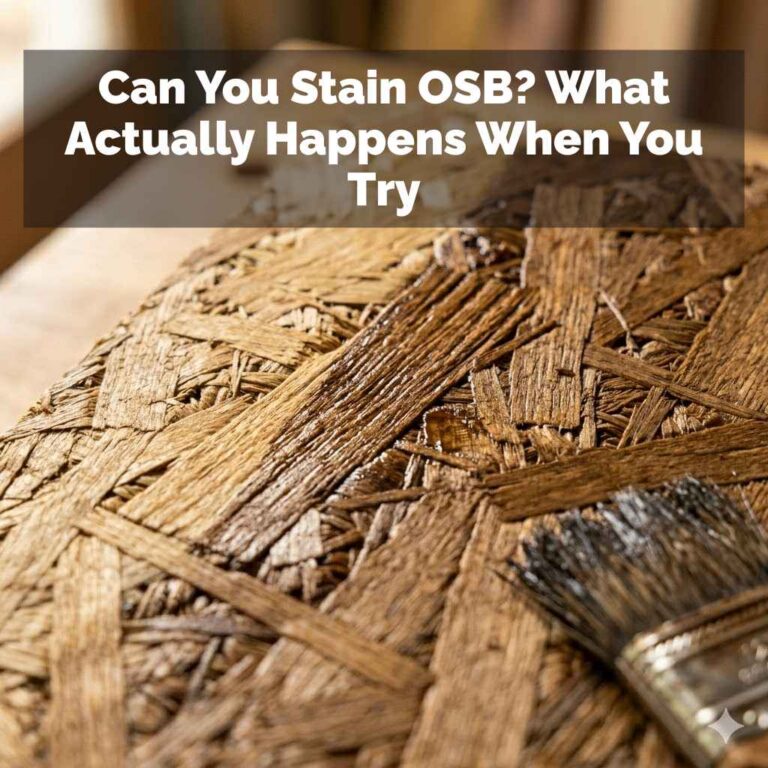
So, I grabbed a can of dark walnut stain. I brushed it onto the OSB. What happened next was… not quite what I expected.
Some strands drank up the stain like a sponge. They turned almost black. Other patches stayed much lighter, almost reddish-brown.
The glue lines also seemed to repel the stain a bit. It looked splotchy. Not rustic, more like a poorly done job.
I felt a pang of frustration. I thought I’d ruined it. But I didn’t give up.
First Steps for Staining OSB
Preparation is Key: Before any stain touches your OSB, it needs a good clean. Dust and debris will prevent the stain from sticking well. Wipe it down with a damp cloth.
Let it dry completely.
Sanding: OSB can have rough spots. Lightly sand the surface. Use a medium-grit sandpaper, like 100 or 120.
This smooths out the worst bumps. It also helps the stain adhere better. Don’t go too heavy, or you might remove too much material.
Prepping Your OSB Board for Stain
The first time I tried staining OSB, I skipped some important steps. I learned the hard way that proper prep makes a huge difference. It’s not just about slapping stain on.
You need to get the surface ready.
Cleaning is the very first thing. OSB can be dusty. It might have manufacturing residues.
You need a clean surface for the stain to work. I usually just use a slightly damp cloth. Make sure the board is totally dry before you move on.
Moisture can affect how the stain takes.
Next is sanding. OSB isn’t smooth like fine furniture wood. It has raised edges and variations.
A light sanding is usually enough. I use sandpaper around 100 to 120 grit. This knocks down the highest points.
It also opens up the wood fibers a bit. This lets the stain get in better. Don’t try to make it perfectly smooth.
That’s not the goal with OSB. You just want to make it less rough.
After sanding, you need to remove all dust. A shop vacuum works well. A tack cloth is even better.
A tack cloth picks up tiny dust particles. It leaves the surface really clean. This step is so important.
Any dust left behind will show up under the stain. It can look like little bumps or rough spots. It’s frustrating to see once the stain is on.
Dealing with Glue and Wood Variations
OSB uses a lot of glue. This glue doesn’t absorb stain. It’s designed to hold wood together.
It’s also resistant to moisture. This means the stain won’t penetrate the glue areas. You’ll see lines or spots where the glue is.
This can create a striped or blotchy look. This is a major reason why OSB stains differently.
The different types of wood strands also cause issues. Some strands are denser than others. Some are softer.
They will absorb stain at different rates. This is what creates the varied color you see. It’s not necessarily a bad thing.
It’s just something to be aware of. You can’t expect a solid, uniform color.
Using a Wood Conditioner
What it is: A wood conditioner is a liquid you apply before stain. It helps the wood absorb stain more evenly. It’s especially useful for woods that are blotchy.
OSB can benefit from this.
How to use it: Apply the conditioner according to the product directions. Usually, you brush it on. Let it soak in for a bit.
Then, wipe off any excess. You don’t want it to dry completely. Stain it while the conditioner is still slightly damp.
This helps the stain spread better.
Applying a Wood Conditioner
This is where things get a bit more advanced. But it can really help achieve a better stain job on OSB. A wood conditioner acts like a primer.
It seals some of the wood fibers. This stops the stain from soaking in too deeply in some spots. It helps create a more even color across the board.
You can buy wood conditioners at any hardware store. They are usually water-based or oil-based. Choose one that matches your stain type if possible.
Water-based conditioner works best with water-based stain. Oil-based conditioner is good for oil-based stain. Read the instructions on the can carefully.
Generally, you apply the conditioner with a brush or cloth. You let it sit for a specific amount of time. Then, you wipe off the excess.
The key is to stain the OSB while the conditioner is still a bit wet. This is when it works best. It’s like applying a sealant that controls how much stain the wood will take.
Even with a conditioner, you will still see some variation. The glue lines will still resist stain more. But the wood strands themselves should take the color more evenly.
It reduces the extreme splotchiness. This is a big win for OSB staining.
Stain Application Techniques
Brush or Rag: You can apply stain with a good quality brush or a clean cloth. Brushes offer more control. Rags give a more wiped-on look.
Work with the grain of the wood strands.
Work in Sections: Don’t try to stain the whole board at once. OSB is porous and the stain can dry fast. Work on a small area.
Apply the stain. Then, wipe off the excess. Move to the next section.
Wipe Off Excess: This is critical. Let the stain sit for a few minutes. Then, use a clean cloth to wipe off the excess.
Wipe with the grain. This is what controls the depth of the color. More wiping means lighter color.
Less wiping means darker color.
Choosing and Applying Your Stain
Now for the fun part: the color! For OSB, darker stains often hide imperfections better. Walnut, dark oak, or ebony can give a rich look.
Lighter stains might show the variations more. If you want a more uniform color, consider mixing your own custom stain. You can add a bit of paint to a clear stain base.
When applying, remember the short paragraphs and simple sentences rule. Work in small areas. Apply the stain generously.
You want to cover the wood strands. Don’t let it pool up too much. Let it sit for the time recommended on the can.
This is usually 5-15 minutes.
Then, take a clean cloth. Start wiping off the excess stain. Wipe in the direction of the wood strands.
This helps create a more natural look. You can wipe harder or softer to change the color. This is your chance to adjust.
If an area is too dark, wipe it more. If it’s too light, you might need another coat later.
This process gives you control. It allows you to react to how the OSB is taking the color. You’re not just applying and hoping for the best.
You’re actively shaping the finish. It’s a bit more labor-intensive. But the results are usually much better.
Some people like to apply stain in two thin coats. This can build up color gradually. It gives you more chances to adjust.
You apply the first coat. Wipe off the excess. Let it dry.
Then, apply a second coat. Wipe off the excess again. This can lead to a deeper, more controlled color.
Sealing Your Stained OSB
Once your stain is dry, you need to protect it. This is very important. OSB can be susceptible to moisture.
It also needs protection from wear and tear. A good sealant will lock in the color. It will also give the surface a finished look.
You have a few options for sealants. Polyurethane is a popular choice. It comes in water-based and oil-based formulas.
Water-based polyurethane dries clear. It’s less likely to yellow over time. Oil-based polyurethane gives a warmer, amber tone.
It’s often more durable.
You can also use a clear coat. Varnish or lacquer are other options. For a more matte look, consider a furniture wax.
You can even use a spray sealant. This is good for reaching all the nooks and crannies of the OSB.
Apply the sealant in thin coats. Let each coat dry completely before applying the next. Usually, two or three coats are enough.
Lightly sanding between coats with very fine sandpaper (like 220 grit) can help create a smoother finish. Always follow the manufacturer’s instructions for the sealant you choose.
Contrast Matrix: Myth vs. Reality
| Myth | Reality |
| OSB cannot be stained. | OSB can be stained, but requires specific prep and techniques for a good result. |
| Staining OSB is easy, just like regular wood. | The glue and wood strand variations make OSB challenging to stain evenly. |
| Any stain will work fine on OSB. | Oil-based stains and using a wood conditioner often give better results. |
| You don’t need to seal stained OSB. | Sealing is crucial to protect the stain and the OSB from damage. |
Real-World Scenarios for Stained OSB
Where might you see stained OSB used? It’s becoming more popular for certain applications. Think about rustic decor.
Stained OSB can make great wall paneling. It adds a unique texture. It’s often seen in basements or garages.
It can give these spaces a more finished feel without high cost.
It’s also used for furniture. For example, a coffee table with a stained OSB top. Or shelves in a pantry or craft room.
Many people use it for accent walls. The pattern of the strands can look like a natural wood grain if stained well. It’s a budget-friendly way to add character.
Consider the environment. If the OSB will be in a humid area, like a bathroom, you need to seal it very well. Moisture can cause OSB to swell or warp.
Staining and sealing offer some protection. But it’s not a complete waterproof solution. You’d need specialized sealants for very wet areas.
User behavior is also a factor. If it’s a high-traffic surface, like a tabletop, you’ll need a very durable topcoat. A few coats of polyurethane will help it resist scratches and spills.
For a wall, less durable protection might be fine.
What This Means for Your Project
So, what does all this mean for you? It means staining OSB is totally possible. But you need to adjust your expectations.
You won’t get a perfectly smooth, uniform finish like you would from a piece of fine hardwood. You will get a more textured, varied look. This can be really appealing.
When is it normal to see variations? Always. With OSB, some color difference between strands is expected.
The glue lines will also stand out. This is normal for the material. The key is how you manage these variations.
When should you worry? If the OSB is swelling or delaminating (coming apart). This means it has absorbed too much moisture.
Staining and sealing can help prevent this. But they can’t fix existing water damage. If you see mold or mildew, that’s a problem too.
Address it before you even think about staining.
Simple checks: Run your hand over the surface. Does it feel rough? Sand it.
Is there dust? Clean it. Does the stain look okay on a scrap piece?
If yes, you’re probably good to go. If no, try a different technique or stain.
Quick Tips for Staining OSB
Test Area: Always stain a small, hidden spot or a scrap piece first. See how the stain looks. Check the color.
Make sure you like it.
Darker is Easier: Darker stains tend to be more forgiving. They hide the natural variations better than light stains.
Thin Coats of Sealant: Build up your topcoat in thin layers. This avoids drips and bubbles. It also makes for a smoother, harder finish.
Ventilation: Always work in a well-ventilated area. Stains and sealants can have strong fumes.
Quick Fixes and Tips for Stained OSB
If your stain comes out too light, don’t panic. You can often apply a second coat. Just make sure the first coat is dry.
This will darken the color. You can also try a gel stain. Gel stains sit more on the surface.
They offer more control over color depth.
If it’s too dark, it’s harder to fix. You can try wiping it with a solvent that matches your stain type. Mineral spirits for oil-based.
Denatured alcohol for some water-based stains. This might lighten it. But be careful.
You could also damage the sealant if it’s already applied.
For uneven color, a wood conditioner is your best friend. If you didn’t use one, you can try a glaze. A glaze is like a thin paint.
You wipe it on. Then you wipe most of it off. It can help even out color.
It also adds depth. It’s a good way to correct blotchiness after the fact.
Remember that the goal with OSB isn’t perfection. It’s character. Embrace the unique patterns.
Sometimes the “mistakes” make it look more interesting. Don’t aim for factory-perfect. Aim for a look that fits your style.
Observational Flow: Staining OSB
Observe the OSB: Notice the wood strands, glue lines, and any rough patches.
Prepare Surface: Clean, sand lightly, and remove all dust thoroughly.
Apply Conditioner: Use a wood conditioner for more even stain absorption.
Apply Stain: Work in small sections. Apply, let sit briefly, then wipe off excess with the grain.
Adjust Color: Wipe more for lighter, less for darker. Multiple thin coats can build color.
Seal: Once dry, apply multiple thin coats of a protective sealant like polyurethane.
Frequently Asked Questions
Can I use regular wood stain on OSB?
Yes, you can use regular wood stain on OSB. However, due to the glue content and varied wood strands, the stain may absorb unevenly. This can lead to a blotchy or splotchy appearance.
Proper preparation, like sanding and using a wood conditioner, is highly recommended for better results.
Will OSB look like solid wood when stained?
No, OSB will not look exactly like solid wood when stained. The natural pattern of the wood strands and the presence of glue create a unique texture and color variation. Staining OSB results in a distinctive, often rustic, look rather than a smooth, uniform solid wood appearance.
How do I get a more even stain on OSB?
To achieve a more even stain on OSB, start by thoroughly cleaning and lightly sanding the surface. Then, apply a wood conditioner before staining. The conditioner helps the wood absorb the stain more uniformly.
When applying stain, work in small sections and wipe off the excess promptly with the grain.
What is the best type of stain for OSB?
Oil-based stains often penetrate OSB better than water-based stains, leading to richer colors. Gel stains are also a good option as they sit more on the surface and offer more control over color depth, which can help manage the uneven absorption of OSB. However, both types can work with proper preparation.
Do I need to seal stained OSB?
Yes, it is highly recommended to seal stained OSB. A sealant, such as polyurethane or varnish, protects the stain from wear and tear. It also provides a layer of protection against moisture and helps to lock in the color, ensuring your project lasts longer and looks better.
Can I paint OSB instead of staining it?
Yes, you can paint OSB. Painting OSB is often easier than staining for achieving an even color. You’ll still need to prepare the surface by cleaning and sanding.
Using a primer designed for porous surfaces can help. Then, you can apply your chosen paint. Many people find painting OSB to be a more straightforward way to get a desired look.
Conclusion
So, can you stain OSB board? Absolutely! It’s a great way to give a budget-friendly material a more finished and attractive look.
Just remember that OSB has its own unique characteristics. You’ll need to prep it well, perhaps use a conditioner, and embrace the natural variations that come with it. With a little patience and the right approach, you can achieve a beautiful stained finish that adds character to your projects.