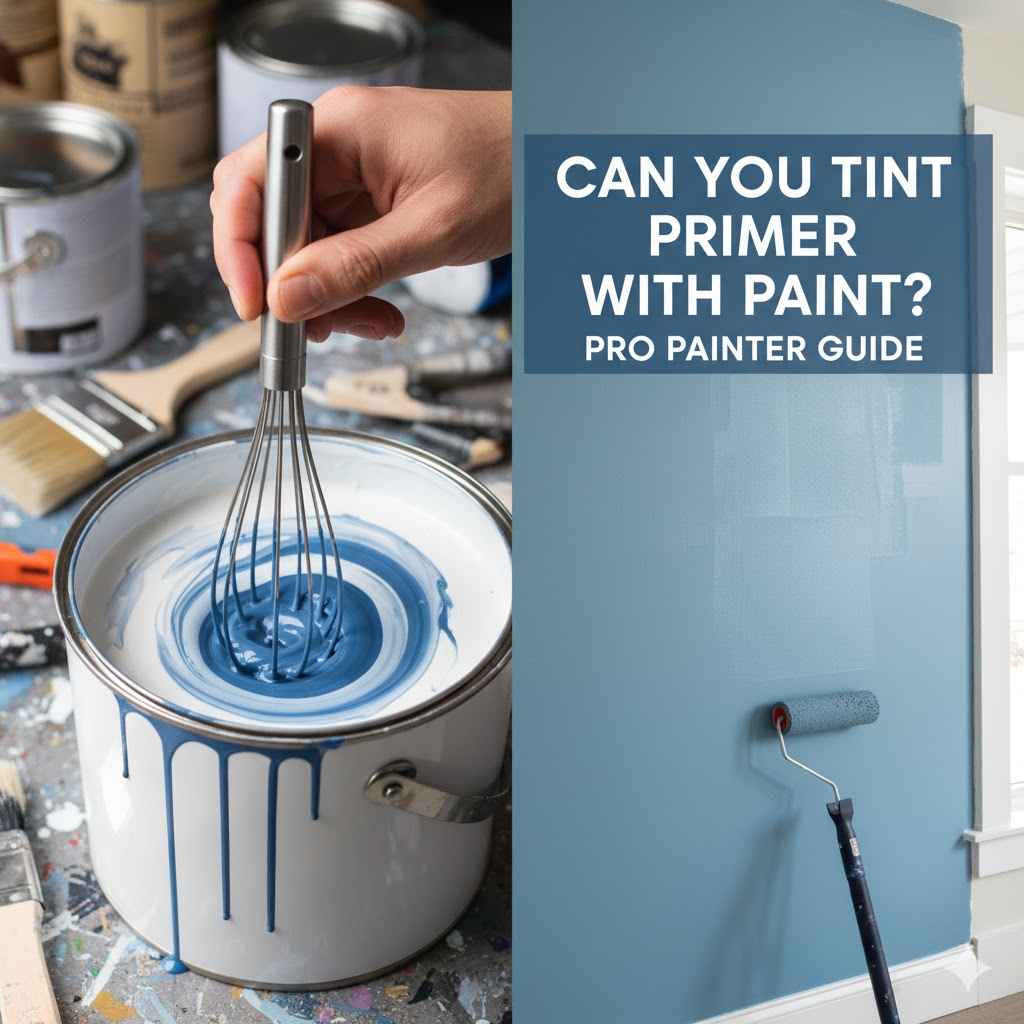
Can You Tint Primer With Paint? Pro Painter Guide
Many DIY painters wonder, “Can You Tint Primer With Paint? Pro Painter Guide”. This is a common question, especially when you want a specific color for your walls but don’t want to use a separate tinted primer and topcoat.
It can seem tricky at first, but it’s actually quite simple. This guide will walk you through everything you need to know, step by step, so you can achieve perfect results every time. Get ready to make your painting projects easier and more efficient!
Tinting Primer With Paint A Simple Guide
This section explores the core question: Can You Tint Primer With Paint? Pro Painter Guide. We will break down the basic principles behind tinting primers, why you might want to do it, and what types of primers and paints work best for this purpose.
Understanding these fundamentals is key to successful color matching and achieving a uniform finish on your walls. We aim to make this process clear and actionable for anyone looking to save time and materials on their next painting job.
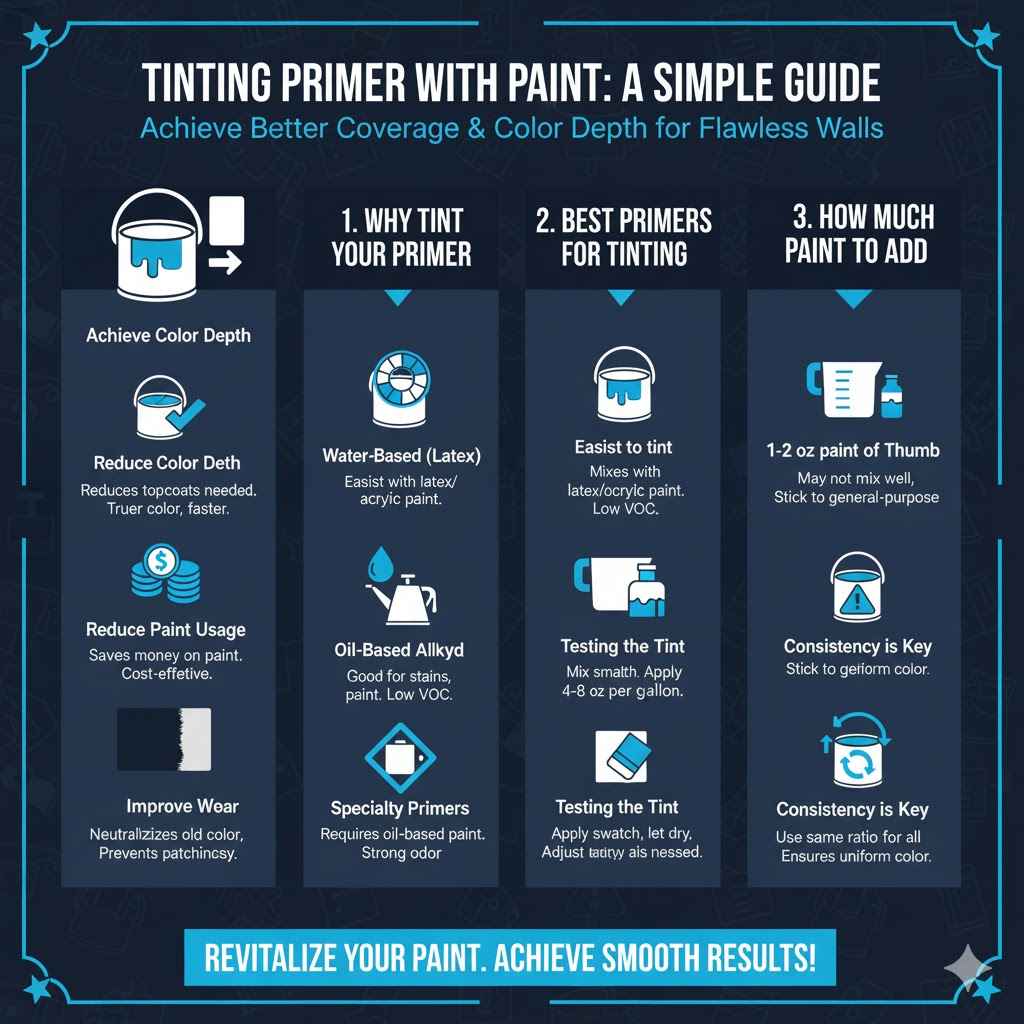
Why Tint Your Primer
Tinting your primer is a smart painting technique. It helps you get closer to your final paint color with fewer coats. This can save you time and money on paint.
It also ensures better coverage, especially when painting over dark colors with lighter shades.
Achieve Color Depth
Tinting primer helps reduce the number of topcoats needed. If you are painting a room a deep red or a bold blue, a standard white primer will require more coats to cover. By tinting the primer to a shade close to your topcoat color, you create a more solid base.
This means your topcoat will look truer to its intended shade, and you might only need two coats instead of three or more. This significantly speeds up the painting process.
Reduce Paint Usage
When you need fewer topcoats, you use less paint overall. This is a direct cost saving. For large projects, this can add up to a noticeable amount of money.
Imagine painting a whole house; reducing paint by even 10-20% can be substantial. Tinted primers are often mixed in smaller batches than a full gallon of paint, making them a cost-effective way to achieve better coverage.
Improve Coverage Over Dark Colors
Painting over dark or vibrant colors with a lighter shade can be a painter’s nightmare. Standard white primer often fails to completely mask the old color, leading to a patchy or uneven final look. A primer tinted to a mid-tone or a color close to the new paint shade will neutralize the old color more effectively.This is especially helpful when transitioning from a dark color to a light pastel.
Best Primers for Tinting
Not all primers are created equal when it comes to tinting. Some are designed to accept color more readily than others. Choosing the right primer ensures that the added color mixes well and doesn’t affect the primer’s performance.
The type of primer you select can impact how much paint you can add and how evenly the color distributes.
Water-Based (Latex) Primers
Water-based primers are the most common and easiest to tint. They readily accept latex or acrylic paint. When you add a small amount of latex paint to a water-based primer, it mixes in smoothly.
These primers are also low in VOCs and clean up with water, making them a popular choice for indoor projects. Their flexibility allows them to work well on various surfaces like drywall, plaster, and wood.
Oil-Based (Alkyd) Primers
Oil-based primers are excellent for blocking stains and adhering to tricky surfaces. However, they are harder to tint. You must use oil-based paint to tint an oil-based primer.
This combination can create a very durable finish. Due to their strong odor and longer drying times, oil-based primers are less common for DIYers and are typically used for specific applications like covering heavy stains or painting metal.
Specialty Primers
Some specialty primers, like stain-blocking or high-hiding primers, may have additives that make them less suitable for tinting. Always check the product label or consult with a paint professional. For instance, primers designed to cover severe water stains might have specific formulations that don’t mix well with added paint.
It’s best to stick to general-purpose primers for tinting.
How Much Paint to Add
The amount of paint you add to your primer is crucial. Too much, and you can alter the primer’s performance. Too little, and you won’t get the desired tint.
It’s a balancing act.
General Rule of Thumb
A good starting point is to add no more than 1 to 2 ounces of paint per quart of primer. For a gallon of primer, this would be about 4 to 8 ounces of paint. This amount is usually enough to impart a noticeable tint without compromising the primer’s adhesion or drying properties.
Always start with a small amount and add more if needed. It’s easier to add more color than to try and fix a primer that’s been over-tinted.
Testing the Tint
Before tinting a whole gallon, it’s wise to test your mixture. Mix a small amount of primer with a small amount of your chosen paint color. Apply a swatch to a piece of scrap drywall or cardboard.
Let it dry completely to see the true color. Primer colors can look different when wet versus dry. This test will show you if you need to add more paint for a deeper tint or if the current shade is sufficient.
Consistency is Key
When tinting primer for a large project, ensure you use the same paint color and the same ratio for all batches. If you need more than one can of primer, tint each can identically. Inconsistent tinting can lead to noticeable variations on your walls.
It’s best to tint all the primer you’ll need at once to guarantee uniformity.
The Process Can You Tint Primer With Paint
Now let’s get into the practical steps. Following this process will ensure you can successfully tint primer with paint. It’s a straightforward method that guarantees good results if done correctly.
We will cover everything from preparing your materials to mixing and applying the tinted primer.
Gather Your Materials
Having the right tools and materials makes any painting job smoother. For tinting primer, you’ll need a few specific items. This preparation step prevents frustration later on.
Primer
Choose a high-quality water-based primer. Look for one labeled as “all-purpose” or “multi-surface.” These are typically more receptive to tinting. Ensure it’s fresh and hasn’t been sitting around for years, as old primer might not mix as well.
Paint for Tinting
Use the same type of paint (latex or acrylic) that you plan to use for your topcoat. If you’re using a specific brand and color for your finish, use that same paint to tint the primer. This ensures the best possible color match and compatibility.
Only use a small amount, as mentioned before.
Mixing Container
You’ll need a clean bucket or paint tray large enough to hold the primer. A 5-gallon bucket is ideal for mixing a gallon of primer. Make sure it’s free from any old paint residue.
Stir Stick or Drill Mixer
A sturdy wooden stir stick or a mixing attachment for a drill is essential. You need something that can thoroughly mix the paint into the primer. For larger quantities, a drill mixer is highly recommended for achieving a uniform blend.
Measuring Tools
Use measuring cups or spoons to ensure you add the correct amount of paint. Precision is important for consistent results.
Mixing the Tinted Primer
This is where the magic happens. Proper mixing is key to a uniform tint. Take your time and be thorough.
Pour Primer into Bucket
Open your can of primer and pour it into your clean mixing bucket. If you are tinting a full gallon, you may want to use a 5-gallon bucket to allow plenty of room for stirring without spillage.
Add Paint Gradually
Measure the desired amount of your chosen topcoat paint. Start with the smaller end of the recommended range (e.g., 4 ounces per gallon). Slowly pour the paint into the primer while stirring.
Stir Thoroughly
Using your stir stick or drill mixer, begin to stir the primer and paint together. Mix until no streaks of paint are visible. For drill mixers, start on a low speed to avoid splashing.
Continue mixing for several minutes to ensure the color is completely integrated.
Check the Color
Dip your stir stick into the mixture and look at the color on the stick. You can also apply a small amount to a piece of scrap material. Let it dry.
If the color is too light, add a little more paint and stir again. Repeat this process until you achieve your desired shade. Remember that primer is meant to be a base; it doesn’t need to be an exact match, just close enough to reduce the number of topcoats.
Applying Tinted Primer
Once your primer is tinted and you’re happy with the color, it’s time to apply it. The application process is similar to applying regular primer, but keep in mind that a tinted primer might have a slightly different consistency. Always test in an inconspicuous area first.
Surface Preparation
Ensure your walls are clean, dry, and free of dust, grease, and old, peeling paint. Patch any holes or cracks and sand them smooth. A clean, smooth surface is essential for any primer to adhere properly.
Application Methods
You can apply tinted primer with a roller or a brush, just like regular primer. For large walls, a roller is faster. Use a high-quality roller cover suitable for the type of primer.
For edges and corners, use a paintbrush. Work in sections, maintaining a wet edge to avoid lap marks.
Drying and Topcoating
Allow the tinted primer to dry completely according to the manufacturer’s instructions. Drying times can vary based on humidity and temperature. Once dry, you can apply your topcoat.
You should notice that the coverage is much better, and the final paint color appears more vibrant and uniform with fewer coats.
Pro Painter Tips and Tricks
Experienced painters often have a few tricks up their sleeves to make painting projects even more efficient. When it comes to tinting primers, these tips can make a big difference in the quality of your finish and the ease of your work. These are the insights that transform a good paint job into a great one.
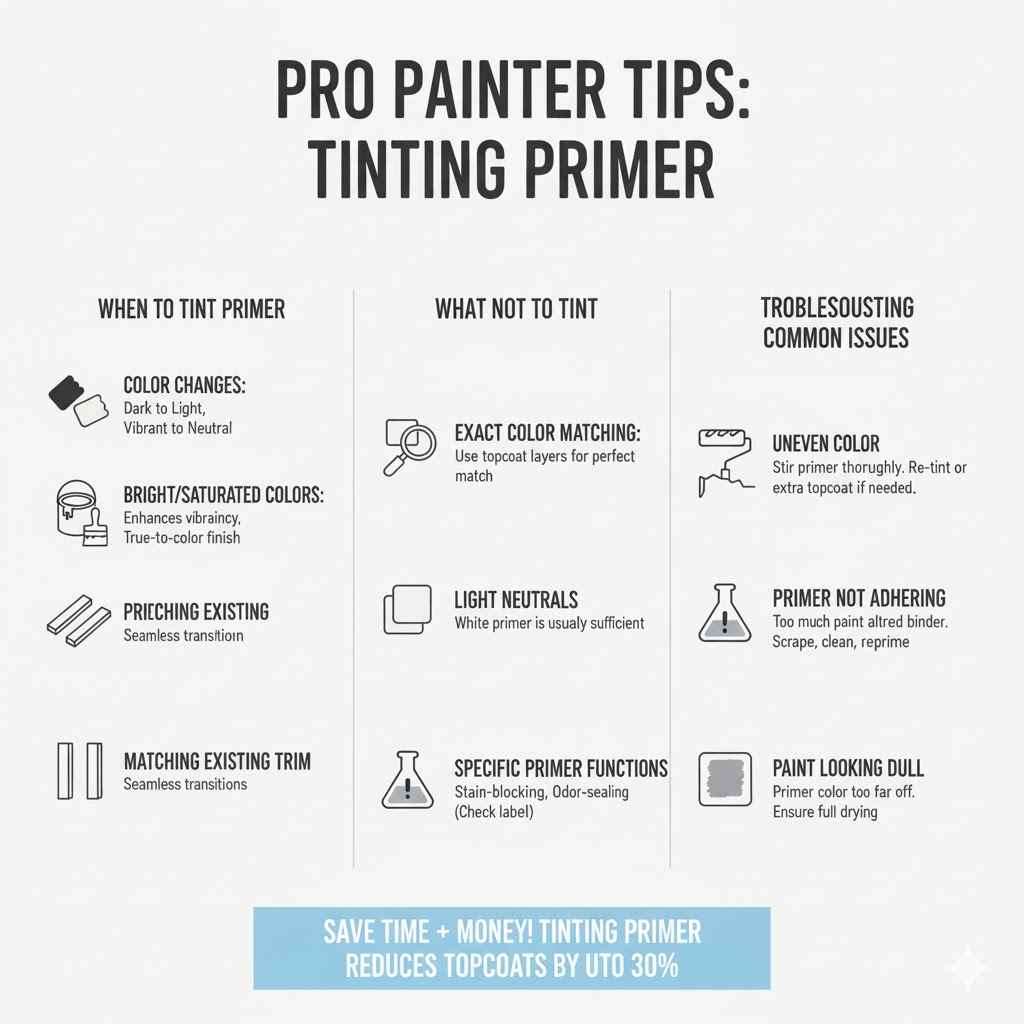
When to Tint Primer
While tinting primer is a great technique, it’s not always necessary. Knowing when to do it can save you time and effort. Consider these scenarios.
Color Changes
Tint your primer when you are making a significant color change, especially from a dark color to a light one, or from a vibrant shade to a neutral. This is the most common reason painters tint primer. For example, painting over a deep eggplant purple with a pale cream.
A cream-tinted primer will cover the purple much better than white primer.
Bright or Saturated Colors
If your topcoat is a very bright, saturated color like a vivid yellow, teal, or lime green, tinting the primer can help it appear more true to color. White primer can sometimes make these colors look a bit washed out or less intense after just one coat.
Matching Existing Trim
Sometimes, you might want to paint a wall a color that is very close to an existing trim color. Tinting the primer can help create a more seamless transition, especially if the existing trim is a slightly different shade of the same color.
What Not to Tint
There are instances where tinting primer is not recommended or might even cause problems. Understanding these limitations helps prevent mistakes.
Color Matching Existing Paint Exactly
If you are trying to match a specific existing paint color exactly, it’s usually best to use multiple coats of your topcoat paint. Tinting primer is about getting close to the final color to improve coverage, not about replicating it perfectly. A tinted primer will always be a slightly different shade than the topcoat.
Very Light Neutrals on White Surfaces
If you are painting a very light neutral color, like off-white or a pale greige, over a white or off-white surface, a standard white primer is usually sufficient. Tinting the primer might not offer a significant enough benefit to justify the extra step.
Specific Primer Functions
Primers designed for very specific purposes, such as extreme stain blocking or odor sealing, might have complex formulations that could be negatively impacted by adding paint. Always check the product’s specifications or ask a paint professional if you’re unsure.
Troubleshooting Common Issues
Even with the best intentions, sometimes things don’t go perfectly. Here are common issues and how to fix them.
Uneven Color Distribution
If you notice streaks or splotches of color after applying, it means the primer wasn’t mixed thoroughly enough. For future batches, stir longer and more vigorously. If the current batch is problematic, you might need to re-tint it or apply an extra coat of topcoat to even it out.
Primer Not Adhering Properly
This could happen if too much paint was added, altering the primer’s binder. Always stick to the recommended ratios. If a section of primer isn’t adhering, you may need to scrape it off, clean the area, and re-prime.
For minor adhesion issues, a light sanding might help, but it’s better to avoid it by using the correct mixture.
Paint Looking Dull
Sometimes, a tinted primer can make the topcoat look a little duller than expected. This can happen if the primer color is too far from the topcoat color, or if the primer wasn’t fully dry before the topcoat was applied. Ensure proper drying time and consider if a slightly different tint might be more effective next time.
Case Study: The Dark Bedroom Makeover
Sarah wanted to repaint her bedroom, which was a deep, rich navy blue. She decided to go with a light, airy sky blue for the new color. Initially, she planned to use white primer and at least three coats of the sky blue paint.
After researching painting techniques, she learned about tinting primer. She bought a gallon of high-quality water-based primer and 8 ounces of her chosen sky blue latex paint. She mixed them thoroughly in a 5-gallon bucket.
She applied one coat of the tinted primer. To her surprise, the navy blue was almost completely covered, leaving a light, uniform base. She then applied two coats of the sky blue topcoat, and the color looked perfect and saturated.
This saved her a significant amount of time and one full coat of expensive paint.
A study by a leading paint manufacturer found that using a tinted primer can reduce the number of topcoats needed by up to 30% for significant color changes. This translates to substantial savings in both time and material costs for homeowners and professional painters alike.
Frequently Asked Questions
Question: Can I tint primer with any kind of paint
Answer: It’s best to tint water-based primers with water-based paints (latex or acrylic) and oil-based primers with oil-based paints. Mixing different bases can lead to poor adhesion and an uneven finish.
Question: How much paint should I add to a gallon of primer
Answer: A good rule of thumb is to add 4 to 8 ounces of paint per gallon of primer. Always start with less and add more if needed, and test the color before tinting large batches.
Question: Will tinting primer affect its ability to block stains
Answer: For general-purpose primers, adding a small amount of paint usually won’t significantly affect stain-blocking properties. However, for primers specifically designed for heavy-duty stain blocking, it’s best to check the product details or consult the manufacturer.
Question: Can I tint primer with spray paint
Answer: No, it is not recommended to tint primer with spray paint. Spray paints have different formulations and propellants that are not compatible with typical primers and can lead to poor mixing and application issues.
Question: How do I know if my primer is thoroughly mixed
Answer: After stirring, check for any streaks or color variations. You can also apply a small swatch to a piece of cardboard and let it dry. If the color is uniform and looks as expected, it’s well-mixed.
Summary
You absolutely can tint primer with paint, and doing so is a pro painter’s secret for achieving better color coverage and fewer coats. By following simple mixing ratios and using compatible paint bases, you create an ideal foundation for your topcoat. This method saves time, reduces paint waste, and ensures your chosen colors appear vibrant and true.
Experiment with tinting for your next project to see the professional difference it makes.