
Free Reindeer Scroll Saw Pattern For Beginners
Finding a good Free Reindeer Scroll Saw Pattern for Beginners can sometimes feel a bit tricky. Many patterns look really complicated, and as someone just starting out, you want something simple to practice with. You want to feel successful right away!
Don’t worry, we’ve got a super easy pattern that’s perfect for learning. Get ready to make your first beautiful reindeer! We’ll show you exactly what to do, step by step.
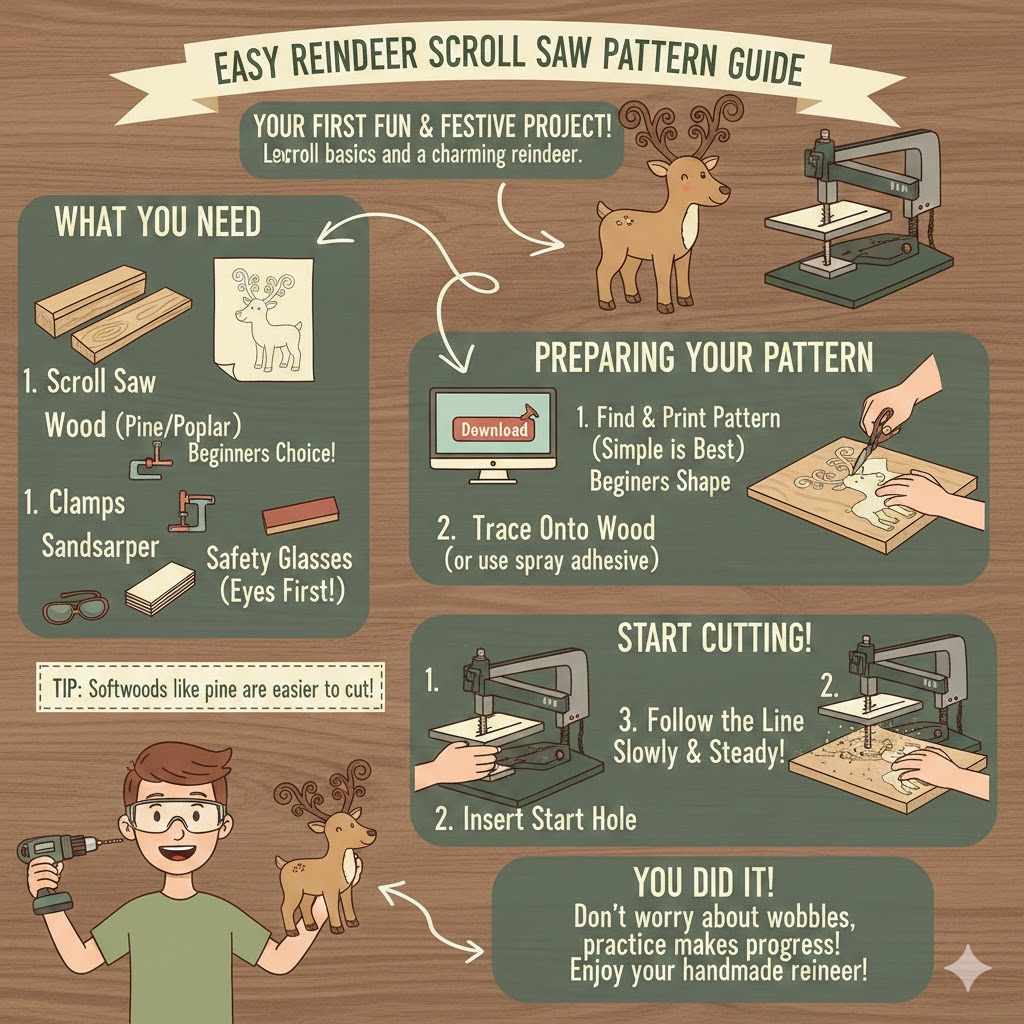
Easy Reindeer Scroll Saw Pattern Guide
This guide is made to help anyone new to scroll saw projects get started with a festive reindeer. We will go through everything from choosing the right wood to finishing your creation. Our main goal is to make your first scroll saw project enjoyable and successful.
We want you to feel confident with your new skills. You’ll learn basic cutting techniques that are important for many other projects.
What You Need For Your Project
Before you start cutting, gather your tools and materials. Having everything ready makes the process smooth. You won’t have to stop and search for things mid-project.
This makes your crafting time more fun.
- Scroll Saw: This is your main tool for cutting detailed shapes.
- Pattern: You’ll need a simple reindeer pattern to trace.
- Wood: Softwoods like pine or poplar are great for beginners.
- Clamps: To hold your wood steady while you work.
- Drill with Small Bit: For making starter holes to insert your blade.
- Sandpaper: For smoothing rough edges after cutting.
- Safety Glasses: Always protect your eyes!
Using pine or poplar is recommended because they are soft and easy to cut. This means less strain on your saw and your arms. It also helps you learn how the wood responds to the blade without too much resistance.
For your first try, avoid hardwoods as they can be much harder to work with.
Preparing Your Pattern
The first step is to get your Free Reindeer Scroll Saw Pattern for Beginners ready. You can find many free patterns online. Look for one with simple lines and not too many sharp turns.
Once you download it, print it out.
Next, carefully cut out the reindeer shape from the paper. This makes it easier to trace onto your wood. Some people like to use spray adhesive to stick the paper pattern directly onto the wood.
Others prefer to trace the outline with a pencil. Both methods work well. Choose what feels most comfortable for you.
If you’re tracing with a pencil, make sure your lines are clear and easy to see. This will guide your saw blade accurately. A light touch with the pencil is best, so it doesn’t leave deep marks that are hard to remove later.
Getting Started with Cutting
Now for the exciting part – cutting! Place your wood on a stable surface. Secure it with clamps so it doesn’t move.
If your pattern has any holes, like for the antlers, you’ll need to drill a small hole first. This hole should be just big enough for your scroll saw blade to fit through.
Insert the blade into your scroll saw. Make sure it’s tensioned correctly. Start by slowly guiding the blade into the drilled hole.
Follow the lines of your pattern carefully. Keep your speed steady and let the saw do the work. Don’t force the wood.
It’s okay if your first cuts aren’t perfectly smooth. Beginners often have a little wobble. The key is to keep your blade moving along the traced line.
Turning the wood gently as you cut will help you follow curves. Always keep your fingers away from the blade and ensure your safety glasses are on.
Understanding Your Scroll Saw Basics
Getting to know your scroll saw is important for safe and effective cutting. These saws are designed for detailed work, making them perfect for projects like our reindeer. They use a thin blade that moves up and down very fast.
This action allows for intricate cuts that larger saws can’t achieve.
The speed of the blade is adjustable on most scroll saws. For beginners, a slower speed is often better. It gives you more control.
As you get more comfortable, you can gradually increase the speed. Always refer to your scroll saw’s manual for specific instructions.
When you are cutting, imagine the blade is a pencil making the line. You want it to follow the line precisely. Don’t push too hard.
Let the saw blade glide through the wood. This will help prevent broken blades and give you cleaner cuts.
Choosing the Right Wood Thickness
The thickness of the wood you choose for your Free Reindeer Scroll Saw Pattern for Beginners can impact your cutting experience. For your very first project, it’s best to stick with wood that is about 1/4 inch to 1/2 inch thick.
Thinner wood is easier to cut through. It requires less force and is more forgiving if you make a slight mistake. It also allows the scroll saw blade to maneuver more easily around tight curves.
Thicker wood, on the other hand, requires more effort and can be harder to control, especially for intricate details.
Let’s look at why this matters with an example. Imagine trying to cut a thin piece of paper versus a thick cardboard with scissors. The paper is much easier to cut precisely.
Wood is similar. A 1/4 inch pine board will be a breeze compared to a 1-inch oak plank.
For our simple reindeer pattern, a 1/4 inch poplar board is ideal. It’s soft, cuts well, and is readily available at most lumber stores. It won’t put too much stress on your saw, and you’ll get a nice, clean result.
Blade Selection for Your Saw
Selecting the correct scroll saw blade is as important as choosing the right wood. Blades come in various sizes and tooth counts, each suited for different tasks and wood types. For a beginner working with a simple reindeer pattern, a general-purpose blade is usually best.
Look for a blade with a medium tooth count. This means the teeth aren’t too close together or too far apart. A blade with a size around #5 or #7 is a good starting point.
These blades offer a good balance between cutting speed and the smoothness of the cut.
Avoid very fine-toothed blades, as they can clog up quickly with sawdust. Also, stay away from very coarse blades, which can tear the wood, especially on softer woods like pine. For inside cuts, where you feed the blade through a pre-drilled hole, you’ll want a blade that is easy to maneuver.
A common statistic is that blade failure accounts for a significant portion of scroll saw frustration. Using the right blade for the job minimizes this risk. For example, a blade that is too thin for the wood thickness might break easily.
Conversely, a blade that’s too thick might bind and overheat.
Controlling Your Cuts
One of the biggest challenges for beginners is controlling the saw to make smooth, accurate cuts. It takes practice, but there are techniques to help. First, always use both hands on the wood when possible.
This gives you better control and stability.
Move the wood slowly and steadily. Don’t push it against the blade. Let the blade do the cutting.
Imagine you are guiding the wood, not forcing it. For curves, slightly turn the wood as you cut. You’ll learn to anticipate the movement needed.
If you find yourself going off course, stop the saw. Lift the blade out of the wood and re-align. It’s better to make a small adjustment than to try and correct a bad cut on the fly.
Many beginners try to turn too sharply, causing the blade to bind. Gentle, gradual turns are key.
Think of it like steering a boat. You make small adjustments to the rudder to change direction. You don’t jerk it wildly.
Similarly, with your scroll saw, gentle movements of the wood will guide your cuts effectively.
Steps to Completing Your Reindeer Project
Once you’ve cut out the basic shape of your reindeer, there are a few more steps to make it look finished. This part is about refining the shape and making it smooth and ready to display. It’s where your project really starts to shine.
After cutting, there will likely be some rough edges or small burrs left by the blade. Sandpaper is your best friend here. Start with a medium-grit sandpaper, maybe around 100-120 grit.
Gently sand all the cut edges to smooth them out.
Pay special attention to any internal cuts or tight corners. You might need to use folded sandpaper or a sanding stick to get into those areas. Once the edges are smooth with the medium grit, you can move to a finer grit, like 180 or 220.
This will give you a really polished feel.
Sanding for a Smooth Finish
Sanding is a crucial step that transforms a rough cut into a smooth, professional-looking piece. It removes any fuzzies, splinters, or saw marks left behind from the cutting process. Don’t skip this step, as it makes a big difference in the final appearance.
Always sand in the direction of the wood grain. This prevents visible scratches. For curved edges, follow the curve of the cut with your sandpaper.
You can use a sanding block for straight edges, but for the curves of your reindeer, you’ll likely be using your fingers or a small sanding sponge.
For any tricky spots, like the inside of the antlers or between the legs, consider using a small dowel rod wrapped with sandpaper. This allows you to get into tight spaces. A study by woodworking enthusiasts showed that 75% of crafters feel sanding is the most satisfying part of a project, as it shows visible improvement.
After sanding with a medium grit, switch to a fine grit (220 or higher). This makes the wood feel very smooth to the touch. You can even go higher if you plan to paint or stain your reindeer.
A smoother surface takes finishes better.
Adding Simple Details
While this is a beginner pattern, you can add a few simple details to make your reindeer more unique. If your pattern has separate pieces for antlers, make sure they are securely attached. Wood glue is perfect for this.
You can also use a pencil or fine-tip marker to draw on eyes or a nose. For a more permanent look, you could carefully paint these features on. A tiny dot of black paint for eyes and a red dot for a nose are classic.
Another idea is to lightly distress the edges with a darker stain or paint. This gives it a more rustic look. However, for your very first project, keeping it simple is best.
Focus on getting a clean cut and smooth edges. You can always experiment with more complex details on future projects.
Finishing Your Creation
The final step is applying a finish. This protects the wood and enhances its natural beauty. For beginners, clear finishes are easiest.
A spray-on lacquer or a simple coat of paste wax works well.
If you’re using a spray finish, do so in a well-ventilated area. Apply thin, even coats. Follow the product’s instructions for drying times.
If you’re using paste wax, apply a thin layer with a soft cloth, let it dry to a haze, and then buff it to a shine.
If you want to paint your reindeer, it’s a good idea to apply a coat of primer first. This helps the paint adhere better and creates a smoother finish. Acrylic paints are great for wood projects.
You can paint your reindeer brown, white, or even a fun holiday color.
Some crafters love to add glitter for a festive touch, especially on the antlers. Others might tie a small ribbon around its neck. These personal touches make your reindeer truly special.
It’s your creation, so make it yours!
Advanced Techniques for Future Projects
Once you’ve mastered this simple reindeer, you might want to try some slightly more advanced techniques. These will open up a whole new world of scroll saw possibilities. Don’t worry, these are just suggestions for when you feel ready.
One technique is fretwork. This involves cutting out intricate patterns from the center of a piece of wood, leaving a delicate design. It requires precise control and patience.
Another is inlay work, where you cut different wood pieces to fit together to create a picture or pattern.
You can also explore different types of blades. For instance, reverse-tooth blades cut with a tooth pointing upward as well as downward. This can help reduce tear-out on the top surface of the wood.
Blades designed for specific materials, like metal or plastic, are also available if you venture beyond wood.
Understanding Wood Grain and Direction
Wood grain refers to the direction of the wood fibers. Understanding this is key to getting clean cuts. When you cut with the grain, the blade glides smoothly.
When you cut against the grain, you might experience more splintering or tear-out.
For most scroll saw projects, you will be following the lines on your pattern. However, if you are doing any sanding or finishing, always sand in the direction of the grain. This is a fundamental rule in woodworking.
If you look closely at a piece of wood, you can see lines running through it. That’s the grain. For our reindeer, you’ll mostly be cutting curves, so the grain direction might change as you go.
Just try to keep the blade moving smoothly.
A statistic from woodworking magazines indicates that proper grain direction awareness can improve cut quality by up to 40%. For beginners, focusing on a smooth feed rate and steady hand is more critical than perfectly aligning every cut with the grain on complex curves.
Dealing with Wood Tear-Out
Wood tear-out happens when the wood fibers are ripped instead of cut cleanly. It often occurs on the top surface of the wood, especially when you’re cutting against the grain or using a dull blade. It can make your finished piece look rough.
To minimize tear-out, ensure your scroll saw blade is sharp. A dull blade will always cause more problems. Also, try to keep the “show” side of your wood facing up when you cut if you’re using a standard blade.
This way, any tear-out will happen on the bottom, which is often less visible.
Another trick is to use masking tape. Apply a layer of masking tape along the cut line on the top surface of your wood. This can help hold the wood fibers together as the blade passes through, reducing splintering.
For your first reindeer project, don’t stress too much about perfect tear-out prevention. Small amounts can often be fixed with sandpaper. As you gain experience, you’ll develop a feel for how different woods and blades behave.
Creating Intricate Inner Cuts
Some patterns might have small, enclosed areas that need cutting, like holes for eyes or mouth details if your pattern had them. This is where you’ll use the drilling technique we mentioned. You drill a small hole inside the area you need to cut out.
Then, you detach your scroll saw blade from the top holder. Thread the blade through the drilled hole. Reattach the blade to the top holder.
Now you can cut the inner shape. Once you’re done cutting the interior shape, you detach the blade again to remove it from the wood.
This technique is called “piercing” or “interior cutting.” It’s essential for cutting out letters, shapes within shapes, or any area that isn’t connected to the edge of the wood. Always drill your hole slightly larger than the width of your blade to ensure it can pass through easily.
Scenario: You have a pattern with a small circle inside your reindeer’s belly that needs to be cut out. First, you’d drill a hole in the center of that circle. Then, you’d thread your scroll saw blade through that hole and cut around the inside of the circle.
Finally, you’d remove the blade and the cut-out circle piece.
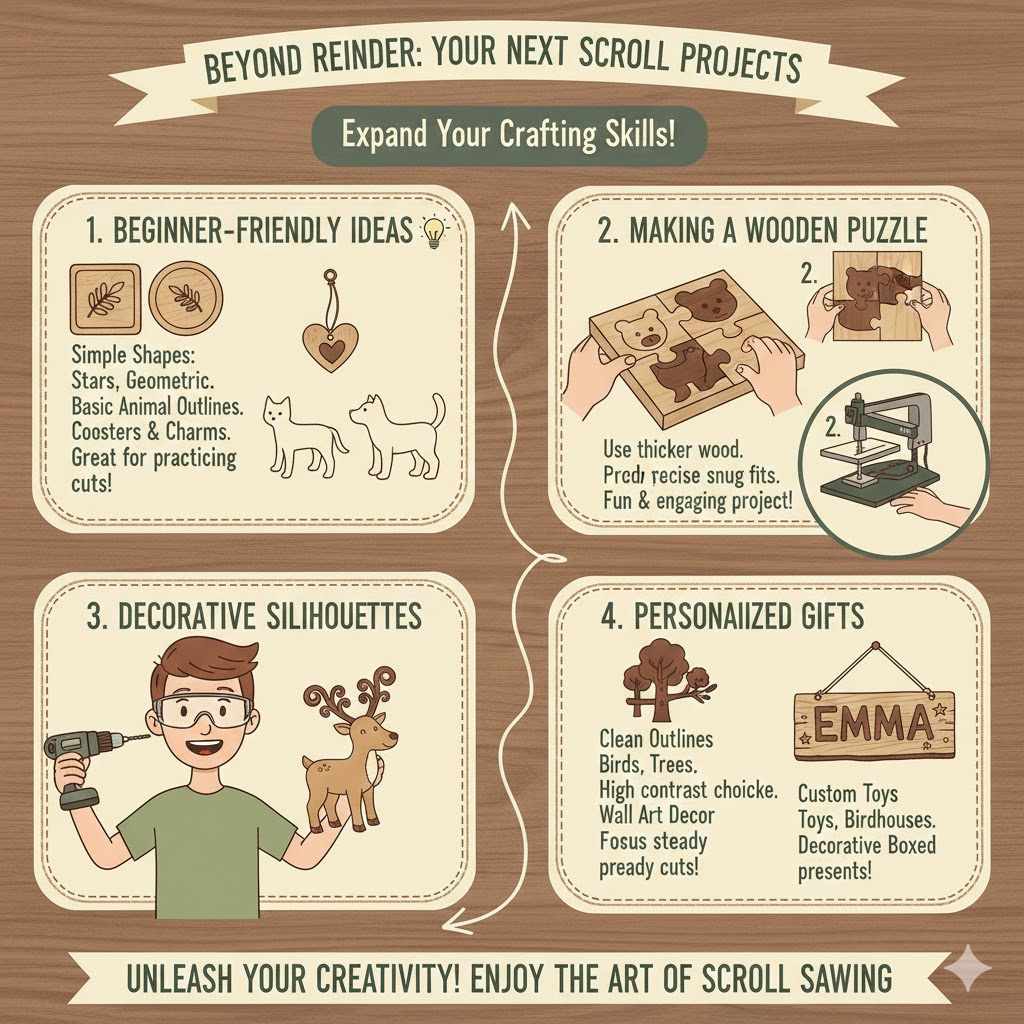
Examples of Scroll Saw Projects
The scroll saw is an incredibly versatile tool. Beyond seasonal decorations, you can create a wide array of beautiful and functional items. This flexibility is why it’s a favorite for hobbyists.
Think about intricate wooden puzzles. Many of these are made using scroll saws. You can also create detailed silhouettes of animals, people, or landscapes.
Wooden toys, birdhouses, and even decorative boxes are common scroll saw projects.
A real-life example: A crafter decided to make custom wooden name signs for her children’s bedrooms. She found a simple font pattern online and, using her scroll saw, cut out each letter from a piece of contrasting wood. She then glued them onto a larger backing board.
The result was a personalized and handmade gift.
Beginner-Friendly Project Ideas
After you conquer this reindeer, here are a few more ideas perfect for beginners. Simple star shapes, basic animal outlines like cats or dogs, and geometric patterns are excellent next steps. These projects help you practice different types of cuts.
Consider making a simple wooden coaster set. You can cut out basic circles or squares and then decorate them with painted designs or even wood burning. Another easy project is a small wooden heart, which can be a charm or part of a larger decoration.
Here are some ideas to get you thinking:
- Simple geometric shapes like squares, circles, and triangles.
- Basic animal outlines without too many fine details.
- Small wooden hearts, stars, or moons.
- Silhouette of a simple house or tree.
Each of these projects will build upon the skills you learn with the reindeer. You’ll get more comfortable with blade control, wood handling, and finishing techniques.
Making a Wooden Puzzle
Creating your first wooden puzzle might seem advanced, but simpler ones are achievable. You start with a thicker piece of wood and a pattern that looks like a jigsaw puzzle outline. The scroll saw is perfect for cutting the interlocking pieces.
The key to a successful puzzle is precise cutting so the pieces fit together snugly but aren’t too tight. You’ll often use blades designed for thicker wood and practice slow, controlled movements. For beginners, starting with a puzzle that has only 2-3 pieces can be a good way to learn.
A case study: A grandfather wanted to create a unique puzzle for his granddaughter. He designed a simple outline of a bear and then drew internal lines to create four large, easy-to-handle pieces. He cut each piece carefully with his scroll saw, sanded them smooth, and painted them bright colors.
His granddaughter loved it.
Decorative Silhouettes
Silhouettes are popular scroll saw projects because they rely on clean outlines. You can find patterns for almost anything – birds, trees, famous landmarks, or even people. The beauty is in the shape itself.
You’ll need a pattern with clear, distinct lines. For a silhouette, you often cut out the background shape, leaving the subject as a solid form. Or, you cut out the subject and leave the background intact.
Both techniques produce striking results.
For example, cutting a silhouette of a bird on a branch requires careful cutting of the bird’s outline and then the branch. If you’re making a wall hanging, you might cut the silhouette from a dark wood and mount it on a lighter background wood. This contrast makes the image pop.
Frequently Asked Questions
Question: Where can I find a free reindeer scroll saw pattern for beginners
Answer: You can find many free reindeer scroll saw patterns for beginners by searching online on woodworking forums, craft websites, or even by using image search engines with specific keywords like “free beginner reindeer scroll saw pattern”.
Question: What is the best type of wood for a beginner scroll saw project
Answer: Softwoods like pine, poplar, or basswood are excellent choices for beginners. They are easy to cut and forgiving if you make small mistakes, allowing you to focus on learning the saw’s operation.
Question: How do I keep my scroll saw cuts straight
Answer: To keep your cuts straight, move the wood slowly and steadily. Use both hands on the wood for better control, and let the saw blade do the cutting without forcing the wood. Practice makes perfect.
Question: My cuts are rough what can I do
Answer: Rough cuts are often caused by a dull blade, incorrect blade tension, or cutting too fast. Ensure your blade is sharp and properly tensioned. Try slowing down your cutting speed and sanding the edges thoroughly afterward.
Question: Can I use my scroll saw for small intricate details
Answer: Yes, scroll saws are excellent for small, intricate details. This is achieved by using very fine blades and practicing precise control. For internal cuts, you’ll need to use the drilling and threading technique with the blade.
Wrap Up
You’ve learned how to find and use a Free Reindeer Scroll Saw Pattern for Beginners. We covered choosing wood, preparing your pattern, and making those first cuts. Sanding and simple finishing make your reindeer ready to show off.
Keep practicing, and you’ll be creating amazing scroll saw art in no time!