Guide to Installing Radiant Heat Under Wood Flooring
Thinking about adding cozy radiant heat under your wood floors? It’s a great idea for a warm home, but some folks find the process a bit confusing at first. Don’t worry!
This guide makes it super simple. We’ll walk you through everything, step-by-step, so you can get that warm, comfy feeling without any stress. Let’s get started on making your home extra special.
Benefits of Radiant Heat Under Wood Floors
Radiant heating systems offer a unique kind of comfort and efficiency that many homeowners find appealing. Unlike forced-air systems that push hot air around, radiant heat warms objects directly, creating a more even and pleasant warmth throughout the room. This method can significantly reduce dust circulation, which is a big plus for allergy sufferers. It also means no more cold spots, just consistent warmth from the floor up. This makes your living space feel much more inviting, especially during colder months.
Consistent Room Temperature
One of the biggest advantages of radiant heating is its ability to maintain a very steady and even temperature. This system heats the mass of the floor, which then slowly releases that heat into the room. Because the heat source is distributed across the entire floor area, you don’t get the hot and cold fluctuations you often experience with other heating methods. This consistent warmth creates a more comfortable environment, allowing you to relax without constantly adjusting your thermostat.
Imagine walking barefoot across your living room on a chilly morning and feeling a gentle, uniform warmth underfoot. That’s the magic of consistent radiant heat. It eliminates the drafts and temperature swings that can make other heating systems feel less comfortable.
Improved Air Quality
Forced-air heating systems can often blow dust, allergens, and other airborne particles around your home. Radiant heat, on the other hand, doesn’t rely on air circulation to distribute warmth. This means less dust gets kicked up, leading to cleaner air and a healthier indoor environment. This is especially beneficial for people with asthma, allergies, or other respiratory sensitivities.
Think about how much cleaner your air could be. With radiant heat, the air stays still, carrying fewer particles. This can make a noticeable difference in how fresh your home feels.
Energy Efficiency
Radiant heating systems are often more energy-efficient than traditional heating methods. Because they heat objects directly and reduce air leakage, less energy is wasted. The ability to set different temperature zones also allows you to heat only the areas you use, further saving on energy costs. Many studies show that radiant heating can reduce energy consumption by up to 30% compared to forced-air systems.
Saving energy means saving money. Radiant systems use heat more directly, so less energy goes to waste. You can heat your home for less when you choose this method.

Guide to Installing Radiant Heat Under Wood Flooring Components
Before you begin installing radiant heat under wood flooring, it’s essential to understand the different parts of the system. Each component plays a vital role in ensuring safe, efficient, and effective operation. Properly identifying and understanding these parts will help you make informed decisions during the installation process and troubleshooting.
Heating Elements
The heart of any radiant heating system is its heating element. For wood floors, you typically have a few main options. Electric radiant floor heating uses thin heating cables or mats that are laid directly on the subfloor. Hydronic radiant floor heating, on the other hand, uses a network of pipes through which heated water or a water-glycol mixture circulates. Both methods transfer heat efficiently to the subfloor, which then warms the wood flooring above.
Electric Heating Cables and Mats
This system involves installing thin electric wires or mats that generate heat when electricity flows through them. They are designed to be low-profile, so they don’t add significant height to your floor. Installation requires careful planning to ensure even coverage and proper connection to the electrical system. They are powered by your home’s electrical grid, and their output is controlled by a thermostat.
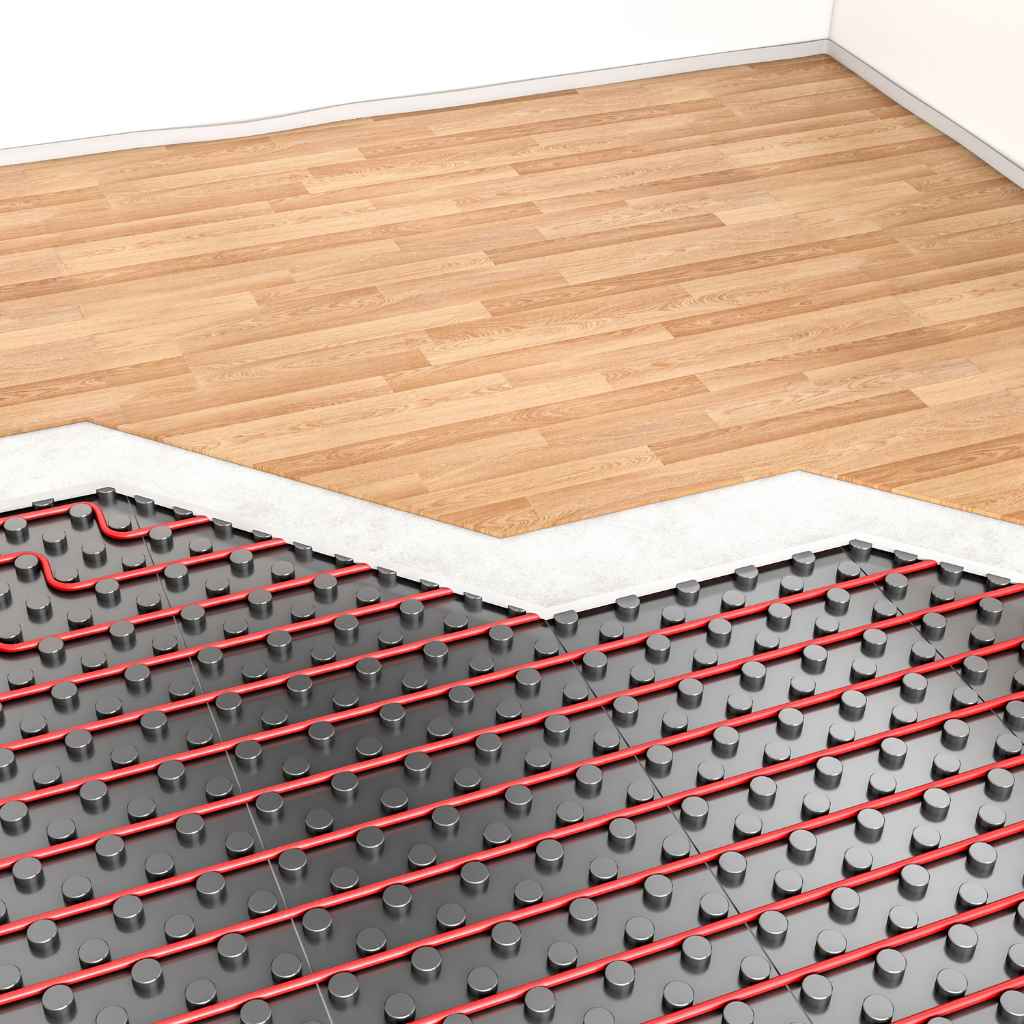
Hydronic Tubing Systems
These systems use flexible plastic tubing, typically PEX (cross-linked polyethylene), laid in a serpentine pattern across the subfloor. Heated fluid is pumped through these tubes, transferring heat to the floor. Hydronic systems are often more complex to install, requiring a boiler or heat pump to heat the fluid, pumps to circulate it, and a manifold to distribute it. They are generally considered more energy-efficient for larger areas.
Thermostats and Controls
Thermostats are crucial for managing the temperature of your radiant heating system. They allow you to set your desired room temperature and program schedules to optimize energy use. Smart thermostats can even learn your habits and adjust heating automatically, further enhancing efficiency. For hydronic systems, more complex controls might be needed to manage pump operation and fluid temperature.
Modern thermostats offer a lot of convenience. You can often control them with your smartphone, ensuring your home is warm when you arrive.
Subfloor and Underlayment
The subfloor and underlayment are critical layers between the heating elements and your wood flooring. The subfloor provides a stable base, while the underlayment acts as a thermal break or a diffusion layer, helping to distribute heat evenly and protect the heating elements. It’s vital to choose an underlayment that is compatible with both your radiant heating system and your specific type of wood flooring. Some underlayments are specifically designed to enhance heat transfer.
Subfloor Preparation
The subfloor must be clean, level, and structurally sound. Any debris or unevenness can create hot spots or prevent proper heat transfer. For electric systems, this might involve installing a thermal break material or a cementitious board to provide a stable, heat-resistant surface. For hydronic systems, the tubing is often embedded in a concrete pour or a specialized underlayment panel.
Underlayment Selection
Choosing the right underlayment is key. Some underlayments are designed to reflect heat upwards, while others are made to conduct heat efficiently. It’s important to consult the manufacturer’s recommendations for both the radiant heating system and the wood flooring to select the best underlayment. Common choices include specialized thermal diffusion mats or thin plywood layers.
Wood Flooring Considerations
Not all wood flooring is ideal for installation over radiant heat. Engineered wood flooring and some solid wood flooring options are suitable, but it’s crucial to follow manufacturer guidelines. Factors like moisture content, thickness, and wood species can affect how the flooring responds to temperature changes. Always verify compatibility to prevent damage.
Think of your wood floor like a blanket. If the blanket is too thick or made of the wrong material, the heat might not get through well, or it could even damage the wood over time.
Understanding Heat Transfer and Compatibility
The interaction between radiant heat and wood flooring is a science of its own. Understanding how heat moves from the elements to the wood, and what types of wood can handle this best, is key to a successful project. This section breaks down the technical aspects in simple terms.
How Heat Travels
Radiant heat transfer primarily occurs through infrared radiation. The heating elements emit infrared waves that directly warm the mass of the floor above them. This warmth then gradually transfers through the subfloor, underlayment, and finally to the wood flooring. Unlike convection heating, which relies on air movement, radiant heat warms objects directly. This leads to a more uniform temperature distribution and a feeling of comfortable warmth without blowing air.
Imagine standing near a fi
Factors Affecting Heat Transfer
Several factors influence how effectively heat transfers to your wood floors. The type of heating element used, the thickness and material of the underlayment, and the thermal conductivity of the wood flooring itself all play a role. A well-designed system will minimize thermal resistance between the heating source and the room’s occupants. Air gaps between layers can act as insulators, hindering efficient heat transfer.
Thermal Resistance (R-value)
Each layer between the heating element and the room has a thermal resistance, or R-value. Higher R-values mean more resistance to heat flow. For optimal performance, you want to minimize the R-value of the subfloor and underlayment when installing radiant heat under wood. Materials like dense concrete or specialized thermal diffusion membranes have lower R-values than thick insulation boards.
Thermal Conductivity (K-value)
Thermal conductivity measures how well a material conducts heat. Materials with high thermal conductivity allow heat to pass through them easily. Wood species, for example, have different K-values. Denser hardwoods generally have lower thermal conductivity than softer woods, but some engineered wood products are designed for better heat transfer.
Wood Flooring Choices
When selecting wood flooring for a radiant heating system, engineered wood is often preferred over solid wood. Engineered wood has a layered construction, usually with a plywood core and a real wood veneer on top. This construction makes it more stable and less prone to expansion and contraction with temperature fluctuations. Some manufacturers recommend a maximum thickness for solid wood flooring, typically around 3/4 inch.
Engineered wood is like a layered cake. Each layer helps it stay stable when things get a little warmer or cooler.
Compatibility Testing
It’s always a good idea to check with both the radiant heating system manufacturer and the wood flooring manufacturer to ensure compatibility. They can provide specific guidelines on acceptable subfloor materials, underlayments, and maximum surface temperatures for their products. Some wood floors may have limitations on the maximum temperature they can withstand to prevent warping or discoloration.
Always double-check! It’s like making sure your shoes fit before a long walk – you want them to work well together.
Guide to Installing Radiant Heat Under Wood Flooring Steps
This section lays out the typical steps involved in installing a radiant heating system beneath wood flooring. While specific details may vary based on the system type (electric vs. hydronic) and materials used, the general process follows a logical sequence. Safety and adherence to manufacturer instructions are paramount throughout.
Step 1 Prepare the Subfloor
Begin by ensuring your subfloor is clean, dry, and level. Remove any old flooring, adhesive, or debris. If the subfloor is uneven, it must be leveled using a suitable leveling compound. This is a crucial step as any imperfections can affect heat distribution and potentially damage the radiant heating system or the wood flooring.
A smooth, clean surface is the foundation for success. Think of it like building a strong house – you need a good base.
Step 2 Install the Heating Elements
For electric systems, this involves laying out the heating cables or mats according to the manufacturer’s layout plan. Secure them in place, ensuring they are not crossed or kinked. For hydronic systems, the PEX tubing is typically laid in a specific pattern (e.g., serpentine or spiral) and secured to the subfloor or embedded in a thin-set mortar or gypsum underlayment.
Electric Cable/Mat Placement
Carefully unroll the heating mat or lay the cable in the designed pattern. Use the provided clips or tape to secure it to the subfloor. Avoid stretching or overlapping the heating elements. Ensure the thermostat sensor is placed correctly within the heated area, typically midway between two runs of cable.
Hydronic Tubing Installation
The PEX tubing is carefully bent and spaced according to the heating design. It is often secured to specialized underlayment panels with a grid system or attached to the subfloor using a thin-set mortar or gypsum-based underlayment. The tubing should be pressure-tested before covering to check for leaks.
Step 3 Install the Underlayment
Over the heating elements, install the approved underlayment. This might be a thermal diffusion mat, a specialized uncoupling membrane, or a layer of thin-set mortar depending on the system. The goal is to protect the heating elements while also promoting even heat distribution.
This layer is like a bridge between the heat source and your beautiful wood floor. It ensures the warmth spreads out evenly.
Step 4 Install the Wood Flooring
Following the wood flooring manufacturer’s instructions, lay your chosen wood planks over the underlayment. This often involves a click-lock system, glue-down method, or nail-down installation. Ensure proper expansion gaps are left around the perimeter of the room, as wood will naturally expand and contract.
Expansion Gaps
Wood flooring needs space to move. Leave a gap of about 1/4 to 1/2 inch around walls, doorways, and any fixed objects. This gap is usually hidden by baseboards.
Adhesive or Fastener Choice
If using a glue-down method, ensure the adhesive is compatible with radiant heat. For nail-down installations, ensure the nails or staples do not penetrate the heating elements.
Step 5 Connect and Test the System
Connect the heating elements to your electrical system or hydronic manifold. A qualified electrician or plumber should perform these connections. Once installed, the system should be tested according to the manufacturer’s guidelines. Electric systems are typically tested for resistance and continuity before the flooring is fully installed, and again after. Hydronic systems undergo pressure testing.
This is where you switch it on and feel the results of your hard work! It’s important this is done by professionals for safety.
Maintenance and Troubleshooting Tips
Even with careful installation, occasional maintenance and troubleshooting might be necessary. Understanding common issues and how to address them can save you time and hassle down the road, ensuring your radiant heated wood floor continues to provide comfort for years to come.
Regular Inspections
Periodically check your radiant heating system for any signs of wear or damage. For electric systems, this might involve occasional checks of thermostat readings or electrical connections. For hydronic systems, monitor pump operation and look for any leaks. Keeping the area around the thermostat and control panel clean is also good practice.
A little check-up now and then can prevent bigger problems later. It’s like giving your car an oil change.
Common Issues and Solutions
One common issue can be uneven heating. This might be due to improper element spacing, air pockets in hydronic systems, or an incorrect underlayment. If you notice cold spots, reassess the installation and consult the system manufacturer. Electrical issues, such as a thermostat not responding, can often be resolved by checking wiring and power supply, but professional help is advised for electrical concerns.
Uneven Heating
If one area is warmer than another, it could mean the heating elements are not spaced evenly or the underlayment isn’t distributing heat properly. Hydronic systems might need their manifolds adjusted or air purged from the lines.
Thermostat Malfunctions
A faulty thermostat can prevent the system from turning on or regulating temperature correctly. First, check the power supply to the thermostat. If that’s fine, the thermostat itself may need to be
When to Call a Professional
While some minor troubleshooting can be done by homeowners, complex electrical issues, major leaks in hydronic systems, or problems with the heating elements themselves should always be handled by qualified professionals. Attempting to repair complex issues without the proper knowledge and tools can be dangerous and may void warranties.
Don’t hesitate to call for help if you’re unsure. The best results come from knowing when to trust the experts.
Frequently Asked Questions
Question: Is it safe to install radiant heat under all types of wood flooring?
Answer: It’s generally safe for most engineered wood floors and some solid wood floors, but you must check compatibility with both the radiant heating system manufacturer and the wood flooring manufacturer. Certain wood types or thicknesses might not be suitable.
Question: How long does radiant heat take to warm up a room with wood floors?
Answer: Radiant heat is a slower, more even heating method. It can take anywhere from 30 minutes to a few hours to fully warm up a room with wood floors, depending on the system, insulation, and the size of the space.
Question: Can I install radiant heat under a floating wood floor?
Answer: Yes, many radiant heating systems are compatible with floating wood floors, provided the correct underlayment and installation methods are used. Always consult the manufacturers’ guidelines.
Question: What is the average cost of installing radiant heat under wood flooring?
Answer: The cost varies greatly depending on the size of the area, the type of system (electric is often cheaper upfront, hydronic can be more efficient long-term), and labor costs. Expect a range from $10 to $30 per square foot for materials and installation.
Question: Do I need special tools to install radiant heat under wood flooring?
Answer: For electric systems, basic tools like wire strippers and multimeters are needed. Hydronic systems might require pipe cutters, crimpers, and pressure testing equipment. Professional installation often uses specialized tools for efficiency and safety.
Summary
This comprehensive Guide to Installing Radiant Heat Under Wood Flooring covered essential components, heat transfer principles, and step-by-step installation procedures. Understanding system parts, compatibility, and proper techniques ensures a warm, comfortable, and efficient home. Always follow manufacturer instructions and consider professional help for electrical and plumbing connections. Enjoy your beautifully heated wood floors.