How To Care For Antique Wood Furniture Without Damaging It
Antique wood furniture holds so much history. It tells stories of families and times gone by. But keeping these precious pieces looking their best can feel tricky.
Bringing an old piece back? See how to restore wood step by step.
You want to be gentle. You worry about making mistakes. This guide will help you feel confident.
We’ll walk through simple ways to care for your wood treasures. You’ll learn to clean, polish, and protect them. Doing this right keeps them beautiful for years.
Antique wood furniture needs careful attention. Proper cleaning, conditioning, and storage help prevent damage. Gentle methods are key to preserving its natural beauty and structural integrity, ensuring it lasts for future generations.
Understanding Your Antique Wood Furniture
Old wood is different from new wood. It’s often drier. It might have been exposed to many different conditions over its life.
Wood can expand and contract with changes in heat and dampness. This is natural. But extreme changes can cause cracks or warping.
Think about where your furniture has been. Has it sat in a sunny window? Has it been in a damp basement?
These past environments shape how the wood behaves now. Knowing this helps you choose the right care.
Each piece of antique furniture is unique. It might have a special finish. Some finishes are shellac.
Others are wax or oil. Some might have even been painted or lacquered. The type of wood matters too.
Oak, walnut, mahogany, and pine all behave a bit differently. They have varying hardness and grain patterns. Identifying the wood and its finish is the first step.
It guides how you should approach cleaning and protection.
Many older pieces may have repairs already. These repairs might be visible or hidden. It’s good to know if a leg has been glued.
Or if a drawer runner has been
The Importance of Gentle Cleaning
When it comes to antique furniture, gentle is always the best word. Harsh chemicals can strip away delicate finishes. They can also soak into the wood.
This can cause discoloration or weaken the structure. Think of it like washing a fine silk scarf. You wouldn’t toss it in a hot washing machine.
You’d use a mild soap and cool water. Your antique wood deserves that same careful touch. Even everyday dust can be abrasive over time.
It can act like fine sandpaper.
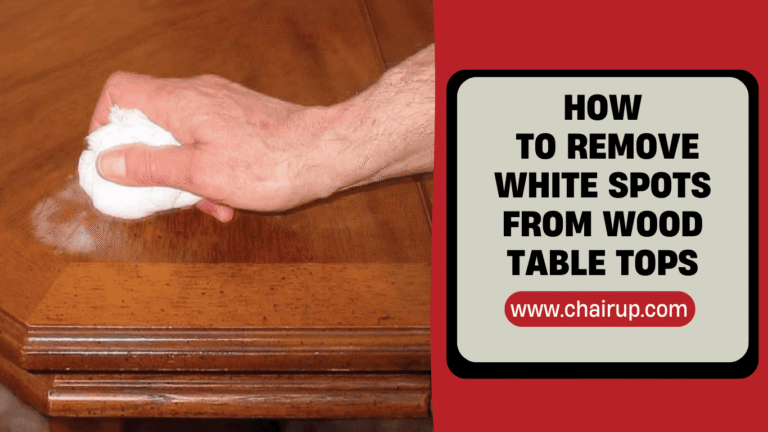
The goal of cleaning is to remove surface dirt. This dirt dulls the finish and can cause damage. We want to lift it away without harming what’s underneath.
This means avoiding ammonia-based cleaners. Stay away from abrasive pads or scrub brushes. Even paper towels can sometimes leave lint or scratch delicate finishes.
Microfiber cloths are your best friend here. They are soft and trap dust effectively.
Regular dusting is much better than deep cleaning infrequently. A quick wipe-down once a week can prevent a lot of buildup. This prevents dirt from becoming ingrained.
It’s the small, consistent efforts that pay off. They keep the furniture looking its best. And they protect the finish from harm.
Step-by-Step Gentle Cleaning Process
Let’s break down how to clean your antique wood. It’s not hard, but it takes a little time. Grab your supplies first.
You’ll need soft microfiber cloths. You might also want a soft brush. Think of a natural bristle paintbrush.
It’s good for tight spots. And you’ll need a wood cleaner. Choose one specifically made for antique or fine wood.
Always do a spot test first.
Find an inconspicuous area. This could be the underside of a shelf. Or the back of a leg.
Apply a small amount of your cleaner to a cloth. Gently rub the test spot. Wait for it to dry.
Check for any color change or damage to the finish. If it looks good, you can proceed. If not, you need to find a milder cleaner or a different approach.
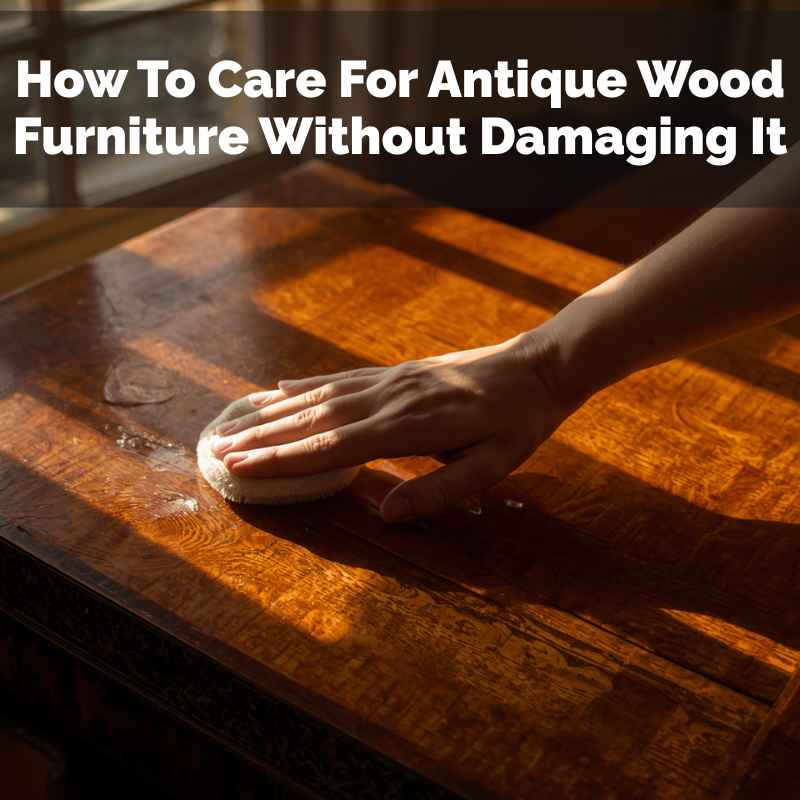
Start with dry dusting. Use a clean, dry microfiber cloth. Wipe down all surfaces.
Gently get into carved areas with your soft brush. Pay attention to edges and crevices. For slightly dirtier spots, dampen a cloth very slightly with your wood cleaner.
Do not spray cleaner directly onto the furniture. Wring the cloth out until it is almost dry. Wipe the area gently.
Follow up immediately with a clean, dry cloth to remove any moisture. Work in the direction of the wood grain. This helps prevent streaks.
Choosing the Right Wood Cleaner and Polish
The market is full of wood cleaners and polishes. But not all are created equal, especially for antiques. Many commercial products contain silicone.
Silicones can build up over time. This buildup can be hard to remove. It can also interfere with future refinishing if you ever choose to do that.
Other products have alcohol. Alcohol can dry out wood and damage finishes.
Look for cleaners that are pH-neutral. This means they won’t be too acidic or too alkaline. They are less likely to harm the finish.
Some brands specialize in furniture restoration products. These are often a safer bet. Natural options can also work well.
A very dilute solution of mild soap (like pH-neutral dish soap) and distilled water can be used. But again, test it and use it sparingly.
For polishing, traditional paste waxes are often recommended. Beeswax or carnauba wax are good choices. These add a protective layer.
They also give a lovely sheen. Apply wax sparingly with a soft cloth. Buff it out gently after it dries a bit.
This builds up a protective barrier. It also enhances the natural beauty of the wood. Avoid sprays.
They can contain solvents and silicones that are not good for old finishes.
The most important rule for polishes and cleaners is: less is more. You are not trying to coat the furniture. You are trying to lightly refresh the existing finish.
A little bit goes a long way. And too much can cause more problems than it solves.
Understanding Wood Finishes
What is a finish? It’s a protective coating on the wood. It makes it look good and last longer.
Common Antique Finishes:
- Shellac: Made from beetle secretions. Can be damaged by alcohol and heat.
- Varnish: A strong protective coating. Can become brittle with age.
- Lacquer: Similar to varnish but dries faster. Can be glossy or matte.
- Oil Finishes: Penetrate the wood. Often look natural and matte.
- Wax: A surface layer. Adds shine and mild protection.
Why it matters: The finish dictates how you clean and polish.
Dealing with Dust and Grime
Dust is the enemy of antique furniture. It settles everywhere. It gets into the wood grain.
It can scratch the finish if rubbed. And it dulls the shine. Regular dusting is your first line of defense.
Use a soft, dry microfiber cloth. Or a lamb’s wool duster. These are great for picking up dust without scratching.
For areas that are hard to reach, like carvings or delicate legs, use a soft-bristled brush. A clean paintbrush works well.
When dusting, work from the top down. This way, any dust you dislodge falls onto areas you haven’t cleaned yet. Wipe gently in the direction of the wood grain.
Don’t scrub. If you notice a sticky spot or a bit of dried-on grime, you might need a damp cloth. Dampen a microfiber cloth with distilled water.
Wring it out until it’s almost dry. Gently wipe the spot. Immediately dry it with a clean, dry cloth.
Avoid using too much water. Water can damage finishes and wood.
Sometimes, a residue can build up from polishes. This can look cloudy or sticky. If this happens, you might need a specialized cleaner.
Look for a “finish cleaner” or a “varnish cleaner.” These are designed to break down old wax or polish buildup. Always test in an hidden spot first. Apply the cleaner to a cloth, not directly to the furniture.
Gently rub the affected area. Then, buff with a clean cloth.
Stubborn grime in crevices can be tricky. A cotton swab (Q-tip) can be useful here. Dampen one end with your cleaner.
Gently work it into the crevice. Then use a dry swab to pick up any loosened dirt and excess moisture. Be patient.
Rushing can lead to damage.
Protecting Your Furniture from Damage
Beyond cleaning, protection is key. Think about the environment your furniture lives in. Sunlight is a major enemy.
The UV rays can fade wood. They can also dry it out. Position antique pieces away from direct sunlight.
Use curtains or blinds to filter light. Extreme temperature changes are also bad. Avoid placing furniture near heating vents or radiators.
Or in drafty areas. Consistent, moderate temperatures are best.
Dampness can cause wood to swell. It can lead to mold or mildew. Dryness can make wood brittle and prone to cracking.
Aim for a moderate humidity level. A hygrometer can help you monitor this. In very dry climates, a humidifier might be helpful.
In very humid areas, a dehumidifier can be a good idea.
Protect surfaces from scratches and heat. Use coasters under drinks. Even though wood is hard, a hot mug can leave a mark.
Use placemats under dishes when serving meals at a table. For tabletops, consider a piece of glass or a custom-made mat. This offers a protective barrier.
But make sure it’s not airtight. Some materials can trap moisture. This can damage the finish.
When moving furniture, always lift. Never drag. Dragging can cause damage to the legs, feet, and the floor.
If a piece is very heavy, get help. Or use furniture sliders made for delicate items.
Quick Scan: What NOT to Do
AVOID:
- Harsh Cleaners: Ammonia, bleach, all-purpose sprays.
- Abrasive Tools: Steel wool, rough sponges, stiff brushes.
- Excess Water: Never soak the wood.
- Direct Sunlight: Causes fading and drying.
- Extreme Temperatures/Humidity: Leads to cracks and warping.
- Dragging Furniture: Always lift!
- Silicone-Based Polishes: Can build up and cause problems.
Dealing with Scratches and Minor Damage
Minor scratches are almost inevitable with antique furniture. But there are ways to make them less noticeable. For light surface scratches, sometimes rubbing with a walnut or pecan can help.
The oils in the nut can blend with the wood. It can fill in the scratch slightly. Rub the nut over the scratch.
Then buff with a soft cloth. Be careful, as this can slightly darken the wood.
For deeper scratches, you might need a touch-up pen or a furniture repair crayon. These come in many wood tones. Choose a color that closely matches your furniture.
Apply it carefully to the scratch. Wipe away any excess with a soft cloth. Blend it in gently.
This is best for small, superficial damage.
If the finish is chipped, you can sometimes use a bit of paste wax. Choose a wax that matches the color of your finish. Press a small amount into the chip.
Buff it smooth. This can seal the chip and make it less obvious.
For more significant damage, like deep gouges or veneer lifting, it’s often best to consult a professional. Trying to fix major damage yourself can sometimes make it worse. A furniture restorer has the skills and tools to handle these issues correctly.
When to Call a Professional Restorer
There are times when DIY care just isn’t enough. If you have a valuable antique, or a piece with sentimental importance, knowing when to call an expert is crucial. A professional furniture restorer has a deep understanding of antique wood.
They know different techniques. They can identify wood types and finishes. They can also assess structural issues.
You should consider calling a restorer if you notice any of these problems:
- Structural Instability: Loose joints, wobbly legs, sagging drawers.
- Severe Veneer Damage: Large sections peeling or missing.
- Deep Cracks or Splits: Especially if they go through the wood.
- Water Stains or Rings: If they are very dark or have damaged the finish.
- Insect Infestation: Evidence of woodworm or termites.
- Extensive Finish Damage: Large areas of blistering, flaking, or wear.
- Uncertainty: If you are unsure about the wood type, finish, or how to proceed.
A good restorer can save pieces that seem beyond repair. They can also advise you on the best long-term care for your specific furniture. Ask for references.
Look at their past work. Make sure they have experience with pieces similar to yours. The goal of restoration is often to preserve as much of the original material and finish as possible.
Storage and Moving Antique Furniture
Proper storage is vital for maintaining antique furniture. When storing pieces, climate control is the most important factor. Avoid attics or garages.
These places often have extreme temperature swings and high humidity. This can cause wood to warp, crack, or even rot. Basements can be damp and dark, also promoting mold and mildew.
The ideal storage environment is cool, dry, and dark.
If you need to wrap furniture for storage, use breathable materials. Avoid plastic wrap. Plastic traps moisture.
This can cause mold and mildew to grow. Old cotton sheets or furniture blankets are better choices. They protect the surface without sealing in dampness.
Make sure the furniture is clean and dry before wrapping it.
When moving antique furniture, take your time. Clear the path. Remove any obstacles.
Always lift, never drag. Get help for heavy pieces. If you have to move it across a floor, use furniture sliders designed for delicate items.
These are often felt-bottomed to protect surfaces.
When loading furniture into a moving truck, secure it well. Use moving blankets to pad it. Use straps to tie it down.
But don’t overtighten the straps. This can create pressure points and damage the wood. Place heavier items on the bottom.
Ensure that nothing can shift and fall onto the antique pieces during transit.
Storing Your Antiques Safely
Ideal Conditions:
- Temperature: Stable, between 60-75°F (15-24°C).
- Humidity: Moderate, between 40-55% relative humidity.
- Light: Dark or very low light to prevent fading.
Avoid: Attics, garages, damp basements, direct sunlight.
Wrapping: Use breathable cotton sheets or blankets, NOT plastic.
Maintaining Upholstery and Metal Accents
Many antique furniture pieces have upholstery. This fabric can be delicate. It can also hold dust and odors.
Regular vacuuming is essential. Use the brush attachment on your vacuum. Go over the fabric gently.
Work in the direction of the weave. For very old or fragile upholstery, be extra careful. Some people prefer to have antique fabrics professionally cleaned.
If you have antique furniture with metal accents, like brass or iron hardware, these need care too. Brass can tarnish. Iron can rust.
Clean metal parts separately from the wood. Use a cleaner appropriate for the metal. For brass, a mild brass polish can restore its shine.
Apply it to a cloth, not directly to the furniture. Rub gently. Then buff with a clean cloth.
For iron, remove any rust with a fine steel wool or a wire brush. Then apply a thin coat of paste wax to prevent future rust.
Be very careful not to get metal cleaners on the wood. Many metal polishes contain abrasives or chemicals that can damage wood finishes. If you get any on the wood, wipe it off immediately with a damp cloth and dry thoroughly.
Common Myths About Antique Furniture Care
There are many old wives’ tales about caring for antique furniture. Some are harmless. Others can cause damage.
One common myth is that you need to oil antique wood constantly. While some antique finishes were oil-based, most modern care involves light dusting and occasional waxing. Too much oil can make the finish sticky and attract dust.
Another myth is that you should always use lemon oil. Lemon oil can actually break down some finishes over time. It’s better to use products specifically designed for wood.
Or stick to natural waxes and very mild cleaners. Some people believe that every scratch needs to be filled with colored wax or polish. While this can hide minor damage, it’s important not to overdo it.
Too much filler can look unnatural and may not be reversible.
The idea that antique furniture needs to be “fed” with oils is also often misunderstood. The wood itself doesn’t get hungry. It’s the finish that needs protection and occasional refreshing.
Think of it as protecting a delicate painting’s varnish, not feeding the canvas.
Myth vs. Reality
Myth: You must constantly oil antique furniture.
Reality: Over-oiling can damage finishes. Gentle dusting and occasional waxing are usually enough.
Myth: Lemon oil is the best for antique wood.
Reality: Lemon oil can harm some finishes. Use specialized wood cleaners or natural waxes.
Myth: All scratches should be filled immediately.
Reality: Minor scratches can sometimes be left alone or gently buffed. Overfilling can look bad.
A Personal Story: The Over-Polished Chair
I remember working with a client once who had a beautiful, old rocking chair. It was an heirloom. She loved it dearly.
But she had a habit of over-polishing. Every few weeks, she’d give it a good coat of spray polish. She thought she was taking great care of it.
The chair looked shiny, sure. But up close, I could see a sticky, cloudy buildup. It was dulling the wood’s natural glow.
The spray polish contained silicones. These had built up layer after layer. It was like putting a plastic film on the wood.
It also made the wood feel tacky. Dust just clung to it. I explained what was happening.
She was worried she had ruined it. We decided to try a specialized furniture cleaner. It took several applications.
We gently worked at the buildup with microfiber cloths. It was slow, tedious work. I could feel her anxiety as we worked.
Finally, after hours of careful cleaning, the original finish started to show through. The deep, rich color of the wood reappeared. The tacky feeling was gone.
The chair looked like itself again. She was so relieved. It taught her that “more” isn’t always better when it comes to furniture care.
It’s about the right kind of care, not just frequent care. That chair still sits in her home, cared for properly now, a beautiful reminder of a lesson learned.
The Role of Humidity in Wood Furniture
Humidity is a huge, often overlooked, factor in how wood furniture behaves. Wood is a natural material. It breathes.
It absorbs and releases moisture from the air. This is called hygroscopic behavior. When the air is damp, wood soaks up moisture and swells.
When the air is dry, wood releases moisture and shrinks.
This constant expansion and contraction can put stress on the wood. It can cause joints to loosen. It can lead to cracks, especially in older, drier wood.
Imagine a wet sponge. It gets bigger. Then, when it dries, it shrinks and can become hard.
Wood does this too, but much more slowly and subtly.
In homes, humidity levels often change. Winter heating dries out the air. Summer air conditioning can also lower humidity.
Humidifiers in winter and dehumidifiers in summer can help keep your home’s humidity stable. Aim for a level between 40% and 55% relative humidity. This is generally considered ideal for wood furniture.
If you notice doors sticking or drawers becoming hard to open in dry weather, it’s likely the wood swelling. If you see small cracks appearing in dry conditions, that’s the wood shrinking and stressing. Maintaining consistent humidity is one of the best ways to prevent long-term damage.
Conserving vs. Refinishing Antique Furniture
This is a big topic for antique owners. Conservation means preserving the furniture as it is. This involves careful cleaning, stabilization, and repair.
The goal is to stop further deterioration. It’s about keeping the original patina and character of the piece. Refinishing means stripping away the old finish and applying a new one.
This can make the furniture look new again.
For most valuable antiques, conservation is preferred. The original finish and patina have historical value. They tell the story of the piece.
Refinishing can significantly decrease an antique’s value. It essentially makes it a “newer” piece. Think of it like restoring an old painting.
You clean it and repair damage, but you don’t repaint it. You keep the artist’s original work.
If your furniture has a badly damaged finish, or is already heavily over-finished, refinishing might be an option. But it’s a decision that should be made carefully. It’s often irreversible.
If you are considering refinishing, consult with a professional first. They can advise you on whether it’s appropriate for your piece and what the implications might be.
Conservation often involves stabilization. This means fixing loose joints, repairing veneer, and protecting fragile areas. It’s about making the piece sound and stable for the future.
It’s a less invasive approach. It respects the history of the object.
Checking for Woodworm and Other Pests
Woodworm is a common problem with older wooden items. It’s actually the larvae of certain beetles that bore into the wood. You might not see the live insects.
But you’ll see the signs. Look for small, round holes on the surface of the wood. These are called “flight holes.” You might also find fine, powdery dust, called “frass,” near these holes.
Frass often looks like tiny sawdust. It might be scattered on the surface or on the floor beneath the furniture.
If you suspect woodworm, act quickly. Small infestations can often be treated at home. You can buy woodworm killer products.
These usually come in a spray or a liquid. Follow the instructions carefully. You’ll need to apply the treatment to all affected areas.
Sometimes, you might need to inject it into the holes. It’s a good idea to treat the entire piece of furniture. And perhaps surrounding wooden items too.
After treatment, keep an eye on the furniture. Look for new holes or fresh frass. If the problem persists, or if you find signs of other pests like termites, it’s best to call a pest control professional.
They can identify the specific pest. They can recommend the most effective treatment. Furniture with severe woodworm damage may also need professional restoration to repair the weakened structure.
Signs of Woodworm
What to Look For:
- Small Holes: Round, about 1-2mm wide.
- Powdery Dust (Frass): Looks like fine sawdust, often found near holes.
- Tunneling: Can sometimes be seen if you look closely at the holes.
- Weakened Wood: The wood might feel soft or crumbly.
What to Do: Treat with a woodworm killer. Monitor for new activity. Call a professional if needed.
Maintaining the Shine: Buffing and Waxing
Once your furniture is clean, maintaining its shine is about gentle polishing. This isn’t about coating it with glossy sprays. It’s about bringing out the natural luster of the wood.
Paste wax is your best option. Look for waxes made from carnauba or beeswax. These are natural and offer good protection.
Apply the wax sparingly. Use a clean, soft cloth. Rub a small amount of wax onto the cloth.
Then, apply it to the furniture surface. Work in small sections. Use light, circular motions or strokes following the wood grain.
You don’t need to use a lot of pressure. The wax will fill in microscopic imperfections in the finish.
Let the wax dry for a few minutes. It should look hazy. Then, buff it off with a clean, dry, soft cloth.
Buffing is what creates the shine. Use a clean part of the cloth for each section. You are essentially polishing the wax layer.
The more you buff, the shinier it will get. This process not only adds a beautiful sheen but also provides a protective barrier against dust and minor spills.
You don’t need to wax antique furniture very often. Once or twice a year is usually plenty. Over-waxing can lead to a buildup that dulls the finish.
It’s better to do it less often but do it right. Always test any new wax product in an inconspicuous area first.
The Impact of Sunlight on Wood
Sunlight is one of the most destructive forces for antique wood furniture. The ultraviolet (UV) rays in sunlight have a powerful effect. They cause the lignin in wood to break down.
This process leads to fading. Colors will lighten. Wood can also become brittle over time.
This makes it more prone to cracking.
Think about a piece of furniture that has always sat near a sunny window. You’ll often see that the exposed side is lighter. The side that has been in the shade is darker.
This is a clear sign of UV damage. It’s not just about aesthetics. The structural integrity of the wood can also be compromised.
To protect your furniture, positioning is key. Try to place antique pieces away from direct sunlight. If that’s not possible, use window treatments.
Curtains, blinds, or UV-filtering films can significantly reduce the amount of UV light reaching the furniture. Rotate your furniture occasionally if possible. This helps to even out any fading that might occur.
Even indirect sunlight can cause damage over time. It’s a slow process, but it’s cumulative. So, being mindful of where you place your antique treasures is a vital part of their long-term care.
The Right Way to Place Coasters and Mats
Coasters and placemats are essential for protecting antique tabletops. But how you use them matters. Always ensure that coasters and mats are clean.
A dirty coaster can scratch a finish just as easily as a bare glass can. Make sure the material of the coaster or mat is suitable. Felt-backed coasters are generally a good choice.
They provide cushioning.
Avoid using materials that could trap moisture against the wood. Some plastic or vinyl placemats can do this. Over time, trapped moisture can damage the finish.
It can cause cloudiness or even lift the finish off the wood. If you use a custom-cut piece of glass for a tabletop, ensure there is some airflow underneath. Sometimes, small clear plastic bumpers are placed between the glass and the wood to allow for this.
Also, be mindful of heat. A hot mug or serving dish can leave a mark on many finishes, even with a coaster or mat. For very hot items, it’s best to use a trivet.
A trivet is a heat-resistant mat. It offers more protection than a standard placemat.
When you’re not using coasters or placemats, store them neatly. Don’t just leave them piled up on the table. This also helps to keep them clean and ready for use.
It’s about consistent, thoughtful protection.
Quick Fixes for Common Issues
Sometimes, you just need a quick fix for a small problem. Here are a few handy tips:
- Sticky Drawers: Rub a bar of plain soap or a candle along the drawer runners.
- Loose Veneer: For small lifts, try wood glue and a clamp. Protect the veneer with a piece of cardboard.
- Minor Scuffs: Try rubbing with a soft cloth that has been lightly buffed with paste wax.
- Water Rings: For fresh rings, try placing a dry towel over it and ironing on a low setting.
For older rings, a professional may be needed.
- Paint Smudges: If you get paint on your wood, try gently removing it with a cloth dampened with mineral spirits. Test first.
Remember, these are for minor issues. If you are unsure, it’s always better to consult a professional.
Frequently Asked Questions
What is the best way to clean antique wood furniture?
The best way to clean antique wood furniture is with a soft, dry microfiber cloth for dusting. For slightly dirtier spots, use a cloth slightly dampened with a pH-neutral wood cleaner, wrung out until almost dry. Always work in the direction of the wood grain and follow up with a dry cloth immediately.
How often should I polish antique furniture?
You generally only need to polish antique furniture once or twice a year. Over-polishing can lead to a buildup of product that dulls the finish. Use a good quality paste wax and buff it gently.
Less is often more when it comes to polishing antique wood.
Can I use furniture polish sprays on my antiques?
It’s generally best to avoid furniture polish sprays on antique furniture. Many contain silicones, alcohol, or solvents that can damage delicate finishes or build up over time, making the wood look dull and sticky. Opt for paste waxes or specialized wood cleaners instead.
What should I do about water rings on my antique table?
For fresh water rings, you can try placing a dry towel over the ring and gently ironing over it with a warm iron (not hot). The heat helps to draw the moisture out of the wood. For older or deeper rings, you may need to consult a professional restorer as the finish may be damaged.
Is it okay to use essential oils on antique wood furniture?
It’s generally not recommended to use essential oils directly on antique wood furniture. While some oils can be beneficial for wood, essential oils are highly concentrated and can potentially damage delicate finishes or cause discoloration. Stick to tested wood care products or natural waxes.
How do I protect my antique furniture from sunlight?
To protect antique furniture from sunlight, place it away from direct sun exposure. Use curtains, blinds, or UV-filtering window films to reduce the amount of light. Rotating the furniture occasionally can also help to even out any fading that might occur over time.
Caring for Your Heirlooms
Caring for antique wood furniture is a journey. It requires patience and a gentle touch. By understanding your furniture’s needs and using the right methods, you can preserve its beauty.
You ensure it remains a cherished part of your home for years to come. Remember to always test products first. Work slowly and deliberately.
Your efforts will be rewarded with furniture that tells its story for generations.