How to Fix Wood Rot Around Doors: Repair or Replace?
Wood rot around a door forms when moisture-fed fungi break down softwood fibers — usually at the bottom corners of the frame or the threshold, where rain and standing water collect. Left alone for a season, soft rot can spread through an entire jamb and force a $400+ frame replacement. This guide covers identifying wet rot vs. dry rot, choosing wood hardener or epoxy filler, and the exact repair steps.
Note: Insert your Affiliate Disclosure reusable block here.
Tools and Materials You’ll Need
Best Wood Rot Repair Kit Pick
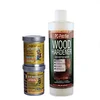
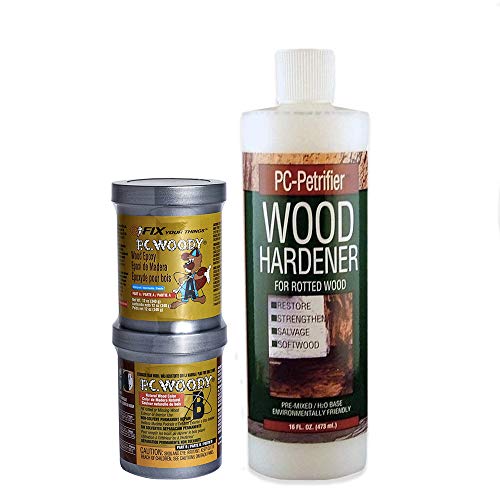
PC-Woody Epoxy Paste + PC-Petrifier Wood Hardener Kit
A hardener-and-filler combo covers both repair steps — strengthen the soft wood first, then rebuild what’s missing — without buying two separate products.
- Best for: Most door-frame rot repairs — soft wood plus small missing sections
- Why we picked it: Combines a liquid hardener for the soft fibers with a two-part epoxy paste to rebuild what’s missing, in one bundle
- Main drawback: Epoxy paste sets fast once mixed, so work in small batches
Compare more wood rot repair options
 Option 1 Re-Rot Wood Repair Kit (48 oz, with tools)
|
 Option 2 TotalBoat Clear Penetrating Epoxy Sealer
|
 Option 3 PC Products 84113 Rotted Wood Repair Kit
|
As an Amazon Associate we earn from qualifying purchases.
- Safety goggles, N95 respirator mask, and gloves
- Chisel, utility knife, and a putty knife
- Screwdriver (for door/hinge removal, if needed)
- Liquid wood hardener
- Two-part epoxy wood filler
- 120- and 220-grit sandpaper or a sanding block
- Exterior wood primer and paint
Wet Rot vs. Dry Rot: Which One Is on Your Door?
Wet rot is a fungal decay that needs sustained high moisture (roughly 50%+ wood moisture content) to grow. It is the type found on almost every rotted door frame, because thresholds and bottom corners sit closest to rain and standing water. Wet rot looks dark, feels soft and spongy, and usually stays localized to the wet spot — it does not spread once it reaches drier wood or masonry.
Dry rot is less common on doors but far more destructive when it appears. It needs less moisture to establish itself, looks brittle, cracked, and powdery rather than soft, and can spread through masonry and plaster to find new wood to infect. If the wood crumbles to dust rather than mush when probed, treat it as dry rot and inspect well beyond the visibly damaged area — including the framing behind the trim — before repairing.
Signs of Damage
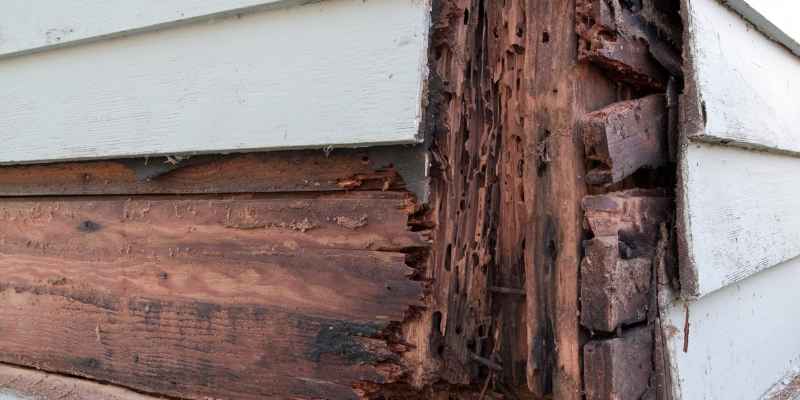
- Soft or spongy wood that gives under a screwdriver tip
- Crumbling, cracked wood, or a hollow sound when tapped
- Discoloration — darker or grayer than the surrounding wood
- A musty, earthy odor near the frame
- Visible fungi, mushrooms, or paint bubbling and peeling
Where It Shows Up First
| Area | Why Moisture Collects There |
|---|---|
| Bottom door frame corners | Rain runoff and splash-back pool at ground level |
| Thresholds and sills | Standing water, snow melt, and ice |
| Trim and molding | Overflow from clogged gutters or downspouts |
| Caulk joints and seams | Cracked or missing caulk lets water behind the trim |
What Causes Wood Rot Around Doors
Two things cause almost every case: moisture intrusion and deferred maintenance. Clogged gutters, cracked or missing caulk, and condensation all push water into unprotected wood; once the finish is compromised, it’s only a matter of time. A door frame that was never primed on the end grain rots faster, and a frame that’s already taken on standing water shows the same early signs as any other water-damaged wood around the house.
Preventing it going forward is cheaper than any repair: keep gutters and downspouts clear, recaulk seams every 1-2 years, and repaint or reseal exposed wood before the finish fails — not after.
Wood Hardener or Epoxy Filler — Which Do You Need?
These are two different products for two different jobs, and most repairs need both. Wood hardener is a thin liquid that soaks into the remaining wood fibers and stiffens them so they can hold a filler. Epoxy filler is a thick two-part paste that rebuilds the wood that’s actually missing, after the hardener has cured — if you’d rather mix your own wood filler from what’s already in the shop, that works for small gaps too, though it won’t match epoxy’s water resistance outdoors.
| Situation | Use | Why |
|---|---|---|
| Surface softness only, wood is mostly intact | Wood hardener alone | Restores rigidity without needing to rebuild missing material |
| Small chunks of wood are missing | Hardener, then epoxy filler | Hardener stabilizes the edges; filler replaces what’s gone |
| Rot runs more than halfway through the board | Cut and splice in new wood | Filler over a weak core won’t hold structural load |
| Rot has reached the framing behind the trim | Call a professional | Structural repair, not a surface fix |
A hardener-only fix is faster and cheaper, but the bond is softer and less weather-resistant than a fully cured epoxy system — fine for a painted interior door stop, riskier on an exterior threshold that sees constant wetting and freezing.
How to Fix Wood Rot Around Doors: Step by Step
Put on safety goggles, an N95 mask, and gloves before you start — rot spores and old paint dust are both worth avoiding. Then work through these steps in order.
- Remove the door (if needed): Support the door with a wedge, unscrew the hinges, and set it aside so you have clear access to the frame.
- Cut out the rotted wood: Use a chisel or utility knife to remove every soft, dark, or crumbling section down to solid wood. Stop only when the chisel meets firm resistance.
- Clean the cavity: Vacuum out debris and old paint chips, then let the area dry fully before treating it.
- Apply wood hardener: Brush the liquid hardener onto all exposed wood and let it cure per the label — usually 15-30 minutes before it’s tack-free.
- Mix and apply epoxy filler: Mix only what you’ll use in the next few minutes — most two-part epoxies set within 15-20 minutes. Press it into the cavity with a putty knife, slightly overfilling.
- Sand and shape: Once fully cured (check the label; some need 24 hours), sand the filler flush with 120-grit, then 220-grit for a smooth finish.
- Prime and paint: Use an exterior-rated primer on bare wood and filler, then two coats of exterior paint to match the rest of the frame.
- Rehang the door: Check hinges for rust, rehang, and confirm the door sits plumb and closes without binding.

When to Replace Instead of Repair
Repair when the rot is limited to a corner, a section of trim, or the surface of the jamb and the core wood underneath is still solid. Replace the frame when rot has spread through more than half a board’s thickness, when it’s reached load-bearing framing, or when the door no longer sits plumb because the frame itself has shifted. In our experience, a frame that’s been soft in the same spot for more than one wet season is almost always past the point where filler alone holds up long-term — it’s cheaper to splice in a new section now than to redo a filler repair in two years.
How to Prevent Wood Rot From Coming Back
- Keep gutters and downspouts clear so overflow doesn’t run down onto the frame below.
- Recaulk seams every 1-2 years — cracked caulk is one of the most common entry points for water.
- Repaint or reseal before the finish fails, not after — a $30 can of paint is cheaper than another repair.
- Improve airflow around the door if condensation is a recurring problem.
- Use pressure-treated or rot-resistant wood for any section you’re replacing.
When to Call a Professional
Call a carpenter or handyman if the rot has reached structural framing, if more than one side of the frame is affected, or if you’re not confident diagnosing wet rot vs. dry rot yourself — misreading dry rot in particular can leave hidden damage behind the trim. A professional also carries liability if the door needs to come off a load-bearing header, which a DIY repair does not cover.
Frequently Asked Questions
How can I identify wood rot around doors?
Look for soft or spongy wood, dark discoloration, a musty smell, or visible fungus. Probe suspect areas with a screwdriver — if it sinks in easily, that section is rotted. Check the bottom corners of the frame and the threshold first, since those areas collect the most moisture.
What’s the difference between wet rot and dry rot on a door frame?
Wet rot looks dark and spongy and stays where the moisture is; it’s the type found on almost all door frames. Dry rot looks brittle and powdery, needs less moisture to grow, and can spread through masonry to reach new wood — it’s less common on doors but requires a wider inspection when it shows up.
Should I use wood hardener or epoxy filler?
Use wood hardener first on any soft or spongy wood you’re keeping — it stiffens the fibers so filler has something to bond to. Add epoxy filler wherever wood is actually missing. Hardener alone works for surface softness; filler is for rebuilding lost material.
How much does it cost to repair vs. replace a rotted door frame?
A DIY repair kit with hardener and epoxy filler runs roughly $20-$60. Full professional frame replacement averages about $400 including labor, according to Angi’s 2026 cost data. Repair first if the rot is localized — replacement is worth it once rot has spread through the core of the frame.
Can I prevent wood rot from coming back after repairing it?
Yes — keep gutters clear, recaulk seams every 1-2 years, and repaint or reseal exposed wood before the existing finish fails. Most repeat rot happens because the original moisture source (a leaking gutter, failed caulk, or bare end grain) was never actually fixed.
Conclusion
Most door-frame rot is a weekend fix: cut out the soft wood, harden what’s left, rebuild the gap with epoxy filler, then seal it against the next rainy season. Save the $400 frame replacement for rot that’s gone structural — for everything else, a $20-$60 repair kit and an afternoon will do it. For general rot repair on furniture or framing elsewhere in the house, see our full wood rot repair guide, or check our wood care and maintenance guide for the full prevention picture.
Sponsored / affiliate links. As an Amazon Associate I earn from qualifying purchases. I may earn additional commission from eligible campaigns.