How To Clean White Oak Floors Without Leaving Any Streaks
White oak floors look so clean and bright. But keeping them that way can feel like a challenge. You want them to gleam, not look hazy.
Many people struggle with streaks. It’s frustrating when you spend time cleaning. Then you look at the floor.
Streaks are there. This guide will help you. We’ll go over easy ways to clean your white oak floors.
You’ll learn what to use. You’ll also learn what to avoid. Get ready for beautiful, shiny floors.
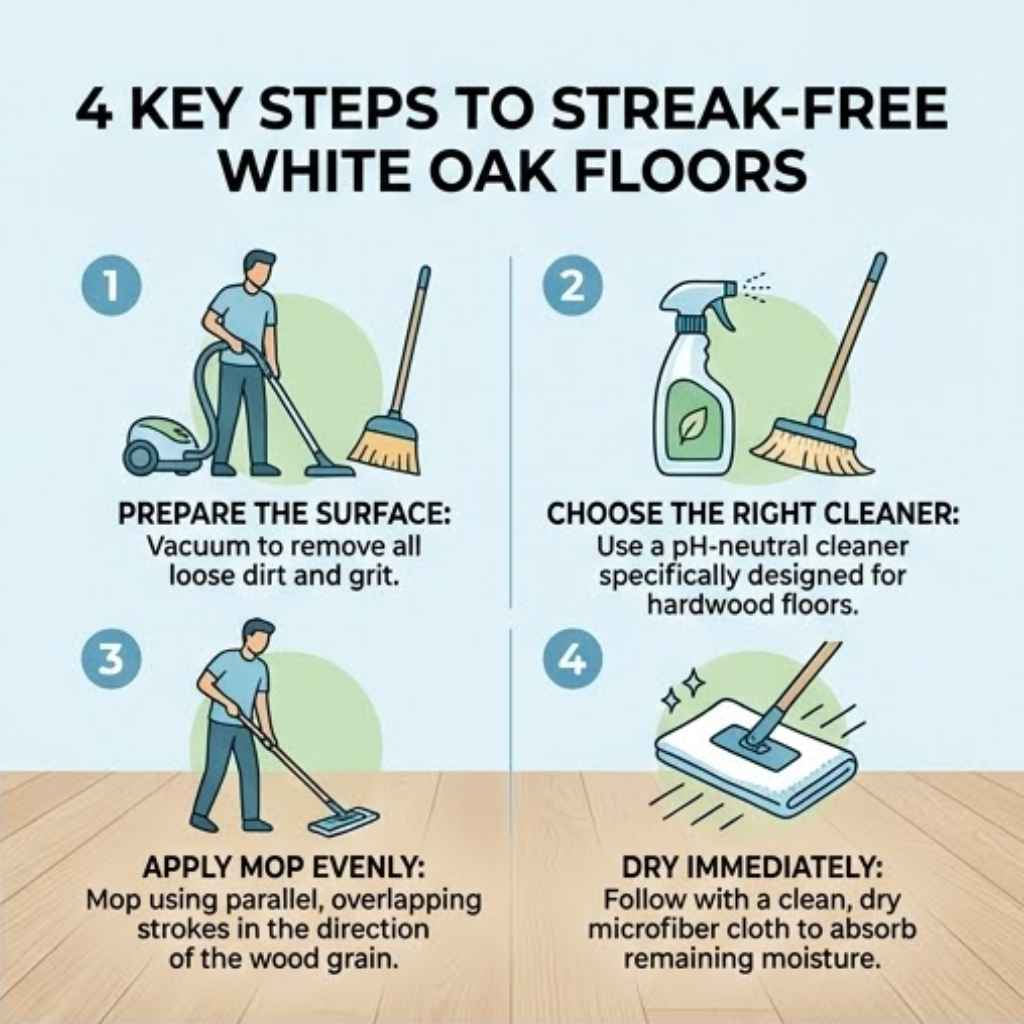
To clean white oak floors without streaks, use a pH-neutral cleaner diluted in water. Sweep or vacuum first. Then, damp-mop with a microfiber mop.
Always wring out the mop well. Never use excessive water or harsh chemicals. Work in small sections and dry any standing water immediately.
Understanding White Oak Floors
White oak is a popular choice for flooring. It has a beautiful, light color. This color works well in many homes.
It makes rooms feel bigger and brighter. The wood itself is strong. It can handle a lot of daily use.
However, its light color can show dirt and marks easily. This means you need to clean them. But cleaning them the wrong way can cause problems.
One big problem is streaking. Streaks look like faded lines. They appear after the floor dries.
They can make your beautiful floors look dull. They can make them look dirty. This is often caused by too much cleaner.
It can also be caused by the wrong kind of cleaner. Water can also play a part. So can the way you mop.
Knowing how your floor is finished is important. Most white oak floors have a protective top coat. This could be polyurethane.
It could be another type of sealer. This coat protects the wood. It also affects how you should clean it.
A sealed floor is easier to clean. An unfinished floor needs different care. Most modern floors are sealed.
We will focus on those.
Why Streaks Happen
Streaks on your white oak floors are a common worry. They are usually not the floor’s fault. They are mostly from the cleaning process.
Let’s break down the main reasons.
Too much cleaner is a big culprit. When you use too much cleaner, it leaves a residue. This residue is sticky.
It attracts dirt. It also dries unevenly. This uneven drying creates those hazy lines.
It looks like dirt left behind. It’s actually cleaner and water combined.
Using the wrong type of cleaner is also a problem. Many common floor cleaners are too harsh. Some contain ammonia or bleach.
These can damage the finish. They can break down the protective coat. This makes the floor more open to stains.
It also makes it more prone to streaking. Even vinegar, which some people like, can be too acidic for some finishes.
Water is another factor. If you use too much water, it can get into the wood. It can also leave a residue when it dries.
Dampness can linger. This dampness mixes with cleaner. It creates a hazy film.
Over-wetting can also harm the wood over time. It can cause warping or cupping.
The cleaning tool itself matters. If your mop is dirty, it will spread dirt. If it holds too much water, it will leave too much liquid.
Old mops can hold onto old cleaner. This old cleaner can then be spread around. A good microfiber mop is best.
It picks up dirt well. It doesn’t hold too much water.
Finally, the drying process can cause streaks. If you let the water and cleaner air dry, it can leave marks. Especially if there’s a slight breeze.
This breeze can move the wet cleaner around. It dries in lines. It’s better to help the floor dry quickly.
The Best Tools for the Job
Having the right tools makes cleaning easier. It also helps you avoid streaks. Think of it like painting.
You need the right brushes for a smooth finish.
Microfiber Mop: This is your best friend. Microfiber is amazing at picking up dirt. It traps dust and grit.
It also doesn’t leave much water behind. Look for a mop with a flat head. It can get into corners.
It should also have a washable pad. You can use it over and over.
Two Buckets: This is a game-changer. One bucket has your cleaning solution. The other bucket has clean rinse water.
You dip your mop in the cleaner. Then you mop the floor. After you mop a section, rinse the dirty mop in the plain water bucket.
Then dip it back into the cleaner. This keeps your cleaning water cleaner for longer. It stops you from spreading dirty water.
pH-Neutral Cleaner: This is super important. A pH-neutral cleaner is gentle. It won’t harm your floor’s finish.
It won’t leave a sticky residue. Many companies make cleaners for hardwood floors. Look for one that says “pH-neutral” or “safe for sealed hardwood.” Avoid anything with ammonia or strong detergents.
Soft Bristle Brush: Sometimes, dirt gets stuck in the wood grain. A soft brush can help. Use it gently on tough spots.
Make sure it’s not too stiff. It should not scratch the finish.
Clean Towels or Rags: Keep some clean, dry microfiber towels or cloths handy. You can use them to dry any damp spots quickly. This helps prevent water spots and streaks.
Vacuum or Broom: Always start by removing loose dirt. A vacuum with a hard floor attachment works well. Or use a soft-bristle broom.
This stops you from pushing dirt around while mopping.
Step-by-Step: Cleaning White Oak Floors
Let’s walk through how to clean your floors. Follow these steps for a streak-free shine. It’s not complicated.
It just needs a little care.
Step 1: Clear the Area
Move any rugs or furniture out of the way. This gives you a clear path. You can clean better when there’s nothing in your way.
If you can’t move big items, just clean around them.
Step 2: Sweep or Vacuum
First, get rid of all loose dirt. Use a soft broom or a vacuum cleaner. Make sure your vacuum has a setting for hard floors.
You don’t want the beater bar scratching the wood. This step removes grit. It stops you from making mud when you mop.
Step 3: Prepare Your Cleaning Solution
Get your two buckets ready. Fill one bucket with cool water. Add a small amount of your pH-neutral cleaner.
Follow the cleaner’s instructions. Usually, it’s just a capful or two. Too much cleaner causes streaks.
Fill the second bucket with plain, cool water. This is your rinse bucket.
Step 4: Damp Mop the Floor
Dip your microfiber mop head into the cleaner bucket. Wring it out very well. The mop should be damp, not wet.
You want to see a light sheen of moisture, not puddles. Start mopping in a corner of the room. Work your way towards the exit.
Mop in straight lines. Overlap your strokes slightly.
After mopping a small section (like 4-6 feet), rinse your mop. Dip it into the plain water bucket. Swish it around.
Then wring it out well again. Now, dip it back into the cleaner bucket. Continue this process.
Keep your cleaning water as clean as possible.
Step 5: Address Stubborn Spots
If you see a spot that won’t come up, don’t scrub hard. Spray a little of your cleaner directly onto the spot. Let it sit for a minute.
Then use a soft cloth or a soft brush to gently lift the stain. Wipe it clean with a damp cloth. Then dry the area well.
Step 6: Dry Any Wetness
As you finish a section, check for any standing water. If you see any, wipe it up with a clean, dry towel or cloth. Don’t let water sit on your white oak floors.
This step is crucial for preventing water marks and streaks. Most of the time, if you wring out your mop enough, this step is minimal. But it’s good to check.
Step 7: Let it Air Dry
Once you’ve mopped and dried any wet spots, let the floor finish drying naturally. Open a window a bit if you can. This helps the air circulate.
It speeds up drying. Your floors should look clean and shiny. There should be no hazy lines.
You’ve done it!
Quick Cleaning Checklist
- Clear the floor
- Sweep or vacuum thoroughly
- Use two buckets
- Mix pH-neutral cleaner with cool water
- Wring mop until it’s just damp
- Mop in straight lines
- Rinse mop often in clean water
- Dry any remaining water
- Ensure good air circulation for drying
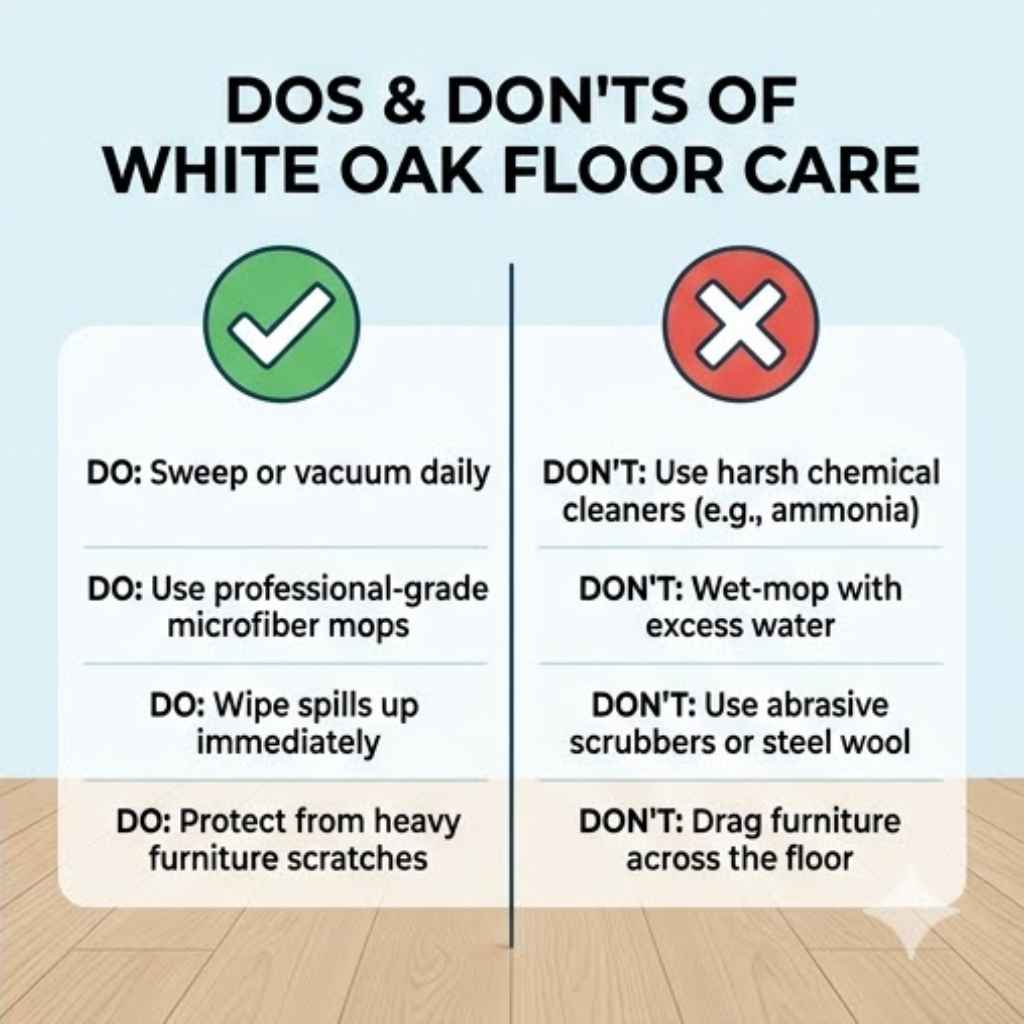
What to Absolutely Avoid
Knowing what to avoid is just as important as knowing what to do. Some cleaning products and methods can ruin your white oak floors. They can cause damage that’s hard to fix.
Harsh Chemicals: Never use cleaners with ammonia, bleach, or strong acids. These can strip the finish. They can etch the wood.
This leads to dull spots and discoloration. Always read the label. If it’s not safe for sealed hardwood, don’t use it.
Excessive Water: As we’ve said, too much water is bad. White oak is wood. Wood and water don’t mix well long-term.
It can lead to swelling, warping, or even mold. Always use a damp mop, not a soaking wet one.
Steam Mops: While they sound good, steam mops can be too hot and wet for sealed hardwood floors. The high heat can break down the finish. The moisture can seep into the wood.
Most manufacturers of hardwood floors advise against using them. Check your floor’s warranty.
Oily or Waxy Cleaners: Some “moisturizing” cleaners leave behind a residue. This residue can build up over time. It makes your floors look dull and greasy.
It can also make them slippery. These are not good for a streak-free shine.
Abrasive Scrubbers: Never use steel wool or abrasive pads on your floors. Even stiff bristle brushes can scratch the finish. Stick to soft cloths and gentle brushes.
Washing with Too Much Solution: Even with the right cleaner, using too much is a mistake. It’s better to use less and mop again if needed. A little cleaner goes a long way.
Not Rinsing the Mop: If you don’t rinse your mop, you are just spreading dirt and cleaner around. Your floors will end up looking streaky and dull. The two-bucket method prevents this.
Letting Water Sit: Always wipe up any puddles or drips immediately. Water left to air dry can leave rings or water spots.
Myth vs. Reality: Common Floor Cleaning Beliefs
| Myth | Reality |
|---|---|
| Vinegar is a great all-purpose cleaner for wood floors. | Vinegar is acidic. It can damage some floor finishes over time, causing dullness. A pH-neutral cleaner is safer. |
| More cleaner means a cleaner floor. | Too much cleaner leaves residue that causes streaks and attracts dirt. Less is often more. |
| A wet mop cleans better than a damp one. | Excess water can damage wood floors and cause streaks. A damp mop is best for sealed hardwood. |
| Steam mops are the most effective way to sanitize floors. | Steam can damage hardwood finishes. It’s too hot and wet. Stick to manufacturer-approved methods. |
Dealing with Tough Stains and Scuffs
Sometimes, you encounter more than just regular dust and dirt. Tough stains or scuff marks can happen. Don’t panic.
There are ways to handle them without harming your white oak floors.
Food Stains
For sticky food spills, act fast. Wipe them up with a damp cloth. If a residue is left, use a little of your pH-neutral cleaner.
Gently rub the spot. Then wipe it clean with a damp cloth. Dry the area.
Grease or Oil Marks
Grease can be tricky. Try a small amount of your regular cleaner first. If that doesn’t work, you can try a paste of baking soda and water.
Apply it to the stain. Let it sit for a few minutes. Gently wipe it away with a damp cloth.
Then dry. Baking soda is mildly abrasive, so use it with care.
Ink or Dye Marks
For ink, try a little rubbing alcohol on a cotton swab. Dab the spot gently. Be careful not to spread it.
Test this in an inconspicuous area first. Then wipe with a damp cloth and dry.
Scuff Marks
Scuff marks are often from shoes or furniture legs. They usually sit on top of the finish. Many times, a clean tennis ball can rub them right off.
You can also try a pencil eraser. Or use a bit of your pH-neutral cleaner on a cloth. Rub the scuff gently.
Important Note: For any stain removal, always test in a hidden spot first. This could be in a closet or under a rug. This ensures the cleaner or method won’t damage your floor’s finish.
If a stain is very deep or old, it might be permanent. Professional refinishing might be needed.
Maintaining Your White Oak Floors Between Cleanings
Regular maintenance helps keep your floors looking good. It also means you won’t have to deep clean as often. Small habits can make a big difference.
Use Doormats
Place doormats both outside and inside every entrance. This traps dirt, sand, and moisture before it gets tracked onto your floors. Natural fiber mats work well.
Take Off Shoes
Encourage everyone in the home to remove shoes at the door. Shoes track in dirt and grit. They can also carry oil and tar.
This is a simple habit that saves your floors a lot of wear and tear.
Use Furniture Pads
Put felt pads on the legs of all furniture. This includes chairs, tables, sofas, and beds. This prevents scratches and scuffs when furniture is moved.
Check the pads regularly. Clean off any dirt or grit stuck to them.
Clean Spills Immediately
Don’t let spills sit. Wipe them up right away with a clean cloth. Even water can leave a mark if left too long.
Regular Dusting
A quick sweep or vacuum daily or every other day is a good idea. This keeps the surface clean. It prevents grit from being ground into the finish.
Protect from Pets
Keep your pets’ nails trimmed. This reduces scratches. Clean up any pet accidents right away.
Use a pet-specific cleaner that is safe for hardwood.
Quick Scan: Daily & Weekly Floor Care
- Daily:
- Sweep or vacuum high-traffic areas.
- Wipe up any fresh spills.
- Weekly:
- Perform a thorough sweep or vacuum.
- Spot clean any scuffs or marks.
- Check furniture pads for dirt.
- Monthly (or as needed):
- Damp mop your floors using the two-bucket method and pH-neutral cleaner.
When is Streaking a Sign of a Bigger Problem?
Most of the time, streaks are a cleaning issue. But sometimes, they can point to something else. It’s good to know when to be concerned.
The Finish is Damaged
If you see streaks that look like the color is coming off, or if the floor feels rough, the finish might be worn out. This can happen over many years. Or it can happen if the wrong cleaners were used for a long time.
This means the wood is exposed. It needs to be refinished by a professional.
Water Damage
If you see dark streaks or stains, especially near doors or windows, it could be water damage. This happens when water has soaked into the wood. It can lead to mold or rot.
If you suspect water damage, you need to address the source of the water. You may need to replace parts of the floor.
Residue Buildup
If your floors look dull and streaky no matter what you do, it might be a heavy buildup of old wax or polish. Some older homes might have floors finished with wax. Wax and water-based cleaners don’t mix well.
This buildup needs to be stripped professionally. Then the floors can be re-sealed.
Poor Installation
In rare cases, a floor might have been installed poorly. Gaps between boards can trap dirt. This dirt can look like streaks.
It’s hard to clean. If you see this, talk to the installer.
If you’re unsure about the cause of your streaks, it’s always best to consult a flooring professional. They can diagnose the problem. They can suggest the best solution.
Expert Tips for a Lasting Shine
As an expert, I’ve seen a lot of floors. Here are some final thoughts to keep your white oak looking its best.
Know Your Finish: If you’re not sure how your floors were finished, check with the builder or previous owner. Different finishes need slightly different care. Most modern floors are polyurethane-based.
Less is More with Cleaner: I can’t stress this enough. Always start with less cleaner than you think you need. You can always add a tiny bit more.
You can’t take it away.
Work in Small Sections: Don’t try to mop the entire room at once. Work in manageable areas. This lets you focus.
It ensures you don’t leave wet spots.
Dry as You Go: Be ready with dry cloths. If you notice any excess moisture, grab it and wipe. This quick action prevents streaks from forming.
Regular Maintenance is Key: A few minutes of dusting or sweeping each day saves hours of scrubbing later. It keeps the finish from being worn down by grit.
Invest in Quality Tools: A good microfiber mop and reusable pads are worth the cost. They clean better and last longer. They are essential for a streak-free finish.
When in Doubt, Consult a Pro: For deep cleaning, refinishing, or if you’re facing persistent problems, call a professional. They have the knowledge and tools to help.
I remember cleaning my friend’s white oak floors. She was so worried about streaks. We used the two-bucket method.
We used a good pH-neutral cleaner. We made sure the mop was just damp. She was amazed.
The floors looked so clear and bright. It wasn’t magic. It was just the right steps.
Frequently Asked Questions About Cleaning White Oak Floors
How often should I deep clean my white oak floors?
For most homes, a thorough damp mopping every 1-2 months is enough. If you have pets or kids, or live in a dusty area, you might need to do it more often, perhaps monthly. Daily sweeping or vacuuming helps a lot between deep cleans.
Can I use a Swiffer WetJet on white oak floors?
Many Swiffer WetJet solutions can be too harsh or leave residue. It’s best to check the ingredients. If it’s not specifically pH-neutral and safe for sealed hardwood, it’s safer to avoid it.
Using your own diluted pH-neutral cleaner with a microfiber mop is usually a better, streak-free option.
What if my white oak floors look hazy after cleaning?
Hazy floors usually mean there’s a residue left behind. This could be from too much cleaner, the wrong type of cleaner, or a dirty mop. Try cleaning again with just water to rinse.
If that doesn’t work, you might need a dedicated residue remover, or a professional cleaning.
Should I polish my white oak floors?
Most modern sealed white oak floors do not need polishing. Polishes can build up and create a dull layer. The best way to keep them shiny is through regular cleaning with the right products and tools.
If your floor’s finish is dull, it might need refinishing, not polishing.
How do I clean in between the planks of my white oak floor?
Start by sweeping or vacuuming thoroughly to remove loose debris. When you mop, make sure your mop pad is well-wrung. You can use a damp cloth or a soft brush for stubborn dirt trapped in the grooves.
Work in small sections and dry any lingering moisture.
Is it okay to use Murphy Oil Soap on my white oak floors?
Murphy Oil Soap is generally safe for many finished wood floors. However, it can sometimes leave a slight residue if not used sparingly and rinsed well. For white oak floors, especially if you are aiming for a perfect, streak-free shine, a dedicated pH-neutral hardwood cleaner is often a safer and more reliable choice.
Conclusion
Keeping your white oak floors clean and streak-free is achievable. It’s about using the right tools and methods. Gentle care wins.
Avoid harsh chemicals and too much water. Focus on a pH-neutral cleaner and a damp mop. Regular quick clean-ups make a big difference.
Enjoy your beautiful, bright white oak floors. They are a wonderful addition to your home.