How to Drill Properly: Beginner’s Step-by-Step Guide
Learning How to Drill Properly: Beginner’s Step-by-Step Guide might seem tricky at first. Many people worry about making mistakes or not knowing where to begin. It is easy to feel a bit lost when you are just starting out with drilling.
This guide breaks down the process into simple steps. You will learn everything you need to know to drill with confidence. Let us get started with what you need to know before you pick up a drill.
Preparing To Drill Safely
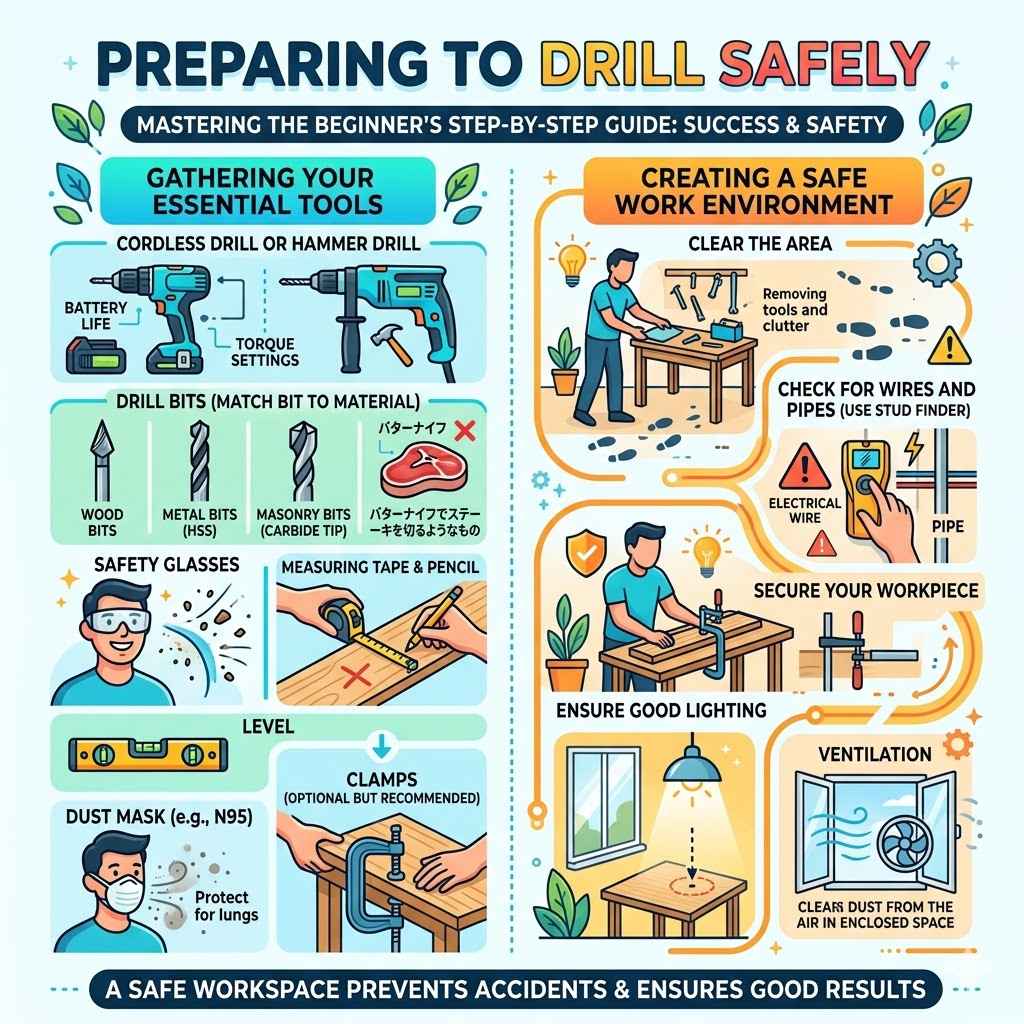
Getting ready before you start drilling is super important for success and safety. This part helps you avoid problems and makes sure your drilling goes smoothly. Think of it as setting yourself up for good results.
We will cover the tools you need and how to make sure your work area is safe and ready. This preparation is key to mastering How to Drill Properly: Beginner’s Step-by-Step Guide.
Gathering Your Essential Tools
To drill properly, having the right tools is half the battle. You will need a good drill, of course, but there are other items that make a big difference. Having these on hand means you do not have to stop and search for them later.
This saves time and frustration.
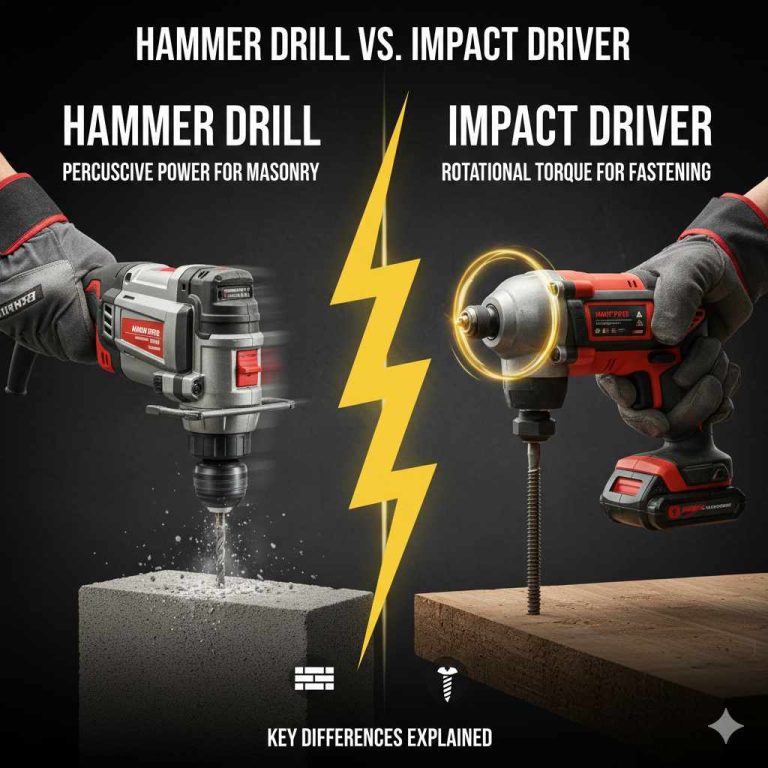
- Cordless Drill or Hammer Drill
This is your main tool. A cordless drill is versatile and easy to move around. For harder materials like concrete or brick, a hammer drill is better. It has a pounding action that helps it cut through tough surfaces. Look for one with good battery life if you choose cordless. Consider the torque settings too. Higher torque means more power for tougher jobs. - Drill Bits
These are the pieces that actually make the hole. You need different sizes and types of bits for different materials. - Wood bits are usually sharp and pointed.
- Metal bits are often made of high-speed steel (HSS) and are very strong.
- Masonry bits have a carbide tip for drilling into concrete, brick, or stone.
- Always use a bit that matches the material you are drilling into. Using the wrong bit can damage the bit, the material, or the drill. It is like trying to cut a steak with a butter knife; it just does not work well.
- Safety Glasses
Protecting your eyes is non-negotiable. Drilling creates dust, debris, and sometimes flying particles. Safety glasses are designed to withstand impact and keep your eyes safe from anything that might fly off. Even if you are just drilling a small hole, wear them. - Measuring Tape and Pencil
You need to know exactly where to drill. A measuring tape helps you mark precise spots. A pencil allows you to draw a small mark or line to guide your drill bit. Make sure your marks are clear but not too large. A small X or dot is usually enough. - Level
If you need a hole drilled straight, a level is essential. It helps you ensure your drill is perpendicular to the surface. This is important for hanging shelves or installing fixtures. A small torpedo level or one built into a ruler works well. - Dust Mask
Drilling creates fine dust that can be harmful to breathe. A dust mask, especially an N95 respirator, will protect your lungs. This is very important when drilling into drywall, wood, or masonry. The dust can irritate your throat and lungs over time. - Clamps (Optional but Recommended)
If you are drilling into something that might move, like a piece of wood you are holding, clamps can secure it. This prevents the material from slipping while you drill. It makes the job safer and helps you drill a cleaner hole.
Creating A Safe Work Environment
Safety is paramount when you are drilling. A clear and safe workspace helps prevent accidents. Before you even pick up the drill, take a moment to prepare your surroundings.
This step ensures you can focus on the task at hand without worrying about tripping or other hazards. A little effort here goes a long way.
- Clear the Area
Remove any clutter, tools, or objects from your immediate work area. This gives you enough space to move freely and safely. Tripping hazards are common in messy spaces, and you do not want to stumble while holding a drill. - Check for Wires and Pipes
This is a critical step, especially when drilling into walls or floors. Use a stud finder that can also detect electrical wires and pipes. Drilling into a live wire can be fatal. Hitting a pipe can cause flooding. If you are unsure, it is best to consult a professional. - Secure Your Workpiece
If you are drilling into a piece of material that is not fixed, like a plank of wood, secure it firmly. Use clamps to hold it to a workbench or sturdy surface. This prevents the material from spinning or moving unexpectedly when the drill bit engages. A moving workpiece is dangerous. - Ensure Good Lighting
Make sure your work area is well-lit. This helps you see what you are doing clearly, which is important for accuracy and safety. Poor lighting can lead to mistakes and accidents. Natural light is best, but a good task lamp can also be effective. - Ventilation
If you are drilling in an enclosed space, ensure there is some ventilation. This helps to clear away dust and fumes from any finishes or materials. Opening a window or door can make a big difference.
Understanding Your Drill And Bits
Before you make your first hole, it is wise to know how your drill works and what the different drill bits are for. This knowledge is a cornerstone of How to Drill Properly: Beginner’s Step-by-Step Guide. Understanding your tools helps you use them effectively and safely.
It also prevents you from damaging your drill or the material you are working on. Let us look at the basics.
Getting To Know Your Drill
Drills come with a few main parts you should be familiar with. Knowing these helps you operate the drill correctly.
- Chuck
This is the part at the front of the drill where you insert the drill bit. It has jaws that tighten around the bit to hold it securely. Some chucks are keyless, meaning you can tighten them by hand. Others require a chuck key, a small tool that turns to tighten or loosen the jaws. - Trigger
This is what you squeeze to make the drill spin. Most triggers are variable speed, meaning the harder you squeeze, the faster the drill spins. This control is very useful for starting holes gently and then increasing speed. - Forward/Reverse Switch
Located near the trigger, this switch changes the direction the drill bit spins. You use forward for drilling and reverse for removing screws or backing out a stuck bit. Always check this setting before you start drilling. - Speed Settings (if applicable)
Some drills have multiple speed settings, often indicated by numbers. Lower speeds are for more control or driving screws, while higher speeds are for faster drilling. - Torque Settings (if applicable)
Many drills have a collar with numbered settings around the chuck. These control the torque, or rotational force, the drill applies. This is especially useful for driving screws. Setting it too high can strip the screw head or damage the material. - Battery (for cordless drills)
Ensure your battery is fully charged before you start. A dead battery will stop your work. Keep a spare battery handy if you have a lot of drilling to do.
Choosing The Right Drill Bit
The drill bit is what does the cutting. Using the wrong bit is a common mistake for beginners. Here is a simple breakdown.
- Twist Drill Bits
These are the most common type and are used for drilling holes in wood, metal, and plastic. They have spiral flutes that help clear away the material being drilled. - Brad-Point Drill Bits
These are specialized bits for wood. They have a sharp tip that helps to center the bit precisely on the wood surface. This prevents the bit from “walking” or wandering off when you start drilling. - Spade Bits (or Paddle Bits)
These are flat bits with a sharp point and two spurs on the edges. They are used for drilling larger diameter holes in wood quickly. They can be a bit rough, so they are not ideal for precision work. - Masonry Bits
These bits are designed for drilling into hard materials like concrete, brick, and stone. They have a carbide tip that is much harder than steel. You will often use these with a hammer drill for best results. - Hole Saws
These are cylindrical saws that cut large diameter holes. They are used for making openings for pipes, vents, or electrical boxes. They have a drill bit in the center to guide them.
When selecting a bit, always consider the material you are drilling into and the size of the hole you need. A bit that is too small will be hard to enlarge later, and a bit that is too large will create a hole that is too big.
Step-By-Step Drilling Process
Now that you are prepared and understand your tools, let us walk through the actual process of drilling. This section is the heart of How to Drill Properly: Beginner’s Step-by-Step Guide. We will cover everything from making the mark to finishing the hole.
Follow these steps for accurate and clean results.
Marking Your Drilling Spot
Precision starts with a clear mark. This might seem obvious, but doing it right makes a huge difference.
- Measure Accurately
Use your measuring tape to determine the exact location for your hole. Double-check your measurements. It is better to measure twice and drill once. - Make a Clear Mark
Use a pencil to make a small dot or an ‘X’ at the spot you measured. The mark should be clear enough for you to see easily but not so large that it interferes with precise bit placement. - Use a Center Punch (for metal or hard surfaces)
For metal or very hard materials, a small dimple made with a center punch can help. This tiny indentation will guide the tip of your drill bit and prevent it from slipping when you start. A tap with a hammer on the punch creates the mark.
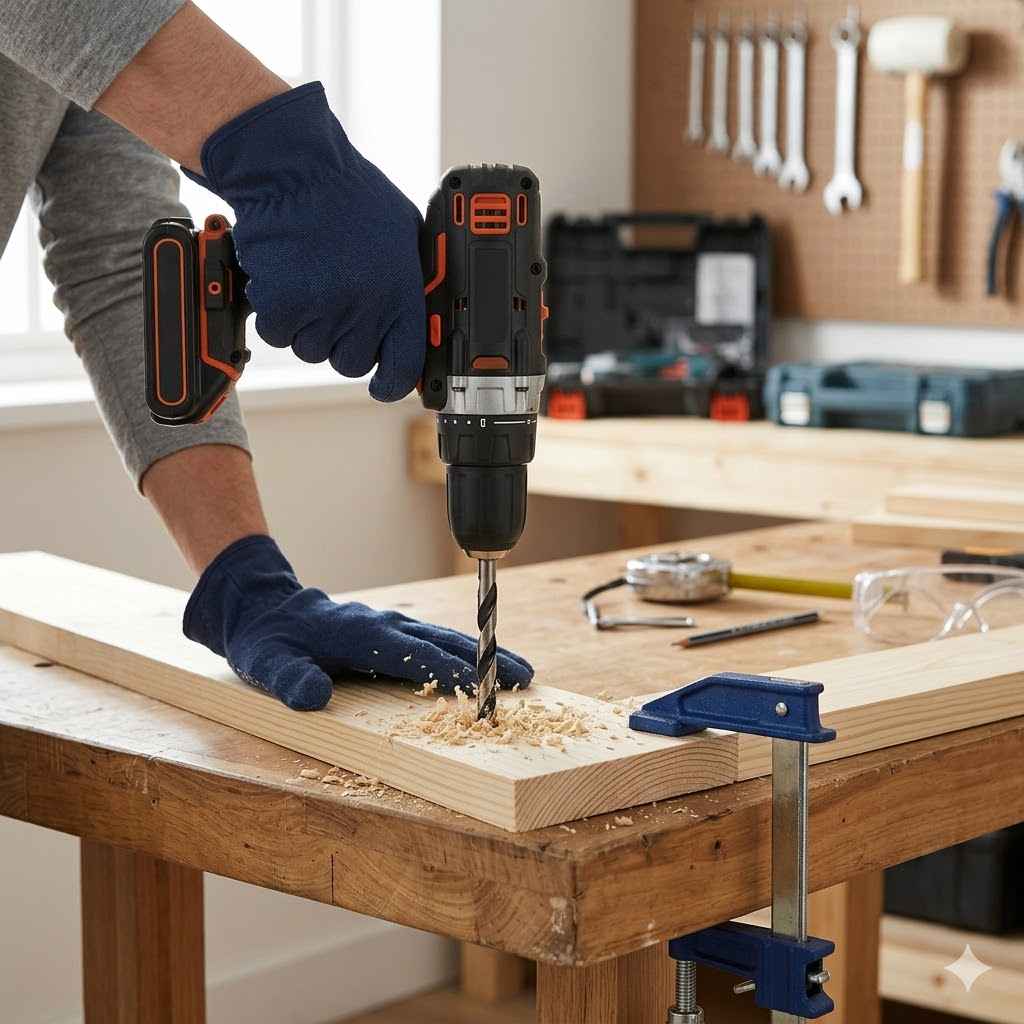
Starting The Hole
This is a crucial moment. Starting the hole correctly sets up the rest of the process.
- Position The Drill Bit
Place the tip of your drill bit directly on the mark you made. Hold the drill firmly with both hands. Keep the drill perpendicular to the surface. If you are using a level, check it now. - Start Slowly
Begin drilling at a very slow speed. Use the variable speed trigger to control this. This allows the bit to bite into the material without slipping or creating a large burr. If you are using a cordless drill, many have a gentle start setting. - Apply Gentle Pressure
Once the bit has started to create a small indentation, you can gradually increase speed. Apply steady, gentle pressure. Do not force the drill. Let the drill bit do the work. Pushing too hard can overheat the bit or drill, and can cause it to break. - Keep The Drill Straight
As you drill deeper, continue to check that the drill remains at a 90-degree angle to the surface. If you are drilling into a wall, ensure the drill is straight into the wall, not at an angle.
Drilling The Hole
With the hole started, you can now proceed to drill through the material.
- Maintain Steady Pressure
Continue to apply consistent, light to moderate pressure. The amount of pressure needed will depend on the size of the hole, the drill bit, and the material. You should feel the drill working, but not straining. - Clear Debris Periodically
As you drill, dust and chips will accumulate. To prevent the bit from binding or overheating, pull the drill bit out of the hole periodically. Do this while the drill is still spinning slowly. This clears out the debris from the flutes of the bit. For deeper holes, you might need to do this several times. - Listen to Your Drill
Pay attention to the sound of your drill. If it starts to strain or make unusual noises, you might be pushing too hard, using the wrong bit, or the bit might be dull. - Watch for Heat
Drill bits and the material can get hot, especially when drilling metal or concrete. If the bit or material feels very hot, stop drilling and let it cool down. This prevents damage to the bit and the material. You can also dip the bit in water to cool it, but be careful as this can sometimes make bits brittle. - Drilling Through Thicknesses
When you get close to breaking through the other side of the material, ease up on the pressure. This will help prevent the material from splintering or tearing as the bit exits. Some people will drill halfway through from one side, then flip the material over and drill from the other side to meet the first hole. This creates a cleaner exit.
Finishing The Hole
Once the bit has passed through the material, you are almost done.
- Smooth the Edges (Optional)
After drilling, you might have a few rough edges or burrs. You can clean these up with sandpaper or a deburring tool. This is especially important for metal or when a clean finish is desired. - Clean Up The Dust
Use a brush, vacuum, or damp cloth to remove all drilling dust from the hole and the surrounding area. This makes your work look neat and professional.
Troubleshooting Common Drilling Issues
Even with careful preparation, you might run into problems. Knowing how to fix common issues is an essential part of How to Drill Properly: Beginner’s Step-by-Step Guide. Do not get discouraged if things do not go perfectly the first time.
These solutions can help you get back on track.
Drill Bit Slipping
This happens when the drill bit does not grip the material properly at the start.
- Check the Surface
Ensure the spot you are drilling is clean and free of grease or oil, especially if you are drilling into metal. - Use a Center Punch
As mentioned earlier, for metal or hard surfaces, a center punch creates a small indentation. This guides the bit and stops it from wandering. - Start Slowly and Gently
When starting the hole, use the slowest speed setting on your drill and apply very light pressure. Let the tip of the bit catch the material before increasing speed. - Use a Guide Hole
For larger holes, you can start with a smaller drill bit to create a pilot hole. Then, use the smaller hole to guide the larger bit.
Drill Bit Getting Stuck
This can happen if you drill too fast, apply too much pressure, or if the material is too hard.
- Do Not Force It
Resist the urge to force the drill. This can break the bit or damage the drill. - Switch to Reverse
Gently switch your drill to the reverse setting. Try to back the bit out slowly. - Wiggle the Bit
If it is still stuck, try to gently wiggle the drill side-to-side while in reverse. This can help break the bond causing it to stick. - Cool It Down
Sometimes, a stuck bit can be due to heat. Let the drill and bit cool down. - Use Lubricant
For metal, a penetrating lubricant or cutting oil can sometimes help free a stuck bit. Apply it around the stuck bit and let it soak in.
Overheating Drill or Bit
This occurs when too much friction is generated.
- Reduce Pressure
Ease up on the pressure you are applying. Let the drill and bit do the work at their own pace. - Increase Speed (Carefully)
Sometimes, a faster drill speed with lighter pressure can help clear debris more efficiently, reducing friction. However, always monitor for heat. - Clear Debris More Often
Pull the bit out of the hole more frequently to clear out dust and chips. This allows for better airflow and reduces the build-up of heat. - Use the Right Bit for the Job
Ensure you are using a sharp drill bit made for the material. A dull or incorrect bit will cause more friction and heat. - Cool Down Period
If the drill or bit gets very hot, stop using it and let it cool down completely before continuing.
Hole Not Going Straight
This is common when drilling freehand.
- Use a Drill Guide or Jig
For critical applications, a drill guide or jig can ensure your drill bit stays perfectly perpendicular. - Use a Level Frequently
Periodically check your drill with a level as you are drilling. Adjust your angle if needed. - Start Slowly and Carefully
A controlled start with a light touch helps keep the bit on course from the very beginning. - Pilot Holes
Drilling a pilot hole first can help align the larger bit.
Drilling Into Different Materials
The material you are drilling into greatly affects the technique and tools you need. This is a vital aspect of learning How to Drill Properly: Beginner’s Step-by-Step Guide. Each material presents its own challenges and requires a specific approach.
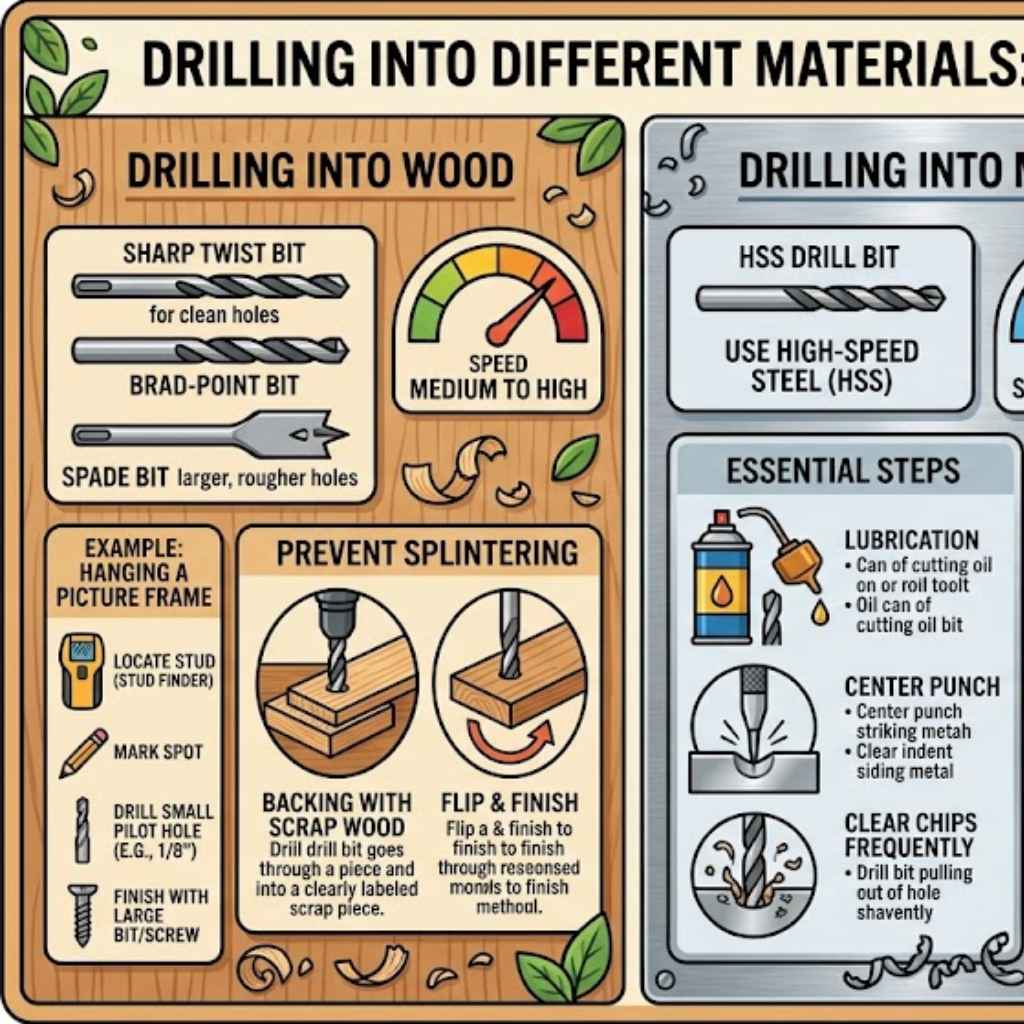
Drilling Into Wood
Wood is one of the most common materials to drill into. It is relatively soft and easy to work with.
- Drill Bits
Use sharp twist drill bits or brad-point drill bits for clean holes. Spade bits are good for larger, rougher holes. - Speed
Medium to high speeds are generally effective for wood. - Pressure
Apply steady, moderate pressure. - Prevent Splintering
To avoid splintering on the exit side, place a piece of scrap wood underneath the piece you are drilling. Drill through the workpiece and into the scrap wood. When you reach the exit side, you can also try to drill most of the way through, then flip the piece and finish from the other side. - Example: Hanging a Picture Frame
You want to hang a picture frame on a drywall-covered wooden stud. First, locate the stud using a stud finder. Mark the spot precisely where the screw will go. Use a small wood drill bit (e.g., 1/8 inch) to create a pilot hole. Then, use a slightly larger bit, or the screw itself, to make the final hole. This prevents the wood from splitting.
Drilling Into Metal
Drilling into metal requires more care due to its hardness and tendency to generate heat.
- Drill Bits
Use high-speed steel (HSS) drill bits specifically designed for metal. They are harder and more durable. - Speed
Use slower speeds for metal than for wood. High speeds can overheat and dull the bit quickly. - Pressure
Apply firm, steady pressure. Do not force it. - Lubrication
Use cutting oil or a lubricant. This reduces friction, cools the bit and the metal, and helps clear away metal shavings. Apply it to the bit before and during drilling. - Center Punching
Always use a center punch to create a starting point. This prevents the bit from slipping. - Clear Chips Frequently
Metal shavings can pack into the drill bit’s flutes. Pull the bit out often to clear them. - Example: Attaching a Bracket to a Metal Frame
Suppose you need to attach a small bracket to a steel shelf bracket. First, clean the surface where the hole will go. Mark the spot and use a center punch. Choose a metal drill bit slightly smaller than your screw or bolt. Apply cutting oil. Start the drill slowly, then increase speed slightly. Drill about halfway, pull out to clear chips and reapply oil. Finish drilling. Use a deburring tool to clean up the edges if needed.
Drilling Into Masonry (Brick and Concrete)
Masonry is the hardest material and requires specialized tools.
- Drill Bits
You must use masonry bits with a carbide tip. A hammer drill is highly recommended. - Speed
Use medium speeds. The hammer action of the drill does most of the work. - Pressure
Apply firm, consistent pressure. - Hammer Drill Function
Ensure your hammer drill is set to its hammer mode for masonry. This adds a pounding action to the rotation, which helps break up the material. - Cooling and Cleaning
Masonry dust is abrasive and can cause overheating. Periodically pull the bit out to clear dust. You can also spray a little water into the hole to cool it down and help clear dust, but be careful not to make a mud slurry. - Pilot Holes
For concrete, always start with a pilot hole, especially if you need a larger hole. - Example: Mounting a Shelf on a Brick Wall
To mount a shelf, you need to drill holes in brick for anchors. Mark your spots. Use a masonry bit the size recommended for your wall anchors. Set your hammer drill to hammer mode. Start drilling slowly to get a purchase, then increase speed and pressure. Drill to the required depth, clearing dust as you go. Once the hole is drilled, blow out the dust with compressed air or a vacuum before inserting the anchor.
Frequently Asked Questions
Question: What is the most common mistake beginners make when drilling?
Answer: Beginners often try to force the drill bit too hard or drill too fast. This can lead to the bit slipping, overheating, or breaking. It is better to let the drill and bit do the work with steady pressure and appropriate speed.
Question: How do I make sure I drill a hole straight?
Answer: Keep the drill perpendicular to the surface you are drilling. Use a level to check the drill’s angle. Starting slowly and carefully can also help guide the bit straight from the beginning.
Question: Can I use a regular drill for concrete?
Answer: While you can attempt it, a regular drill is not ideal for concrete. A hammer drill with a masonry bit is much more effective and will make the job significantly easier and faster.
Question: How often should I clean my drill bit?
Answer: You should clear debris from your drill bit periodically, especially when drilling deeper holes or into materials that create a lot of dust or shavings. Pulling the bit out while spinning slowly helps clear the flutes.
Question: What is a pilot hole for?
Answer: A pilot hole is a small hole drilled before the main hole. It helps guide the larger drill bit, prevents material from splitting (especially wood), and makes it easier to start drilling accurately.
Summary
Mastering How to Drill Properly: Beginner’s Step-by-Step Guide involves preparation, tool knowledge, and careful execution. By gathering the right tools, ensuring a safe workspace, understanding your drill and bits, and following a clear step-by-step process, you can achieve accurate results. Troubleshooting common issues and adapting your technique to different materials are also key.
With practice, drilling becomes a simple and effective skill.