How to Make a Wood Door: Step-by-Step Build Guide (2026)
To make a wood door, cut a top rail, bottom rail, two stiles, and a center panel from lumber, then assemble with glue and screws in a frame-and-panel configuration. A basic slab door (flat boards edge-glued together) is simpler but less stable — frame-and-panel allows the wood to expand without warping. Budget $50–120 in materials; plan 4–6 hours for a first build.
⚡ Quick Answer: How to Make a Wood Door
| Step | Action | Note |
|---|---|---|
| 1 | Measure opening precisely | Door = opening width −1/8″ + height −3/8″ for clearance |
| 2 | Cut stiles (vertical sides) and rails (horizontal top/bottom) | Use 1×6 or 2×6; stiles run full height; rails fit between |
| 3 | Cut groove (dado) in stile edges for panel | 1/4″ wide × 3/8″ deep; panel floats in groove — not glued |
| 4 | Assemble frame with glue + screws or dowels | Glue only the stile-to-rail joints; panel must float freely |
| 5 | Clamp, square, and let cure 24 hours | Check diagonal measurements — must match within 1/8″ |
| 6 | Sand, prime, paint or stain; hang with 3 hinges | Use 3.5″ butt hinges for doors under 80 lbs |
Gathering Materials And Tools
Before you can begin making a wood door, it’s important to gather all the necessary materials and tools. This step is crucial to ensure a smooth and efficient process. In this section, we will discuss the different aspects of gathering materials and tools, including choosing the right wood and selecting the necessary tools.
Choosing The Right Wood
When it comes to making a wood door, selecting the right type of wood is essential for both its appearance and durability. Here are a few factors to consider when choosing the wood:
- Strength: Look for wood that is strong and durable enough to withstand everyday use and external factors.
- Stability: Choose wood that is less likely to warp or expand and contract with changes in temperature and humidity.
- Appearance: Consider the aesthetic appeal of the wood, including its color, grain pattern, and texture.
Some popular wood options for a wood door include oak, mahogany, and pine. These types of wood offer different characteristics and finishes, so it’s important to choose the one that fits your preferences and needs.
Selecting The Necessary Tools
Once you have chosen the right wood, the next step is to gather the necessary tools to make your wood door. Here is a list of essential tools you will need:
| Tools |
|---|
| Saw (circular or table) |
| Chisel |
| Wood glue |
| Clamps |
| Router |
| Sanding block or sander |
| Drill |
| Screwdriver |
| Tape measure |
These are just the basic tools needed for making a wood door. Depending on your design and personal preferences, you may require additional tools or equipment.
By carefully choosing the right wood and gathering the necessary tools, you are well on your way to creating a beautiful and functional wood door. In the next section, we will dive into the process of preparing the wood for construction.
Taking Accurate Measurements
Before you can begin making a wood door, it is crucial to start by taking accurate measurements. Accurate measurements ensure that your door fits perfectly into the door frame, allowing for smooth operation and a professional finish. In this section, we will guide you through the process of measuring the door frame and calculating the wood dimensions, ensuring a successful door-making project.
Measuring The Door Frame
Measuring the door frame is the first step in creating a custom wood door that fits seamlessly into your space. Follow these steps to take precise measurements:
- Using a tape measure, measure the height of the door frame from the floor to the top.
- Make note of the width of the door frame by measuring the distance between the two sides.
- Measure the thickness of the door frame to determine the appropriate wood dimensions.
Calculating Wood Dimensions
Once you have the measurements of the door frame, it’s time to calculate the wood dimensions that will be needed to construct the door. Follow these tips to ensure accurate calculations:
- Consider the width of the door frame when calculating the overall width of the wood door. It is recommended to add an extra 1/8 inch to allow for a smooth fit.
- For the height of the wood door, consider any floor coverings or transitions that may affect the clearance. It’s essential to leave a gap of approximately 1/4 inch to accommodate for these factors.
- Take into account the thickness of the wood planks you plan to use for the door. This will help you determine the appropriate dimensions for the stiles and rails.
By taking accurate measurements and calculating the wood dimensions correctly, you set yourself up for success in creating a perfectly fitting wood door. These steps ensure that your door will not only visually enhance your space but also function efficiently. Now that you have your measurements in hand, it’s time to move on to the next step in the door-making process.
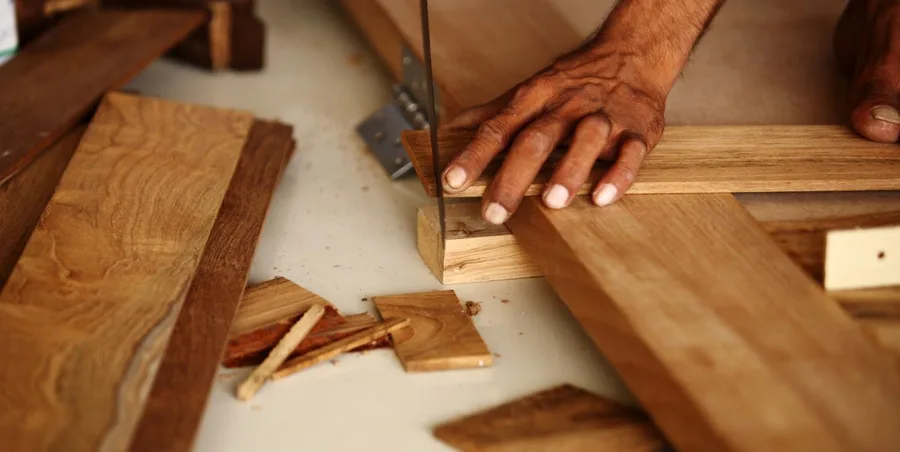
Preparing The Wood
Preparing the wood is a crucial step in making a wood door. It ensures that the final product is sturdy, aesthetically pleasing, and long-lasting. Preparing the wood involves cutting it to size and smoothing the surface before moving on to the assembly process.
Cutting The Wood To Size
Cutting the wood to the correct dimensions is the initial step in preparing it for the door assembly. This can be achieved using a table saw, circular saw, or hand saw, depending on the availability of tools. A precise measurement of the door frame is crucial to ensure that the wood pieces fit perfectly.
Smoothing The Surface
Once the wood is cut to size, the next step is to smooth the surface to eliminate any rough edges or irregularities. This can be done using a planer or a wood sander. Sanding the wood not only provides a smooth finish but also prepares the surface for the application of paint or varnish, enhancing the door’s visual appeal.
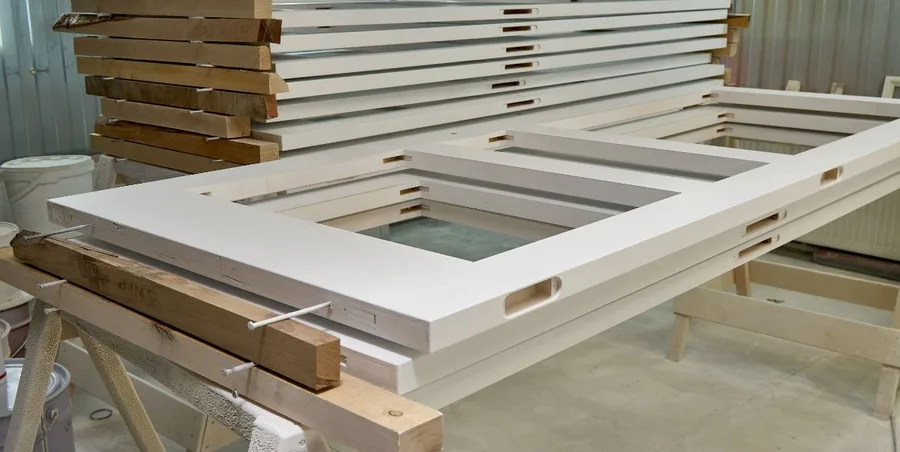
Assembling The Door
Once you have created the frame for your wood door, it’s time to move on to the next step: attaching the panels. This is a crucial part of the door-making process, as it not only adds strength to the door but also enhances its aesthetics. In this section, we will guide you through the process of creating the frame and attaching the panels, ensuring that your wood door is sturdy and visually appealing.
Creating The Frame
To begin, gather the necessary tools and materials:
- Wood boards for the stiles and rails
- Saw or a miter saw
- Wood glue
- Clamps
- Nail gun or hammer and nails
Start by measuring and cutting the stiles and rails according to the desired dimensions of your door. Remember to account for the panel thickness when determining the length of the stiles and rails. It’s best to use a miter saw to achieve accurate and clean cuts.
Next, apply wood glue to the ends of the rails and attach them to the stiles, forming the door frame. Use clamps to hold the pieces together securely while the glue dries. Make sure the corners are square by measuring diagonally from corner to corner. Adjust if necessary before securing the joints with nails or a nail gun.
Attaching Panels
Now that you have the door frame constructed, it’s time to attach the panels. Here’s how:
- Measure the dimensions of the door frame opening and cut the panels to fit. The panels can be made from solid wood or plywood, depending on your preference and the design of your door.
- Apply wood glue to the back of each panel and position them within the door frame. Make sure they are centered and level.
- Secure the panels in place by nailing or screwing them to the frame. Be careful not to damage the surface of the panels while doing so.
- After attaching all the panels, check for any gaps or irregularities. Fill any gaps with wood filler and sand the entire surface smoothly to achieve a flawless finish.
- Finally, apply a coat of paint or sealer to protect the wood and give your door a polished look.
With the panels securely attached, your wood door is now complete. Remember to let the glue dry completely and take your time throughout the assembly process to ensure a high-quality end result. Whether you’re building a door for a new project or replacing an old one, following these steps will help you create a durable and beautiful wood door that will stand the test of time.
Applying Finishing Touches
Enhancing a wood door involves sanding, staining, and sealing for a professional finish. Begin by sanding the door, then apply a wood stain of your choice. After the stain dries, seal the door with a clear coat to protect it from the elements and give it a polished look.
Once your wood door has been constructed and sanded, it’s time to apply the finishing touches that will make it truly shine. The final steps of this process include adding hardware and applying stain or paint. By following these simple steps, you can transform your wood door into a stunning centerpiece for your home.
Adding Hardware
Adding hardware to your wood door is like adding jewelry to an outfit. It not only enhances the functionality of the door but also adds a touch of style and personality. Here are a few steps to guide you:
- Select hardware that complements the overall aesthetic of your door and home.
- Start by drilling pilot holes for the screws to ensure they fit securely.
- Attach the hinges to the door frame using the provided screws, making sure they are aligned properly.
- Next, install the doorknob or handle, aligning it with the latch mechanism.
- Tighten all screws to ensure the hardware is secure and functional.
Applying Stain Or Paint
Deciding whether to stain or paint your wood door depends on your personal preference and the desired look. Staining enhances the natural beauty of the wood, while painting allows for more versatility in terms of color. Here’s how to apply stain or paint to your wood door:
Staining
- Prepare the surface by sanding it lightly to remove any imperfections.
- Choose a high-quality wood stain that matches your desired color.
- Apply the stain evenly using a brush or cloth, following the direction of the wood grain.
- Allow the stain to penetrate the wood for the recommended time.
- Using a clean cloth, wipe off any excess stains and let the door dry completely.
- Apply additional coats if a deeper color is desired, allowing each coat to dry before proceeding.
- Finish the process by applying a clear topcoat to protect the wood and add a beautiful sheen.
Painting
- Prepare the surface by sanding it lightly and applying a primer to ensure proper adhesion.
- Select a high-quality paint designed for exterior or interior use, depending on the location of your door.
- Start painting from the top, working your way down, using a brush or roller.
- Apply thin, even coats, allowing each coat to dry before applying the next.
- Use long, smooth strokes to minimize brush marks or roller lines.
- Finish by adding a clear sealant to protect the paint and enhance its durability.
With these simple steps, you can add the perfect finishing touches to your wood door, creating a beautiful and functional entrance to your home. Whether you choose to add hardware or apply stain or paint, these final steps will complete your wood door project with style and elegance.
Frequently Asked Questions Of How To Make A Wood Door
Can I Build My Own Door?
Yes, you can build your own door. However, it requires careful planning, measuring, and carpentry skills. Follow instructions, and use proper tools and materials. Consider safety precautions and ensure the door fits well in the frame. DIY door building can be a rewarding project but may be challenging for beginners.
How To Make A Door Step By Step?
To make a doorstep, follow these steps:
1. Measure and mark the desired location for the step.
2. Dig out the area and level it with sand or gravel.
3. Build a form to shape the step using plywood and stakes.
4. Mix and pour concrete into the form, making sure it’s evenly distributed.
5. Smooth the surface with a trowel and allow it to cure before removing the form.
What Do You Need To Make A Wooden Door?
To make a wooden door, you will need wood planks, screws or nails, hinges, a doorknob, and a saw or drill.
What Is The Best Wood To Use For A Door?
The best wood to use for a door is solid hardwood like oak, mahogany, or cherry. They are strong, durable, and provide a classic, elegant look. Hardwood doors also resist warping and are ideal for both interior and exterior use.
Types of Wood Doors You Can Make
| Door Type | Difficulty | Best Wood | Cost (materials) |
|---|---|---|---|
| Slab door (edge-glued boards) | Beginner | Pine, poplar | $40–60 |
| Frame-and-panel door | Intermediate | Oak, pine, poplar | $60–100 |
| Barn door (Z-brace) | Beginner | Pine 1×6 or 1×8 | $30–50 |
| Dutch door (split horizontally) | Intermediate | Cedar, pine | $80–140 |
| Exterior solid wood door | Advanced | Oak, mahogany, cedar | $120–250 |
Best Wood for Making a Door
Interior doors: pine (cheap, easy to work, takes paint well), poplar (smooth, minimal grain — best for painted doors), or red oak (if staining). Exterior doors demand rot-resistant species — cedar, white oak, or mahogany. Avoid untreated pine outdoors; it rots within 5 years without regular sealing. For any door, use kiln-dried lumber with moisture content below 12% to prevent post-build warping.
Best Products for Making a Wood Door
 wood door panel construction kit DIY interior exterior solid wood
Titebond III Ultimate Wood Glue
Waterproof wood glue for door frame assembly. Titebond III is water-resistant (passes ANSI/HPVA Type I) — critical for any door that will see humidity changes. Sets in 20–30 minutes, full cure in 24 hours. Works on all wood species used for door-making: pine, oak, poplar, cedar.
| Best for | Frame-and-panel door assembly — stile to rail joints, panel glue-ups |
| Why we picked it | Waterproof; longer open time than Titebond II; no creep under load; FDA-approved for food contact surfaces |
| Main drawback | Longer cure before clamping removal vs. Titebond Original; slightly more expensive |
 door hinges hardware set for wooden door DIY installation
RELIABILT 3.5″ Ball Bearing Door Hinges (3-pack)
| Best for | Hanging a DIY interior wood door up to 80 lbs |
| Why we picked it | Ball-bearing design eliminates squeak; mortise-style fits standard door prep; comes with screws |
| Main drawback | Requires chisel mortising — not a simple screw-on hinge |
 lumber wood boards for making a wooden door DIY project
Kreg Pocket Hole Jig 320 (for door joinery)
| Best for | Joining stiles and rails without a router or dado set — beginner-friendly |
| Why we picked it | No mortise-and-tenon required; pocket screws hold well for interior doors; fast setup |
| Main drawback | Pocket joints not as strong as M&T for exterior doors — use for interior only |