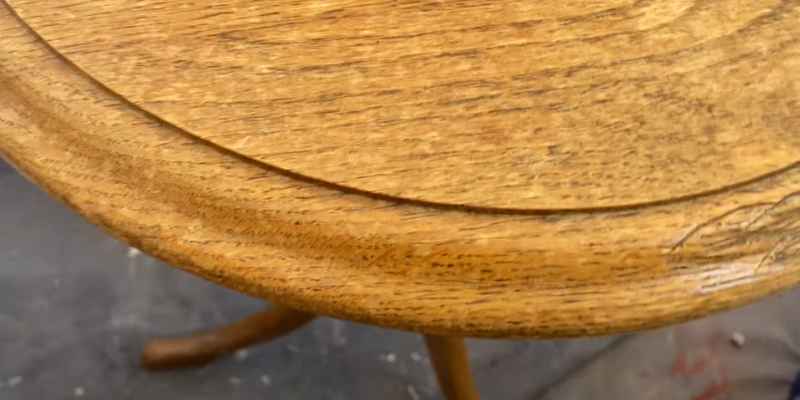
How to Transform Dark Stained Wood into Lighter Elegance
To make dark stained wood lighter, you can sand the wood surface and apply a light-colored stain or paint. This process effectively lightens the wood’s appearance and transforms its overall look.
If you have dark stained wood furniture or flooring that doesn’t quite match your desired aesthetic, you may be wondering how to lighten it up. Whether you want to create a more airy and brighter space or simply prefer a lighter wood tone, there are effective methods to achieve the desired result.
While older methods involved bleaching or stripping techniques, today, there is a simpler way to make dark stained wood lighter. By following a few straightforward steps, you can transform your dark wood into a lighter, more appealing shade without compromising its natural beauty. We’ll explore the process of lightening dark stained wood and provide you with some useful tips to achieve the desired effect.
Choosing The Right Wood
When it comes to lightening the color of dark stained wood, choosing the right type of wood is essential. Different wood species react differently to stains and can produce varying results. To help you make an informed decision, here are some key considerations to keep in mind.
Type Of Wood
Not all wood is created equal when it comes to staining. Some woods take stain more evenly, while others may have a tendency to absorb stain inconsistently. Here are some popular wood types that are known for their ability to lighten effectively:
| Wood Type | Pros | Cons |
|---|---|---|
| Maple | Light in color, takes stain evenly | Can be expensive |
| Ash | Accepts stain well, has a pronounced grain pattern | May require extra sanding to prevent blotchiness |
| Birch | Uniform texture, takes stain evenly | Can be prone to dents and scratches |
These are just a few examples, but there are many other wood types that can be effectively lightened with the right staining techniques.
Considerations For Staining
When lightening dark stained wood, there are a few considerations to take into account:
- Preparation: Before applying any stain, it’s important to prepare the wood properly. This includes sanding the surface to remove the existing finish and any imperfections.
- Test Staining: Always test the stain on a small, inconspicuous area of the wood before proceeding with the entire project. This will allow you to assess the color and ensure it matches your desired outcome.
- Layering: Lightening dark wood may require multiple coats of stain. Applying thin layers and allowing each coat to dry completely before adding another will help achieve the desired hue.
- Sealing: Once the wood has reached the desired color, it’s important to apply a protective finish to seal the stain. This will help preserve the new color and provide added durability.
By considering these factors and selecting the right wood species, you can successfully lighten dark stained wood and achieve the desired result. Remember to always follow proper staining techniques for best results.
Preparing The Wood For Staining
To make dark stained wood lighter, it is important to properly prepare the wood for staining. This involves sanding the surface to remove the existing stain and creating a smooth, uniform base for a lighter stain application. Using a fine-grit sandpaper, make sure to sand in the direction of the wood grain for the best results.
Sanding The Surface
To achieve a lighter stain on dark-stained wood, it’s essential to properly prepare the surface. Sanding the wood is the first step in this process. Sanding helps remove the top layer of stain and any existing varnish or finish, allowing the new stain to penetrate the wood more evenly.
When sanding, start with a medium-grit sandpaper, such as 120 grit, and work your way up to a finer grit, such as 220 grit. This gradual progression ensures a smooth and even surface.
Here are some key points to keep in mind while sanding:
- Always sand in the direction of the wood grain to avoid damaging the fibers.
- Apply even pressure and use smooth, controlled movements.
- Pay extra attention to any areas with stains, scratches, or imperfections, as these may require more sanding.
- After sanding, use a soft cloth or vacuum to remove any sawdust or debris from the surface.
Filling In Gaps And Cracks
In addition to sanding, filling in gaps and cracks is crucial to ensuring a smooth and professional finish when lightening dark-stained wood. Fillers help create an even surface by filling in any voids and preventing the stain from seeping into gaps, which can result in an uneven color.
Here’s how to effectively fill in gaps and cracks:
- Closely inspect the wood surface for any noticeable gaps or cracks.
- Choose an appropriate wood filler that matches the color of your stained wood.
- Using a putty knife or spatula, carefully apply the filler to the gaps or cracks, smoothing it out to ensure a flush surface.
- Allow the filler to dry according to the manufacturer’s instructions.
- Once dry, sand the filled areas lightly to ensure they are level with the rest of the wood surface.
- Remove any remaining dust or debris before proceeding to the staining process.
By sanding the surface and filling in gaps and cracks, you’ll be well on your way to achieving a lighter stain on your dark-stained wood. These essential preparation steps help create a smooth and uniform surface, ensuring the stain adheres evenly and produces fantastic results.
Selecting The Stain
When it comes to transforming dark stained wood into something lighter and more vibrant, selecting the right stain is crucial. The stain color will determine the overall look and feel of the wood, so it’s important to choose wisely. In this section, we will explore different stain colors and discuss how to determine the opacity for the desired outcome.
Exploring Different Stain Colors
Before beginning the staining process, it’s essential to familiarize yourself with the variety of options available. Here are some popular stain colors to consider:
- Light Oak: This stain color is perfect for achieving a natural and light finish, enhancing the wood’s natural grain.
- Golden Pecan: If you’re looking for a warm and inviting look, golden pecan stain can add a touch of elegance to your wood.
- Weathered Gray: For a more modern and trendy appearance, weathered gray stain can give your wood a beautiful, weathered look.
- White Wash: If you prefer a more rustic or beachy feel, white wash stain can create a light, airy, and coastal vibe.
These are just a few examples, and there are numerous stain colors available in the market to suit your specific preferences and interior style.
Determining The Opacity
Opacity plays a key role in achieving the desired lighter look for your stained wood. It refers to how transparent or opaque the stain is once applied. To determine the opacity that aligns with your vision, here’s what you need to consider:
- Light Opacity: If you want to maintain some of the wood’s natural darkness while still lightening it up, opt for a stain with light opacity. This will allow the wood’s existing tone to shine through while adding a lighter hue.
- Medium Opacity: For a more balanced look that offers a noticeable lightening effect, choose a stain with medium opacity. This will give the wood a pleasant glow without completely masking its original color.
- High Opacity: If you want to completely transform the dark stained wood and achieve a significantly lighter finish, select a stain with high opacity. This will provide maximum coverage, making the wood appear much lighter.
By considering the opacity, you can tailor the stain to meet your expectations and create the perfect lightened wood appearance.
Applying The Stain
To make dark stained wood lighter, apply a lighter shade of stain or use a wood bleaching product. Sanding the surface before staining can also help achieve the desired lighter tone.
Using A Brush Or Cloth
If you’re wondering how to make dark stained wood lighter, applying the stain is a crucial step. The method you choose can impact the final result of your project. When it comes to applying stain to darken wood, you have two common options: using a brush or a cloth.
Using a brush: To apply stain using a brush, start by dipping the bristles into the stain. Make sure to wipe off any excess stain on the rim of the can to prevent drips. Then, brush the stain onto the wood in long, even strokes, following the grain. It’s important to work quickly to avoid overlap marks or uneven coverage. Once the stain is applied, allow it to sit for a few minutes before wiping off any excess with a clean cloth.
Using a cloth: If you prefer a more controlled application method, using a cloth is a great option. Begin by dampening a clean cloth with the stain. Then, gently rub the stain onto the wood in the direction of the grain. This technique allows for more precision, especially in hard-to-reach areas or intricate woodwork. Be sure to wear gloves to protect your hands from the stain, and regularly check for streaks or uneven coverage as you go.
Applying Multiple Coats
Applying multiple coats of stain is often necessary when lightening dark stained wood. This technique allows you to gradually build up the desired color and ensures a more even finish. However, it’s essential to follow a few guidelines to achieve the best results:
- Allow each coat to dry: Before applying another coat of stain, always ensure the previous coat is completely dry. This usually takes around 24 hours, but it’s important to check the manufacturer’s recommendations for the specific stain you’re using.
- Sand between coats: To help the subsequent coats adhere to the wood surface, lightly sand the wood with a fine-grit sandpaper after each coat has dried. This will remove any roughness and create a smooth surface for the next application.
- Apply thin coats: It’s better to apply several thin coats rather than one thick coat. Thin coats allow the wood to absorb the stain more evenly and result in a more natural-looking finish.
By applying multiple coats, taking the necessary drying and sanding steps, you’ll be able to achieve a lighter appearance on dark stained wood. Remember, patience and attention to detail are key in creating a beautiful and professional-looking finish.
Finishing Touches
Discover effective techniques for making dark stained wood lighter with our Finishing Touches guide. Transform your furniture and accessories with simple steps to achieve a brighter and more vibrant wood finish.
When it comes to transforming dark stained wood into a lighter shade, the finishing touches play a crucial role in achieving the desired result. Applying a finish coat and sealing the wood are the final steps in the process that enhance the wood’s appearance and protect it from damage. In this section, we will walk you through these two important steps to ensure a successful transformation.
Applying A Finish Coat
Once you have lightened the wood, applying a finish coat is essential to seal the color and protect the surface. A finish coat acts as a barrier between the wood and external elements, preventing it from getting stained or damaged. To apply a finish coat:
- Choose a suitable finish, such as polyurethane, varnish, or lacquer, based on your preference and the type of wood you are working with.
- Use a clean brush or cloth to evenly apply the finish coat on the wood’s surface, following the direction of the grain.
- Allow the coat to dry completely as instructed by the manufacturer.
- If necessary, lightly sand the surface between coats to ensure a smooth finish.
- Apply multiple coats as needed, allowing each coat to dry completely before applying the next.
- Once the final coat is applied and dried, gently buff the surface with a soft cloth for a polished look.
Sealing The Wood
Sealing the wood is another important step in making dark stained wood lighter. It helps to lock in the lighter color and protect the wood from moisture, stains, and wear. Follow these steps to seal the wood effectively:
- Choose a appropriate sealer, such as shellac, polyurethane sealer, or wood conditioner, based on your specific needs and the type of wood.
- Apply a thin and even layer of the sealer using a brush or cloth, ensuring complete coverage on all surfaces.
- Allow the sealer to penetrate the wood for the recommended time.
- Remove any excess sealer with a clean cloth.
- Let the sealer dry completely before proceeding with any additional steps.
- If necessary, repeat the sealing process for added protection and durability.
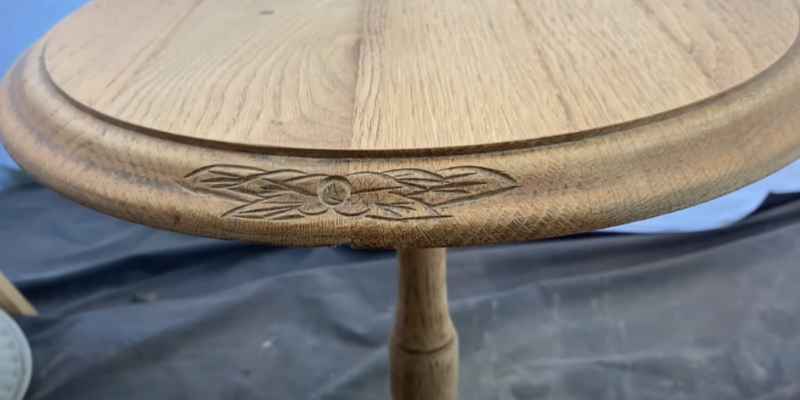
With these finishing touches, your dark stained wood can be transformed into a lighter, brighter, and more appealing shade. Remember to choose suitable finishes and sealers, apply them properly, and allow them to dry thoroughly for the best results. Now, you can enjoy the beauty of your transformed wood and the sense of accomplishment it brings!
Frequently Asked Questions For How To Make Dark Stained Wood Lighter
Can Dark Stained Wood Be Lightened?
Yes, dark stained wood can be lightened.
What Can I Add To Wood Stain To Make It Lighter?
To make wood stain lighter, you can add mineral spirits or water to dilute the color. Mix it gradually until desired lighter shade is achieved.
How Do You Change Wood Color From Dark To Light Without Sanding?
To change wood color from dark to light without sanding, try using a a wood bleach or chemical stripper. These products can remove the dark stain and lighten the wood, but make sure to follow the instructions carefully. Additionally, you can also try using a wood conditioner or light-colored stain to help achieve a lighter shade.
How Do You Lighten Stained Wood Cabinets?
To lighten stained wood cabinets, use a wood bleach or sand the surface to remove the stain. Choose a bleach that matches the wood color and follow the instructions carefully. Sanding can also lighten the cabinets, but be cautious not to remove too much wood.
Conclusion
Transforming dark stained wood into a lighter shade can be achieved through a variety of techniques and products. Whether it’s sanding, bleaching, or using a wood conditioner, the process requires patience and attention to detail. With these methods, you can revitalize your furniture and enhance the overall aesthetic of your space.
So, go ahead and give it a try – your lightened wood pieces will surely bring a fresh and inviting feel to any room.