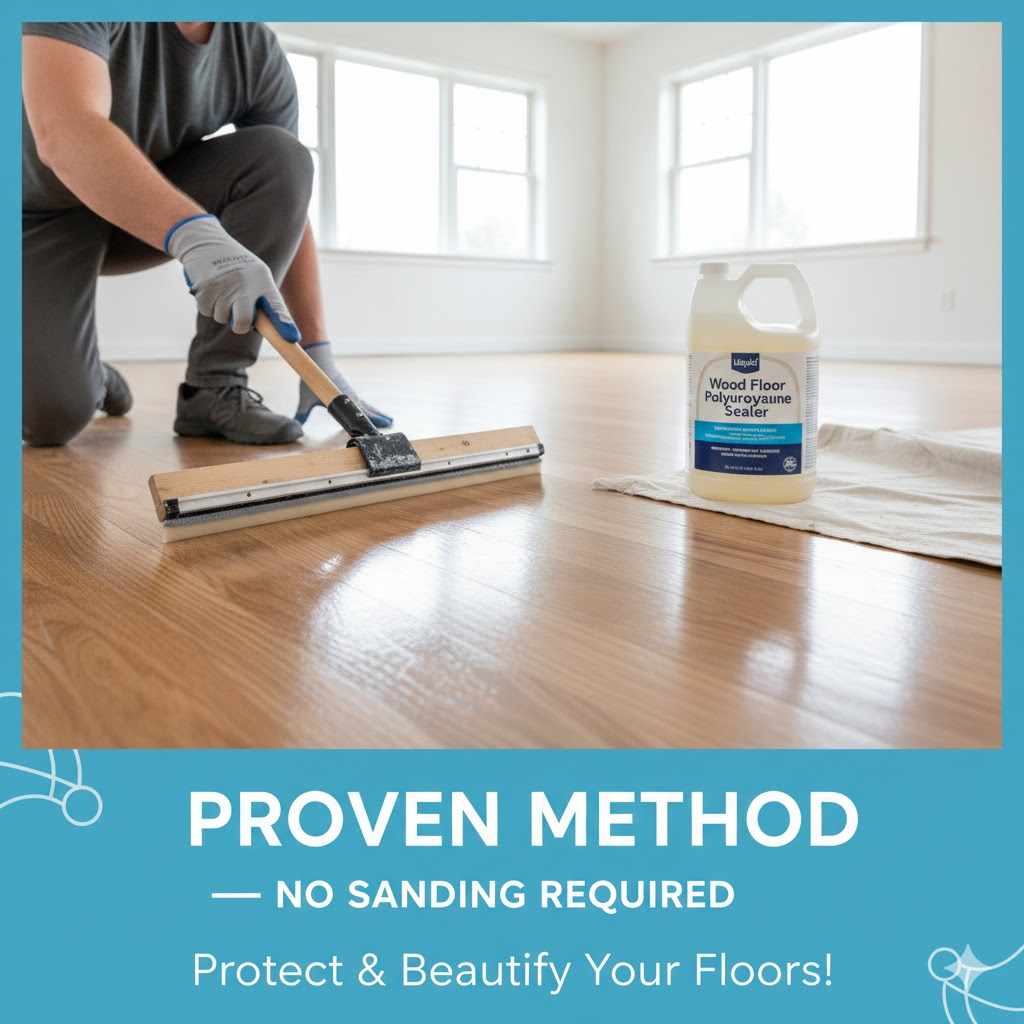
How to Seal Hardwood Floors: The Best Proven Method
To seal hardwood floors, first clean and lightly sand the surface to ensure proper adhesion. Apply a thin, even coat of a quality sealant like polyurethane using a natural bristle brush or applicator pad, starting at the edges and working your way out of the room. Allow it to dry completely, then lightly sand again before applying a second or third coat for maximum durability.
Hello there! I’m Md Meraj. Nothing makes a room feel warmer or more inviting than beautiful hardwood floors. But over time, those floors can start to look a little tired from daily life. Scuffs, spills, and sunlight can take their toll.
You might look at them and think, “I need to hire a professional for this,” but I’m here to tell you that sealing your floors is a project you can absolutely tackle yourself. It’s one of the most rewarding DIY jobs out there.
I know it can feel intimidating, but don’t worry. I’ve broken down the process into simple, easy-to-follow steps. Together, we’ll walk through everything you need to know to get that beautiful, durable finish. Let’s get started and bring that shine back to your floors!
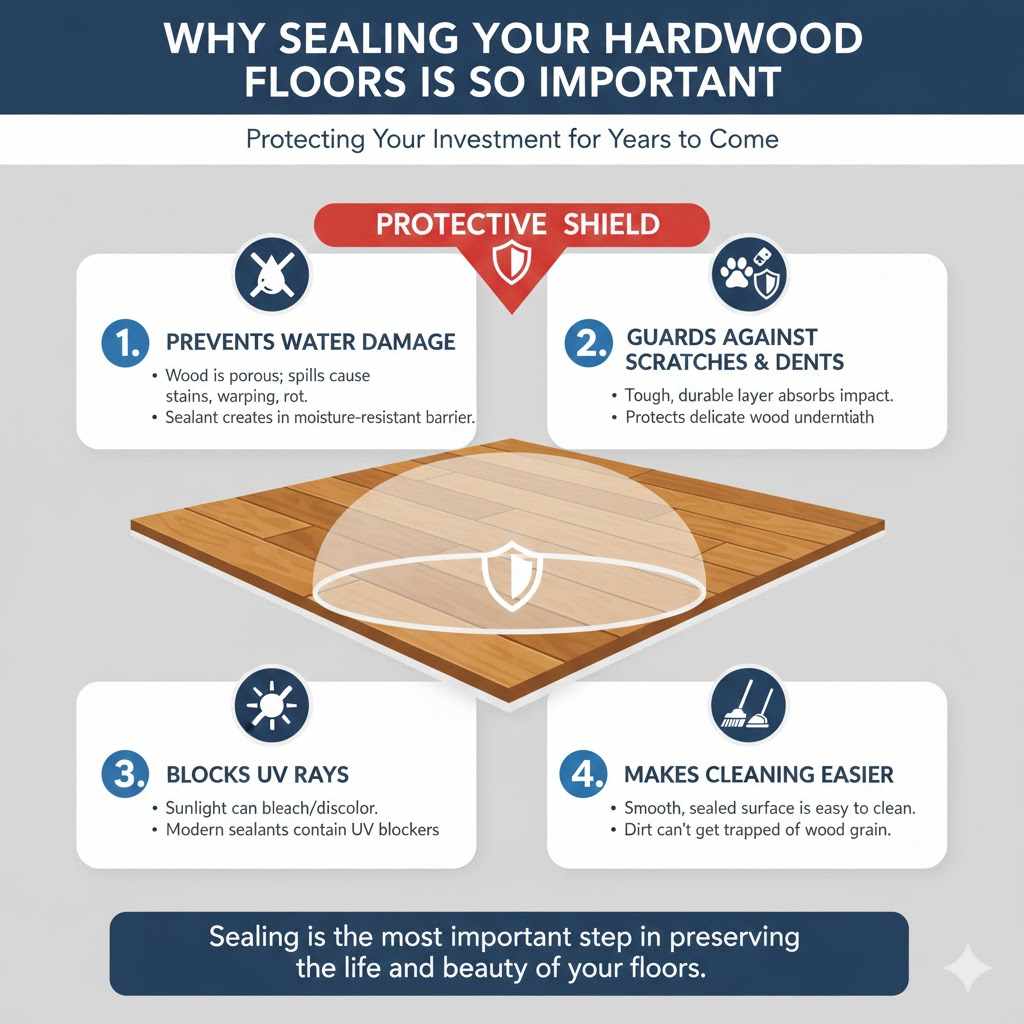
Why Sealing Your Hardwood Floors is So Important
Think of floor sealant as a protective shield for your wood. It’s the invisible armor that keeps your beautiful investment safe from the challenges of everyday life. Without a good seal, your hardwood is vulnerable.
Here’s exactly what a good coat of sealant does:
- Prevents Water Damage: Wood is like a sponge. Spills can seep into unprotected wood, causing stains, warping, and even rot over time. A proper seal creates a moisture-resistant barrier.
- Guards Against Scratches and Dents: From dog claws to dropped toys, life happens. Sealant adds a tough, durable layer that absorbs much of this impact, protecting the delicate wood underneath.
- Blocks UV Rays: Just like your skin, wood can be damaged by the sun. Sunlight can bleach or discolor your floors over the years. Many modern sealants contain UV blockers to keep your floor’s color rich and consistent.
- Makes Cleaning Easier: A smooth, sealed surface is much easier to sweep and mop. Dirt and dust can’t get trapped in the wood grain, making routine cleaning faster and more effective.
Sealing isn’t just about making your floors look shiny; it’s the single most important step in preserving their life and beauty for years to come.
Choosing the Right Sealant for Your Floors
Walking into the hardware store can feel overwhelming with all the options on the shelf. Don’t let it stress you out! The choice usually comes down to two main types for floors: oil-based polyurethane and water-based polyurethane. Each has its strengths, and the best one for you depends on your priorities.
Oil-Based vs. Water-Based Polyurethane
Water-based polyurethane is my top recommendation for most beginners. It has low odor, dries quickly, and is easy to clean up with just soap and water. It provides a clear, durable finish that won’t turn yellow over time, which is great for preserving the natural look of light-colored woods like maple.
Oil-based polyurethane is a classic choice known for its incredible durability. It imparts a warm, amber glow to the wood, which can look beautiful on oak and other darker woods. However, it has a very strong smell and requires mineral spirits for cleanup. It also takes much longer to dry. The strong fumes are caused by Volatile Organic Compounds (VOCs), so excellent ventilation is a must if you choose this option.
Here’s a simple table to help you decide:
| Feature | Water-Based Polyurethane | Oil-Based Polyurethane |
|---|---|---|
| Durability | Good to Excellent | Excellent |
| Appearance | Dries crystal clear, non-yellowing | Adds a warm, amber color; yellows with age |
| Drying Time | Fast (2-4 hours per coat) | Slow (12-24 hours per coat) |
| Odor | Low | Very Strong |
| Cleanup | Soap and water | Mineral spirits |
| Best For | Beginners, light-colored woods, projects on a time crunch | High-traffic areas, achieving a traditional warm look |
Gather Your Tools and Materials
Having everything you need ready before you start makes the whole process smooth and stress-free. It’s like cooking a meal—you wouldn’t start without all your ingredients measured out! Here’s a simple checklist of what you’ll need.
Essential Supplies:
- Floor Sealant: Enough water-based or oil-based polyurethane for at least two coats. The can will tell you the square footage it covers. It’s always smart to buy a little extra.
- Applicator: A high-quality synthetic bristle brush for cutting in edges and a weighted T-bar applicator or a foam applicator pad on a pole for the main floor area.
- Painter’s Tape: To protect your baseboards and any transitions to other flooring.
- Sanding Screens: You’ll need a couple of grits. A 150 or 180-grit screen is for the initial scuffing, and a finer 220-grit screen is for sanding between coats. A sanding pole (like the one used for drywall) will save your back.
- Cleaning Supplies: A vacuum with a hard floor attachment, a microfiber dust mop or tack cloths, and a cleaner specifically made for hardwood floors.
- Safety Gear: This is non-negotiable! You’ll need an N95 respirator mask to protect your lungs from dust and fumes, safety glasses, and gloves.
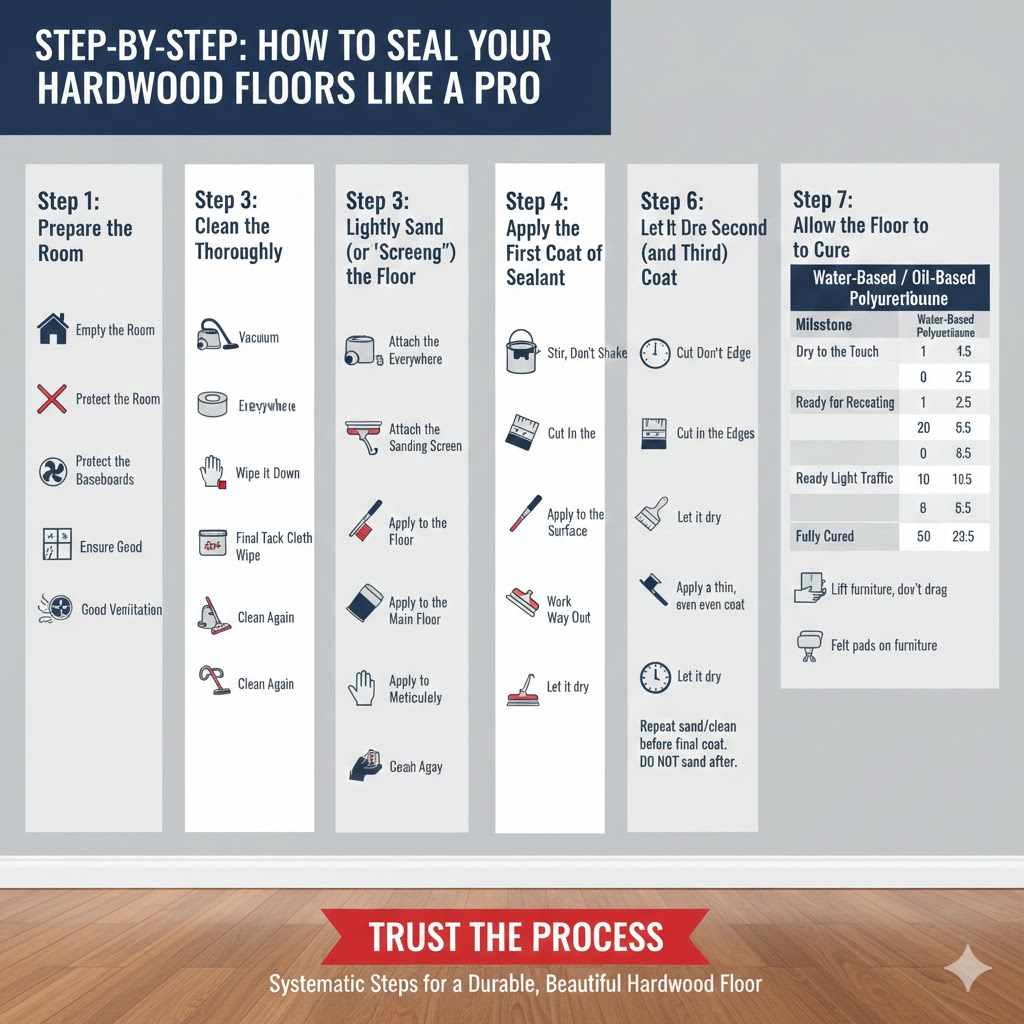
Step-by-Step: How to Seal Your Hardwood Floors Like a Pro
Alright, you’ve chosen your sealant and gathered your tools. Now comes the fun part! Just take your time and follow these steps. Remember, slow and steady wins the race when it comes to a beautiful floor finish.
Step 1: Prepare the Room
Your first job is to create a clean, empty workspace. This step is all about preparation.
- Empty the Room: Remove every piece of furniture, including rugs and curtains that might touch the floor.
- Protect the Baseboards: Apply painter’s tape along the bottom edge of all your baseboards. This will give you a clean line and protect your trim from any stray sealant.
- Ensure Good Ventilation: Open the windows and doors to get fresh air circulating. If you have a box fan, set it in a window blowing outwards to help pull fumes out of the room. Safety first!
Step 2: Clean the Floor Thoroughly
You cannot have a beautiful finish if you seal over dust, hair, or grime. The floor must be perfectly clean. Do not skip this step!
- Vacuum Everywhere: Use a vacuum with a soft brush or hard floor setting. Pay special attention to corners and along the baseboards where dust bunnies love to hide.
- Wipe It Down: Lightly dampen a microfiber mop with water or a specialized hardwood floor cleaner. You want it damp, not soaking wet—excess water is bad for wood. Go over the entire floor to pick up any fine dust the vacuum missed.
- Final Tack Cloth Wipe: For a perfectly pristine surface, go over the floor one last time with a tack cloth right before you apply the sealant. This will grab any tiny particles that have settled.
Step 3: Lightly Sand (or “Screen”) the Floor
This step is what separates a good finish from a great one. Don’t worry, you are not trying to remove the old finish, just rough it up a little. This process, called “screening” or “abrading,” creates microscopic scratches that give the new sealant something to grip onto. Without this step, your new finish could peel off later.
- Attach the Sanding Screen: Attach a 180-grit sanding screen to your sanding pole.
- Scuff the Surface: Working in the direction of the wood grain, lightly sand the entire floor. You don’t need a lot of pressure. The goal is just to take the shine off the old finish. The floor should look dull or hazy when you’re done.
- Clean Again: All that scuffing creates a fine powder of dust. You need to get it all up. Vacuum the entire floor again, then follow with a tack cloth until it comes up clean.
For more detailed information on proper wood finishing techniques, a great resource is the woodworking page from Utah State University Extension. It provides excellent background knowledge on how finishes adhere to wood.
Step 4: Apply the First Coat of Sealant
This is the moment of truth! Don’t be nervous. The key is to work methodically and maintain a “wet edge” to avoid lap marks.
- Stir, Don’t Shake: Gently stir the sealant with a paint stick for a minute or two. Never shake the can! Shaking creates tiny air bubbles that will ruin your smooth finish.
- Cut In the Edges: Pour a small amount of sealant into a paint tray. Using your high-quality brush, apply a thin layer around the perimeter of the room, about 3-4 inches wide. This is called “cutting in.”
- Apply to the Main Floor: Start in the corner farthest from your exit. Pour a small amount of sealant directly on the floor and use your applicator pad to spread it in a thin, even coat. Always work in the direction of the wood grain.
- Work Your Way Out: Continue working in small sections, overlapping each pass slightly to maintain that wet edge. Your goal is to work your way smoothly across the room and out the door.
Step 5: Let It Dry and Lightly Sand Again
Patience is your best friend now. You have to let the sealant dry completely according to the manufacturer’s instructions. Rushing this will ruin all your hard work.
- Check the Can: Look for the “recoat time” on the sealant can. This is typically 2-4 hours for water-based and 12-24 hours for oil-based products.
- Lightly Scuff the Surface: Once the floor is dry, it might feel a little rough from dust nibs or raised grain. Attach a fine 220-grit sanding screen to your pole and very lightly go over the entire floor again.
- Clean Meticulously: Just like before, vacuum up all the sanding dust and wipe the floor with a tack cloth. A perfectly clean surface is essential before the next coat.
Step 6: Apply the Second (and Third) Coat
Now you’re a pro! The next coats will go on much smoother and faster. Most floors need a total of two or three coats for proper protection. Follow the exact same process as the first coat:
- Cut in the edges with your brush.
- Apply a thin, even coat to the rest of the floor with your applicator.
- Let it dry for the recommended recoat time.
- If you are applying a third coat, repeat the light sanding and cleaning process before you do. Do not sand after your final coat.
Step 7: Allow the Floor to Cure
You’re almost there! Your floor may be dry to the touch in a few hours, but it is not “cured.” Curing is the process where the finish hardens to its maximum strength. This takes much longer than drying.
Rushing to put furniture back can leave permanent dents and marks in your brand-new finish. Be patient for this final, crucial step.
Here’s a general timeline to help you understand the difference:
| Milestone | Water-Based Polyurethane | Oil-Based Polyurethane |
|---|---|---|
| Dry to the Touch | 1-2 hours | 6-8 hours |
| Ready for Recoating | 2-4 hours | 12-24 hours |
| Ready for Light Traffic (Socks Only) | 24 hours | 48-72 hours |
| Fully Cured (Ready for Furniture & Rugs) | 7 days | 30 days |
Always lift furniture back into place; don’t drag it. And it’s a good idea to put felt pads on the bottom of all your furniture legs to protect your beautiful new finish.
Frequently Asked Questions (FAQ)
1. Do I really have to sand my floor before sealing it?
Yes, but you don’t need to sand it down to bare wood for a simple recoat. A light “scuff sanding” or “screening” with a fine-grit sandpaper is crucial. It gives the new finish something to stick to. If you apply sealant over a glossy, unsanded surface, it’s very likely to peel off later.
2. How many coats of sealant do I need for my hardwood floor?
For most residential floors, two coats are good, but three coats are best, especially in high-traffic areas like kitchens and hallways. The first coat acts as a sealer, while the subsequent coats build up the protective layer for durability.
3. What is the difference between oil-based and water-based sealant?
The main differences are in color, dry time, and smell. Water-based sealant dries fast, has low odor, and provides a clear finish. Oil-based sealant is more durable, gives the wood a warm amber tint, but has a strong smell and takes much longer to dry and cure.
4. How long do I have to wait before walking on my newly sealed floor?
You can usually walk on the floor with socks only about 24 hours after the final coat of a water-based finish, and 48-72 hours for an oil-based one. However, you should wait for the floor to fully cure—about 7 days for water-based and up to 30 days for oil-based—before placing furniture and rugs back.
5. Can I seal just one high-traffic area instead of the whole room?
While you can, it is very difficult to blend a new patch of sealant with an old finish perfectly. You will likely see a difference in sheen and color. For the best, most uniform results, it’s always recommended to screen and recoat the entire room from wall to wall.
6. I spilled some sealant! How do I clean it up?
If you used a water-based sealant, you can clean up spills quickly with a damp cloth while it’s still wet. If you used an oil-based sealant, you will need a rag dampened with mineral spirits to clean it up.
Conclusion: Enjoy Your Beautifully Protected Floors
You did it! Step back and admire your hard work. There’s a special kind of pride that comes from restoring something with your own two hands. By following these steps and taking your time, you’ve not only made your hardwood floors look brand new, but you’ve also added a powerful layer of protection that will keep them beautiful for years to come.
Remember, the keys to success were all in the preparation: the cleaning, the light sanding, and the patience to let everything dry and cure properly. Now you can relax and enjoy the warm, durable, and stunning floors you created yourself.
Thanks for letting me join you on this project. Keep up the great work in your home, and never be afraid to tackle a new challenge!