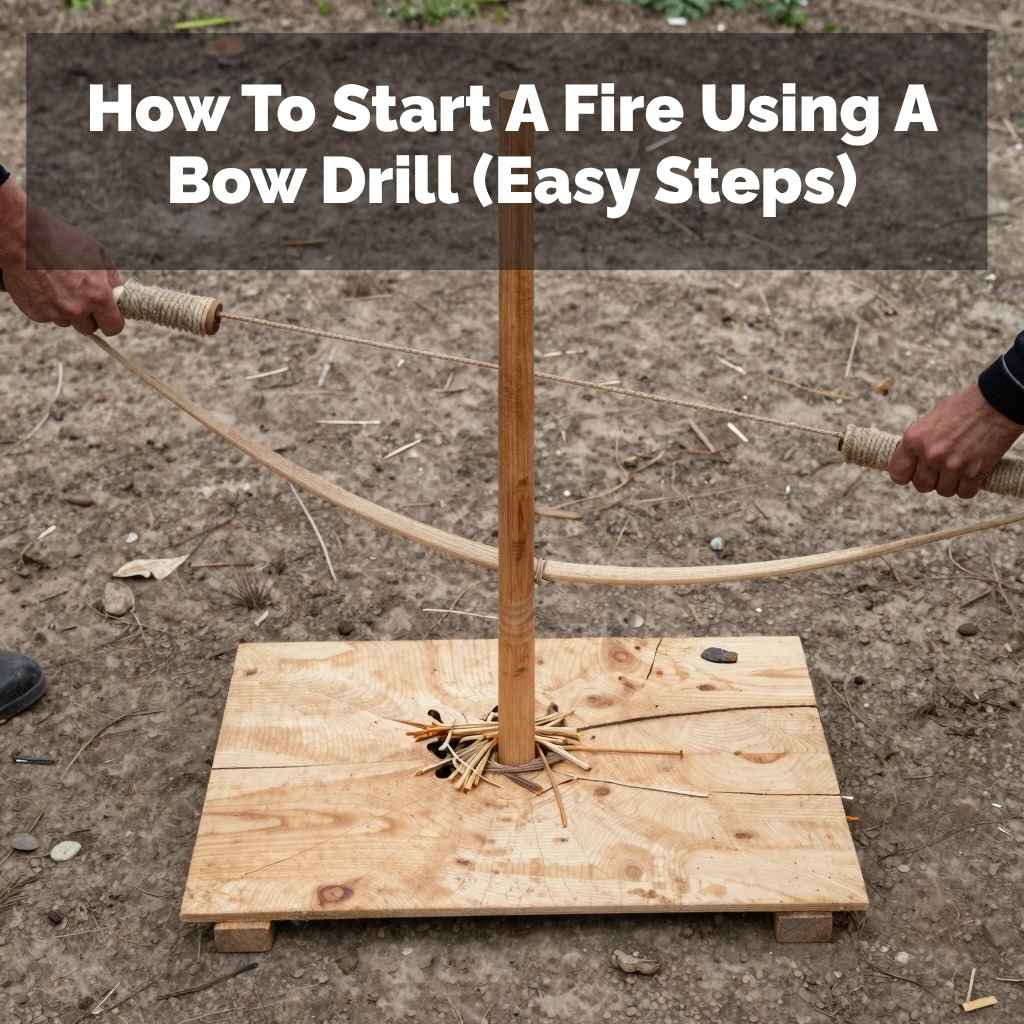
How To Start A Fire Using A Bow Drill (Easy Steps)
Starting a fire with a bow drill involves friction. You spin a spindle on a fireboard. This creates hot dust.
If you enjoy working with natural wood for outdoor and survival projects, our guide on how to make a spear out of wood walks through shaft selection, tip carving, and hardening — all with hand tools.
You then blow on this dust to make a flame. It requires practice and the right technique. This method is ancient and effective.
It works well when you have no modern tools.
The Magic of Friction Fire
A bow drill is a tool. It uses friction to make fire. This is one of the oldest ways humans made fire.
It’s more than just a survival skill. It connects you to our ancestors. They relied on this method daily.
It works by creating heat. You rub two pieces of wood together. You do this fast.
Very fast.
This rubbing creates tiny wood particles. These particles get very hot. They turn into a fine dust.
This dust is called an ember. An ember is not a flame yet. It’s a glowing piece of coal.
You need to give this ember air. You gently blow on it. This makes it glow brighter.
Eventually, it catches nearby tinder. Then you have a flame.
Why is this important? Think about being outdoors. You might forget your lighter.
Your matches get wet. A bow drill can save the day. It’s also a great skill to learn.
It builds confidence. It teaches patience. You learn about wood types.
You learn about your own limits. Mastering it feels amazing.
What You Need for a Bow Drill
To build a bow drill, you need a few key parts. Each part has a specific job. Getting these right makes the process much easier.
Imagine trying to build a house with only a hammer. You need more tools. The bow drill is like that.
You need the right components.
These are the main pieces:
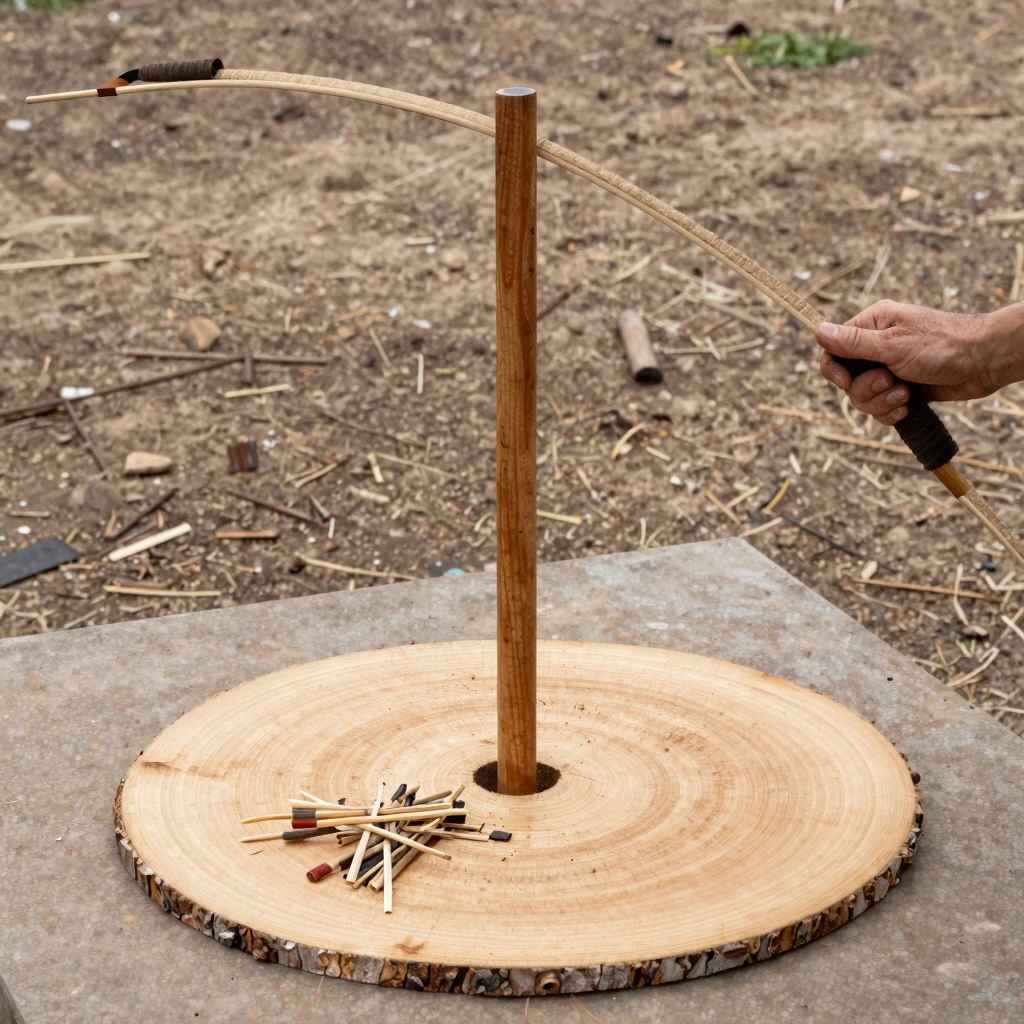
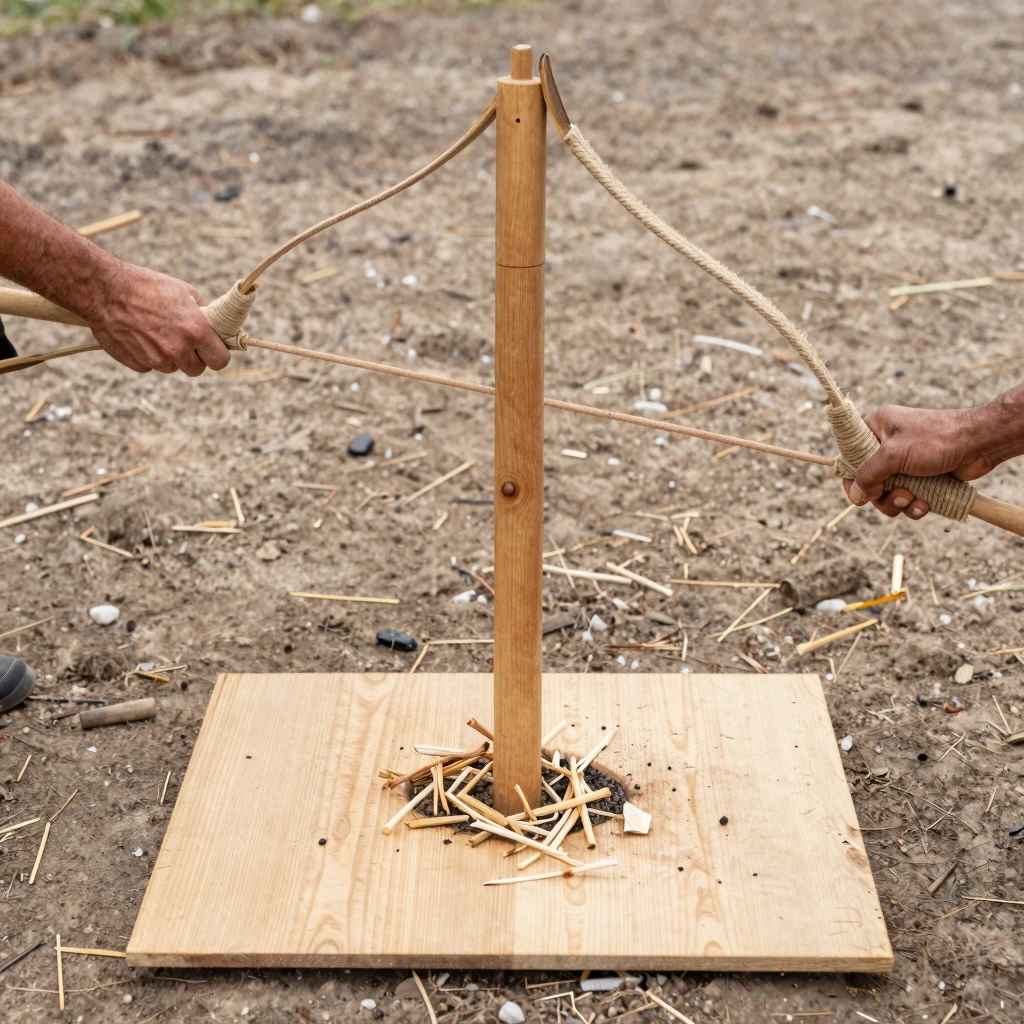
- Bow: This is like a giant rubber band. It has a string. You wrap the string around the spindle. Moving the bow back and forth spins the spindle.
- Spindle: This is a straight stick. It’s usually about a foot long. One end is dull. The other end is pointed. The dull end rests on the fireboard. The pointed end goes into a socket.
- Fireboard: This is a flat piece of wood. It has a small notch cut into its edge. The spindle spins against this board. The friction happens here.
- Socket (or Handhold): This is something you hold in your hand. It presses down on the spindle. This keeps the spindle from jumping out. It can be a smooth stone or a piece of hard wood.
- Tinder Bundle: This is very dry, fluffy material. It catches the spark from the ember. Think dry grass, bark fibers, or cottonwood fuzz.
Choosing the right wood is super important. You need dry, soft wood for the fireboard and spindle. Cedar, basswood, and cottonwood are great choices.
They create dust easily. Hardwoods are not good for this. They don’t make enough dust.
They can also be too hard to drill.
Key Wood Properties for Bow Drills
Wood Type: Always use dry wood. Wet wood will not work. Avoid green wood at all costs.
Softness: Softer woods are better. They shave off easily. This makes dust faster.
Grain: A straight grain is best. This helps the spindle spin evenly.
No Knots: Avoid wood with knots. Knots can break your spindle. They can stop the spinning.
My First Bow Drill Attempt: A Tale of Frustration
I remember my first time trying. It was a cool autumn afternoon. I was so excited.
I had read all the books. I gathered what I thought were the right materials. I found a nice, flat piece of wood.
I carved a spindle from a fallen branch. I even made a little socket from a smooth rock. Then I started sawing with my bow.
Back and forth, back and forth. Nothing happened. The spindle just spun.
I didn’t see any smoke. No dust. Nothing.
I kept going. My arm started to ache. My hands got sore.
I checked my wood. Was it dry enough? Maybe it was too hard?
I tried different angles. I pushed down harder. Still nothing.
I was getting really annoyed. The sun was starting to set. My wife called me inside for dinner.
I felt like a total failure. I had spent hours outside. And I couldn’t even make a wisp of smoke.
That first attempt taught me a lot. Mostly, it taught me I needed to learn more. It wasn’t as easy as it looked.
But I didn’t give up.
Step-by-Step: Making Fire with the Bow Drill
Let’s break down the actual process. This is where the magic happens. You need to do each step right.
Small mistakes can lead to big problems. But don’t worry. With practice, you’ll get it.
1. Prepare Your Fireboard
First, find your fireboard. It should be about half an inch thick. It needs to be flat.
Make a small divot in the edge of the board. This divot is where the spindle will sit. It’s like a little nest for the spindle.
It should be deep enough to hold the spindle. But not too deep.
Next, you need a notch. This is super important. Cut a V-shaped notch.
It should go from the edge of the board into the divot. This notch is where the hot dust will fall. It’s where your ember will form.
Make sure the notch is clean and sharp.
2. Shape Your Spindle
Your spindle needs to be just right. It should be about as thick as your thumb. It needs to be straight.
About a foot long is good. One end should be rounded off. This end goes into your socket.
The other end should be slightly pointed. This end will spin in the divot. Make sure the pointed end is not too sharp.
You don’t want it to dig in too much.
3. Get Your Socket Ready
The socket holds the spindle. It stops it from wobbling. It also lets you push down.
You can use a smooth, hard stone. You can also use a piece of hardwood. Carve a small hollow in it.
This hollow should match the pointed end of your spindle. You can put a leaf or some sap inside the hollow. This makes it smoother.
It reduces friction.
4. String the Bow
Take your bow. It’s a sturdy stick. It should be slightly curved.
Get a strong string. Shoelaces, paracord, or even rawhide work. Tie the string to both ends of the bow.
The string should be tight. But not so tight that the bow snaps. You will wrap the spindle one time around this string.
5. Set Up for Drilling
Place your fireboard on the ground. Make sure it’s stable. Put some dry tinder under the notch.
This is where your ember will fall. Have your socket ready. Hold it firmly.
Put the spindle into the socket. Place the other end of the spindle into the divot on the fireboard.
Wrap the bowstring around the spindle. Do this once. Hold the socket with one hand.
Keep it pressing down. Hold the bow in your other hand. Position yourself so you can move the bow back and forth.
This needs a steady rhythm. You want to saw the bow smoothly. This spins the spindle.
6. Drill and Create Dust
Start moving the bow. Saw it back and forth. Keep the spindle spinning.
Apply steady pressure with the socket. At first, you will see nothing. Then, you might see a little white dust.
Keep drilling. Your speed should increase. Your pressure should be firm.
You need to create a dark brown dust pile. This dust is falling into the notch.
Watch the dust pile. It should start to get darker. You might see a tiny wisp of smoke.
This is good! Keep drilling. Don’t stop too soon.
You need enough hot dust to form an ember. The dust should be deep brown. It might start to smoke more.
Stop drilling. Do this gently. Don’t blow too hard yet.
7. Nurture the Ember
Look closely at the dark dust pile. You should see a tiny red glow. That’s your ember!
It’s a small piece of burning wood. It’s not a flame yet. Now, be very careful.
Take your dry tinder bundle. Gently place the ember into the center of the tinder. Fold the tinder loosely around it.
Lift the tinder bundle. Hold it in your hands. Blow very gently at first.
You want to give it just a little air. You should see the glow get brighter. Blow a little more.
The smoke will increase. Blow steadier now. The tinder will start to glow all around the ember.
It will get hotter and hotter.
8. Make a Flame!
As you blow, the tinder will get very hot. It will start to smolder more. Then, suddenly, you’ll see a small flame!
You did it! Carefully add tiny, dry twigs to the flame. Then add slightly larger sticks.
Build your fire slowly. Don’t smother the baby flame. Give it room to grow.
Common Pitfalls & How to Avoid Them
Problem: Spindle slips out of the socket.
Fix: Ensure a good hollow in the socket. Add a lubricant like a green leaf.
Problem: Not enough dust or smoke.
Fix: Check wood dryness. Increase drilling speed and pressure. Ensure spindle fits divot well.
Problem: Ember dies out.
Fix: Prepare a very fine, fluffy tinder bundle. Blow gently and steadily, not too hard at first.
Problem: Fireboard or spindle breaks.
Fix: Use stronger, straight-grained wood. Don’t force the spindle too hard.
Real-World Bow Drill Scenarios
Where would you actually use a bow drill? It’s not just for survival shows. Think about camping trips.
Or hiking adventures. Many people enjoy learning it as a skill. It’s a fun challenge.
Imagine you’re camping in a state park. You want to make a campfire. But you forgot your lighter.
Your friend’s matches are damp. This is a perfect chance to try your bow drill. You might have practiced at home.
Or you might be learning on the spot. The key is having dry wood nearby.
In a survival situation, this skill is vital. If you are lost or stranded, fire means warmth. It means cooking food.
It means boiling water to make it safe. It also provides comfort and a signal. Having a bow drill kit, or knowing how to make one from scratch, is incredibly empowering.
Some people also use bow drills for artistic reasons. Woodworking enthusiasts enjoy the challenge. They appreciate the history.
They like the connection to nature. Building and using a bow drill is a rewarding hobby.
Where Bow Drill Skills Shine
Camping: As a backup or primary fire-starting method.
Hiking: When you need fire away from established campsites.
Survival Training: Essential for emergency preparedness.
Bushcraft Enthusiasts: For the pure joy of mastering ancient skills.
Education: Teaching history and resourcefulness to younger generations.
When Is Your Bow Drill Fire “Normal”?
Seeing smoke is a great sign. It means friction is happening. Dark brown dust collecting is good.
A glowing ember is the goal. If you get these signs, you are on the right track. Don’t get discouraged if it takes time.
The amount of smoke can vary. Some woods produce more visible smoke than others. The speed of your drilling also matters.
A steady, fast pace is best. Don’t overthink it. Feel the rhythm.
When you blow on the ember, watch for changes. The glow should intensify. The smoke should thicken.
If the ember just fades away, you might need more time drilling. Or your tinder might not be dry enough. Or your blowing technique might need adjustment.
Gentle, consistent breaths are key.
Don’t worry if your first few tries don’t work. This is a skill that takes practice. Everyone struggles at first.
It’s how you learn. You learn what works. You learn what doesn’t.
Quick Bow Drill Tips for Success
Here are some things to keep in mind. They can help you succeed faster.
- Dryness is Key: All your wood components MUST be dry. If you find wood that feels damp, leave it out in the sun to dry.
- Tinder Matters: Use the driest, fluffiest tinder you can find. Think bird nests, inner bark fibers, or cotton balls.
- Practice Your Stance: Find a comfortable position. You need to be able to saw the bow smoothly.
- Pressure Control: Apply enough pressure to make friction. But not so much that you stop the spindle.
- Rhythm is Everything: Find a steady, consistent sawing motion. Don’t rush.
- Patience, Patience, Patience: This skill takes time and effort. Don’t give up easily.
- Have a Backup: Always carry a lighter or waterproof matches. The bow drill is a great skill, but not always the fastest.
Bow Drill Quick Checklist
Component Check:
- Dry, soft wood for spindle and board? Yes / No
- Spindle straight, thumb-thick? Yes / No
- Fireboard flat with divot and notch? Yes / No
- Socket ready and smooth? Yes / No
- Bow string strong and tight? Yes / No
- Dry, fluffy tinder bundle? Yes / No
Technique Check:
- Steady bow movement? Yes / No
- Consistent downward pressure? Yes / No
- Focus on dust creation? Yes / No
- Gentle blowing on ember? Yes / No
Frequently Asked Questions About Bow Drills
What kind of wood is best for a bow drill?
Softer, non-resinous woods work best. Cedar, basswood, cottonwood, and willow are great choices. The wood must be very dry.
Avoid hardwoods like oak or maple. They are too hard to create dust easily.
How long does it take to make a fire with a bow drill?
It varies a lot. For a beginner, it might take 30 minutes or more. With practice, experienced users can make fire in under 5 minutes.
It depends on the wood, your technique, and the conditions.
Can I use any string for the bow?
A strong, durable string is needed. Shoelaces, paracord, or even a sturdy natural fiber cordage can work. Avoid thin or weak strings.
They will likely break. The string needs to handle friction and tension.
What if my ember goes out when I blow on it?
This often means the ember wasn’t hot enough. Or your tinder isn’t dry enough. Try drilling for longer to create more dust.
Make sure your tinder is very fine and fluffy. Blow gently at first, then increase strength. Don’t blow too hard too soon.
Do I need to buy a special bow drill kit?
You can buy kits, and they are often very well-made. But you can also make your own from natural materials. Learning to make your own parts is a valuable skill.
It connects you more deeply to the process.
How do I know if my wood is dry enough?
Dry wood feels light and sounds hollow when tapped. It should not feel cold or damp. If you can, split a piece open.
The inside should be dry, not wet or sappy. You can test wood by trying to shave thin curls. Dry wood will shave easily.
Wet wood will resist.
Final Thoughts on Bow Drill Fire Starting
Starting a fire with a bow drill is a journey. It’s a skill that connects you to the past. It builds confidence and resilience.
Don’t get discouraged by early failures. Every attempt teaches you something new. Keep practicing.
Refine your technique. Celebrate each wisp of smoke. You’ll eventually make that flame.
And it will feel like pure magic.