How To Change A Drill Bit On The Milwaukee M18 (Easy Fix)
Changing a drill bit on a Milwaukee M18 is a simple process. For most M18 models, you’ll need to loosen the chuck by hand or with a chuck key (if applicable), remove the old bit, insert the new one, and then tighten the chuck securely. Always ensure the tool is off and the battery is removed before starting.
Understanding Your Milwaukee M18 Chuck
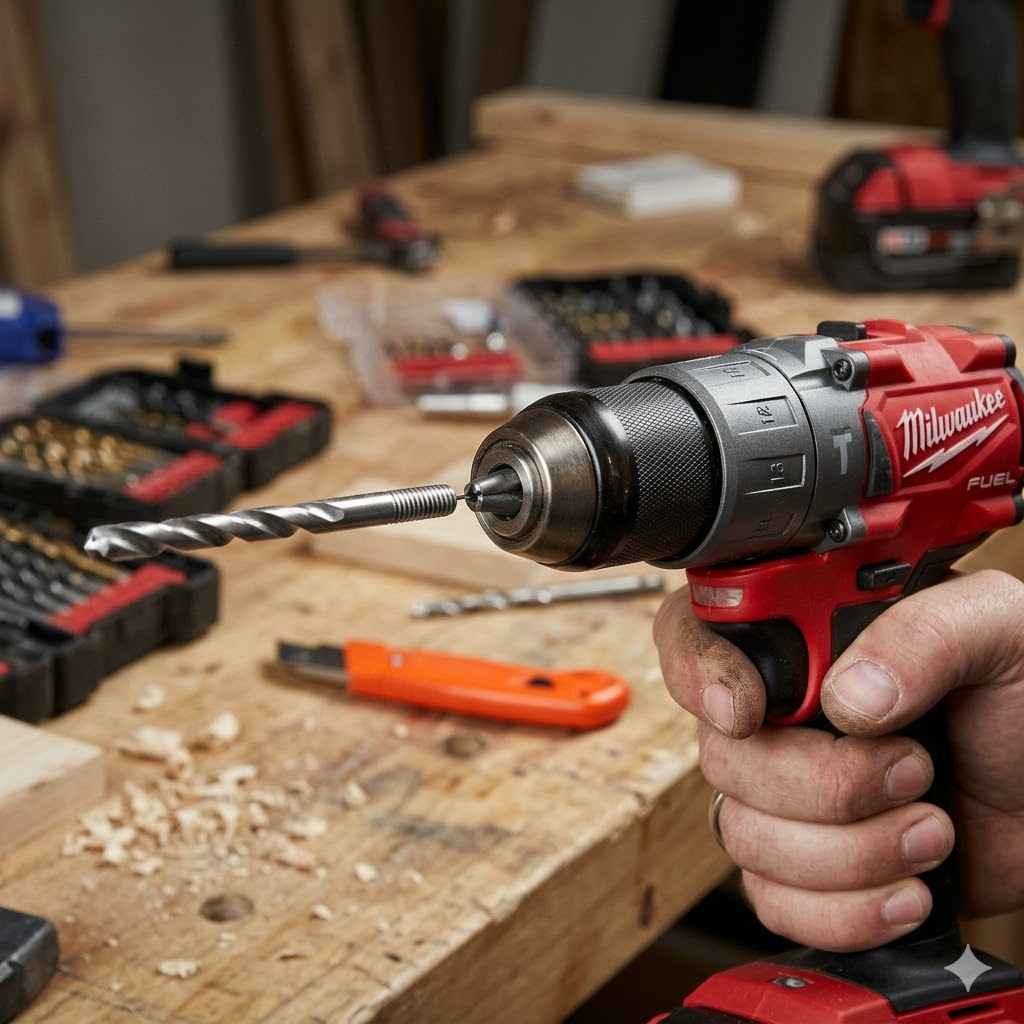
Your Milwaukee M18 drill is a versatile tool. A big part of that versatility comes from its chuck. The chuck is the part that holds the drill bit.
It’s like the hand that grips the tool. Different drills have different types of chucks. Most modern drills, like many Milwaukee M18 models, use a keyless chuck.
This means you can tighten and loosen it by hand. Some older or more heavy-duty models might use a keyed chuck. This needs a special tool, a chuck key, to tighten and loosen.
Knowing your chuck type is the first step. For the Milwaukee M18 line, keyless chucks are very common. They are designed for quick changes.
This is great for busy workdays. You don’t want to waste time fumbling with tools. The mechanism works by opening and closing jaws.
These jaws grip the shank of the drill bit. When you twist the chuck in one direction, it opens. When you twist it the other way, it closes and tightens.
Milwaukee tools are known for their durability and user-friendly design. This includes their chucks. They are built to be robust.
They can handle the power of the M18 battery system. Even with heavy use, the chuck should remain reliable. Understanding how it works helps you use it properly.
It also helps you avoid common mistakes when changing bits.
Safety First: Always Power Down
This is the most crucial step. Before you even think about touching the chuck, you need to make sure the drill cannot accidentally turn on. The power source for your Milwaukee M18 is its battery.
So, the absolute first thing to do is remove the battery pack. Slide it out from the base of the drill. This disconnects the power completely.
It’s a simple step, but it prevents nasty surprises.
Once the battery is out, it’s a good idea to double-check. Press the trigger briefly. You should hear nothing.
No spinning, no lights. This confirms the tool is dead. It’s a small action that gives you peace of mind.
Working with power tools always has risks. Taking these basic safety precautions makes the job much safer. You can then focus on the task at hand without worry.
Step-by-Step: Changing a Drill Bit on Your Milwaukee M18
Let’s walk through the process. It’s really quite simple once you know the steps. Most Milwaukee M18 drills have a keyless chuck.
This is what we’ll focus on. If your model uses a keyed chuck, the process is slightly different. We’ll cover that too.
For Keyless Chucks (Most Common M18 Models)
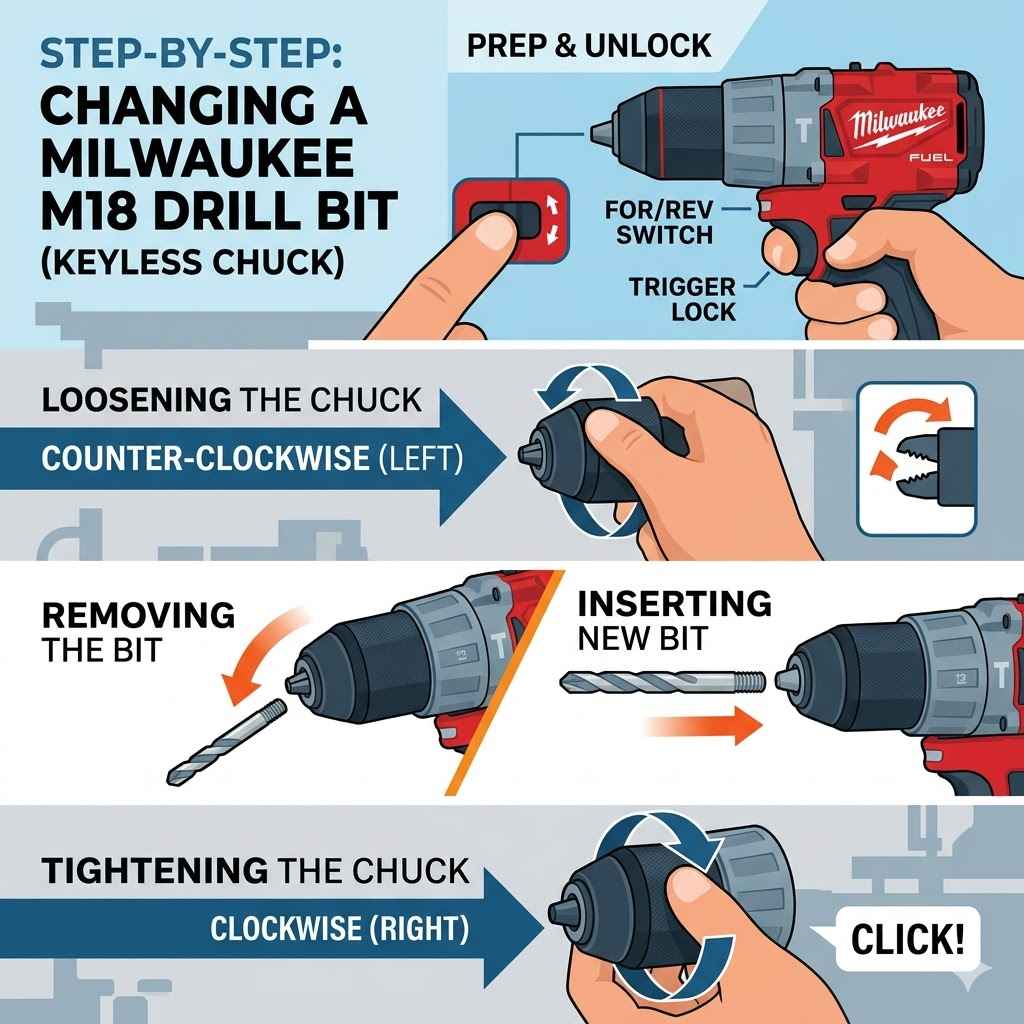
First, ensure the battery is removed. This is non-negotiable. Next, look at the chuck.
It’s the metal part at the front of the drill. It has a textured sleeve that you can grip. You’ll see ridges on this sleeve.
These ridges are for your fingers to get a good hold.
To loosen the chuck, you need to twist this sleeve. Which way do you twist? For most drills, you twist it counter-clockwise.
This is the opposite direction from how you would tighten a screw. You might need to use a bit of force. Grab the sleeve firmly with one hand.
Hold the main body of the drill with your other hand. Twist the sleeve counter-clockwise. You’ll feel and hear it open up.
The jaws inside will retract, making the opening wider.
Once it’s loose enough, the old drill bit will slide right out. You can usually pull it straight out. Sometimes, if the bit is stuck, a gentle wiggle might help.
Make sure you have the new bit ready. Look at the shank of the new bit. This is the part that goes into the chuck.
It should be clean and free of debris.
Now, insert the new drill bit into the opening of the chuck. Push it in as far as it will comfortably go. The jaws should surround the shank of the bit.
Once the bit is in place, you need to tighten the chuck. Twist the sleeve clockwise. Again, use a firm grip.
Tighten it until it feels snug. You don’t need to go crazy with force, but it must be secure. A loose bit can wobble or even fall out during use.
This can damage the bit, the material you’re drilling, or even the drill itself.
After tightening, give the bit a gentle tug. It shouldn’t move. You can also hold the drill and try to twist the chuck sleeve again to ensure it’s locked.
Once you’re confident it’s secure, you can reinsert the battery. Your drill is now ready for action with the new bit.
Quick Chuck Tightening Tip
For extra security with keyless chucks, some users like to “over-tighten” slightly when closing. This means twisting the sleeve until it’s very snug, and then giving it just a little extra firm twist. This can help the internal locking mechanism engage more effectively.
However, avoid excessive force that could damage the chuck.
For Keyed Chucks (Less Common M18 Models)
If your Milwaukee M18 drill has a keyed chuck, the process is a bit different. You’ll need a chuck key. This is a small, often L-shaped metal tool.
It has a gear on one end that fits into a specific hole on the side of the chuck.
First, remove the battery. Always. Then, locate the holes on the side of the chuck.
You’ll see one or more holes. Insert the chuck key into one of these holes. To open the chuck, turn the key counter-clockwise.
You’ll need to turn it quite a bit. The jaws will open wide. Remove the old drill bit.
Insert the new drill bit into the chuck opening. Make sure it’s centered. Now, use the chuck key to tighten.
Turn the key clockwise. You’ll need to engage the key in different holes on the chuck as you tighten. This ensures all the jaws are gripping the bit evenly and firmly.
Tighten it until the bit is held very securely. A properly tightened bit won’t slip or wobble. Once done, remove the chuck key.
Reinsert the battery. Your drill is ready. Keyed chucks can offer a very strong grip.
They are often found on older or more powerful hammer drills. The extra step of using the key ensures a solid connection for demanding tasks.
Common Issues and How to Solve Them
Sometimes, things don’t go perfectly smoothly. This is normal. Here are a few common problems people run into when changing drill bits and how to fix them.
Contrast: Stuck Drill Bits
Normal Scenario: The old drill bit slides out easily once the chuck is loosened.
Concerning Scenario: The drill bit feels jammed or won’t budge after loosening the chuck.
What to Do: Ensure the chuck is fully open. Sometimes, a bit gets wedged in at an angle. Try slightly wiggling the bit while turning the chuck sleeve.
If it’s still stuck, try tapping the chuck body gently with the handle of a screwdriver (not the metal part of the bit). If it’s a very stubborn bit, you might need to apply a little penetrating oil and let it sit for a few minutes before trying again. Avoid excessive force, which can damage the chuck.
Chuck Won’t Tighten Properly: If the chuck sleeve spins but doesn’t seem to grip the bit, the internal mechanism might be worn or dirty. For keyless chucks, ensure you’re twisting the sleeve in the correct direction. If it feels loose after tightening, try a bit more pressure.
If the problem persists, the chuck might need professional servicing or
Wrong Bit Size: Make sure the new bit you’re trying to insert actually fits. Drill bits come in many diameters. The chuck has a specific range it can hold.
Check the markings on the chuck. They usually indicate the minimum and maximum bit shank diameter it can grip. Trying to force a bit that’s too large can damage the chuck jaws.
Debris in the Chuck: Dust and metal shavings can get inside the chuck over time. This can make it harder to loosen or tighten properly. When you have the old bit out, take a moment to look inside the chuck.
If you see debris, use a dry cloth or a soft brush to clean it out. Compressed air can also be useful here. A clean chuck works much better.
Why Using the Right Drill Bit Matters
Changing the bit is only part of the story. What you’re replacing it with is just as important. The type of drill bit you use directly affects the outcome of your work.
It also affects how hard you push your drill. Using the wrong bit can lead to poor results, damaged materials, or even broken bits.
Quick-Scan Table: Common Drill Bit Types
| Drill Bit Type | Best For | Milwaukee M18 Use Case |
|---|---|---|
| Twist Drill Bits | General purpose drilling in wood, plastic, metal. | Versatile for most M18 tasks. |
| Spade Bits (Paddle Bits) | Large holes in wood. | Quickly making larger holes for pipes or wiring with M18. |
| Masonry Bits | Drilling into brick, concrete, stone. | Requires M18 hammer drill function for best results. |
| Forstner Bits | Clean, flat-bottomed holes in wood. | Fine woodworking projects with M18 precision. |
| Screwdriver Bits | Driving screws. | Using your M18 as a powerful screwdriver. |
For instance, using a wood bit on metal will quickly dull the bit and create poor holes. Metal shavings can clog the flutes. Conversely, trying to drill concrete with a standard twist bit is futile.
You’ll likely break the bit and achieve nothing. Masonry bits have a special carbide tip designed to chip away at hard materials.
The shank of the bit also needs to match the chuck’s capacity. Most standard drill bits have a round shank. This is what keyless and keyed chucks grip best.
Some specialized bits might have hex shanks. These are common for driver bits and some spade bits. Most Milwaukee M18 chucks can handle round shanks up to about 1/2 inch.
Always check the specifications of both your drill and the bit.
When Is It Time for a New Drill Bit?
Drill bits don’t last forever. They wear out. You’ll notice this when your drilling becomes harder.
You might have to push the drill much harder to make progress. The holes won’t be as clean. Sometimes, the bit will start to overheat.
You might even smell burning, which is a sign of friction.
Worn bits are frustrating. They slow you down. They can also put extra strain on your Milwaukee M18 drill.
This is because the motor has to work harder. For a tool as robust as an M18, this isn’t ideal. Replacing dull bits is a simple maintenance step.
It keeps your tools working efficiently. It also ensures better results for your projects.
Observational Flow: Signs of a Dull Bit
Start Project: Drill bit is sharp and new.
First Few Holes: Drill enters material easily. Minimal pressure needed.
Mid-Project: Noticeable increase in pushing effort. Drill motor sounds strained.
Late Project: Bit feels like it’s grinding, not cutting. Smoke or excessive heat from the bit.
Result: Rough holes, slow progress, potential for bit breakage.
A good rule of thumb is to inspect your bits regularly. If a bit is visibly dull, chipped, or bent, it’s time for a replacement. Keep a small supply of common drill bit sizes on hand.
This way, you can swap them out as needed. It’s a small investment that pays off in saved time and reduced frustration.
Maintaining Your Milwaukee M18 for Longevity
Your Milwaukee M18 is a powerful tool. Taking good care of it ensures it lasts for years. Changing bits is a part of this.
But there are other things you can do. Keeping the tool clean is vital. After a dusty job, wipe down the body.
Pay attention to vents. You don’t want dust clogging them up.
Store your drill properly. Avoid leaving it in damp places. Extreme temperatures can also affect the battery and tool.
Always use genuine Milwaukee batteries and chargers. These are designed to work perfectly with your M18 tools. They prevent damage and ensure optimal performance.
Make sure the battery contacts are clean too.
Stacked Micro-Sections: M18 Care Tips
Cleanliness: Wipe down the tool after use. Clear vents.
Storage: Keep in a dry, moderate temperature environment.
Batteries: Use only genuine Milwaukee M18 batteries and chargers.
Chuck Care: Clean debris from the chuck periodically.
Avoid Abuse: Don’t drop the tool or use it for tasks it wasn’t designed for.
When you’re not using the drill, consider removing the battery. This is especially true for long-term storage. It helps prevent the battery from slowly discharging.
It also reduces the risk of accidental activation. These simple steps help maintain the performance and lifespan of your Milwaukee M18.
Frequently Asked Questions About Changing Milwaukee M18 Drill Bits
Can I change a drill bit on my Milwaukee M18 without removing the battery?
It’s strongly advised NOT to. While some keyless chucks might allow you to loosen them with the battery in, there’s always a risk of accidental trigger activation. This could lead to injury or damage.
Always remove the battery first for complete safety.
How do I know if my Milwaukee M18 has a keyless or keyed chuck?
Look at the front of the drill. If you see a sleeve that you can grip and twist by hand, it’s likely a keyless chuck. If there are specific holes on the chuck designed for a separate tool (a chuck key), it’s a keyed chuck.
Most modern M18 drills are keyless.
What is the maximum size drill bit my Milwaukee M18 can hold?
This depends on the specific M18 model and the chuck installed. Most standard M18 drills with 1/2-inch chucks can hold bits up to 1/2 inch in diameter. Smaller M18 drills or those with smaller chucks will have a lower maximum capacity.
Check the markings on your chuck or your drill’s manual.
My drill bit keeps slipping even after tightening the chuck. What should I do?
Ensure the drill bit shank is clean and free of oil or debris. Make sure you are tightening the chuck sufficiently. If it continues to slip, the internal jaws of the chuck might be worn or damaged.
In this case, the chuck may need to be replaced.
Can I use a different brand of drill bit with my Milwaukee M18?
Yes, you can use drill bits from other reputable brands. The key is to ensure the bit’s shank size fits within the capacity of your Milwaukee M18 chuck. Quality bits will perform better and last longer, regardless of brand.
How often should I clean the chuck on my Milwaukee M18?
It’s a good practice to clean the chuck whenever you change bits, especially if you’ve been working in a dusty environment. A quick wipe down with a cloth is often enough. For deeper cleaning, a soft brush or compressed air can help remove stubborn dust and debris.

Final Thoughts on Bit Changes
Changing a drill bit on your Milwaukee M18 is a fundamental skill. It’s simple, quick, and essential for efficient work. Always prioritize safety by removing the battery.
Then, with a firm grip, loosen, swap, and tighten. Understanding your chuck type ensures you do it right. Regular maintenance, like cleaning and using good bits, keeps your M18 performing at its best.
Now you can tackle any project with confidence, knowing your tool is ready.