How To Change The Chuck On A Dewalt Drill Like A Pro
What if you could fix this yourself? What if changing the drill chuck was simpler than you thought? This guide will walk you through it.
You’ll learn how to swap out that old chuck for a new one. We’ll make it easy to understand.
Changing the chuck on a Drill Bits in a Milwaukee Drill: Compatibility Guide” href=”https://woodworkingadvisor.com/can-i-use-dewalt-drill-bits-in-a-milwaukee-drill/” target=”_blank” rel=”noopener” data-wpil-monitor-id=”21200″>DeWalt drill involves identifying the type of chuck, securing the drill, and using the right tools to loosen and
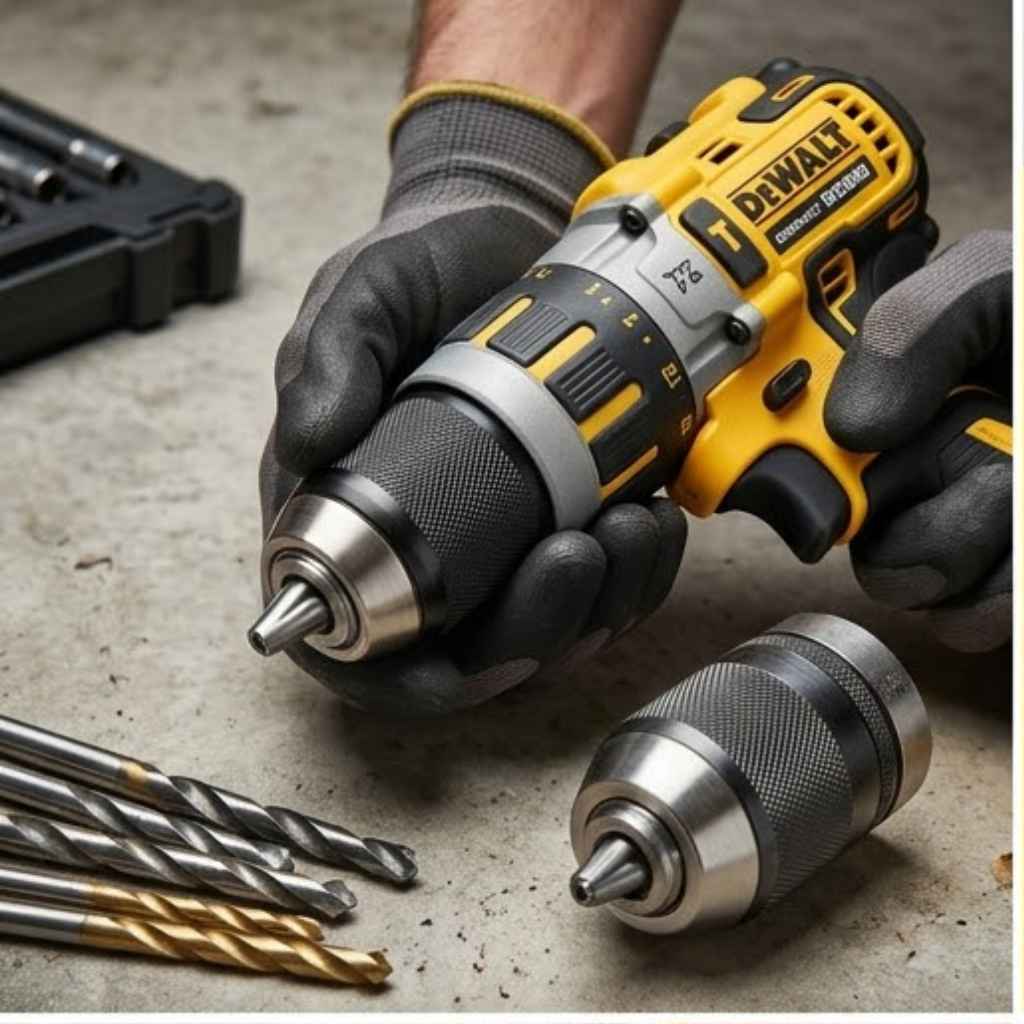
Understanding Your DeWalt Drill Chuck
Your drill chuck is the part that holds the drill bit. It’s like the drill’s hand. It needs to grip the bit tightly.
Sometimes, this grip gets weak. Or maybe it gets stuck. This can happen with normal wear and tear.
There are a couple of main types of chucks on DeWalt drills. Some are keyless. You just twist them with your hand.
Others use a chuck key. This is a small metal tool you stick into a hole. It helps you tighten or loosen the chuck.
Knowing which type you have is the first step. It affects how you’ll change it. Most modern DeWalt drills have keyless chucks.
They are very popular. They offer speed and ease of use. You can change bits fast without fumbling for a key.
But even these can wear out. Or they might get damaged. Grit can get inside.
This makes them hard to turn. A worn-out chuck means poor grip. Your bits might spin.
This is not safe. It can damage your workpiece too.
If your drill bit feels loose, or the chuck won’t open or close well, it might be time for a change. Don’t worry. It’s not a huge job.
It’s something you can often do at home. It will save you money and get your drill working right again.
Why Would You Need to Change a Drill Chuck?
Think about your drill. It’s a workhorse. It sees a lot of action.
Bits get changed often. Sometimes, you drop the drill. Even a small fall can jar things.
Grit and dust get everywhere. This is a big enemy of moving parts.
A common problem is a worn-out chuck. The jaws inside can get dull. They lose their grip.
This is when bits start to slip. You’ll feel it. The drill might hum but not make progress.
That’s a sure sign the chuck isn’t holding on.
Another issue is corrosion. If the drill gets wet and isn’t dried properly, rust can form. Rust makes parts stick.
It can seize up the chuck completely. You might not be able to open it at all. This makes changing bits impossible.
Damage is another reason. Maybe the chuck got hit hard. A dent or bend can throw off its alignment.
This means it won’t close evenly. Some bits will be tight, others loose. It can also make it hard to get bits out.
Sometimes, you just want an upgrade. Maybe your current chuck is okay, but a new one has better features. For example, a higher quality chuck might have a tighter grip.
It might be more durable. Or it might be easier to use.
Whatever the reason, swapping out a DeWalt drill chuck is a doable repair. It means you don’t have to buy a whole new drill. You can give your existing tool new life.
It’s a great way to be a smart DIYer.
Gathering Your Tools and Supplies
Before you start, make sure you have everything. This makes the job smooth. You don’t want to stop halfway.
You’ll need your DeWalt drill, of course. And you’ll need a replacement chuck. Make sure it’s the right one for your drill model.
You’ll likely need a flathead screwdriver. This is for prying. A small hammer can also be useful.
Sometimes, a few gentle taps help loosen things. Always use rubber mallets or soft-faced hammers if you have them.
For many DeWalt drills, you’ll need an Allen wrench or hex key. This is for the set screw inside the chuck. Check your drill manual if you’re unsure of the size.
Often, it’s a common size.
A bench vise is very handy. It holds the drill steady. This is important for applying force.
If you don’t have a vise, you can clamp the drill’s body securely. Make sure it doesn’t move at all.
Safety glasses are a must. You’re working with tools that can slip. Metal bits can fly.
Protect your eyes. Work gloves can also help you get a better grip. They protect your hands too.
Cleaning supplies are good to have. A small brush and some penetrating oil can help. This can loosen stubborn parts.
Make sure you have rags to wipe things clean.
Finally, get the new chuck. You can usually find them online or at hardware stores. Make sure the size and threading match your drill.
Some chucks are a direct screw-on. Others might need a specific adapter. Your drill’s model number is key here.
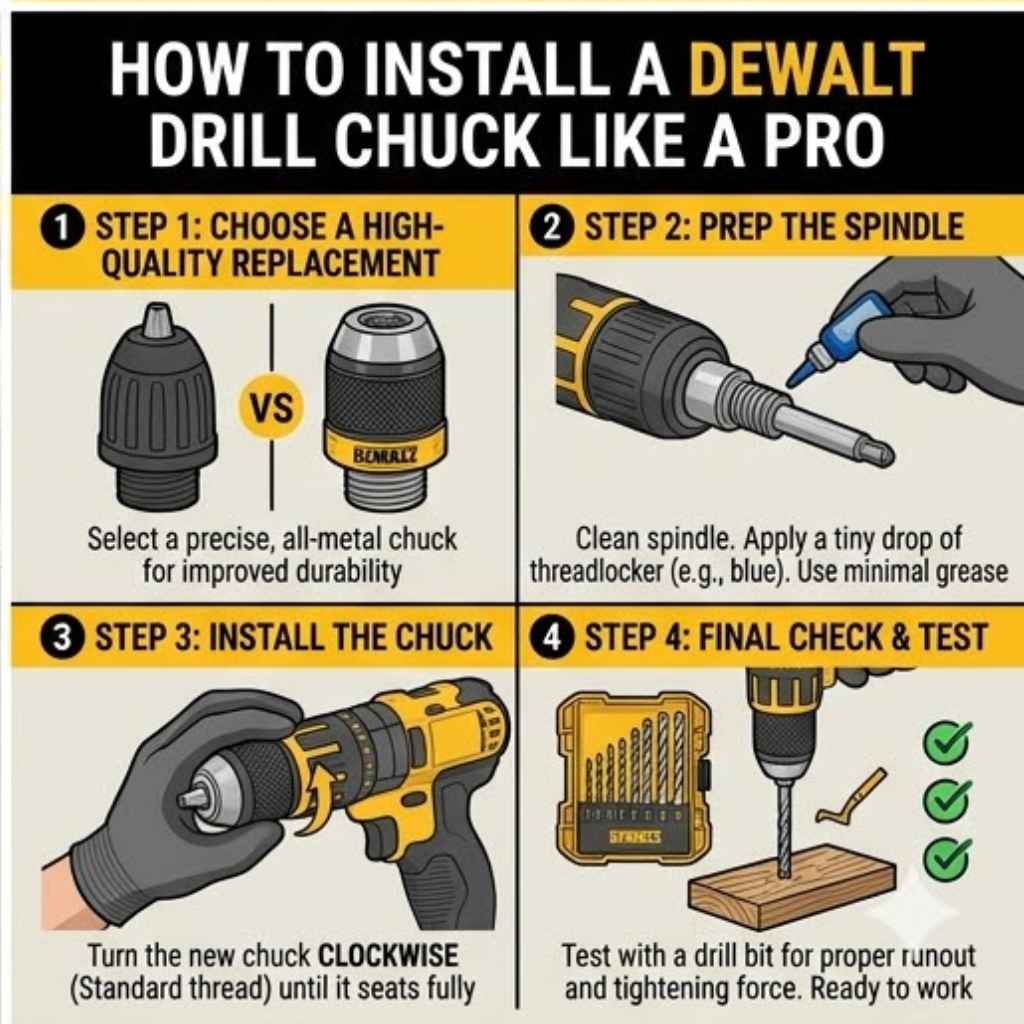
Step-by-Step: Changing a Keyless DeWalt Chuck
Let’s break down changing a keyless chuck. This is the most common type. It’s good to know these steps.
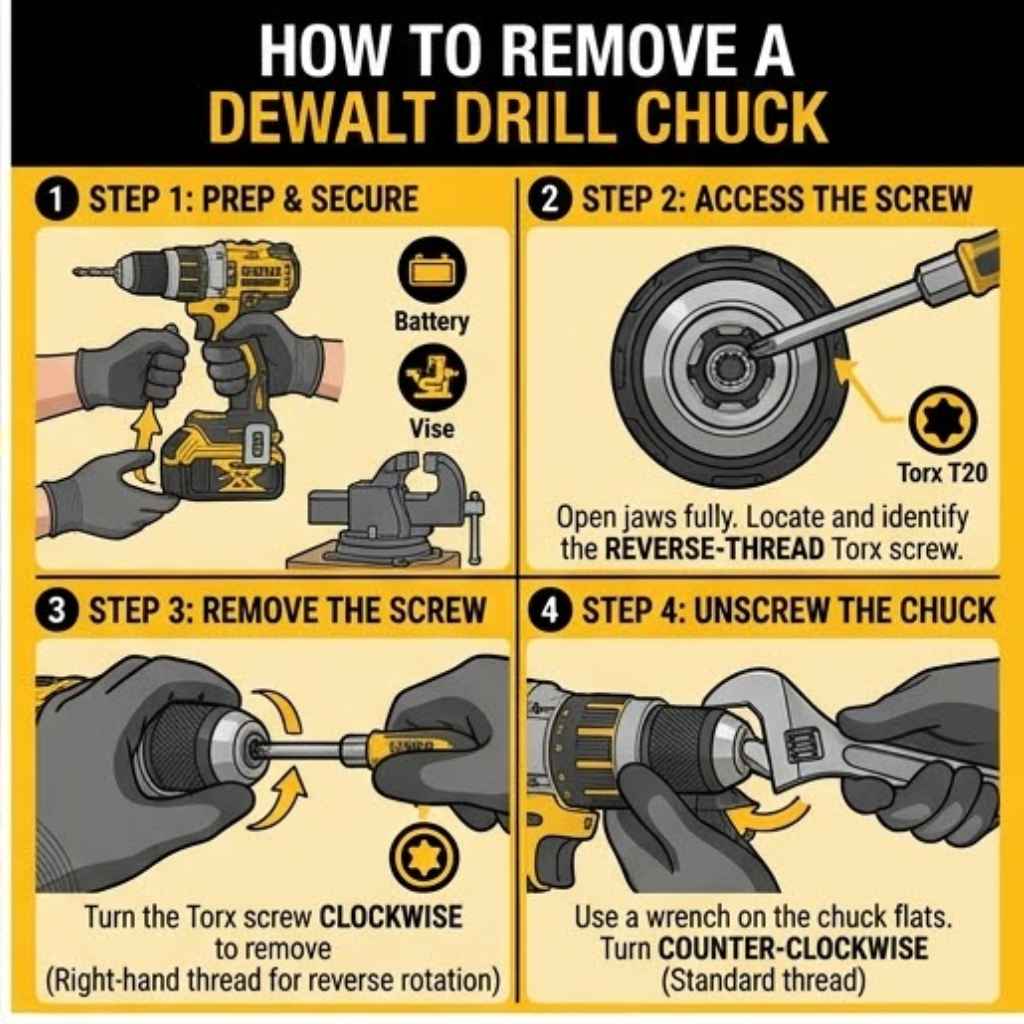
Step 1: Power Down and Secure
First, and this is critical, remove the battery from your drill. Always work with a disconnected power source. This prevents accidental startups.
Then, secure the drill. A bench vise is best. Clamp the drill body.
Do not clamp the chuck itself.
Step 2: Find the Set Screw
Most keyless chucks have a small set screw inside. It holds the chuck onto the drill’s spindle. You’ll usually find it at the back of the chuck jaws.
Open the chuck jaws wide. Look deep inside. You should see a small hole.
Sometimes this screw is a standard Phillips head. More often, it’s a hex head (Allen screw). Use the right size Allen wrench.
’s the tricky part. Most set screws on power tools are reverse-threaded.
This means you turn them clockwise to loosen them. Yes, you read that right. Clockwise to loosen.
This is to prevent them from loosening during normal use when the drill spins counter-clockwise. Try turning it clockwise first. If it doesn’t budge, try counter-clockwise.
It might be tight. You might need a bit of force. Make sure your wrench is seated well.
Gentle taps with a hammer on the wrench handle can help break it loose. Once it starts to turn, it should come out fairly easily. Keep the screw safe!
Step 3: Loosen the Chuck
Once the set screw is out, the chuck should be free. However, it’s still threaded onto the spindle. You need to unscrew it.
For many DeWalt drills, the chuck is left-hand threaded. This means you turn it clockwise to loosen it.
Try turning the chuck clockwise. You’ll need a good grip. You can use a strap wrench.
Or, if it’s really tight, you might need two people. One person holds the drill body. The other turns the chuck.
Sometimes, a few sharp taps with a rubber mallet can help loosen it.
Be firm but don’t force it too hard. If it feels like it might break something, stop and re-evaluate. Penetrating oil can help if it’s seized.
Let it soak for a bit. Then try again.
Step 4: Install the New Chuck
Once the old chuck is off, clean the spindle threads. Use a rag. Make sure there’s no old grease or debris.
Take your new chuck. It will also have threads. Carefully thread it onto the spindle by hand.
Turn it counter-clockwise to tighten it onto the spindle.
You want it to thread on smoothly. If it feels like it’s cross-threading, stop. Back it off and try again.
Make sure it’s straight. Screw it on as far as you can by hand.
Step 5: Secure the Set Screw
Now, you need to put the set screw back in. Remember, it’s likely reverse-threaded. So, you turn it counter-clockwise to tighten it.
Insert the screw into the hole. Tighten it firmly. You don’t need to overtighten.
Just make it snug. This screw prevents the chuck from backing off the spindle.
Step 6: Test It Out
Remove the drill from the vise. Reinsert the battery. Try closing the chuck.
Does it open and close smoothly? Does it grip a drill bit firmly? Insert a bit and test the drill in both forward and reverse.
Everything should feel solid and secure.
Keyless Chuck Types on DeWalt Drills
Standard Keyless: The most common. You grip the rear part and twist the front to open/close.
Auto-Locking: Many modern DeWalt drills use this. When you stop rotating the chuck to tighten, it locks automatically. This provides a very secure grip.
Some older models might have chucks that accept a key. These are less common now.
Changing a DeWalt Drill with a Chuck Key
If your DeWalt drill has a traditional chuck with holes for a key, the process is a bit different. These are often found on older models or some hammer drills.
Step 1: Disconnect Power and Secure
Just like with the keyless type, remove the battery first. Safety is paramount. Then, secure the drill.
A bench vise works well. Clamp the drill body firmly.
Step 2: Remove the Chuck Key Screw
Look into the chuck jaws. You’ll see holes on the chuck body. These are for the chuck key.
You’ll also find a central screw. This screw usually needs to be removed first. Use a Phillips head screwdriver.
This screw is typically a standard right-hand thread. So, you turn it counter-clockwise to remove it. It might be a bit tight.
Once removed, set it aside safely.
Step 3: Loosen and Remove the Chuck
Now, take your chuck key. it gets a little different. You’re not just tightening or loosening a bit. You’re unscrewing the whole chuck.
Typically, you’ll insert the key and turn it in the direction that loosens the chuck. For most standard chucks, this means turning the key counter-clockwise. Some chucks might require you to use two key holes at once to apply more force.
It will likely be very tight. You may need to use a bit of leverage. If the drill is securely in the vise, you can put a pipe over the chuck key for more reach.
Be careful not to damage the key or the drill. If it’s really stuck, a little penetrating oil can help.
Once it’s loose, you can unscrew it the rest of the way by hand. Again, pay attention to the thread direction. It’s often left-hand threaded onto the spindle.
Step 4: Install the New Chuck
Clean the drill spindle threads. Make sure they are free of debris. Take your new chuck.
Carefully thread it onto the spindle. Turn it clockwise by hand to start. Screw it on as tightly as you can.
Step 5: Reinsert the Set Screw
Put the central screw back in. Screw it in by hand first. Then use your screwdriver to tighten it.
This screw holds the chuck onto the spindle. Make it snug.
Step 6: Test Functionality
Remove the battery. Test the chuck. Does it open and close properly with the key?
Insert a bit and tighten it. Remove the bit. Make sure everything feels secure and smooth.
Contrast: Keyless vs. Chuck Key
Keyless Chucks
- Pros: Fast bit changes, no extra tool needed, modern feel.
- Cons: Can sometimes slip if not tightened enough, may wear out jaws faster.
Chuck Key Chucks
- Pros: Very strong grip, good for high torque applications, often more durable.
- Cons: Slower bit changes, requires the separate chuck key tool, can be less convenient.
Troubleshooting Common Chuck Problems
Even with the right steps, you might run into issues. Here’s how to deal with them.
Problem: The Set Screw Won’t Budge
This is common. The screw is tiny and often in a tight spot. Make sure you have the right size Allen wrench.
Push the wrench in firmly. Try tapping the end of the wrench with a hammer. This can shock it loose.
Penetrating oil is your friend here. Let it sit for a while.
Problem: The Chuck is Stuck on the Spindle
This happens from grit, rust, or overtightening. Again, penetrating oil is key. Let it soak.
You might need to use a strap wrench for better grip on the chuck. Sometimes, carefully using a pipe over the wrench handle can give you the leverage needed.
In extreme cases, you might need to heat the chuck slightly. Use a heat gun, not a torch. Heat expands metal.
This can help break the bond. Be very careful not to overheat or damage plastic parts.
Problem: The New Chuck Doesn’t Fit
Double-check your drill model number. Order the correct replacement chuck. Chucks have specific thread sizes and spindle mounts.
If it’s not threading on smoothly, don’t force it. It might be the wrong part or cross-threaded. Back it off and try again carefully.
Problem: The Drill Chuck Jaws Are Worn
This is usually why you’re changing it. If the new chuck doesn’t seem to grip well, check for debris in the jaws. Make sure the chuck is tightened fully onto the spindle and the set screw is snug.
Sometimes, a faulty new chuck is possible but rare.
Problem: Stripped Screw Head
If the head of the set screw or the central screw is stripped, it’s harder. You might need a screw extractor kit. These tools are designed to grip damaged screw heads.
You drill a small pilot hole into the screw, then use the extractor to turn it out.
Quick Tips for Stubborn Chucks
- Apply penetrating oil generously.
- Use firm, steady pressure.
- Tap gently with a rubber mallet.
- Ensure your tool is fully seated in the screw head.
- Consider heat (with caution).
When to Consider Professional Help
While changing a chuck is a DIY-friendly job, there are times when it’s best to get help. If your drill is still under warranty, trying to change the chuck yourself might void it. Check your warranty terms first.
If you’ve tried all the usual steps and the chuck still won’t budge, or if you’re worried about damaging the drill’s motor or gearbox, it might be time to take it to a professional tool repair shop. They have specialized tools and experience.
Sometimes, the problem isn’t the chuck at all. It could be an internal issue with the drill’s mechanism. A professional can diagnose this accurately.
For very old or complex tools, professional repair might be more reliable.
When to Call a Pro
- Drill is still under warranty.
- You fear damaging the drill.
- Chuck is completely seized and won’t budge.
- Problem might be deeper than the chuck.
Real-World Scenarios and What They Mean
Let’s look at some situations.
Scenario 1: The Drill Bit Keeps Slipping
This is the most common sign of a worn chuck. The jaws inside have lost their bite. Or, the internal mechanism is damaged.
You might be tempted to overtighten, but this can damage the chuck further. Replacing the chuck is the best fix.
Scenario 2: The Chuck Grinds When Tightening
This usually means dirt, debris, or rust is inside the chuck. It’s preventing the jaws from moving freely. If it’s just dirt, cleaning might help.
But often, it’s a sign of internal wear. A deep clean might give temporary relief, but a new chuck is usually needed for reliable performance.
Scenario 3: The Chuck Won’t Open or Close Fully
This is a definite problem. It could be a bent spindle, a damaged internal cam, or severe corrosion. If the jaws are stuck in the middle, you might not be able to insert or remove bits.
This is a strong indicator that the chuck needs replacement.
Scenario 4: Dropped the Drill and Now the Chuck is Off-Center
A fall can misalign the chuck jaws. Even if it tightens, the bit might not run true. This affects precision.
If you notice wobble, even after trying to re-tighten, the chuck mechanism or spindle might be bent. Replacement is likely needed.
My Experience with a Stubborn Chuck
I remember working on a deck build. My trusty DeWalt was drilling pilot holes. Suddenly, the bit just spun.
I tried tightening it more, but it kept slipping. I knew the chuck was old, maybe ten years of hard use. I took it home, armed with my new Allen wrench.
I found the set screw. It was tiny. And it was on there tight!
I turned it clockwise like they say. Nothing. I tried counter-clockwise.
Still stuck. I grabbed my rubber mallet and gave the wrench a few taps. It started to budge.
Then, the chuck itself. It took some serious twisting.
But seeing that new chuck spin on smooth was so satisfying. My drill felt new again. It was a good reminder that even tough repairs are doable with the right info.
Maintaining Your New DeWalt Chuck
Once you have a new chuck, you want it to last. A little care goes a long way.
After each use, wipe down your drill. Pay attention to the chuck area. Get rid of any sawdust or debris.
If you work in a dusty environment, a quick brush-out is good.
Avoid dropping your drill. If it does fall, inspect the chuck for damage.
If your chuck ever feels stiff or hard to turn, try a little penetrating oil. Spray a small amount into the jaw mechanism. Open and close the chuck a few times.
Then wipe off any excess. Don’t overdo it with the oil. Too much can attract dust.
Store your drill properly. Keep it in its case if you have one. This protects it from dust and moisture.
A dry environment is best.
For chucks that take a key, keep the key with the drill. Losing it means you can’t tighten the chuck properly. Some people use a small string or clip to keep it attached.
Chuck Care Checklist
- Clean after use.
- Protect from drops.
- Use lubricant sparingly.
- Store in a dry place.
- Keep track of chuck key.
Frequently Asked Questions About DeWalt Drill Chucks
Here are some common questions people have.
How do I know if my DeWalt drill chuck needs replacing?
If your Drill Bits for Metal vs Wood: Choosing the Right Tool” href=”https://woodworkingadvisor.com/drill-bits-for-metal-vs-wood/” target=”_blank” rel=”noopener” data-wpil-monitor-id=”21204″>drill bits slip, the chuck won’t tighten or loosen properly, it makes grinding noises, or it looks physically damaged, it’s likely time for a replacement.
Can I use a generic chuck on my DeWalt drill?
It’s best to use a DeWalt-specific or a high-quality compatible chuck. The threading and spindle size need to match precisely. Using the wrong chuck can damage your drill or cause it to not function safely.
What is the set screw in my DeWalt drill chuck?
The set screw is a small screw inside the rear of the chuck that secures the chuck to the drill’s spindle. It’s often reverse-threaded, meaning you turn it clockwise to loosen it.
How tight should I make the new chuck on my DeWalt drill?
For keyless chucks, tighten them firmly by hand until they are snug. For chucks with a key, use the key to get a very tight grip. The set screw or central screw should also be tightened securely.
Can I just buy a new spindle instead of a whole chuck?
In most cases, the chuck is a separate unit that screws onto the spindle. If the spindle itself is damaged, it’s a more complex repair. Usually, replacing the chuck is the simpler and more common solution if the spindle threads are okay.
How often should I lubricate my DeWalt drill chuck?
You don’t need to lubricate it often. Only use a small amount of penetrating oil if it becomes stiff or hard to turn. Otherwise, cleaning debris is usually sufficient.
Over-lubrication can attract more dirt.
Final Thoughts on Chuck Replacement
Changing the chuck on your DeWalt drill might seem daunting at first. But with these steps, it becomes a manageable task. You’ve learned about the types of chucks, the tools you need, and how to tackle the job step-by-step.
Remember to prioritize safety. Always disconnect power. Take your time.
And don’t be afraid to use a little patience. Your drill will thank you for it, and you’ll feel a great sense of accomplishment.