How to Use Wood Filler on Large Holes: Proven, Easy Steps
To use wood filler on large holes, first clean and roughen the hole’s interior for good grip. For deep holes, use a backing material. Apply a two-part epoxy filler in thin layers, allowing each to partially dry. Overfill slightly, let it cure completely, then sand it flush with the surface before priming and painting.
Hello, friends! Md Meraj here. In my workshop, I see it all the time: a beautiful piece of wood, marred by a large, ugly hole. Maybe it’s from rot, old hardware, or an accident. It can feel like a project-stopper. But I’m here to tell you that it’s not. Fixing a large hole is easier than you think. You don’t need to be a professional carpenter to get a strong, smooth, and lasting repair. Today, I’ll walk you through the simple, proven steps to make that damage disappear. Let’s build your confidence and fix that wood together!
Why Large Holes Need Special Care
Fixing a small nail hole is one thing, but tackling a large gap—say, wider than a quarter—is a different game. You can’t just scoop in some filler and call it a day. Here’s why large holes are trickier:
- Shrinking and Cracking: Standard wood filler shrinks as it dries. When you use a lot of it in a big hole, this shrinking causes deep cracks, and the filler can pull away from the edges.
- Lack of Strength: A deep plug of simple filler has no structural integrity. It can easily crumble or get knocked out.
- Endless Drying Time: A huge glob of filler can take days to dry, and the inside might never cure properly at all.
The secret is to treat the repair like a small construction project: you need the right material, a solid foundation, and a layering technique. It’s simple once you know how, and I’ll show you every step.

Choosing the Right Filler for a Big Job
Your success starts with picking the right product. Not all wood fillers are created equal, especially when it comes to large-scale repairs. For big holes, you need a filler that is strong, minimally shrinks, and hardens like a rock. The best choice is almost always a two-part epoxy filler.
Here’s a quick comparison to help you understand your options:
| Filler Type | Best For | Pros | Cons |
|---|---|---|---|
| Two-Part Epoxy Filler | Large holes, rotted wood, structural repairs | Incredibly strong; waterproof; won’t shrink or crack; can be drilled and sanded like real wood. | Requires mixing; has a limited working time; more expensive. |
| Solvent-Based Wood Filler | Medium-sized holes and deep gouges | Very durable and hard; good for exterior use. | Strong fumes; can shrink; slower drying time for deep fills. |
| Water-Based Wood Filler | Small cracks, nail holes, minor cosmetic flaws | Easy cleanup; low odor; dries fast. | Not strong enough for large gaps; prone to shrinking and cracking in deep applications. |
For any large hole, I strongly recommend a two-part epoxy wood filler. It consists of a resin and a hardener that you mix together. Once it cures, it forms a bond that is often stronger than the wood itself. This is the professional’s choice for a reason—it delivers a permanent, reliable repair.
Gathering Your Tools and Materials: A Simple Checklist
Let’s get everything ready before we start. Having all your tools within arm’s reach makes the process smooth and stress-free. You don’t need a fancy workshop for this!
Safety First:
- Safety glasses
- Disposable nitrile gloves (epoxy is sticky and hard to remove from skin)
- Dust mask (for sanding)
Tools & Supplies:
- Two-part epoxy wood filler (like Minwax High Performance Wood Filler or Bondo)
- Stiff and flexible putty knives
- A small, disposable mixing board (a scrap of cardboard or plastic works fine)
- A 5-in-1 painter’s tool or a sharp chisel (for cleaning the hole)
- Sandpaper in various grits (80-grit, 120-grit, and 220-grit)
- A sanding block
- Shop vacuum or a clean cloth
- Primer (oil-based or shellac-based works best over epoxy)
- Paint or stain to match your finish
Step-by-Step Guide: Filling That Large Hole Like a Pro
Ready to make that hole vanish? Just follow these steps carefully. Take your time, and you’ll get a fantastic result.
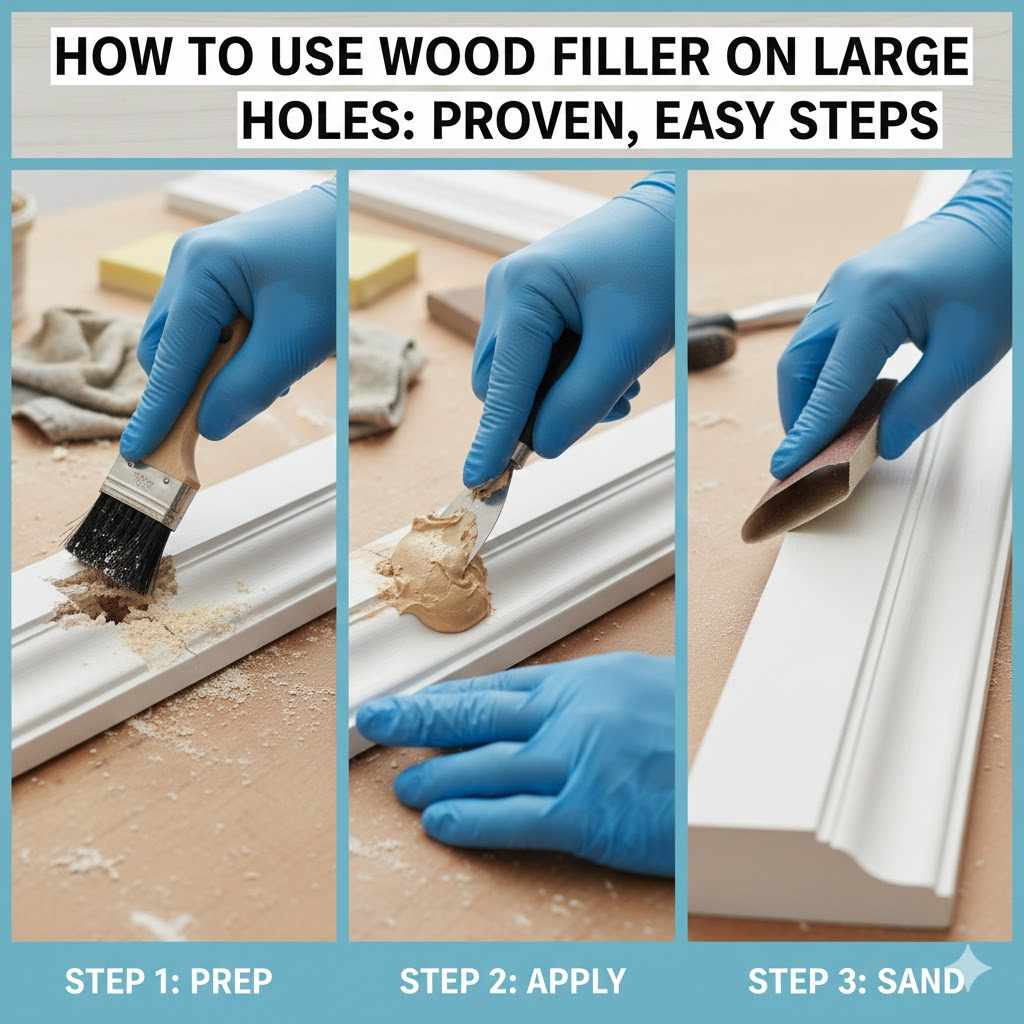
Step 1: Prepare the Hole and Surrounding Wood
A great repair starts with a clean foundation. The filler needs a solid, clean surface to grab onto.
- Clean Out Debris: Use a shop vacuum, a stiff brush, or your 5-in-1 tool to remove all loose wood chips, dirt, and dust from inside the hole. If you’re dealing with rotted wood, you must dig it all out until you reach solid, healthy wood.
- Scrape the Edges: Scrape the inside edges of the hole to remove any splintered or weak wood fibers. This helps the filler bond directly to the strong parts of the wood.
- Lightly Sand: Briefly sand the inside of the hole with 80-grit sandpaper. This roughs up the surface just enough to give the filler extra grip.
- Final Clean: Give the hole one last vacuum or wipe it with a clean, dry cloth to ensure it’s completely dust-free.
Step 2: Provide a Backing or Support (The Secret Step!)
This is the most important step for holes that go all the way through a piece of wood. If you try to fill a through-hole, the filler will just droop or fall out the other side. You need to create a “floor” for it.
- For Holes You Can Access from Both Sides: Take a piece of painter’s tape and apply it firmly over the back of the hole. For larger holes, you can tape a small piece of wood or plastic over the back for more support.
- For Holes You Can’t Access from the Back: This is a clever trick. You can insert a “backer” into the hole. Cut a piece of wood slightly larger than the hole, tie a string to it, push it through the hole, and then pull the string to hold it tight against the back while you apply the first layer of filler. Another easy option is to use self-adhesive fiberglass mesh tape (used for drywall) and press it into the bottom of the hole.
Step 3: Mix Your Two-Part Epoxy Filler
Now it’s time for some chemistry! Working with two-part fillers is simple, but you need to be mindful of the time.
- Read the Directions: Every brand is slightly different. Check the instructions for the specific mixing ratio and working time (also known as “pot life”). For helpful handling information, you can often find a Safety Data Sheet from manufacturers like 3M for their Bondo products.
- Scoop and Mix: On your disposable mixing board, scoop out a golf ball-sized amount of the filler (the base). Then, add the specified amount of hardener (it usually comes in a small tube).
- Mix Thoroughly: Use your stiff putty knife to mix the two components together until the color is uniform and there are no streaks. Do not whip air into it; just fold and press.
- Watch the Clock: You typically have about 10-15 minutes to work with the filler before it starts to harden. Only mix as much as you can use in that time.
Step 4: Apply the Filler in Layers
Here’s where patience pays off. Do not try to fill a deep hole all at once. This will lead to cracking and poor curing. Layering is the key.
- The First Layer: Using a putty knife, press the first layer of filler firmly into the hole. Focus on forcing it into all the nooks and crannies and against your backing material. Make this first layer about a quarter-inch thick.
- Build It Up: Let the first layer set for a few minutes until it’s semi-hard. Then, mix a new batch of filler and apply the next quarter-inch layer. Press it firmly to bond with the layer below.
- Continue Layering: Repeat this process until the hole is almost full. This layering technique ensures the entire repair cures properly and creates a much stronger plug.
Step 5: Overfill Slightly to Account for Sanding
For the final layer, apply enough filler so that it sits slightly proud (a little bit higher) than the surrounding wood surface. It should be a small mound. This is critical! Wood filler doesn’t shrink much, but you will be sanding it down. If you fill it perfectly flush, you’ll end up with a shallow dip after sanding. The slight overfill gives you material to sand away for a perfectly level finish.
Step 6: Let It Cure Completely
Patience is a virtue in woodworking. Walk away and let the filler do its job. Read the product’s instructions for the full cure time. It can range from 30 minutes to several hours, depending on the product, temperature, and depth of the fill. Don’t rush this! Sanding too early will just create a gummy mess and ruin your repair.
Step 7: Sand the Repair Smooth
Once the filler is rock-hard, it’s time to make it disappear.
- Start with a Coarser Grit: Wrap a piece of 80- or 120-grit sandpaper around a sanding block. The block is essential for keeping the surface flat and preventing you from accidentally sanding a curve into your repair.
- Sand It Level: Sand the filler down until it is perfectly flush with the wood surface. Let the sandpaper do the work; don’t press too hard. Always wear a dust mask during this step. Proper dust control is important for your health, a point emphasized by safety organizations like the Consumer Product Safety Commission.
- Feather the Edges: Once it’s level, switch to a finer 220-grit sandpaper. Lightly sand the filler and the wood immediately around it to create a smooth, seamless transition. When you run your hand over it, you shouldn’t feel a bump or an edge.
- Clean Up: Vacuum or wipe away all the sanding dust.
Step 8: Prime and Finish
You’re on the home stretch! The final step is to prime and paint or stain your repair.
- Priming is a Must: Epoxy fillers are non-porous and will look different from the surrounding wood under paint. Applying a coat of primer seals the repair and gives the paint a uniform surface to adhere to. This ensures your final color looks even.
- Paint or Stain: Once the primer is dry, you can paint over it to match your project. If you plan to stain, be aware that most epoxy fillers do not absorb stain well. Your repair might look like a light-colored patch. For stain projects, it’s best to test on a scrap piece first or plan to use a paint that mimics a wood finish.
Common Mistakes to Avoid When Filling Large Holes
We all make mistakes, but you can avoid the most common ones with a little know-how. Here’s a quick guide to what not to do.
| Mistake | Why It’s a Problem | How to Avoid It |
|---|---|---|
| Using water-based filler | It will shrink, crack, and lack the strength needed for a large void. The repair will fail. | Always use a two-part epoxy filler for holes larger than a half-inch. |
| Not cleaning the hole | Dust and loose wood prevent the filler from bonding properly. It can pop out later. | Take five minutes to thoroughly vacuum and scrape the hole before you begin. |
| Filling in one thick layer | The center may never cure, and the massive amount of filler will shrink and crack as it dries. | Apply the filler in thin, quarter-inch layers, allowing each one to set before adding the next. |
| Underfilling the hole | After sanding, you’ll be left with a noticeable divot or depression in the wood. | Always overfill the final layer slightly so it mounds above the wood surface. |
| Sanding too soon | The filler will be soft and gummy. It will clog your sandpaper and create a messy, uneven surface. | Follow the manufacturer’s instructions for full cure time and test a small area to ensure it’s rock-hard. |

Frequently Asked Questions (FAQ)
1. Can I use regular wood putty for a large hole?
No, you should not. Wood putty is designed for small, cosmetic imperfections. It does not harden like wood filler and remains semi-flexible, so it lacks the strength to fill a large gap. For any significant hole, always choose a hard-curing filler, preferably a two-part epoxy.
2. How long does wood filler for large holes take to dry?
Drying or curing time depends entirely on the product, the temperature, and the depth of your repair. A two-part epoxy filler might be sandable in as little as 30-60 minutes, while other types could take 8-12 hours or more. Always check the directions on the container for accurate times.
3. Can I drill into wood filler?
Yes, if you use the right kind! A fully cured two-part epoxy filler is extremely hard and dense. You can drill, screw, and sand it just like real wood. This makes it perfect for repairing stripped screw holes or areas where you need to re-mount hardware.
4. Will the repaired spot look different after staining?
Almost certainly, yes. Most wood fillers, especially epoxy types, are non-porous and do not absorb wood stain the way real wood grain does. The repaired patch will often look lighter or have a different tone. For this reason, filled areas are best for projects you plan to paint. If you must stain, test on a scrap piece first.
5. What’s the difference between wood filler and wood putty?
The biggest difference is that wood filler hardens, while wood putty does not. Wood filler (like epoxy or solvent-based types) dries hard and becomes a permanent, sandable part of the wood. Wood putty stays pliable and is meant for filling finished wood, as it can be applied after the stain and topcoat.
6. Is epoxy wood filler waterproof?
Yes, most two-part epoxy fillers are waterproof once fully cured. This makes them an excellent choice for exterior repairs, such as on window sills, door frames, or outdoor furniture, where the wood will be exposed to moisture.
You’ve Got This!
Fixing a large hole in wood can seem intimidating at first, but it’s really just a series of simple, logical steps. By choosing the right product—a strong two-part epoxy—and following the technique of preparing, layering, and sanding, you can create a repair that is strong, seamless, and built to last. You don’t need years of experience, just a little patience and the right guidance.
So, the next time you see a daunting hole in a piece of wood, don’t discard it. See it as an opportunity. You have the skills to fix it. Get your tools, take a deep breath, and bring that piece back to life. Happy building!