Ideas for Cedar Planks: Genius, Essential
Cedar planks offer a fantastic, natural way to add beauty and functionality to your DIY projects. From stunning outdoor furniture to charming indoor decor, discover genius ideas to transform simple cedar planks into essential, eye-catching pieces. This guide makes it easy for beginners!
Are you looking for simple, beautiful ways to use wood in your home or garden? Cedar planks are a wonderful choice! They smell great, look lovely, and are surprisingly easy to work with, even if you’re just starting out in DIY. Sometimes, though, we have these planks and wonder, “What can I make with them?” You might feel a little stuck, staring at beautiful wood and wanting to create something amazing but not knowing where to start. Don’t worry! I’m here to help you unlock the potential of cedar planks. We’ll explore super smart, beginner-friendly ways to turn them into projects you’ll be proud of. Get ready to get inspired and start building!
Why Cedar Planks Are a DIY Dream
Cedar wood is like nature’s gift to DIYers. It’s naturally resistant to rot and insects, which means your projects will last longer, especially if they’re outdoors. Think about garden benches, planters, or even fences – cedar handles the weather like a champ! Plus, it has this beautiful, rich color and a wonderful scent that just makes any space feel cozier. For beginners, cedar is forgiving. It’s soft enough to cut and shape easily without needing super heavy-duty tools, and it doesn’t splinter as much as some other woods. This makes it a joy to work with and reduces the frustration that can sometimes come with woodworking.
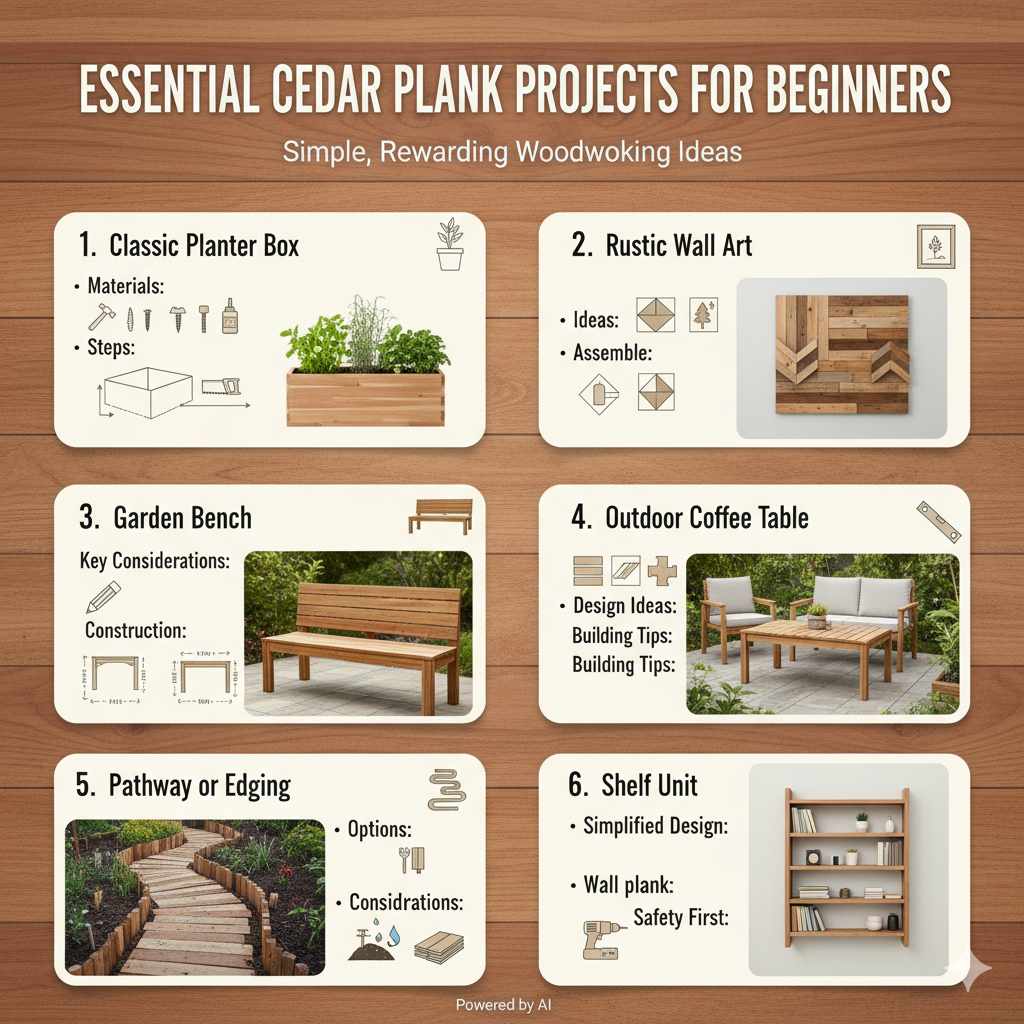
Essential Cedar Plank Projects for Beginners
Let’s dive into some fantastic projects that are perfect for those new to woodworking. These ideas focus on simplicity, visual appeal, and functionality, ensuring you get rewarding results without needing advanced skills.
1. The Classic Cedar Planter Box
A planter box is a cornerstone of any garden or patio. Using cedar planks makes it both durable and attractive. It’s a straightforward build that teaches basic assembly skills.
Materials You’ll Need:
- Cedar planks (various widths and lengths, depending on desired size)
- Wood screws (stainless steel or coated for outdoor use)
- Wood glue (outdoor-rated)
- Measuring tape
- Saw (hand saw or power saw)
- Drill with drill bits
- Sandpaper (medium and fine grit)
- Optional: Wood sealant or stain
Simple Steps to Build Your Planter:
- Measure and Cut: Decide on the dimensions of your planter. For a basic rectangular box, you’ll need four sides and a bottom. Cut your cedar planks to the required lengths. For example, if you want a 2-foot long planter, cut two side pieces to 2 feet and two end pieces slightly shorter, accounting for the thickness of the side planks (or cut all four to 2 feet and assemble in a way that hides the end grain).
- Assemble the Sides: Apply a thin bead of outdoor wood glue along the edges where the planks will join. Screw the planks together, pre-drilling pilot holes to prevent splitting. Use at least two screws per joint. For larger planters, consider reinforcing the corners with mitered cuts or corner blocks.
- Add the Bottom: Cut more cedar planks to fit the base of your assembled sides. You can either attach them directly to the bottom edges of the sides or create a recessed bottom by adding small support strips (cleats) inside the planter walls. Ensure there are small gaps between the bottom planks for drainage, or drill drainage holes after assembly.
- Finishing Touches: Sand down any rough edges. If you plan to use a sealant or stain, apply it now following the product’s instructions. This adds an extra layer of protection and can enhance the wood’s natural beauty.
This project is a fantastic introduction to building sturdy outdoor structures. You can find more detailed guides and variations on websites like This Old House for inspiration.
2. Rustic Cedar Plank Wall Art
Bring the warmth of cedar indoors with a piece of stunning, rustic wall art. This project is very forgiving and allows for a lot of personal creativity.
Ideas for Design:
- Geometric Patterns: Cut planks into different lengths and angles and arrange them in an abstract geometric design.
- Chevron or Herringbone: These classic patterns look beautiful in wood and are achievable with some careful cuts.
- Monogram or Initial: Cut out a large letter from a single plank or arrange smaller pieces into the shape of a letter.
- Landscape Silhouette: Mount smaller, specially cut pieces onto a larger plank to create a simple silhouette of mountains, trees, or waves.
Basic Steps:
- Prepare Your Planks: Select planks with interesting grain patterns or knots. Sand them smooth to avoid splinters. You can leave them natural, apply a light stain, or even paint them for a more contemporary look.
- Design and Layout: Arrange your planks on a flat surface to create your desired design. Take a picture so you can replicate it.
- Assemble the Art: You can attach the planks to a backing board (like a thin plywood or even another piece of cedar). Alternatively, for lighter pieces, you can glue and screw them directly to each other from the back to create a solid panel. If you’re creating a standalone piece without a backing, you might need to add some cross braces on the back for stability.
- Add Hanging Hardware: Install D-rings or a wire on the back of your artwork for easy hanging.
For more advanced techniques or detailed visual inspiration, check out woodworking blogs that often showcase creative plank art ideas.
3. Cedar Plank Garden Bench
A simple, sturdy bench made from cedar planks is a rewarding project that adds functionality and charm to your garden or porch. This design emphasizes clean lines and durability.
Key Considerations for a Bench:
- Height: Standard bench height is around 17-18 inches.
- Depth: 15-20 inches is comfortable for sitting.
- Length: Typically 3-4 feet for a two-seater.
- Support: Ensure adequate leg support for stability.
Construction Overview:
The basic idea is to build a frame for the legs and seat supports, then attach the cedar planks to create the seat and potentially the backrest. This often involves some angled cuts for the legs to give them a slight splay for stability, but a simple, straight-legged design is also very effective for beginners. You can find many free plans online that break down the cuts and assembly step-by-step. A great resource for understanding basic furniture joinery and safety when using power tools is the Wood Magazine safety section.
4. Cedar Plank Outdoor Coffee Table
Create a beautiful and functional coffee table for your patio or deck. Cedar planks provide a warm, natural look that complements outdoor furniture.
Design Ideas:
- Slatted Top: Arrange planks with small gaps to create a classic slatted tabletop.
- Paneled Look: Use planks to mimic a more traditional paneled table design.
- Simple Block Legs: Build sturdy legs from thicker cedar pieces or even 4×4 posts for a robust feel.
Building Tips:
This project is similar in construction to the planter box but on a larger scale. You’ll be building a rectangular frame for the tabletop and attaching planks. The legs can be attached to the inside corners of the frame or built as separate leg assemblies that attach to the underside. Ensuring the table is level and the joints are strong is crucial for longevity. For outdoor furniture, using exterior-grade screws and finishes is non-negotiable to protect against the elements.
5. Cedar Plank Pathway or Edging
For a more landscaping-focused project, cedar planks can create charming and natural pathways or garden bed edging. This can be as simple as laying planks directly on the ground or building simple frames.
Pathway Options:
- Simple Laid Planks: Lay planks flat, spaced slightly apart, on a well-prepared base of gravel or sand. This creates a rustic, informal path.
- Raised Edging: Stand planks on their edge and secure them with short stakes driven into the ground behind them. This creates a defined border for garden beds or walkways.
Considerations:
When using cedar for ground contact, its natural resistance is even more valuable. You can extend the life of planks used in direct contact with soil by using thicker cuts or applying a specialized ground-contact sealant. For pathways, ensuring the ground is level and well-drained will prevent warping and rot.
6. Cedar Plank Shelf Unit
Bring outdoor charm indoors with a simple shelf unit. Cedar’s natural beauty is perfect for a rustic-style bookshelf, entry hall organizer, or even a display shelf in your living room.
Simplified Design:
A basic shelf unit can be made by creating two vertical supports and attaching horizontal shelves. You can use thicker cedar boards for the uprights and thinner planks for the shelves. Alternatively, for a more open look, you can create frame-and-panel shelves. For a beginner, building a simple box shelf or a tiered shelf unit where planks are directly attached to a wall (using appropriate mounting hardware) is a great starting point.
Safety First for Wall Mounting:
Always use appropriate wall anchors and screws, especially if you are mounting shelves that will hold significant weight. Consult your local hardware store or resources from organizations like the National Park Service for guidance on proper mounting techniques for different wall types.
Enhancing Your Cedar Plank Projects
Once you’ve built your project, there are a few things you can do to make it even better and ensure it lasts.
Finishing Options
Cedar has a beautiful natural color, but you can enhance or protect it further.
- Natural Look: Leave the cedar unfinished if it’s for an area where minimal maintenance is desired. It will naturally weather to a silvery-gray.
- Sealants: For added protection against moisture and UV rays, apply a clear exterior-grade sealant. This preserves the wood’s natural color for much longer.
- Stains: If you want to alter the color, use an exterior-grade stain. Cedar takes stains well, allowing you to achieve darker or richer tones.
- Paint: While many prefer to showcase cedar’s natural beauty, it can also be painted. Ensure you use an exterior primer and paint system suited for wood.
Maintenance Tips
Regular, simple maintenance will keep your cedar projects looking great.
- Cleaning: Gently wash with mild soap and water. Avoid harsh chemicals.
- Inspection: Periodically check for any loose screws or signs of wear.
- Reapplication: Sealants or stains may need reapplication every 1-3 years, depending on your climate and the product used.
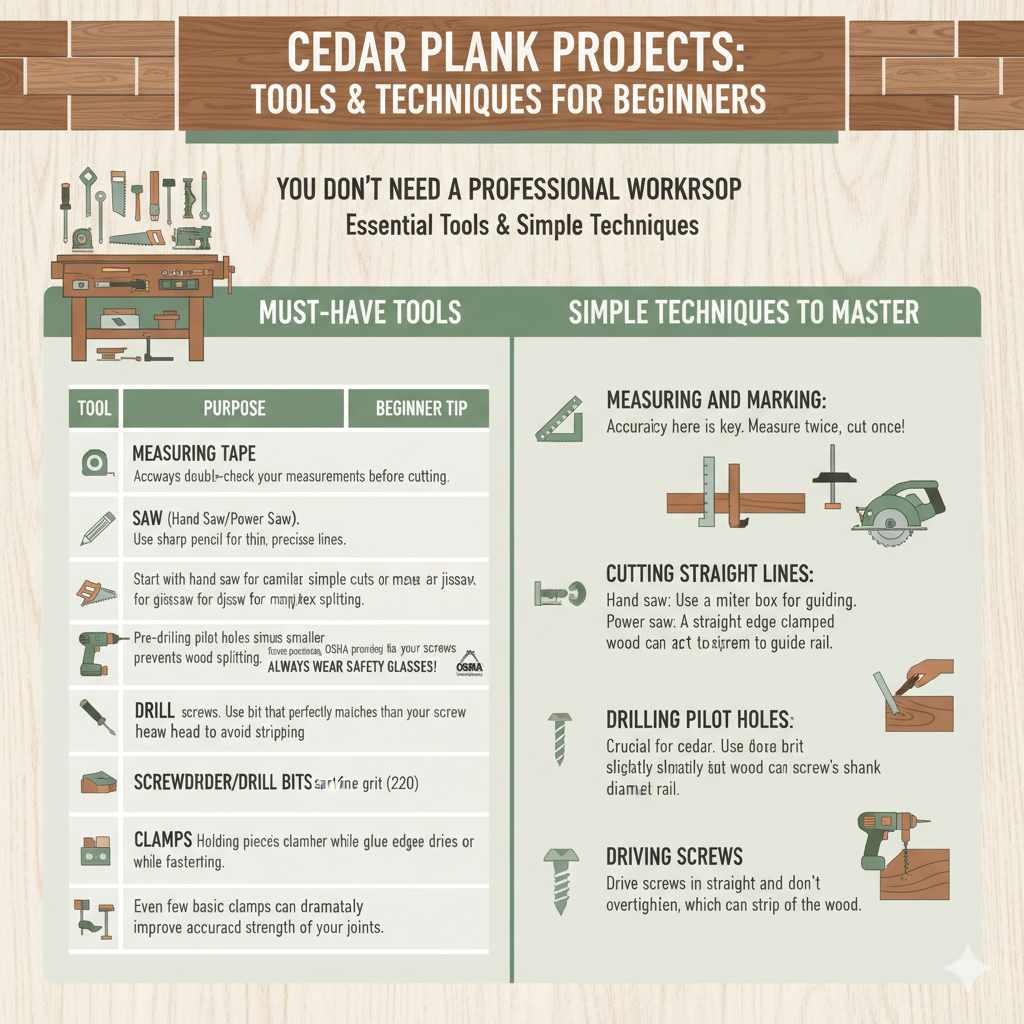
Tools and Techniques for Beginners
You don’t need a professional workshop to create amazing things with cedar planks. Here are some essential tools and simple techniques.
Must-Have Tools
Start with these basics, and you’ll be well-equipped for most cedar plank projects:
| Tool | Purpose | Beginner Tip |
|---|---|---|
| Measuring Tape | Accurate measurement of wood. | Always double-check your measurements before cutting. |
| Pencil | Marking cut lines and measurements. | Use a sharp pencil for thin, precise lines. |
| Saw (Hand Saw or Power Saw) | Cutting wood to size. | Start with a hand saw for simple cuts or a jigsaw for more complex shapes. Always wear safety glasses! OSHA provides safety guidelines for power tool use. |
| Drill | Creating pilot holes and driving screws. | Pre-drilling pilot holes smaller than your screws prevents wood splitting. |
| Screwdriver/Drill Bits | Driving screws. | Use a bit that perfectly matches your screw head (Phillips, Square, etc.) to avoid stripping. |
| Sandpaper (and Block) | Smoothing rough edges and surfaces. | Start with medium grit (e.g., 120) and finish with fine grit (e.g., 220). |
| Clamps | Holding pieces together while glue dries or while fastening. | Even a few basic clamps can dramatically improve the accuracy and strength of your joints. |
Simple Techniques to Master
- Measuring and Marking: Accuracy here is key. Measure twice, cut once!
- Cutting Straight Lines: With a hand saw, use a miter box for guiding. With a power saw, a straight edge clamped to the wood can act as a guide rail.
- Drilling Pilot Holes: This is crucial for cedar. Use a drill bit slightly smaller than the screw’s shank diameter.
- Driving Screws: Drive screws in straight and don’t overtighten them, which can strip the wood.
- Sanding: Always sand with the grain of the wood.
Frequently Asked Questions About Cedar Planks
What kind of cedar is best for outdoor projects?
Western Red Cedar is a popular choice due to its natural beauty, durability, and resistance to rot and insects. Alaskan Yellow Cedar is also highly durable and resistant. For simpler projects, you can also use Cedar fence pickets or siding, which are readily available and cost-effective.
Do I need to seal cedar planks?
It’s not strictly necessary, as cedar is naturally weather-resistant. However, applying a sealant or stain will protect its color from UV rays, prevent it from weathering too quickly to gray, and offer additional moisture protection, extending its lifespan and maintaining its aesthetic appeal.
Can I use regular screws with cedar planks?
For outdoor projects, it’s highly recommended to use exterior-grade screws made of stainless steel or coated metals. These resist rust and corrosion, which can stain the cedar and weaken the fastener over time. Regular steel screws will corrode and can bleed rust marks onto the wood.
How do I prevent cedar planks from warping?
Proper finishing and regular maintenance help. Ensure your wood is dry before starting your project. For outdoor items, allowing for some air circulation and avoiding constant saturation with water can also prevent warping. If building a large surface like a tabletop, consider using cross-bracing on the underside to add rigidity.
What is the easiest cedar plank project for a complete beginner?
A simple cedar planter box or a small serving tray are excellent starting points. They involve basic cuts, simple assembly, and don’t require complex joinery, offering a quick and satisfying result.
How can I cut cedar planks cleanly?
Use a sharp saw blade! For hand saws, ensure the teeth are sharp and well-set. For power saws like a circular saw or miter saw, a fine-tooth blade designed for wood will give you the cleanest cuts. Always mark your cut line clearly and use a guide if necessary for straightness.
Can I use reclaimed cedar planks?
Yes, reclaimed cedar can be fantastic for projects, adding character and history. However, ensure the wood is free from nails, staples, or other fasteners before cutting. It’s also wise to check for any signs of rot or heavy damage. Reclaimed wood might require extra cleaning and preparation.
Conclusion
As you can see, cedar planks are incredibly versatile and offer a wonderful opportunity for DIY enthusiasts of all skill levels. From building functional garden furniture that will withstand the elements to crafting unique decorative pieces for your home, the possibilities are truly inspiring. Remember to start with simple projects, focus on safety, and enjoy the process of transforming raw wood into something beautiful and lasting.
Don’t be afraid to experiment. These ideas are just a starting point. With a little planning, basic tools, and a willingness to learn, you can confidently tackle projects that will not only enhance your living space but also give you a great sense of accomplishment.