Best Way to Clean Stained Grout: Proven Effortless
The best way to clean stained grout is by using baking soda and hydrogen peroxide, or a specialized grout cleaner, applied with a stiff brush and consistent elbow grease. This simple, effective method lifts tough stains without damaging your tile.
Seeing dingy, stained grout can really take away from the beauty of your tiled surfaces, whether it’s your kitchen backsplash, bathroom floor, or shower walls. It’s a common problem that makes even the most sparkling tiles look a bit sad. But don’t worry, you don’t need fancy tools or expensive chemicals to bring that grout back to life. With a few simple ingredients and a little know-how, you can make your grout look almost new again. We’ll walk you through the easiest and most effective ways to tackle those stubborn stains. Get ready to see your tiles shine!
Why Does Grout Get Stained Anyway?
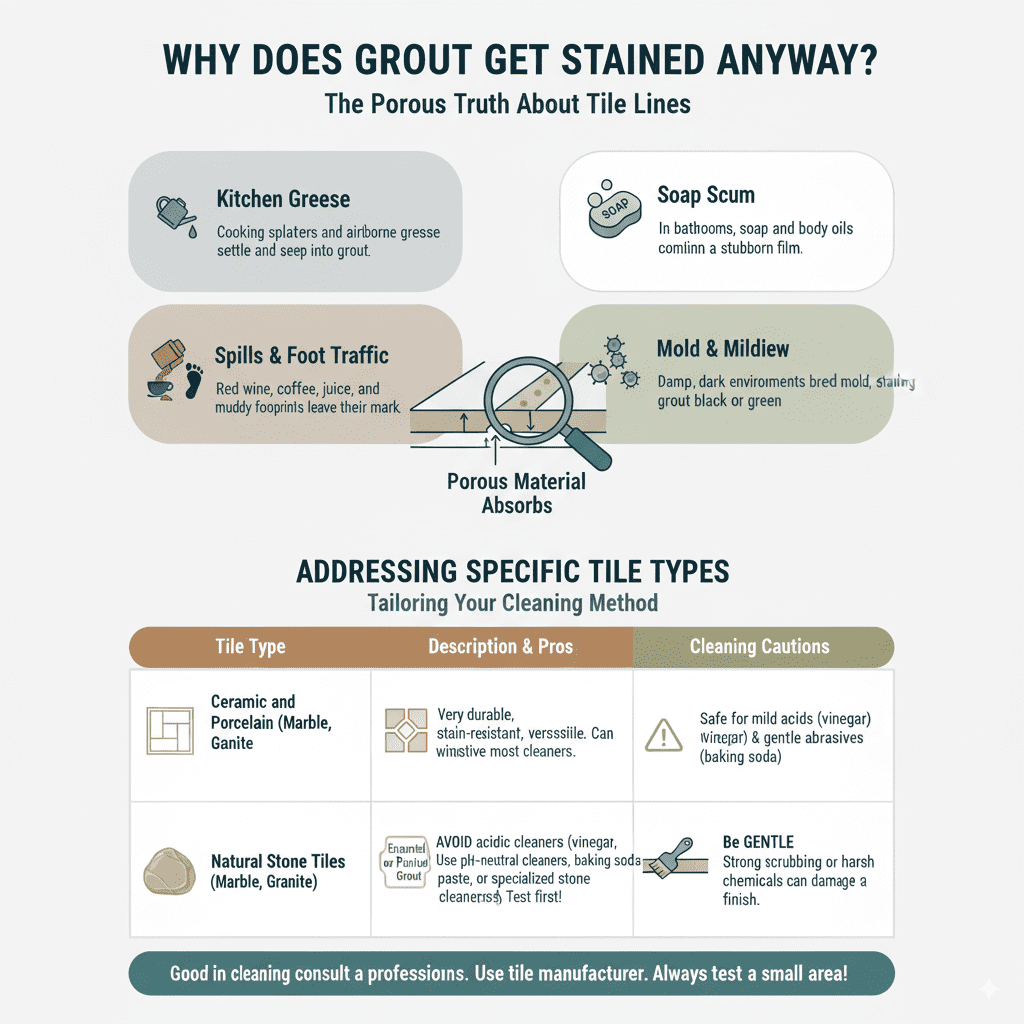
Grout is like a porous sponge for your tiles, and that’s exactly why it stains. It’s typically made from a mixture of cement, sand, and water, with a binder like lime. This porous nature means it can easily absorb liquids, dirt, grease, and grime that settle on it. Over time, these absorbents get trapped deep within the grout lines, leading to discoloration. Think about common culprits:
- Kitchen Grease: Cooking splatters and airborne grease can settle and seep into grout.
- Soap Scum: In bathrooms, soap and body oils combine to form a stubborn film.
- Spills: Red wine, coffee, juice, or even muddy footprints can leave their mark.
- Mold and Mildew: Damp, dark environments are perfect breeding grounds for mold, which can stain grout black or green.
- General Dirt: Everyday foot traffic and general dust can accumulate.
The good news is that even though grout is absorbent, a good cleaning can significantly lighten or even remove many of these stains. It’s all about using the right cleaning agent and the right technique.
Gathering Your Grout Cleaning Arsenal
Before we dive into the cleaning process, let’s make sure you have everything you need. Having your supplies ready makes the job much smoother. You don’t need a lot of complicated or expensive items.
Essential Cleaning Supplies:
- Stiff-Bristled Brush: This is key! A dedicated grout brush or an old toothbrush works wonders. Look for one with firm bristles that can get into those tiny grout lines without damaging the tile.
- Spray Bottle: For applying your cleaning solutions evenly. Reusing an old cleaner bottle is a great eco-friendly option after rinsing it thoroughly.
- Microfiber Cloths or Sponges: For wiping away loosened dirt and rinsing. Microfiber is excellent because it traps dirt effectively.
- Bucket: For mixing cleaning solutions or rinsing your brush and cloths.
- Gloves: To protect your hands, especially if you’re using stronger cleaning agents.
- Safety Glasses: A good idea to protect your eyes from any splashes.
Common Household Cleaning Agents:
You likely have these in your home already:
- Baking Soda: A gentle abrasive that also helps to lift stains.
- Hydrogen Peroxide (3% solution): A natural disinfectant and mild bleaching agent that’s great for stains.
- White Vinegar: An acidic cleaner that can break down grime and soap scum. (Note: Avoid using vinegar on unsealed natural stone tile or grout, as it can etch the surface.)
- Dish Soap: Mild and effective for cutting through grease.
When to Consider a Commercial Grout Cleaner:
For very stubborn or old stains, a commercial grout cleaner might be necessary. These are specifically formulated to tackle tough grime, mold, and mildew. Always follow the manufacturer’s instructions carefully and ensure good ventilation.
The Proven Effortless Method: Baking Soda & Hydrogen Peroxide Paste
This is often considered the best way to clean stained grout because it’s effective, affordable, and uses relatively gentle ingredients. It’s my go-to for most common grout stains.
Step-by-Step Guide:
- Prepare Your Workspace: Clear the area of any items on the counter or floor. If you’re cleaning a shower, ensure it’s dry. Protecting your floors with old towels or newspaper is a good idea.
- Mix Your Paste: In a small bowl or bucket, combine about ½ cup of baking soda with just enough hydrogen peroxide to form a thick paste. You want it to be spreadable but not runny. Think of the consistency of toothpaste. You can add a drop of dish soap if you’re dealing with greasy stains.
- Apply the Paste: Using an old toothbrush or a small applicator, spread the baking soda paste directly onto the stained grout lines. Make sure to cover all the soiled areas generously.
- Let It Sit: Allow the paste to sit on the grout for at least 10-15 minutes. For tougher stains, you can let it sit for up to 30 minutes. This gives the baking soda and hydrogen peroxide time to work their magic and break down the grime.
- Scrub Away: Now for the elbow grease! Dip your stiff-bristled brush into a little more of the paste or a separate cleaning solution (if needed) and start scrubbing the grout lines vigorously. Work in small sections, scrubbing back and forth.
- Rinse Thoroughly: Use a damp microfiber cloth or sponge to wipe away the paste and loosened dirt. Rinse your cloth or sponge frequently in a bucket of clean water. Make sure to get all the residue off the tile and grout.
- Inspect and Repeat: Check your grout. If some stains are still visible, repeat the process. You might need a second application or a bit more scrubbing for those really stubborn spots.
- Dry the Area: Once you’re happy with the results, dry the tiles and grout with a clean, dry microfiber cloth. This prevents water spots and helps prevent future mildew growth.
This method is fantastic because it’s gentle enough for most tile types but strong enough to tackle everyday grime and many common stains. The baking soda acts as a mild abrasive, while the hydrogen peroxide helps to lift stains and kill mold or mildew spores.
Alternative Cleaning Methods for Specific Stains
While the baking soda and hydrogen peroxide paste is a great all-rounder, some stains might require a slightly different approach. Here are a few other effective options:
1. White Vinegar Solution (for General Grime & Soap Scum)
When to Use: Great for general cleaning and breaking down soap scum on non-stone tiles.
How to Use:
- Mix equal parts white vinegar and water in a spray bottle.
- Spray generously onto the grout lines.
- Let it sit for 5-10 minutes.
- Scrub with a stiff brush.
- Rinse thoroughly with clean water.
Important Note: As mentioned before, avoid using vinegar on natural stone tiles like marble or granite, as its acidity can damage the surface. Always test in an inconspicuous area first.
2. Commercial Grout Cleaners (for Tough Stains)
When to Use: For deeply ingrained stains that household cleaners can’t touch, or for significant mold and mildew issues.
How to Use:
- Read the product label carefully for instructions and safety precautions.
- Ensure proper ventilation by opening windows or using a fan. Wear gloves and safety glasses.
- Typically, you’ll apply the cleaner directly to the grout, let it sit for a specified time, scrub, and then rinse thoroughly.
- Some cleaners are specifically designed for colored grout, so check the label if this applies to you.
A reputable source like Consumer Reports often provides reviews of different cleaning products, which can be helpful when choosing a commercial cleaner.
3. Oxygen Bleach for Stubborn Stains
When to Use: For tough organic stains like mildew, coffee, or wine, especially when hydrogen peroxide isn’t enough.
How to Use:
- Mix a powdered oxygen bleach (like OxiClean) with water according to the package directions to form a paste.
- Apply the paste to the grout lines.
- Let it sit for 15-30 minutes.
- Scrub with a stiff brush.
- Rinse thoroughly.
Oxygen bleach is generally safer for colored grout than chlorine bleach, but always test first.
A Comparison of Grout Cleaning Methods
To help you choose the best approach, here’s a quick look at popular methods:
| Cleaning Method | Pros | Cons | Best For |
|---|---|---|---|
| Baking Soda & Hydrogen Peroxide Paste | Effective, affordable, natural ingredients, safe for most tiles, disinfects. | Requires some scrubbing, paste can dry out. | General stains, everyday dirt, mild mold. |
| White Vinegar Solution | Good for soap scum, deodorizes, easily available. | Can damage natural stone, strong smell, less effective on set-in stains. | Light grime, soap scum, deodorizing. |
| Commercial Grout Cleaners | Powerful, designed for tough stains, can be quick. | Can be expensive, may contain harsh chemicals, requires ventilation, potential for tile damage if misused. | Deep stains, severe mold/mildew, restoration. |
| Oxygen Bleach Paste | Tackles organic stains well, generally safer for colored grout than chlorine bleach. | Requires purchasing a specific product, needs rinsing. | Tough organic stains (wine, coffee, mildew). |
Preventing Grout Stains in the Future
Dealing with stained grout is one thing, but preventing it is even better! A little ongoing maintenance goes a long way:
1. Seal Your Grout
This is arguably the most effective preventative measure. Grout sealers create a barrier that repels liquids and stains, making cleanup much easier. Most sealers need to be reapplied every 1-2 years, depending on traffic and cleaning habits.
How to Seal:
- Ensure the grout is completely clean and dry.
- Apply the sealer according to the manufacturer’s instructions, usually with a brush or applicator. Work in small sections.
- Wipe off any excess sealer from the tile surface immediately.
- Allow the sealer to cure fully before exposing it to moisture.
You can find excellent guides on grout sealing and maintenance from resources like the Tile Council of North America (TCNA), a leading authority in tile standards and practices.
2. Regular Cleaning
Don’t let dirt and grime build up. A quick wipe-down or sweep of your tiled areas a few times a week can make a huge difference.
- For daily cleaning, a damp mop or microfiber cloth is often enough.
- For tougher spots, a pH-neutral tile cleaner is a good choice.
3. Address Spills Immediately
Protips: If you spill something on your tiled surfaces, especially colored liquids like wine or juice, blot it up immediately with a clean cloth. The less time it has to soak into the grout, the less likely it is to stain.
4. Improve Ventilation in Damp Areas
In bathrooms and kitchens, where moisture is common, good ventilation is crucial for preventing mold and mildew. Use exhaust fans during and after showering/cooking, and open windows when possible.
Addressing Specific Tile Types
While these cleaning methods are generally safe, it’s always wise to consider your tile material:
- Ceramic and Porcelain Tiles: These are very durable and can withstand most cleaning methods, including mild acids like vinegar and gentle abrasives like baking soda.
- Natural Stone Tiles (Marble, Granite, Travertine): These are more delicate. Avoid acidic cleaners like vinegar or lemon juice, as they can etch or dull the surface. Stick to pH-neutral cleaners, baking soda paste, or specialized stone cleaners. Always test in an inconspicuous spot first.
- Enamel or Painted Grout: Be gentle. Strong scrubbing or harsh chemicals can damage the finish.
When in doubt, consult the tile manufacturer’s guidelines or test your cleaning solution on a small, hidden area.
Frequently Asked Questions About Cleaning Stained Grout
Q1: How often should I clean my grout?
A1: For best results and to prevent deep stains, aim for a light clean weekly and a deeper clean with a grout-specific method monthly or as needed. Regular maintenance is key!
Q2: Will hydrogen peroxide damage my colored grout?
A2: A 3% hydrogen peroxide solution is generally safe for colored grout and acts as a mild whitener. However, it’s always a good idea to test it in an inconspicuous area first to be sure.
Q3: Can I use chlorine bleach on my grout?
A3: Chlorine bleach can be effective for whitening grout and killing mold, but it’s harsh. It can damage grout over time, discolor some tile types, and requires very good ventilation. Many prefer gentler alternatives like hydrogen peroxide or oxygen bleach. If you use it, dilute it well and rinse thoroughly.
Q4: How can I clean grout without scrubbing?
A4: While some scrubbing is usually necessary for effective stain removal, you can minimize it by letting your cleaning solution (like a baking soda paste or commercial cleaner) sit for a longer period, allowing it to break down the grime. Steam cleaners can also be effective for loosening dirt with minimal scrubbing, but use them cautiously on certain tile types and ensure they are designed for grout.
Q5: My grout is crumbling. What should I do?
A5: Crumbling grout usually indicates damage or wear and needs to be removed and replaced. You’ll need to carefully chip out the old grout, clean the joint, and then re-grout. This is a more involved repair project that requires specific tools and techniques. If you’re unsure, it’s best to consult a professional.
Q6: What’s the difference between cleaning grout and sealing grout?
A6: Cleaning grout removes existing dirt, stains, and grime. Sealing grout is a preventative step that applies a protective barrier to the clean grout to help prevent future stains and moisture absorption. You must clean and dry your grout thoroughly before sealing it.
Conclusion
Tackling stained grout might seem like a daunting task, but with the right approach, it’s completely manageable for any DIY enthusiast. The baking soda and hydrogen peroxide paste method stands out as a top-tier, beginner-friendly solution, offering a powerful yet gentle way to restore the look of your tiles. Remember that consistency is key – regular cleaning and timely sealing of your grout will keep it looking its best for years to come. So grab your brush, mix up that paste, and get ready to be amazed by the transformation. You’ve got this!