Can a Water Stain Be Covered by Wood Stain?
Thinking about how to fix water stains on wood is a common worry for people. Many people wonder, Can a Water Stain Be Covered by Wood Stain? It can seem like a tough problem, but don’t worry! This guide will break it down into easy steps. We’ll explore the things you need to know and the best ways to get your wood looking good again. You’ll learn the secrets to making those water marks disappear. Let’s begin!
Water Stains and What Causes Them
Water stains on wood are often caused by spills or moisture. These stains can ruin the look of your wood furniture and floors. However, the good news is you can fix it. Learning about what causes these marks is the first step toward finding a solution that fits your specific situation. This helps you figure out the best ways to make the wood look great again. Different types of wood and finishes react differently to water damage. So, it’s key to identify the type of stain you’re dealing with before attempting a repair.
Types of Water Damage on Wood
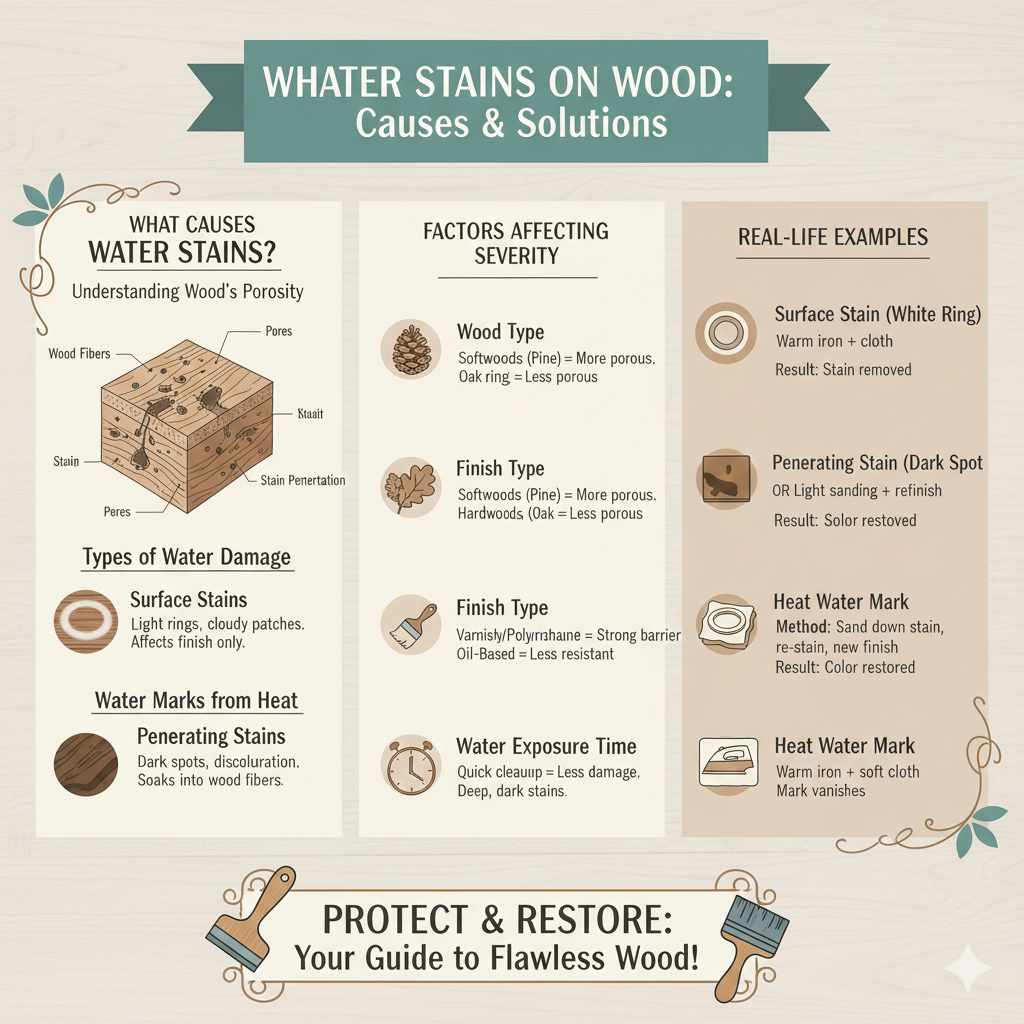
Wood is a porous material. This means it absorbs water. When wood comes into contact with water, it can cause problems. The type of water damage depends on how long the water sits on the wood and the wood’s finish. There are several forms of water damage that can affect wood, and it is key to identify the kind of damage you’re facing to choose the right solution. Recognizing these different types will guide you toward an effective repair strategy. By understanding the nature of each stain, you can select the correct stain and prep methods.
Surface Stains. These are usually light and happen when water sits on the wood’s surface for a short time. They might look like a cloudy ring or a slightly darker patch. A damp cloth may sometimes be enough to remove a surface stain. This type of damage typically affects the finish and is the easiest to address.
Surface stains often show up as white rings or cloudy areas. This means water got past the finish of the wood but didn’t go deep into the wood. In some cases, you might remove them with a warm iron and a cloth. For more noticeable surface marks, you might need to lightly sand and reapply the finish. Remember to always work with the grain of the wood.
Penetrating Stains. When water gets into the wood itself, it’s called a penetrating stain. These stains are darker. They might have changed the wood’s color. Penetrating stains need more work to fix.
Penetrating stains happen when water gets absorbed into the wood fibers. This often causes the wood to darken and warp. Fixing them might require sanding down the wood to get rid of the stain. Then, you may need to apply wood stain and a new finish. The severity of the stain will influence the amount of work required. Deep water penetration is more difficult to fix than surface-level damage.
Water Marks from Heat. These marks appear when hot items, like cups or plates, sit on wood. This kind of stain looks similar to a surface stain. But it happens because heat affects the wood’s finish.
Water and heat can create white rings. These happen when the moisture combines with heat. These stains affect the finish first. You can often remove these types of marks by using a warm iron and a soft cloth. But, if the mark is hard to remove, you might need to lightly sand the area and add a new finish. Protect your wood from heat with coasters and trivets.
Factors Affecting Water Stain Severity
Several things affect how bad a water stain will be. The type of finish on the wood is important. Unfinished wood will soak up water fast. But wood with a good finish will resist water. The length of time water sits on the wood matters too. The longer the water sits, the deeper the stain will go. Also, the type of wood impacts how it absorbs water. Softer woods like pine absorb water more quickly than hard woods. Knowing these things can help you understand how to best take care of water-damaged wood.
Wood Type. Different wood types absorb moisture at different rates. Softwoods, like pine, are more porous. They take in water fast. Hardwoods, like oak or maple, are denser. They soak up water more slowly.
The grain and density of the wood decide how much water it will absorb. For example, pine’s open grain structure makes it more likely to absorb water. On the other hand, oak, with its tighter grain, offers more resistance. Choosing the right stain for your wood type is important. Remember to consider how the wood will interact with water.
Finish Type. The finish on wood acts like a shield. It protects the wood from water. Finishes like varnish and polyurethane create a strong barrier. They keep water out for a longer time. But, some finishes, like oil-based ones, are less water-resistant.
The finish makes a big difference in how the wood reacts to water. Polyurethane offers great protection against water damage. Oil finishes are more porous and let water in easier. When the finish is damaged, water can get to the wood itself. So, consider the finish when choosing how to fix a water stain. Regular maintenance is also important to maintain the protective barrier.
Water Exposure Time. How long the water sits on the wood is very important. If you clean up a spill quickly, it will cause less damage. But, if water sits for a long time, it can go deep into the wood.
The amount of time the wood is exposed affects how deep the stain will be. Rapid action can stop water from soaking in. Delaying cleaning allows water to penetrate the wood fibers, making the stain harder to fix. Always clean up spills as quickly as possible. This step minimizes the extent of damage.
Preparing Wood for Wood Stain
Before you can use wood stain, you must get the wood ready. This step is key for a great finish. You must clean, sand, and sometimes bleach the wood. This removes old finishes, smooths the wood, and prepares it to accept the stain evenly. By taking the time to prepare the wood, you’ll achieve better results. These steps help the stain absorb into the wood. This way, the finish will be smooth, even, and long-lasting.
Cleaning the Wood Surface
Cleaning is the initial step in prepping wood. It removes dirt, dust, and any old finishes. Cleaning ensures the wood is free from anything that could prevent the stain from properly adhering. Use a mild cleaner and a soft cloth. Always work with the grain of the wood. This will remove any surface dirt, ensuring that the wood stain will absorb correctly.
Removing Dirt and Debris. Before staining, make sure the wood is clean. Use a soft brush or a vacuum to remove loose dust and debris. This guarantees the stain won’t have any obstacles.
Dust and dirt can create an uneven surface. This will show through the stain. Removing these particles ensures a clean surface. The stain can then absorb correctly into the wood. A good cleaning makes the stain look more uniform. By cleaning the surface, you make sure that nothing interferes with the stain.
Using a Mild Cleaner. Use a mild cleaner. Harsh chemicals can damage the wood. Mix warm water with a small amount of dish soap. Wipe the wood gently with a soft cloth dampened with the cleaning solution.
Harsh cleaners can remove the finish or discolor the wood. By using a mild cleaner, you protect the wood while removing surface contaminants. Always test the cleaner in a small, hidden area first. Then, make sure it doesn’t harm the finish. This ensures your cleaning doesn’t damage the surface. Rinse the wood with clean water and dry it before sanding.
Addressing Existing Finishes. If there’s an old finish on the wood, you’ll need to remove it. You can do this by sanding, using a chemical stripper, or both. Be sure to follow the manufacturer’s instructions.
Old finishes can prevent the stain from absorbing correctly. Stripping or sanding ensures the new stain will bond with the wood. A chemical stripper will dissolve the old finish. Sanding will remove it physically. Choose the method that is best suited for the type of finish on your wood. Then, make sure the surface is ready for the new stain.
Sanding the Wood
Sanding is another important step. Sanding smooths the wood’s surface. It gets rid of any rough spots or imperfections. Sanding makes the stain absorb more evenly. It also helps to get rid of any existing water stains or damage. Always sand in the direction of the wood grain. This ensures you do not cause any new scratches or damage.
Selecting the Right Grit. The grit number of sandpaper tells you how coarse or fine it is. Start with a medium-grit sandpaper (like 120- or 150-grit). Then, switch to a finer grit (like 220-grit) for a smoother finish.
The grit of your sandpaper determines how much material it removes. Begin with a coarser grit to eliminate any imperfections. Then, switch to a finer grit. This creates a smoother surface. The type of wood and the existing finish will affect the grit you should use. Experimenting with different grits can help you decide what will work best.
Sanding Technique. Always sand in the direction of the wood grain. Use even pressure. Don’t press too hard. Let the sandpaper do the work. Overlapping strokes will keep the surface smooth.
Sanding with the grain prevents scratches that show up after staining. Keeping a steady pressure ensures the surface is smooth. Overlapping strokes mean you’ll get an even finish. This creates a better surface for absorbing the stain. A good technique will prevent the need for additional sanding.
Sanding to Remove Stains. When sanding, focus on removing any existing water stains. Sand the stained area until the stain is gone. Be careful not to sand through the wood finish.
Sanding can remove light to moderate water stains. Sand until the affected areas are smooth. Be aware of the depth of the stain. You do not want to go too deep. Check your work often to make sure the stain is coming off evenly. If a stain is too deep, you might need to use a stain remover or wood bleach.
Optional Bleaching for Stubborn Stains
Sometimes, water stains are tough and can’t be fixed by just sanding. In these situations, wood bleach might be needed. Wood bleach lightens the wood. It also reduces the appearance of stubborn stains. You must use wood bleach very carefully. It can change the color of the wood if used incorrectly. Always follow the instructions on the bleach. Remember to protect yourself and the wood by testing the bleach in an area that isn’t easily seen.
Types of Wood Bleach. There are two main types of wood bleach: two-part bleach (sodium hydroxide and hydrogen peroxide) and oxalic acid. Two-part bleach is more powerful. It’s best for darker stains. Oxalic acid is gentler. It’s good for light stains and overall wood brightening.
Knowing the type of bleach is important. Two-part bleach provides a powerful effect. It is perfect for heavy water stains. Oxalic acid works well for lighter stains and general wood fading. Choosing the right bleach will ensure the best possible results. Always consider the intensity of the stain. The type of wood is key when making your choice.
Applying Wood Bleach. Always wear safety gear, such as gloves, eye protection, and a mask. Apply the bleach according to the instructions. Use a brush or cloth. Allow the bleach to sit for the recommended time.
Safety is key when handling wood bleach. Protecting your skin and eyes from chemical exposure is a must. Applying the bleach correctly is also important. This often includes carefully brushing the bleach onto the wood. It is crucial to follow the directions. This is the only way to get the best result.
Neutralizing and Rinsing. After bleaching, you must neutralize the wood. Use water. Then, rinse the wood thoroughly. Allow it to dry completely before applying any stain or finish.
Neutralizing the wood stops the bleaching process. Rinsing eliminates any remaining chemicals. Proper drying before staining or finishing is necessary. This prevents problems with adhesion and color. The surface needs to be completely clean and dry before you move on to the next step.
Choosing the Right Wood Stain
Selecting the right wood stain is key for fixing water stains. The stain’s color, type, and finish impact the final look. The stain needs to match the existing wood or provide the desired effect. Choosing the best stain includes considering how it will affect the wood. You must also consider its durability. You should choose a stain that will stand up to wear and tear. A good stain will cover the water stain and make your wood look beautiful.
Types of Wood Stains
There are many types of wood stains. Each type has different qualities and uses. Knowing these differences will help you choose the best stain for your project. Water-based stains are easy to clean up. Oil-based stains offer good durability. Gel stains are great for vertical surfaces. Understanding the benefits of each type will guide you to a well-matched stain.
Oil-Based Stains. Oil-based stains are common. They penetrate deep into the wood. They provide a rich, long-lasting color. They are also known for their durability.
Oil-based stains are a good choice. They work well for both interior and exterior projects. They are able to cover the wood. They give a rich, even color. Oil-based stains require mineral spirits for cleanup. They can take longer to dry than other types of stains.
Water-Based Stains. Water-based stains are easy to clean up. They dry fast. They have a low odor. These stains also come in many colors.
Water-based stains are simple to apply and eco-friendly. They offer good coverage and color, and they are perfect for many DIY projects. Their fast drying time is a great benefit. Their low odor makes them suitable for use indoors. Water-based stains can sometimes raise the wood grain, which can be mitigated through proper sanding.
Gel Stains. Gel stains have a thick consistency. They are perfect for vertical surfaces. They will not drip or run. They are good for furniture.
Gel stains are excellent for covering. They work well on surfaces. This includes doors and cabinets. Gel stains are ideal for projects with tricky angles. They work well on smooth surfaces. They create a beautiful finish. Gel stains often provide good color and durability.
Matching Stain Color
Matching the stain color is a key step. The right color will blend the repaired area with the surrounding wood. Test different stain colors on a hidden area of the wood. This way, you can see how the stain looks. The type of wood and the existing finish will affect how the stain looks. Take time to do your homework. This ensures the best match. This is key to achieving a good result.
Identifying Wood Species. Knowing the type of wood is key. Different woods absorb stains differently. Identifying the wood helps you find the right stain color and type.
The type of wood plays a role in how it takes up the stain. Oak, pine, and maple have different grain patterns and densities. This changes how the stain looks. Identifying the wood can help you choose a stain that will offer a good result. Understanding the wood’s characteristics is essential.
Testing Stain Colors. Test different stain colors on a small, hidden area of the wood. This helps you to see how each stain will look. It can give you a clear idea of what the final color will be.
Testing the stain before you apply it to the entire surface prevents mistakes. It helps you see how the color will look with your wood. It also shows if the stain will blend well. Testing allows you to make adjustments. You can avoid bad outcomes by testing first.
Considering Existing Finish. The existing finish can change the way a stain looks. You might need to remove some of the old finish before staining. This ensures an even absorption of the new stain.
The old finish can act as a barrier. It may interfere with the stain. Removing the existing finish will provide the new stain a clean surface. It ensures that the color will absorb and look as you expect. This is essential for getting the right result.
Staining Techniques
Applying the stain correctly is important for getting a smooth and even finish. Use a brush, cloth, or spray. Always go with the wood grain to prevent streaks. The number of coats and the application method will affect the final color and look. By following these steps, you can get a beautiful and professional-looking result. Taking your time will make sure the stain looks its best.
Application Tools. You can use a brush, cloth, or sprayer. Brushes are great for detail work. Cloths are good for easy application. Sprayers are ideal for large surfaces.
Choosing the right tool is key for ease of use and finish. Brushes provide excellent control for detailed work. Cloths are perfect for small projects. Sprayers are perfect for big surfaces, such as floors and doors. You should select a tool that best meets your needs. This way, you will get the best result.
Applying Stain with the Grain. Always apply the stain in the direction of the wood grain. This ensures the stain absorbs evenly. It also prevents streaks and an uneven look.
Following the wood grain is essential for professional results. Doing this helps the stain go into the wood’s pores properly. This ensures a consistent color and a polished look. You should always use this method for the best outcome.
Number of Coats. Usually, you need one or two coats of stain. The number of coats decides how dark the color will be. Let each coat dry fully before applying the next coat.
The number of coats affects how the color will show. A single coat may create a light, natural look. Multiple coats will give a richer and deeper color. Let the first coat dry fully. Then, add a second coat for the desired depth.
Can a Water Stain Be Covered by Wood Stain? The Final Application
Yes, Can a Water Stain Be Covered by Wood Stain? When it comes to the final application, you should focus on the details. Getting the surface ready, picking the right stain, and applying it with care are key. Your goal is a smooth finish. You need to follow each step carefully. Taking the time to do things right will give you great results. The final look should be beautiful and last a long time.
Applying Wood Stain to Cover Water Stains
Covering water stains with wood stain needs special attention. First, you must get the wood ready by cleaning and sanding it. Then, choose a stain that matches the color of the rest of the wood. Applying the stain correctly is also important. These steps help to make the water stains vanish. You will get a surface that is consistent and beautiful.
Spot Staining. Focus on the stained area. Apply the stain carefully. Match the surrounding color. Blend the edges of the stain to create a seamless transition.
Spot staining targets only the areas affected by the stain. It’s used for small repairs. Carefully match the color of the surrounding area. Blend the new stain into the existing finish. This method minimizes changes to the surface. It preserves the look of the wood. This approach allows you to repair the damage and improve the look without re-staining the entire piece.
Staining the Entire Surface. For big stains or when you need a consistent color, you might need to stain the whole surface. This makes sure that the color matches perfectly. Follow all the prep and application steps.
Staining the entire surface guarantees an even color across the wood. It is needed when the damage is widespread. You should apply stain evenly. This helps to make a consistent and uniform look. Thorough preparation and attention to detail are crucial for great results. When you stain the whole surface, you restore the original beauty of the wood.
Multiple Coats. Use multiple coats of stain to make sure the water stains are covered. Let each coat dry before you apply another one.
Apply multiple coats. The goal is complete coverage. This is especially key if the stains are deep or dark. Each coat adds depth and richness to the color. This process allows the stain to penetrate evenly. Always wait for each coat to dry fully. This gives you the best finish.
Sealing and Protecting the Wood
Once you stain the wood, you must seal and protect it. This step ensures that the wood will last for a long time. It also prevents water stains from returning. Applying a clear finish, like varnish or polyurethane, will add a protective layer. This protects the wood from water and wear. The right finish provides lasting beauty and protection.
Applying a Clear Finish. Apply a clear finish. This adds a protective layer. It also makes the wood resistant to water. Choose from varnish, polyurethane, or other clear coatings.
A clear finish is like an added shield. It adds an extra layer of protection. This layer protects the wood from water, scratches, and wear. It is essential for long-term protection. Varnish and polyurethane are both good choices. They create a strong barrier. Always apply these finishes as the instructions say.
Choosing the Right Finish. The type of finish matters. Polyurethane is tough and long-lasting. Varnish offers a more classic look. The finish you choose should fit your needs.
Choosing the right finish depends on your needs. Polyurethane is a great choice for areas that get a lot of use. Varnish is a good option for projects that need a classic finish. You should consider durability, look, and the ease of application. Selecting the perfect finish will help preserve the beauty of your wood.
Applying Multiple Coats of Finish. Apply multiple coats of finish. This creates a stronger protective barrier. Let each coat dry completely. Then, lightly sand between coats for a smooth surface.
Multiple coats of finish provide extra protection. Each coat adds to the protection. Wait for the coat to dry. Then, gently sand the surface. This creates a smooth finish. Proper application will enhance the finish’s lifespan. It will also help the wood look great for a long time.
Maintenance and Prevention
Taking care of your wood is important for long-term health. Regular cleaning and care can keep your wood looking great. Using coasters and mats prevents water stains. If you spill something, clean it up right away. These easy steps will help protect your wood from damage. This way, you can keep your wood beautiful for years.
Regular Cleaning. Clean your wood surfaces regularly. Use a damp cloth to wipe up spills. Stay away from harsh chemicals or abrasive cleaners.
Regular cleaning is key for keeping your wood in great shape. Clean up spills to prevent stains. Use a damp cloth to wipe up dust and grime. You should always use gentle cleaners. This keeps your wood healthy. Consistent cleaning makes sure your wood always looks good.
Using Coasters and Mats. Always use coasters under glasses and cups. Use mats under plants and other items that might leak. These simple steps protect your wood from water damage.
Using coasters and mats is an easy way to prevent water stains. Coasters prevent water rings from drinks. Mats protect surfaces from spills from plants. These items create a barrier. This reduces the risk of water damage. This prevents stains from happening. Protecting your wood is easier than repairing damage.
Prompt Spill Cleanup. Clean up spills right away. The faster you act, the less damage the water will cause. Use a soft cloth. Don’t let spills sit on the wood for a long time.
Quick action is key to prevent water stains. If you spill water, wipe it up at once. This reduces the chance that water will seep into the wood. The goal is to remove the water before it gets absorbed. Quick action can save you from a lot of work. Immediate cleanup is very important.
| Factor | Impact on Water Staining | Mitigation Strategy |
|---|---|---|
| Wood Type | Affects how quickly water is absorbed | Choose appropriate stain and finish; seal wood |
| Finish Type | Determines water resistance | Use water-resistant finishes; regular maintenance |
| Exposure Time | Longer exposure leads to deeper stains | Clean spills immediately; use coasters/mats |

Frequently Asked Questions
Question: Can I just apply wood stain over a water stain?
Answer: It’s best to prepare the wood first by cleaning and sanding to help the stain absorb evenly and give you the best results. However, a light stain may cover a minor mark.
Question: What’s the difference between surface stains and penetrating stains?
Answer: Surface stains are on the finish, while penetrating stains go into the wood. Surface stains are easier to fix, whereas penetrating stains may require more work, such as sanding to remove the damage.
Question: What’s the best way to remove a water stain?
Answer: Start by cleaning and sanding the area. Then, try spot staining. Apply wood bleach if the stain is deep and sanding doesn’t do the trick. A combination of methods will likely provide the best outcomes.
Question: Should I always stain the whole surface, or can I spot-treat?
Answer: Spot-treating is an option for smaller stains. You should stain the whole surface if you want a uniform color or have extensive staining to guarantee a consistent result.
Question: How do I choose the right finish for my wood?
Answer: Consider the wood’s use and wear. Polyurethane is durable, while varnish offers a classic look. Look at both looks. Match what you want and how you use the wood to choose a finish.
Final Thoughts
Can a Water Stain Be Covered by Wood Stain? Yes, you can. You must understand the kind of stain and take action as needed. This article walked through the steps needed to deal with the water damage. It started with understanding what causes the stains and the different kinds of damage. Then, it looked at the prep work needed for the wood, including cleaning, sanding, and even bleaching if needed. The guide explored the best ways to pick a stain. It considered color, type, and application methods. The blog post also provided a look at the final application and how to protect the wood with a seal.
The knowledge can make all the difference. Start by assessing the damage and finding the method that works for your situation. Take time to prep, pick the right materials, and apply with care. You can get great results.