Can I Paint Ceiling Tiles? Your Proven, Essential Guide
Yes, you can absolutely paint most ceiling tiles. With the right preparation, primer, and paint, you can easily refresh your ceiling without a costly replacement. This guide will show you how to identify your tile type, choose the best materials, and get a professional-looking finish, saving you time and money on your home improvement project.
Does your drop ceiling look old, stained, or dated? You might think your only choice is a full replacement. But what if you could give it a fresh, modern look for a fraction of the cost? Many homeowners wonder, “Can I paint my ceiling tiles?” The answer is a big, resounding yes!
Painting is a simple and budget-friendly way to transform a room. It covers up years of discoloration and makes the entire space feel brighter and cleaner. It might seem like a tricky job, but I’m here to walk you through it. We’ll break it down into easy, manageable steps. Together, we’ll turn that tired ceiling into something you can be proud of.
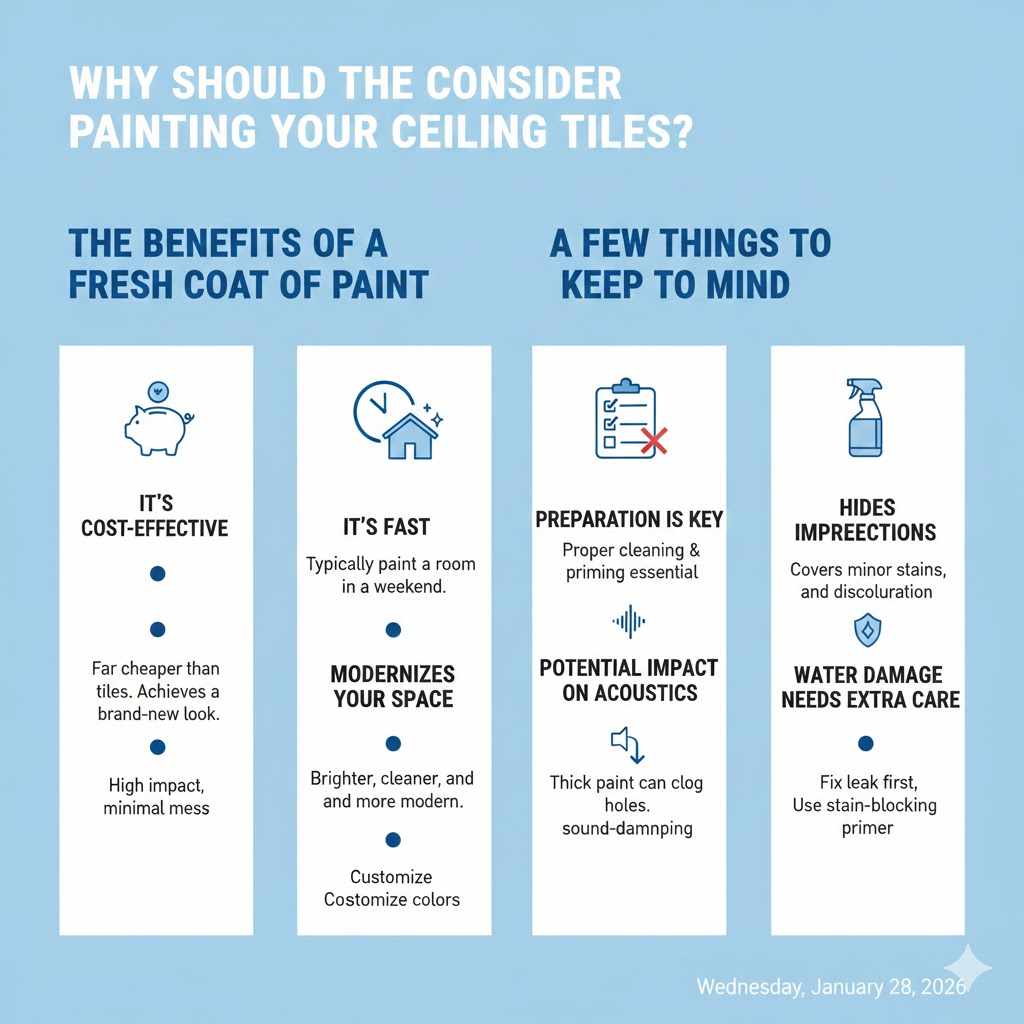
Why Should You Consider Painting Your Ceiling Tiles?
Before we grab our tools, let’s look at why painting is such a great option. Like any project, it has its good points and a few things to keep in mind. Understanding these helps you decide if this is the right weekend project for you.
The Benefits of a Fresh Coat of Paint
- It’s Cost-Effective: Painting is far cheaper than buying new tiles and paying for installation. You can achieve a brand-new look with just a few gallons of paint and some basic supplies.
- It’s Fast: You can typically paint an entire room’s ceiling in a weekend. Replacing tiles can take much longer and create a bigger mess.
- Modernizes Your Space: A bright, white ceiling makes a room feel larger, cleaner, and more modern. You can also choose colors to match your decor, giving you full creative control.
- Hides Imperfections: Paint is excellent at covering minor stains, scuffs, and discoloration that build up over time. It gives your ceiling a uniform, clean appearance.
A Few Things to Keep in Mind
- Preparation is Key: You can’t just slap paint on the tiles. Proper cleaning and priming are essential for a lasting finish. Skipping these steps will lead to peeling and chipping.
- Potential Impact on Acoustics: For acoustic tiles designed to absorb sound, a thick coat of paint can clog the tiny holes and reduce their sound-dampening ability. We’ll cover how to handle this!
- Water Damage Needs Extra Care: If you have water stains, you must fix the leak first. Then, you’ll need a special stain-blocking primer to prevent the stain from bleeding through the new paint.
First, Let’s Identify Your Ceiling Tile Type
Not all ceiling tiles are created equal. The type of tile you have will determine the best way to prepare and paint it. Let’s figure out what you’re working with. Most homes have one of the following types.
| Tile Type | Description | Best Painting Method |
|---|---|---|
| Acoustic (Mineral Fiber) | These are the most common drop-ceiling tiles. They feel porous and lightweight, often with small holes or fissures to absorb sound. | Light spray painting is best to avoid clogging the pores. Rolling is possible with a light touch and minimal paint. |
| Fiberglass/PVC | Smooth, lightweight, and often waterproof. These look like plastic and are common in bathrooms and kitchens. | Roller or sprayer. These are very easy to paint once cleaned and primed. |
| Tin/Metal | These are decorative, stamped metal tiles. They can be real tin, aluminum, or steel. | A sprayer gives the most even finish. A small roller or brush can also work if you’re careful around the designs. |
| Styrofoam/Polystyrene | Very lightweight and decorative, often with embossed patterns. Feels like a coffee cup. | Use a water-based (latex) paint ONLY. Solvent-based paints can melt the foam. A brush or roller works well. |
If you’re unsure, carefully remove one tile and inspect it. Is it fibrous and dusty? It’s likely mineral fiber. Is it smooth and plastic-like? Probably PVC. Knowing your material is the first step to a successful project.
Your Essential Tools and Materials List
Having everything ready before you start makes the job go smoothly. Nothing is worse than being halfway up a ladder and realizing you forgot something. Here’s a simple checklist to get you prepared.
For Preparation and Safety:
- Safety glasses
- Dust mask
- Drop cloths or plastic sheeting
- Painter’s tape
- Step ladder or sturdy platform
- Shop vacuum with a brush attachment
- Soft cloths or sponges
- Mild detergent
For Painting:
- Stain-blocking primer: This is a non-negotiable step! Choose a quality oil-based or water-based primer designed to cover stains.
- Paint: A flat or matte latex ceiling paint is your best bet. It hides imperfections well and doesn’t reflect glare.
- Paint roller with extension pole: A 3/8-inch or 1/2-inch nap roller works for most tiles.
- Paint tray
- Small paintbrush: For cutting in around edges and light fixtures.
- (Optional) Paint sprayer: If you have acoustic tiles or a large area, a sprayer provides the best, most even coverage.
Your Step-by-Step Guide to Painting Ceiling Tiles
Alright, you’ve identified your tiles and gathered your gear. Now comes the fun part! Follow these steps carefully, and you’ll be amazed at the results. We’ll take it one step at a time, making sure every part of the process is clear and simple.
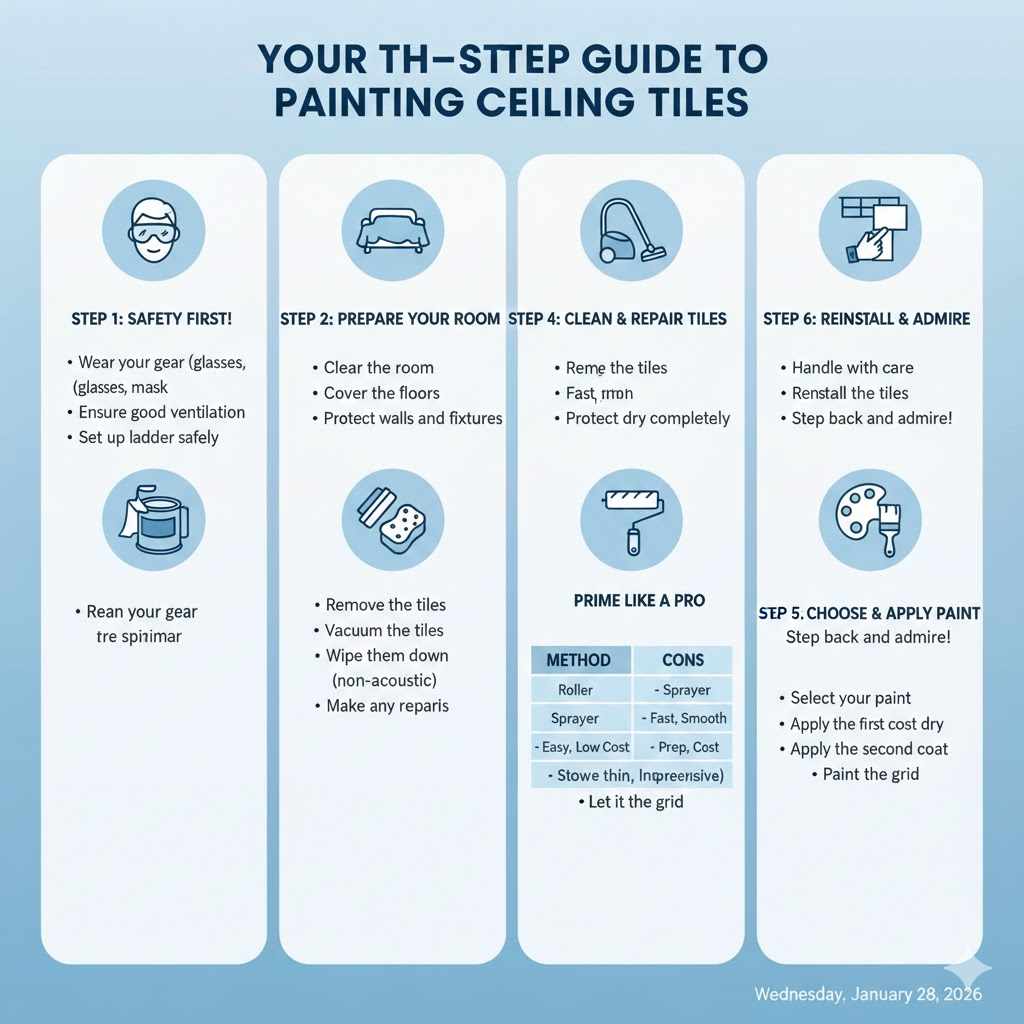
Step 1: Safety First!
Before you do anything else, let’s make sure your workspace is safe. You’ll be working overhead, so taking a few minutes to prepare is crucial.
- Wear your gear: Put on your safety glasses and dust mask. Old ceiling tiles can release dust and fibers you don’t want to breathe in or get in your eyes.
- Ensure good ventilation: Open windows and doors to get fresh air flowing. This is especially important when using oil-based primers. Refer to the Environmental Protection Agency’s guidance on indoor air quality.
- Set up your ladder safely: Make sure your ladder is on a flat, stable surface. Never overreach; it’s always better to climb down and move the ladder.
Step 2: Prepare Your Room
A little prep work on the front end saves a lot of cleanup later. Protect your room and furniture from paint drips and dust.
- Clear the room: Move as much furniture out of the room as you can. For heavy items, push them to the center and cover them completely with plastic sheeting.
- Cover the floors: Lay down drop cloths over the entire floor. Tape them down at the edges to prevent them from slipping.
- Protect walls and fixtures: Use painter’s tape to mask off the top of the walls where they meet the ceiling grid. You can also tape around any light fixtures or vents you aren’t removing.
Step 3: Clean and Repair the Tiles
You cannot paint over dirt and dust. A clean surface is the secret to a professional, long-lasting paint job. This is the most important prep step!
- Remove the tiles (if possible): For drop ceilings, it’s often easiest to remove the tiles and paint them on the ground. This prevents neck strain and gives you better results. Lay them on a drop cloth in your garage or another work area.
- Vacuum the tiles: Use a shop vacuum with a soft brush attachment to gently remove all loose dust, cobwebs, and debris from the tiles and the metal grid.
- Wipe them down: For non-acoustic tiles (like PVC or metal), you can wipe them with a damp cloth and a mild soap-and-water solution to remove any grease or grime. Let them dry completely. For porous acoustic tiles, skip this step to avoid damaging them with moisture. A thorough vacuuming is usually enough.
- Make any repairs: Check for any cracked corners or significant damage. A small amount of spackle or joint compound can fix minor issues. Let any repairs dry fully and sand them smooth before moving on.
Step 4: Prime Like a Pro
Do not skip priming! Primer does two very important jobs: it seals the porous surface of the tile so it doesn’t soak up all your paint, and it blocks stains from bleeding through your beautiful new topcoat.
- Choose the right primer: A quality stain-blocking primer is essential, especially for tiles with water spots or nicotine stains. Shellac-based or oil-based primers offer the best stain-blocking power. Water-based options are easier to clean up and work well for tiles in good condition.
- Apply a thin, even coat: Whether you’re rolling or spraying, apply one light, even coat of primer to all tiles. Don’t try to get complete coverage in one go. The goal is to seal the surface.
- Prime the grid: Don’t forget the metal grid that holds the tiles! A quick coat of primer will help the paint adhere and create a seamless look.
- Let it dry completely: Follow the manufacturer’s instructions for dry time. Rushing this step can ruin your final finish. This can range from one hour to several, so plan accordingly.
Step 5: Choose and Apply the Right Paint
With the prep work done, it’s time to add the color. Choosing the right paint and application method will ensure your ceiling looks amazing for years to come.
| Application Method | Pros | Cons | Best For |
|---|---|---|---|
| Roller | – Easy for beginners – Low cost of equipment – Good control | – Can fill in acoustic tile pores – Slower on large ceilings – Can leave texture (stipple) | Smooth tiles (PVC, metal), small rooms, and DIYers on a budget. |
| Paint Sprayer | – Fastest method for large areas – Professional, smooth finish – Best for acoustic tiles | – Requires more prep and masking – Equipment can be expensive – Has a learning curve | Acoustic tiles, textured tiles, large rooms, and achieving a flawless finish. |
| Brush | – Best for details – Inexpensive | – Extremely slow for a whole ceiling – Can leave brush marks | Cutting in around edges, painting the grid, and small touch-ups only. |
- Select your paint: An interior latex paint with a flat or matte finish is the standard choice for ceilings. Flat finishes hide imperfections much better than glossy ones.
- Apply the first coat: Using your chosen method (roller or sprayer), apply a thin, even coat of paint. Work in one direction to maintain a consistent pattern. Don’t press too hard with the roller; let the tool do the work. If spraying, keep the nozzle moving to prevent drips.
- Let the first coat dry: Check the paint can for recommended drying times between coats. It’s usually 2 to 4 hours. Good airflow will help speed this up.
- Apply the second coat: A second coat is almost always necessary for full, even coverage. Apply it in the opposite direction of the first coat (e.g., if you went north-to-south first, go east-to-west for the second). This helps ensure you don’t miss any spots.
- Paint the grid: If you’re painting the metal grid, use a small 4-inch roller or a paintbrush. It’s usually easiest to paint this after the tiles are done.
- Reinstall and Admire: Once everything is completely dry (give it a full 24 hours to be safe), you can carefully place your tiles back into the grid. Step back and enjoy your bright, refreshed ceiling!
Frequently Asked Questions (FAQ)
What kind of paint is best for ceiling tiles?
The best paint is a high-quality interior latex (water-based) paint with a flat or matte finish. This type of finish is excellent at hiding minor surface imperfections and doesn’t create glare. For tiles with stains, always start with a stain-blocking primer first.
Do I really need to use a primer on ceiling tiles?
Yes, absolutely. Priming is arguably the most crucial step. Most ceiling tiles, especially mineral fiber ones, are very porous. A primer seals the surface, preventing the tile from soaking up your expensive paint. It also ensures the paint sticks properly and blocks any old stains from showing through.
Will painting acoustic ceiling tiles ruin their sound-dampening quality?
It can, if not done correctly. The sound-dampening ability comes from the tiny holes and porous texture. A thick coat of paint applied with a roller will clog these pores. To preserve the acoustic properties, use a paint sprayer and apply several very light mist coats instead of one heavy coat.
Can I paint over water-stained ceiling tiles?
Yes, but you must fix the source of the water leak first. Once the leak is repaired and the tile is completely dry, you must use a high-quality stain-blocking primer (shellac-based is often best for water stains) over the stained area. If you skip this, the stain will bleed through your new paint, no matter how many coats you apply.
How should I clean ceiling tiles before painting them?
First, use a vacuum with a soft brush attachment to gently remove all loose dust and cobwebs. For smooth, non-porous tiles like PVC or tin, you can then wipe them down with a damp cloth and a mild soap solution. For porous acoustic tiles, it’s best to stick to just vacuuming to avoid water damage.
Is it better to roll or spray paint onto ceiling tiles?
It depends on the tile type and your goal. A sprayer gives the best, most even finish and is the only recommended method for acoustic tiles to avoid clogging them. A roller is easier for beginners, requires less prep, and works well on smooth tiles. However, it can be slower and may leave a slight texture.
Should I paint the metal grid that holds the tiles?
Yes, for the best look, you should paint the metal grid to match the tiles. A painted grid creates a seamless, uniform appearance and makes the entire ceiling look brand new. You can paint it with a small roller or a brush after you’ve painted the tiles.
Conclusion: Your Fresh, New Ceiling Awaits
See? You can definitely paint ceiling tiles, and now you have the knowledge to do it with confidence. What once seemed like a daunting task is really just a series of simple, manageable steps. By taking the time to prepare your space, clean your tiles, and use the right primer and paint, you can achieve a finish that looks clean, modern, and professional.
This project is a perfect example of how a little bit of effort can completely change the feel of a room. You’ve not only saved money but also added value to your home with your own two hands. So go ahead, look up at that fresh, bright ceiling and feel proud of the work you’ve done. You’ve earned it!