Can You Lighten Stain After It Dries? The Best Proven Ways
Yes, you can absolutely lighten wood stain after it dries. Depending on how long the stain has cured, you can use mineral spirits for fresh stain, or stronger methods like chemical strippers, sanding, or wood bleach for older, darker finishes. It’s a fixable problem, and with the right steps, you can achieve the color you wanted.
You’ve spent hours preparing your beautiful wood project. You apply the stain, wait for it to dry, and step back to admire your work. But your heart sinks—it’s much, much darker than the color on the can. Don’t panic! This is one of the most common issues in woodworking, and it happens to everyone, from first-timers to seasoned pros.
The good news is you are not stuck with a finish you don’t love. A stain that’s too dark is a completely fixable problem. You don’t need to throw the project away or start over from scratch. In this guide, I’ll walk you through the safest and most effective ways to lighten that stain and get your project back on track. Let’s get that wood looking just right.
Why Did My Stain Turn Out So Dark?
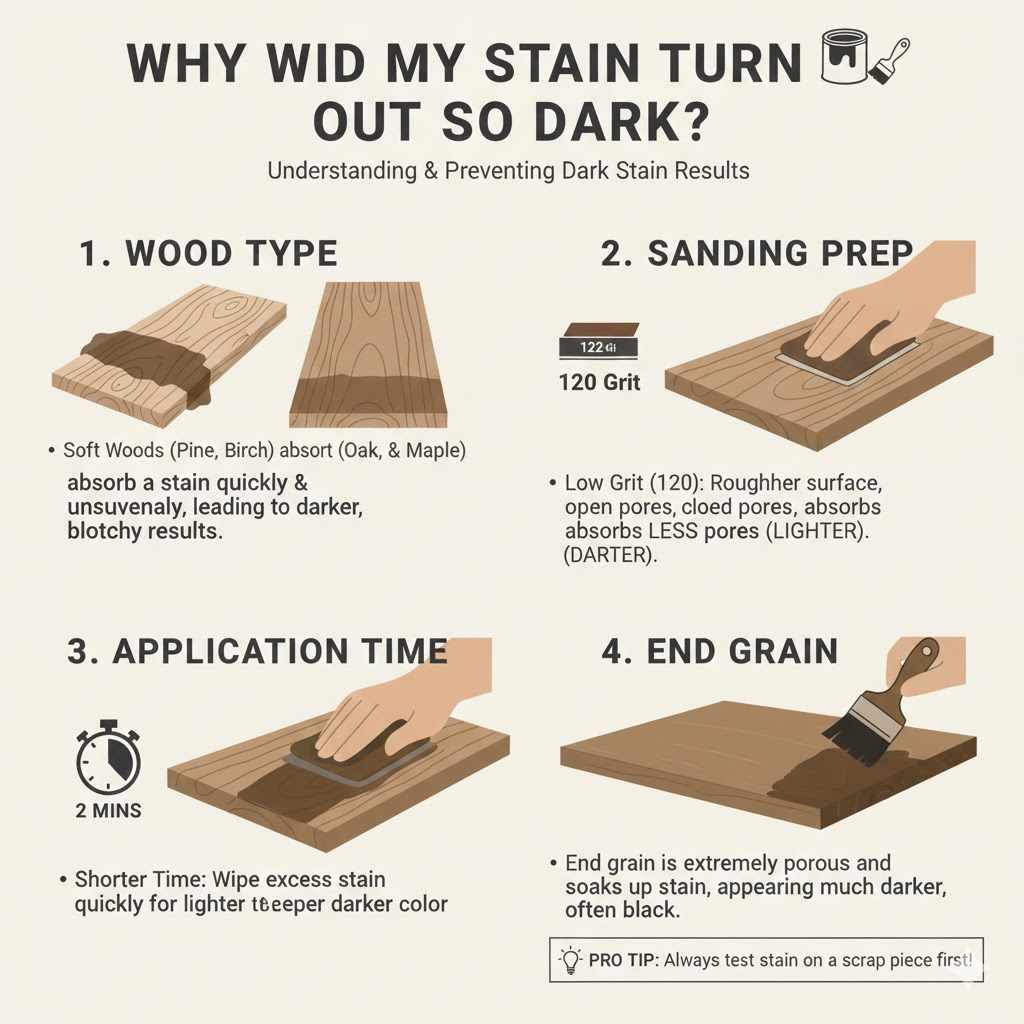
Before we jump into the solutions, it’s helpful to know why a stain might dry darker than you expected. Understanding the cause can help you prevent it from happening on your next project. It usually comes down to a few key factors.
- Wood Type: Softer woods like pine and birch are like sponges. They soak up stain very quickly, which often results in a darker, sometimes blotchy, appearance. Hardwoods like oak or maple absorb stain more evenly and slowly.
- Sanding Prep: The texture of the wood makes a big difference. Wood sanded with a lower grit (like 120) has a rougher surface with more open pores, causing it to absorb more stain. Wood sanded with a higher grit (like 220) is smoother and will take the stain more lightly.
- Application Time: How long you leave the stain on the wood before wiping off the excess is crucial. Leaving it on for even a few extra minutes allows more pigment to soak in, leading to a deeper color.
- End Grain: The ends of a board (the end grain) are extremely porous and will drink up stain, often turning nearly black. It’s always a good idea to sand the end grain to a finer grit than the rest of the board.
The best way to avoid surprises is to always test your stain on a scrap piece of the same wood or on a hidden spot of your project first. This little step can save you a lot of time and frustration!
Safety First: Your Workshop Checklist
Working with chemicals like strippers, solvents, and bleach requires care. Your safety is the most important tool in your workshop. Before you start any of the methods below, make sure you have the right protective gear and a safe workspace.
- Work in a Well-Ventilated Area: Fumes from these products can be strong and harmful. Work outdoors if you can, or in a garage with the doors wide open. Use fans to create cross-ventilation.
- Wear Chemical-Resistant Gloves: Regular latex gloves won’t cut it. Use nitrile or neoprene gloves to protect your skin from harsh chemicals.
- Use Eye Protection: Safety glasses or goggles are a must. You do not want any of these substances splashing into your eyes.
- Wear a Respirator: A simple dust mask is not enough for chemical fumes. Use a respirator with organic vapor cartridges to protect your lungs. You can learn more about choosing the right one from the National Institute for Occupational Safety and Health (NIOSH).
- Read the Product Label: Always read and follow the manufacturer’s instructions and safety warnings on any product you use.
Proven Ways to Lighten Wood Stain After It Dries
Alright, let’s get to fixing that stain. We’ll start with the gentlest method and work our way up to the more powerful options. Your choice will depend on the type of stain (oil-based vs. water-based) and how long it has been dry.
Method 1: Using Mineral Spirits or Paint Thinner (For Freshly Dried Oil-Based Stain)
This is the first thing you should try if you’re working with an oil-based stain that has been drying for less than 24-72 hours. The stain isn’t fully cured yet, meaning the solvents in mineral spirits can reactivate the binders and lift some of the pigment out of the wood grain.
Tools and Materials You’ll Need:
- Mineral spirits, paint thinner, or naphtha
- Clean, lint-free rags
- Chemical-resistant gloves
- Safety glasses
Step-by-Step Instructions:
- Put on Your Safety Gear: Gloves and glasses on! Make sure your workspace is well-ventilated.
- Apply the Solvent: Dampen a clean rag with mineral spirits. Don’t soak it—you want it damp, not dripping wet.
- Wipe the Surface: Gently wipe the stained surface with the damp rag, moving in the direction of the wood grain. You should see some of the stain color transfer onto the rag.
- Work Evenly: Apply even pressure and work across the entire surface to ensure a consistent, lighter tone. Avoid scrubbing one spot, as this can create a patchy look.
- Switch Rags Often: As your rag picks up stain, switch to a clean section or a new rag. Using a dirty rag will just smear the old stain around.
- Let It Dry: Once you’ve achieved a lighter color, wipe the surface with a final clean, dry rag to remove any excess solvent. Let the wood dry completely (at least 24 hours) before deciding if it’s light enough.
Important Note: This method only works on oil-based stains. It will not be effective on water-based stains or stains that have fully cured for many days or weeks.
Method 2: Using Chemical Strippers (For Fully Cured or Tough Stains)
If the stain has been dry for a while, or if the mineral spirits trick didn’t work, a chemical stripper is your next best bet. These products are designed to break down tough finishes and can effectively remove a layer of cured stain. There are many different types, from citrus-based to stronger solvents, so read the label to find one that’s right for your project.
Tools and Materials You’ll Need:
- Chemical wood finish and stain remover
- Natural bristle brush (synthetic bristles can melt)
- Plastic putty knife or scraper
- Steel wool (0000 grade) or a synthetic scouring pad
- Mineral spirits or water for cleanup (check product instructions)
- All your safety gear (respirator is highly recommended here!)
Step-by-Step Instructions:
- Prepare for Safety: This is where ventilation and personal protective equipment (PPE) are non-negotiable. The fumes from strippers are powerful.
- Apply the Stripper: Use the natural bristle brush to apply a thick, even layer of stripper to the surface. Don’t “paint” it back and forth; lay it on in one direction.
- Wait for It to Work: Follow the manufacturer’s instructions for how long to wait. This could be anywhere from 15 minutes to several hours. You’ll see the surface start to bubble or wrinkle—that means it’s working!
- Scrape Off the Finish: Once ready, use your plastic putty knife to gently scrape away the softened gunk. Angle the scraper low to avoid gouging the wood. Scrape in the direction of the grain.
- Clean Up the Residue: There will likely be some residue left in the wood grain. Dip your steel wool or scouring pad into the neutralizing agent specified by the stripper’s instructions (usually mineral spirits for solvent-based strippers or water for water-based ones). Gently scrub the surface to remove any leftover stripper and stain.
- Wipe and Dry: Wipe the entire piece clean with a rag dampened with the neutralizer. Then, do a final wipe with a clean, dry rag. Let the wood dry completely for at least 24-48 hours. It needs to be totally dry before you do any sanding or re-staining. For more on safe practices with paint and finish removers, see the guidance from the U.S. Environmental Protection Agency (EPA).
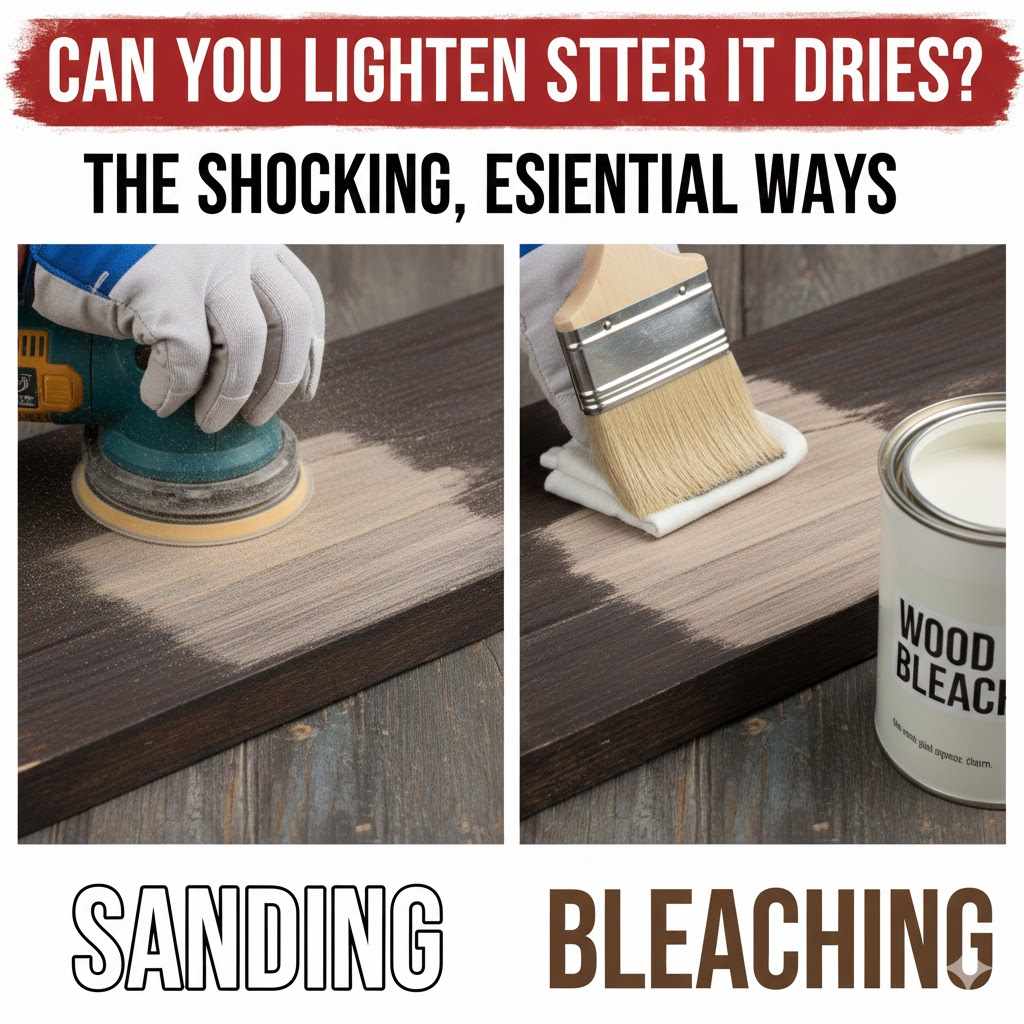
Method 3: Sanding (The Physical Removal Method)
Sanding is a labor-intensive but highly effective way to remove dried stain. It physically grinds away the top layer of stained wood fibers, giving you a fresh, clean surface to work with. This method is best for solid wood projects, as you can easily sand through the thin top layer of a wood veneer.
Tools and Materials You’ll Need:
- Random orbital sander (highly recommended for large surfaces)
- Sanding block for hand sanding edges and details
- Sandpaper in various grits (e.g., 120, 150, 180, and 220)
- Dust mask or respirator
- Tack cloth or vacuum with a brush attachment
Step-by-Step Instructions:
- Start with a Medium Grit: Don’t start with a very coarse grit like 60 or 80 unless you have a thick, paint-like finish to remove. For most stains, starting with 120 or 150 grit is perfect. This will remove the color without creating deep scratches that are hard to get out later.
- Sand Evenly: Whether you’re using an orbital sander or sanding by hand, always move with the grain of the wood. Keep the sander moving constantly to avoid creating dips or low spots. Let the tool do the work—don’t press down too hard.
- Work Your Way Up the Grits: Once all the stain is gone and you have a uniform surface with 120-grit paper, switch to 150-grit to remove the scratches from the 120-grit. Then move to 180-grit, and finish with 220-grit for a smooth surface ready for a new stain.
- Clean the Surface: Sanding creates a lot of dust. Vacuum the entire surface thoroughly, then wipe it down with a tack cloth to pick up any remaining particles. Any dust left behind will interfere with your new finish.
Top tool manufacturers like Bosch offer excellent guides on how to use orbital sanders effectively and safely for projects just like this.
Method 4: Wood Bleach (For Drastic Lightening)
Wood bleach is the most powerful option and is used when you need to remove the stain’s pigment and lighten the natural color of the wood itself. It’s a chemical process that alters the wood fibers. This is an advanced technique, so always test it on a scrap piece first.
There are different types, but the most common for this task is a two-part A/B bleach (sodium hydroxide and hydrogen peroxide).
Tools and Materials You’ll Need:
- Two-part (A/B) wood bleach kit
- Synthetic bristle brush or sponge
- Plastic containers for mixing
- A solution of 50/50 white vinegar and water for neutralizing
- All your safety gear—gloves, goggles, and respirator are essential
Step-by-Step Instructions:
- Prepare the Surface: Wood bleach works best on bare wood. You’ll need to strip or sand off any remaining top coat or stain first using the methods above.
- Apply Part A: Following the product directions, apply the “A” solution (sodium hydroxide) evenly across the wood.
- Apply Part B: While the first coat is still wet, apply the “B” solution (hydrogen peroxide). The chemical reaction is what does the bleaching.
- Let It Work: Allow the solution to sit and dry on the wood. You’ll see the wood lighten as it works. This can take anywhere from a few minutes to several hours.
- Neutralize the Wood: Once you’re happy with the lightness, you must neutralize the bleach to stop the chemical reaction. Wipe the surface down thoroughly with the 50/50 vinegar and water solution.
- Final Rinse and Dry: After neutralizing, rinse the surface with a clean cloth dampened with water. Then, let the wood dry for at least 48 hours before doing a light final sanding (220-grit) and applying a new finish.
Working with these chemicals requires extreme caution. The University of Minnesota Extension provides an excellent overview of the different types of wood bleaches and their safe use.
Choosing the Right Method: A Quick Comparison
Feeling a bit overwhelmed? Here’s a simple table to help you choose the best approach for your project.
| Method | Best For | Difficulty | Notes |
|---|---|---|---|
| Mineral Spirits | Fresh (under 72 hours) oil-based stain. | Easy | Gentlest method; won’t work on cured or water-based stains. |
| Chemical Stripper | Fully cured, tough stains and old finishes. | Medium | Very effective but requires good ventilation and safety gear. Can be messy. |
| Sanding | Solid wood projects where you want a completely fresh start. | Medium to Hard | Labor-intensive but gives full control. Not recommended for veneers. |
| Wood Bleach | Removing deep-set pigment and lightening the natural wood color. | Advanced | The most powerful method. Requires stripping/sanding first and proper neutralization. |
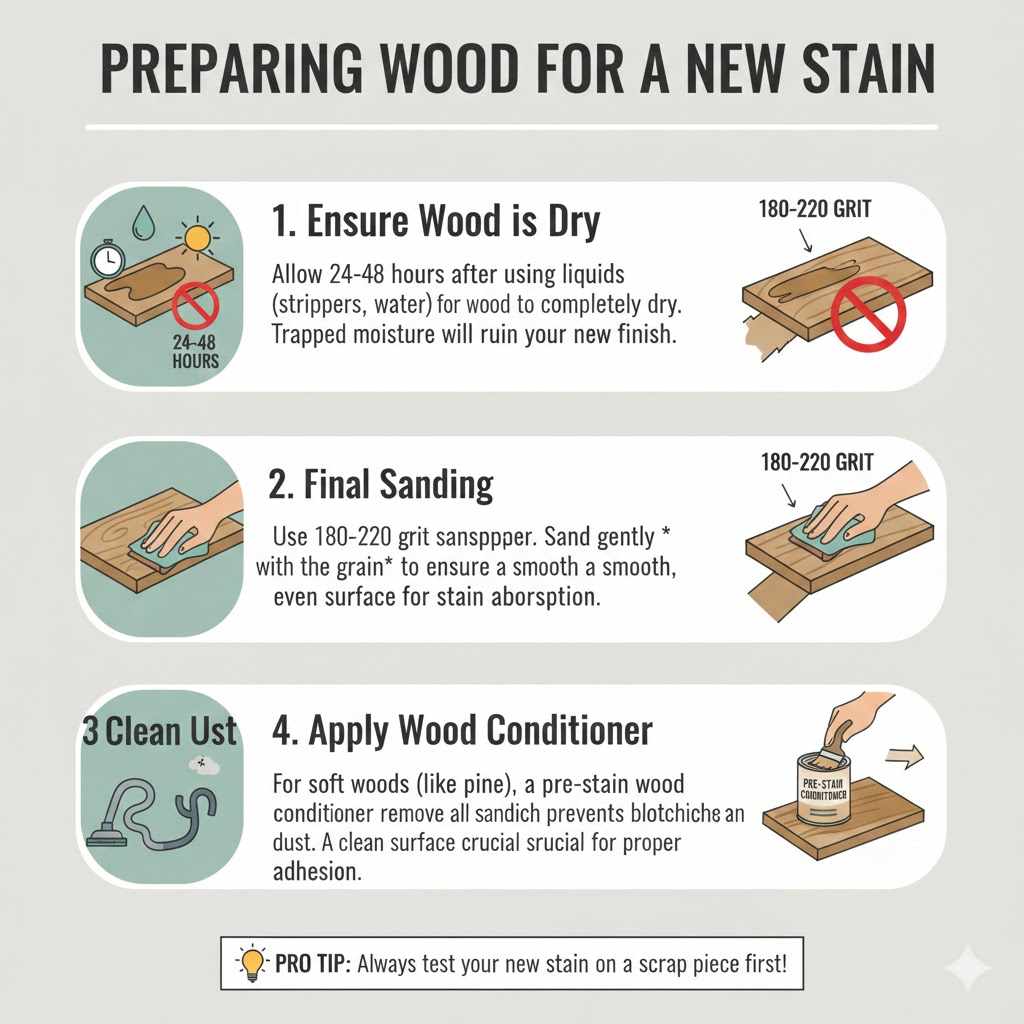
Preparing the Wood for a New Stain
Once you’ve successfully lightened or removed the old stain, your job isn’t quite done. Proper preparation is the key to making sure your next coat of stain looks perfect.
- Ensure the Wood is Completely Dry: If you used any liquids (solvents, strippers, water), give the wood at least 24-48 hours to dry out completely. Trapped moisture will ruin your new finish.
- Final Sanding: No matter which method you used, a final light sanding is essential. Use 180- or 220-grit sandpaper and sand gently with the grain. This ensures the surface is smooth and will accept the new stain evenly.
- Clean Up the Dust: Use a vacuum and tack cloth to remove every last bit of sanding dust.
- Consider a Wood Conditioner: If you are working with a soft wood like pine, applying a pre-stain wood conditioner before your new stain can prevent blotchiness and help you achieve a more even color.
Frequently Asked Questions (FAQ)
What is the easiest way to lighten a dark wood stain?
The easiest method is to wipe the surface with mineral spirits, but this only works on oil-based stain that is still fresh (dried for less than 72 hours). For fully cured stain, using a chemical stripper is often less labor-intensive than sanding the entire piece down.
Can I just apply a lighter stain on top of a dark stain?
No, this won’t work. Wood stain is transparent, designed to let the wood grain show through. Applying a lighter color over a darker one will not make the wood lighter. The dark color underneath will dominate. You must remove the dark stain first before applying a lighter one.
What about using gel stain to go lighter?
This is one exception. Gel stains are more like a thick, semi-opaque paint that sits on the surface of the wood rather than soaking in. You could use a light-colored gel stain over a darker stain to change the color, but it will obscure some of the wood grain. It’s a great option if you don’t want to go through the process of stripping and sanding.
Will lightening methods damage my wood?
When done carefully, these methods are safe for wood. The biggest risks are gouging the wood with a scraper, creating uneven spots from aggressive sanding, or not properly neutralizing wood bleach. Always be gentle, work slowly, and test your method on an inconspicuous area first.
Do I have to sand after using a chemical stripper?
Yes, you should always do a light final sanding. Chemical strippers can raise the wood grain, and there might be tiny bits of old finish left behind. A quick pass with 180- or 220-grit sandpaper will smooth the surface and prepare it perfectly for the new stain.
How long should I wait before re-staining the wood?
Patience is key! After using any method involving liquids (stripper, mineral spirits, bleach, water), you must let the wood dry completely. A minimum of 24 to 48 hours in a dry, well-ventilated space is recommended. Staining wood that is still damp will result in a blotchy, uneven finish.
Your Project is Back on Track
Seeing a stain dry too dark can be disheartening, but as you can see, it’s far from a disaster. It’s just another step in the learning process of woodworking. Every mistake is an opportunity to learn a new skill, and now you know exactly how to correct a finish and take full control of your project’s final look.
Remember to always start with the gentlest method first and work your way up only if necessary. And never, ever skip the safety precautions—a beautiful project is not worth risking your health. Take your time, test your approach, and you’ll be able to fix that finish and create something you are truly proud of. Happy woodworking!