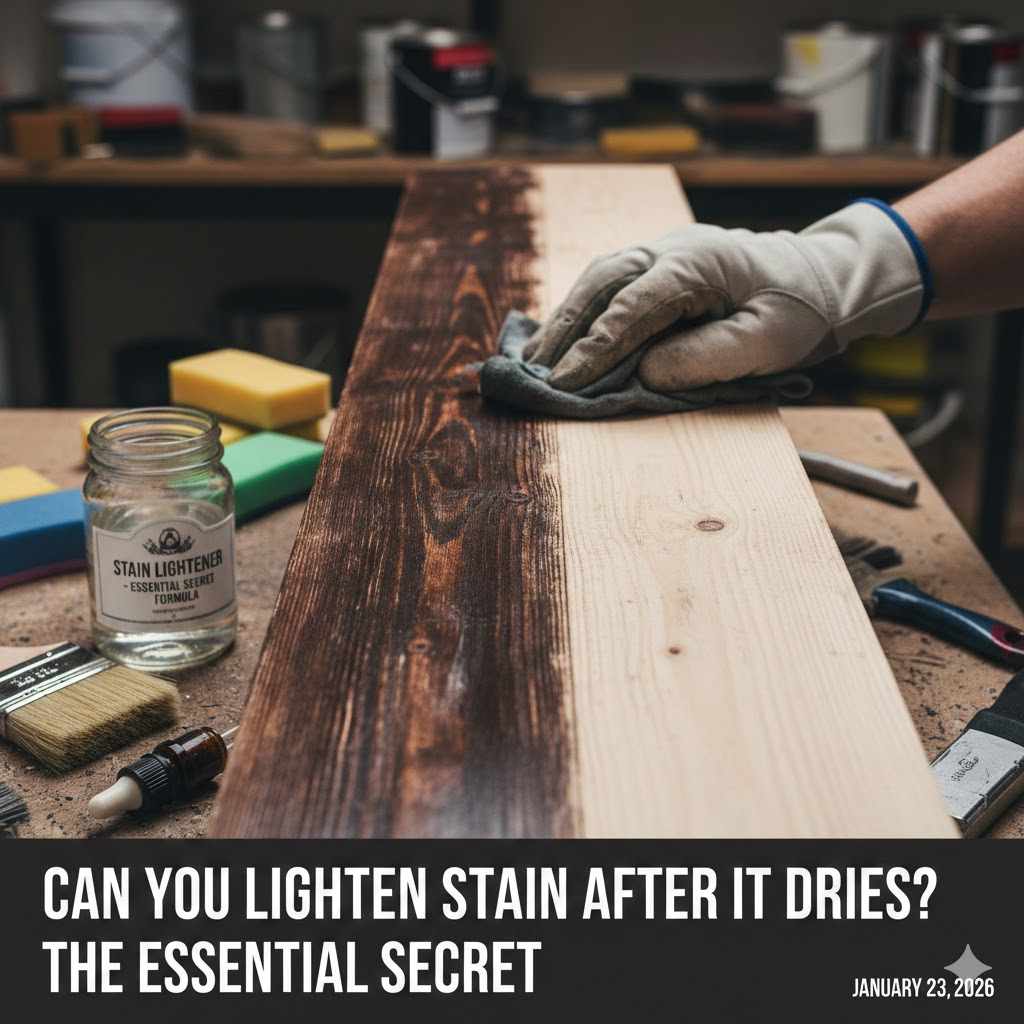
Can You Lighten Stain After It Dries? The Essential Secret
Yes, you can absolutely lighten a wood stain after it dries. The secret is to choose the right method for your project. For a slight adjustment, use a mineral spirits scrub to lift a small amount of pigment. For a more significant change, you can gently sand the surface or use a chemical stripper for a complete do-over. Always test on a hidden spot first!
Have you ever stepped back from a freshly stained project, only to feel your heart sink? That beautiful piece of pine now looks more like a dark, muddy walnut. It’s a common moment of panic for DIYers. You followed all the steps, but the color is just… too much. You might be wondering if it’s too late to fix it.
Take a deep breath. It’s going to be okay! This is one of the most common learning moments in woodworking, and it’s completely fixable. You don’t have to live with a stain color you don’t love, and you certainly don’t have to scrap your project and start over. There are simple, effective ways to lighten a wood stain, even after it has fully dried.
In this guide, I’ll walk you through the essential secrets to lightening that dark stain. We’ll cover gentle methods for small tweaks and more powerful options for big changes. Let’s turn that project frustration back into a feeling of pride.
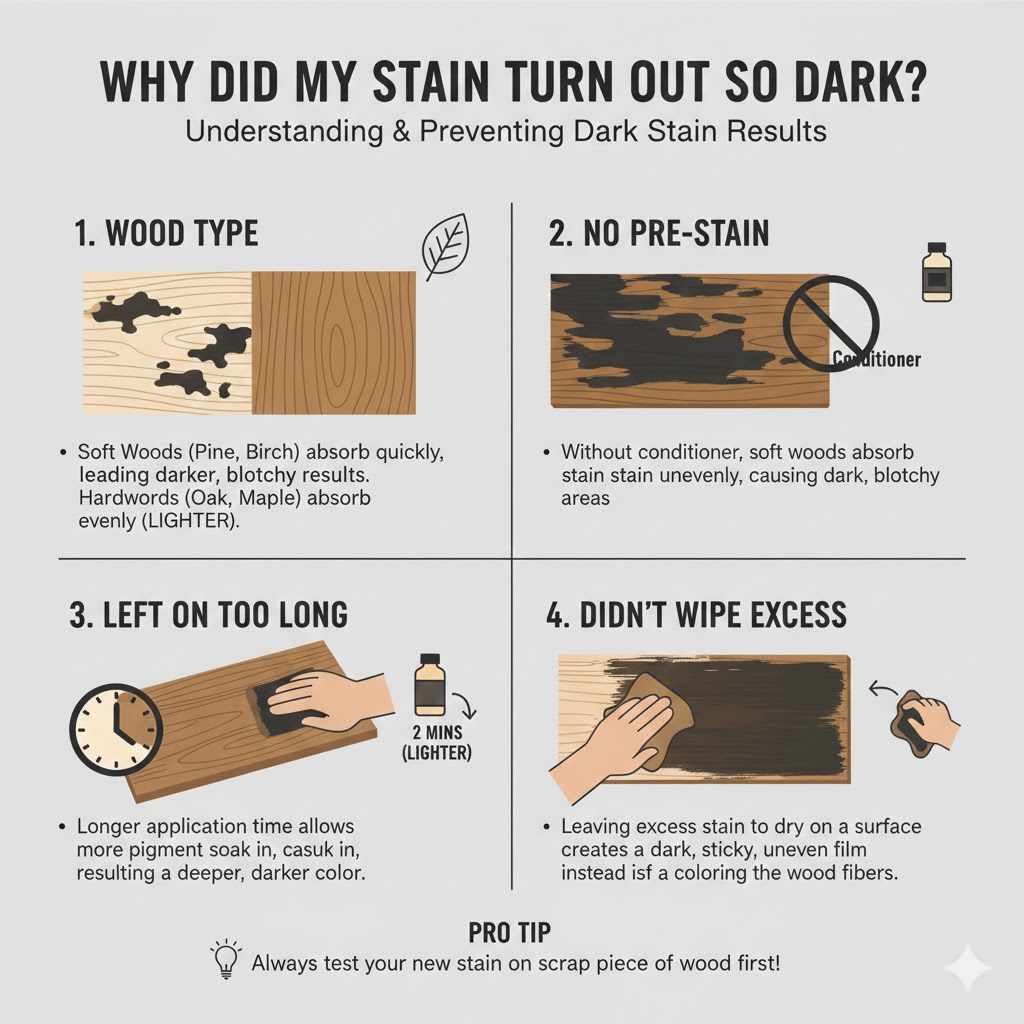
Why Did My Stain Turn Out So Dark?
Before we dive into the solutions, it helps to understand why a stain might dry darker than you expected. Knowing the cause can help you avoid the issue on your next project. It usually comes down to one of a few things:
- Wood Type: Soft woods like pine, fir, and birch are extra thirsty. They soak up stain like a sponge, which often leads to a darker and sometimes blotchy finish. Hardwoods like oak and maple are less absorbent and give you more control over the color.
- Not Using a Pre-Stain Conditioner: Especially on soft woods, a pre-stain wood conditioner helps even out the wood’s porosity. It partially seals the wood so the stain is absorbed more uniformly, preventing dark, blotchy areas.
- Leaving Stain On Too Long: The instructions on the can usually say to wipe off the excess stain after 5-15 minutes. The longer you leave it on before wiping, the more pigment soaks into the wood fibers, resulting in a deeper, darker color.
- Not Wiping Off the Excess: Forgetting to wipe away the excess stain is a common mistake. Any stain left to dry on the surface will create a dark, sticky, and uneven finish instead of just coloring the wood fibers.
The good news? No matter the reason, you have options to correct it. Let’s explore the methods you can use, from the gentlest to the most aggressive.
The Essential Secret: Your Toolkit for Lightening Dried Stain
Lightening dried stain isn’t about one single trick; it’s about choosing the right tool for the job. Your approach will depend on how much lighter you want to go and whether you’ve already applied a top coat like polyurethane or lacquer. If you have applied a top coat, you will need to remove it first using sanding or a chemical stripper before you can address the stain itself.
We’ll cover four main methods. I always recommend starting with the least aggressive method and only moving on if you need a more dramatic result.
- The Mineral Spirits Scrub (Least Aggressive)
- The Gel Stain or Stain-Wash (A Creative Approach)
- Light Sanding (Moderately Aggressive)
- Chemical Strippers (Most Aggressive)
The golden rule for all of these methods is simple: Test on an inconspicuous area first! Try it on the underside of a table, the back of a leg, or a piece of scrap wood from your project. This ensures you’ll be happy with the result before applying it to your entire piece.
Method 1: The Mineral Spirits Scrub (For a Gentle Touch-Up)
If your stain is just a little too dark and you caught it relatively early (within a day or two), this is the perfect place to start. Mineral spirits are a solvent that can re-liquefy the binders in some oil-based stains, allowing you to lift a small amount of pigment from the wood.
Tools and Materials Needed:
- Mineral spirits or paint thinner
- Clean, lint-free rags (old t-shirts work great)
- Chemical-resistant gloves
- Safety glasses
- A well-ventilated workspace
Step-by-Step Instructions:
- Safety First: Put on your gloves and safety glasses. Open windows and doors or turn on a fan. Mineral spirits have strong fumes, so good ventilation is a must.
- Apply the Mineral Spirits: Dampen a clean rag with mineral spirits. You want it wet, but not dripping everywhere.
- Gently Scrub the Surface: Rub the damp rag on the stained surface, moving with the grain of the wood. Use light to moderate pressure. You’re not trying to scrub the finish off, just gently coax some pigment out.
- Wipe and Assess: Use a separate, dry, clean rag to wipe away the loosened stain and excess mineral spirits. You should see some color transferring to your rag. Step back and look at the wood. It should be slightly lighter.
- Repeat if Necessary: You can repeat this process a few times, but you’ll get diminishing returns. This method is best for toning down a fresh stain, not for making a dark walnut look like a light oak.
- Let It Dry Completely: Allow the wood to dry for at least 24-48 hours before deciding if you are happy with the color or need to move to another method. The wood must be fully dry before you can apply a top coat.
Pros and Cons of the Mineral Spirits Method
| Pros | Cons |
|---|---|
| Very gentle and low-risk. | Only works for minor adjustments. |
| Inexpensive and easy to do. | Less effective on old, fully cured stain. |
| Doesn’t damage the wood itself. | Requires good ventilation due to fumes. |
| Great for oil-based stains. | May not work as well on water-based stains (use water instead of mineral spirits for them). |
Method 2: Using a Lighter Gel Stain or a Stain Wash
This is a slightly different approach. Instead of removing the dark stain, you’re adding a very thin layer of a lighter, opaque stain on top to visually lighten the overall color. Gel stains are great for this because they sit on top of the wood more than they soak in. A “stain wash” (also called a pickling stain) uses a very thin, watery light-colored stain to achieve a similar effect.
This is a great choice if you want to give your dark piece a slightly faded, coastal, or weathered look. For example, applying a thin coat of white or light gray gel stain over a dark brown can create a beautiful, rustic “driftwood” effect.
How to Apply a Lightening Wash:
- Choose Your Product: Select a gel stain in a light color like white, off-white, or a light gray.
- Prepare the Surface: Make sure your dark stain is fully dry and clean. You don’t need to sand it, as you want the gel stain to sit on top.
- Apply Sparingly: Using a clean rag or a foam brush, apply a very thin layer of the gel stain over the dark surface. The key is to apply just a little bit.
- Wipe It Back Immediately: Right away, use another clean rag to wipe off most of the gel stain, leaving just a hint of the light color in the wood’s grain and texture. This creates a hazy, washed-out look that makes the base color appear much lighter.
- Build Up if Needed: You can apply a second coat if the first one isn’t light enough, but always keep the coats thin and wipe them back thoroughly.
This method gives you a lot of creative control, but remember to test it on a hidden spot. The final look depends heavily on the combination of the base color and the wash color.
Method 3: Light Sanding to Remove the Surface Layer
If the mineral spirits scrub wasn’t enough, sanding is your next step. Sanding physically removes the very top layer of wood fibers that hold the most stain. This method gives you more control than chemicals but requires patience and a gentle touch to avoid creating an uneven finish.
Tools and Materials Needed:
- Fine-grit sandpaper (180 or 220 grit is a good starting point)
- A sanding block or random orbit sander
- Tack cloth or a vacuum with a brush attachment
- Dust mask
Step-by-Step Instructions:
- Get Your Gear: Wear your dust mask. Wood dust, especially from treated wood, can be harmful to breathe in.
- Start with a Fine Grit: Wrap a piece of 220-grit sandpaper around a sanding block. If you use an electric sander, be extremely careful and use very light pressure to avoid creating divots.
- Sand with the Grain: Always, always sand in the direction of the wood grain. Going against the grain will create ugly scratches that will be very noticeable when you apply a new finish.
- Use Even Pressure: Apply light, even pressure across the entire surface. Your goal is to just skim the top layer off. You will see the wood begin to lighten as you remove the most heavily stained fibers.
- Check Your Progress: Stop frequently, wipe away the dust with a tack cloth or vacuum, and check the color. The goal is an evenly lightened surface, not one with light and dark patches.
- Clean Thoroughly: Once you’re happy with the lighter color, vacuum all the dust from the surface and the surrounding area. Then, go over it one last time with a tack cloth to ensure it’s perfectly clean before applying a new stain or a clear top coat. For more details on proper finishing techniques, the U.S. Forest Service offers an in-depth guide on wood finishing.
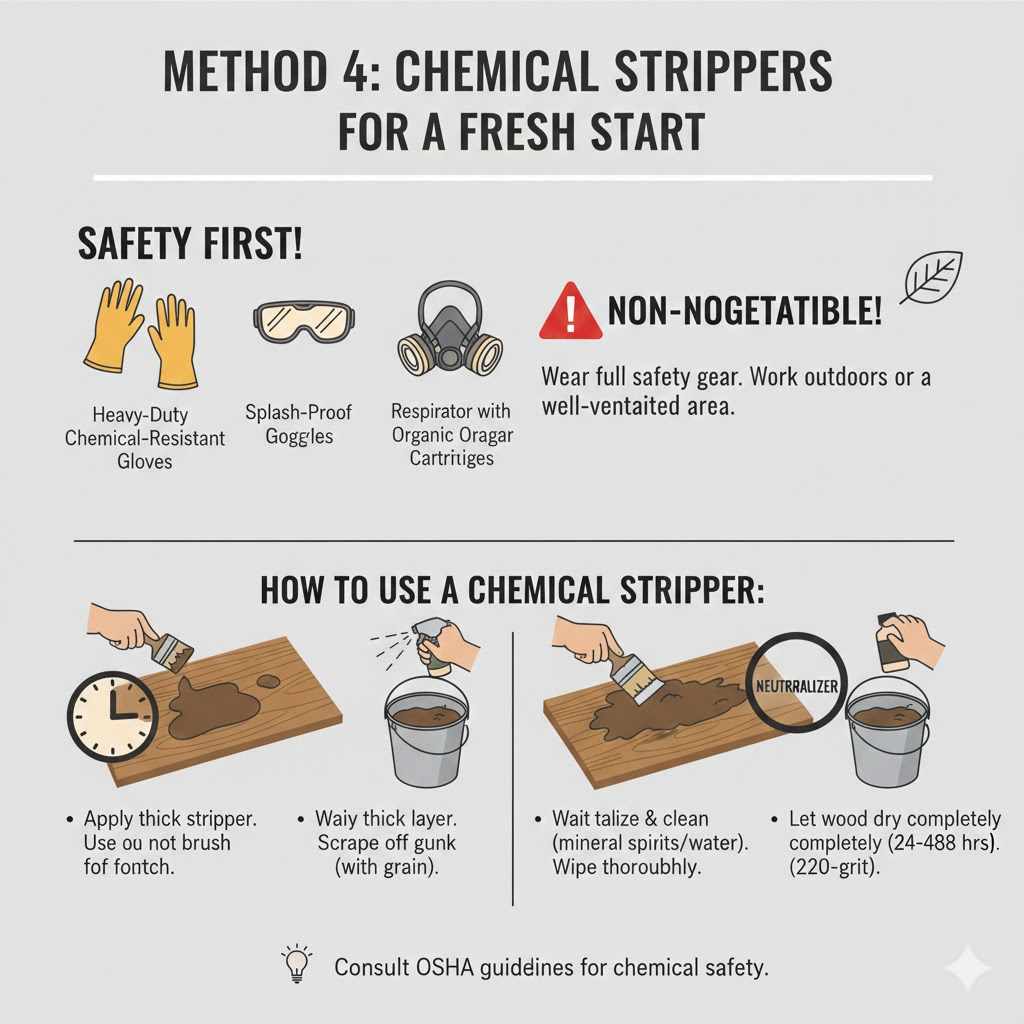
Method 4: Chemical Strippers for a Fresh Start
This is the nuclear option. If you need to dramatically lighten the color, or if none of the other methods have worked, a chemical stripper is your most effective choice. It will remove the stain (and any top coat) almost completely, bringing you back to nearly bare wood. This method is messy and requires serious safety precautions.
Safety First—This is Non-Negotiable!
Chemical strippers are caustic and can harm your skin, eyes, and lungs. Before you even open the can, you must have the proper safety gear and work in an extremely well-ventilated area, preferably outdoors.
- Heavy-Duty Chemical-Resistant Gloves: Standard latex or vinyl gloves will dissolve. Get the thick rubber ones.
- Splash-Proof Goggles: Protect your eyes from accidental splashes.
- Respirator with Organic Vapor Cartridges: A simple dust mask is not enough to protect you from the fumes.
Your safety is the most important part of any project. For guidance on working with chemicals, consult resources from the Occupational Safety and Health Administration (OSHA).
How to Use a Chemical Stripper:
- Protect Your Workspace: Lay down a drop cloth or thick plastic sheeting to protect the floor or surface you’re working on.
- Apply the Stripper: Use a cheap, disposable paintbrush to apply a thick, even layer of the stripper to the wood. Don’t brush it back and forth like paint; lay it on and leave it alone.
- Wait for it to Work: Follow the manufacturer’s instructions for how long to let the stripper sit. You’ll see the finish start to bubble and lift—this is how you know it’s working.
- Scrape it Off: Use a plastic putty knife or scraper to gently scrape off the gooey mess. Work with the grain to avoid gouging the wood. Collect the gunk in a disposable container.
- Neutralize and Clean: Most strippers require a neutralizing agent, often mineral spirits or a water wash, to stop the chemical reaction. Check the product’s instructions. After neutralizing, clean the wood thoroughly with a clean rag.
- Let It Dry Completely: The wood must be 100% dry before you can do anything else. This can take a day or more. Once dry, you may need to do a very light sanding with 220-grit sandpaper to smooth the wood fibers before you re-stain.
Choosing the Right Method: A Quick Comparison
Still not sure which path to take? This table should help you decide.
| Method | Aggressiveness | Difficulty | Best For… |
|---|---|---|---|
| Mineral Spirits Scrub | Low | Easy | Slightly toning down a fresh, dark oil-based stain. |
| Gel Stain Wash | Low | Easy-Medium | Creating a stylized, weathered, or “pickled” look over the existing stain. |
| Light Sanding | Medium | Medium | Evenly lightening the color by a few shades and preparing for a new finish. |
| Chemical Stripper | High | Difficult | Removing the stain almost entirely for a complete color change. |
Frequently Asked Questions (FAQ)
1. Can I just paint over a dark stain?
Yes, you can, but you must prepare the surface properly first. If the stained surface has a glossy top coat, you’ll need to lightly sand it to scuff it up so the primer can grip. Then, apply a high-quality, stain-blocking primer before painting. If you don’t use a primer, the dark stain can bleed through the paint over time.
2. How can I avoid making my stain too dark next time?
The best way is to always test your stain on a scrap piece of the same wood first. To keep the color light, apply the stain, and wipe off the excess almost immediately. You can always apply a second coat if you want it darker, but it’s much harder to lighten it. Using a pre-stain wood conditioner on soft woods also helps prevent it from getting too dark and blotchy.
3. Can I use bleach to lighten wood stain?
While wood bleach is a product used to remove the natural color from wood itself, it is generally not recommended for lightening a stain. It’s an aggressive chemical process that can be unpredictable and may damage the wood fibers, making it difficult to re-stain evenly. It’s best to stick to the methods outlined above for more controlled and reliable results.
4. Will mineral spirits completely remove the stain?
No, mineral spirits will not remove the stain completely. A mineral spirits scrub is only designed to lift a small amount of the pigment from a recently applied oil-based stain. It reactivates the stain just enough to let you wipe some of it away, lightening the color by a shade or two. For complete removal, you’ll need to use sanding or a chemical stripper.
5. Does the type of wood affect how I lighten the stain?
Absolutely. Softwoods like pine are more porous and absorb stain deeper, which can make them harder to lighten with gentle methods like mineral spirits. You might need to move to sanding more quickly with softwoods. Hardwoods like oak are denser and the stain sits more on the surface, making it easier to lift with solvents or light sanding. Veneered furniture is very thin, so be extremely careful if you choose to sand it—you could easily sand right through the top layer.
6. What is the safest way to lighten stain?
The safest method is the mineral spirits scrub, as it involves the mildest chemicals and no dust creation. Light sanding is also relatively safe as long as you wear a dust mask. The most hazardous method is using a chemical stripper, which requires full personal protective equipment (PPE), including a respirator, goggles, and chemical-resistant gloves.
Conclusion: Your Project is Back on Track
Seeing a wood finishing project turn too dark can feel like a disaster, but it’s truly just a detour. Whether you need a small adjustment or a complete overhaul, you now have the knowledge and the tools to fix it. The essential secret is simply knowing your options and starting with the gentlest one first.
Remember to work patiently, always test in a hidden area, and prioritize your safety, especially when working with chemicals. Every woodworking project is a learning experience, and learning how to correct a finish is a valuable skill that will give you the confidence to tackle any project. So go ahead, lighten that stain, and get ready to apply a finish you truly love.