Can You Paint Over Deck Stain Genius Essential Tips
Yes, you can absolutely paint over deck stain, but success depends entirely on proper preparation. The key is to thoroughly clean the surface, scuff-sand it to create a grip, and use a high-quality bonding primer designed for glossy or slick surfaces. Skipping these crucial prep steps will almost certainly lead to the paint peeling and failing.
Hello there, fellow DIYers! It’s Md Meraj, your friendly guide in the workshop. I know how it is. You look at your stained deck, and while it was beautiful once, you’re ready for a change. You dream of a solid, modern color—maybe a sleek gray or a classic white. Then the big question hits: can you just paint right over that old stain?
It’s one of the most common questions I hear, and it’s a great one. The thought of stripping an entire deck down to bare wood can feel overwhelming. The good news is, you often don’t have to! With the right know-how and a bit of elbow grease, you can successfully paint over your deck stain and achieve a durable, beautiful finish that lasts.
In this guide, I’m going to walk you through everything, step-by-step. We’ll figure out what kind of stain you have, gather the right materials, and follow a simple process to transform your deck. Let’s build that confidence and get this project done right.
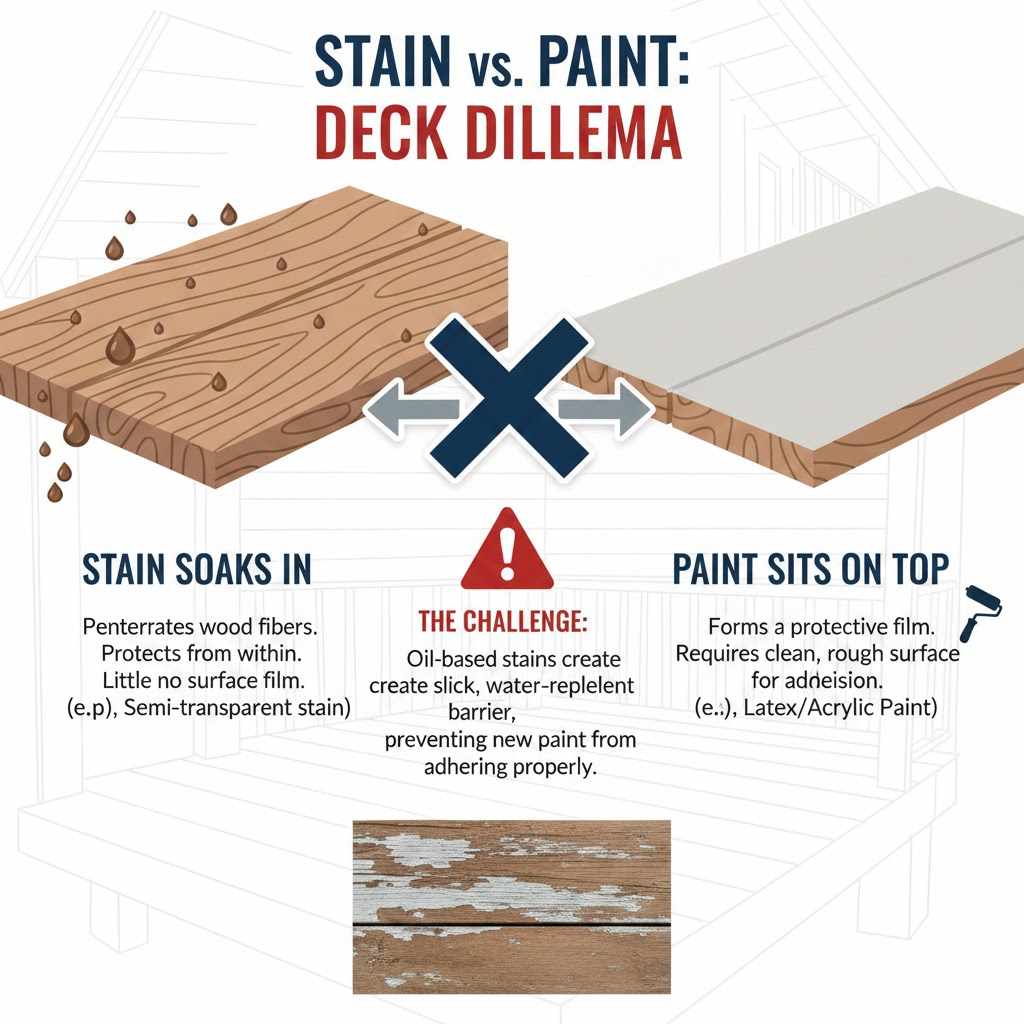
First, Understand the Challenge: Why Stain and Paint Can Be Foes
Before we grab a brush, it’s important to understand why this isn’t as simple as slapping on a coat of paint. Deck stain and paint behave very differently.
- Stain Soaks In: Most deck stains are designed to penetrate the wood fibers. This protects the wood from the inside out. Some stains, especially semi-transparent or transparent ones, leave very little film on the surface.
- Paint Sits on Top: Paint, on the other hand, is designed to form a protective film on top of the wood. For it to stick, it needs a clean, stable, and slightly rough surface to grab onto.
The problem arises when the old stain prevents the new paint from getting that solid grip. This is especially true with oil-based stains, which can leave a slick, water-repellent surface that new latex or acrylic paint will struggle to adhere to.
The Most Important Step: Identify Your Deck Stain
Everything that follows depends on this one step. You need to know if your deck was treated with an oil-based or a water-based stain. Trying to paint over a fresh or non-cured oil-based stain without the right prep is a recipe for peeling paint.
Here’s a simple test you can do right now:
The Water Droplet Test:
- Find a clean, representative spot on your deck.
- Sprinkle a few drops of water onto the surface.
- Watch what happens for a few minutes.
- If the water beads up and sits on the surface, you likely have an oil-based stain that is still repelling moisture. This surface will need extra attention before painting.
- If the water soaks into the wood fairly quickly, turning it darker, you likely have a water-based stain or a very old, weathered oil-based stain. This is generally easier to paint over.
Oil-Based vs. Water-Based Stain: What You Need to Know
Here is a quick breakdown to help you understand the differences when it comes to painting.
| Stain Type | How It Affects Painting | Key Prep Step |
|---|---|---|
| Oil-Based Stain | Penetrates deeply and can leave an oily or waxy residue that blocks paint adhesion. Requires a strong primer. | Thorough cleaning and sanding, followed by a stain-blocking, oil-based, or bonding primer. |
| Water-Based Stain | Forms more of a film on the surface and is generally more compatible with latex/acrylic deck paints. | Thorough cleaning and light scuff-sanding are usually sufficient before using a high-quality acrylic primer. |
The Ultimate Checklist: Tools and Materials You’ll Need
Having everything ready before you start makes the whole process smoother. No one likes running to the hardware store mid-project!
For Cleaning and Prep:
- Stiff-bristled brush or push broom
- Garden hose with a high-pressure nozzle (or a pressure washer on a low setting)
- Deck cleaner
- Bucket
- Scraper or 5-in-1 tool (for any peeling areas)
- Orbital sander or pole sander
- Medium-grit sandpaper (80 to 120-grit)
- Safety glasses and dust mask
- Gloves
For Painting:
- High-quality exterior bonding primer (stain-blocking is a plus)
- High-quality acrylic latex exterior deck paint or porch and floor paint
- Paint tray and liners
- Paint roller with an extension pole
- Paintbrushes (a 2-3 inch angled brush is great for details)
- Painter’s tape
- Drop cloths or plastic sheeting
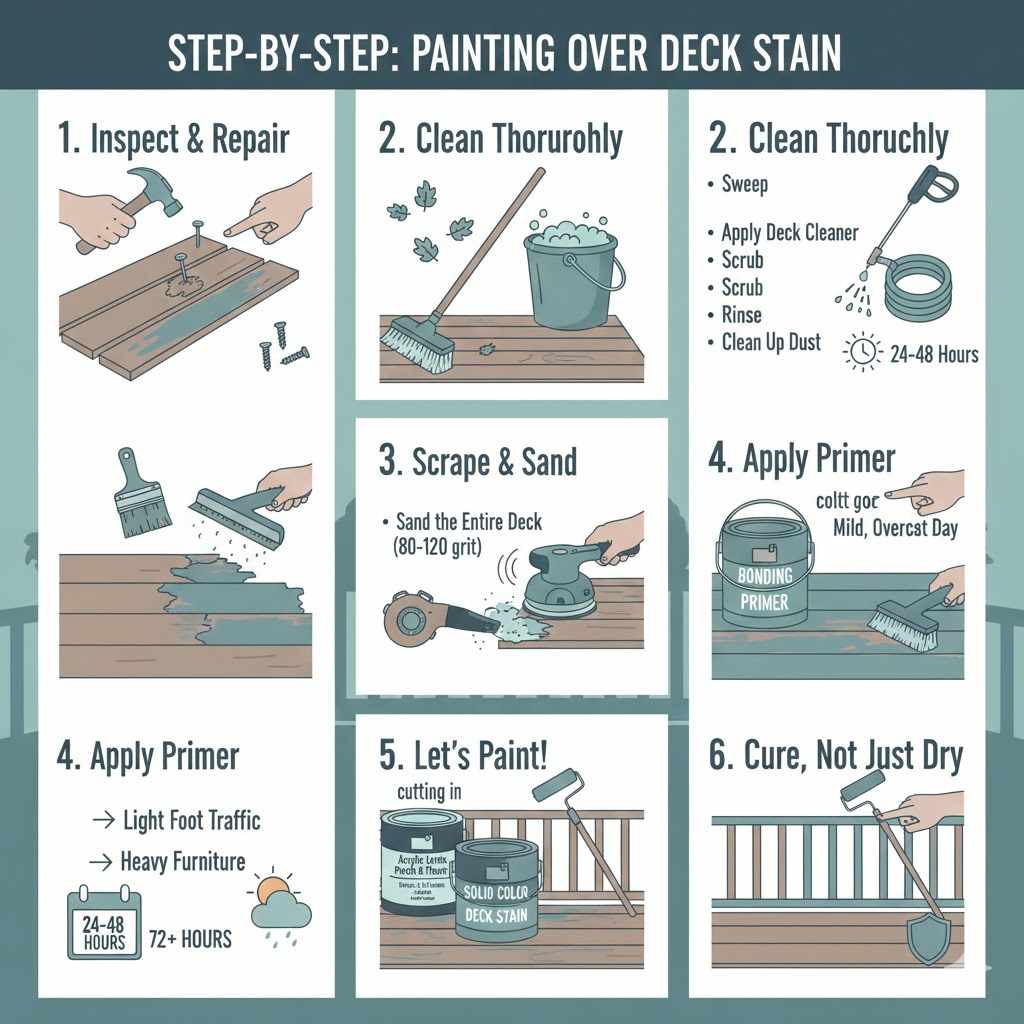
Your Step-by-Step Guide to Painting Over Deck Stain
Ready to get started? Let’s break this down into simple, manageable steps. Follow these in order, and you’ll be on your way to a fantastic new look for your deck.
Step 1: Inspect and Repair Your Deck
Before any cleaning begins, give your deck a thorough once-over. Paint can hide some imperfections, but it won’t fix structural problems. Look for:
- Loose or Popped Nails/Screws: Pound down nails or replace them with deck screws, which hold better.
- Rotten or Damaged Boards: Probe any suspicious-looking spots with a screwdriver. If it’s soft and spongy, the board needs to be replaced. Painting over rot will only trap moisture and make it worse.
- Loose Railings or Stairs: Ensure everything is secure and safe.
Make all necessary repairs now. It’s much easier to do this before you invest time and money into painting.
Step 2: Clean the Deck Thoroughly
You cannot paint over dirt, mildew, or grime. The surface must be perfectly clean for the primer and paint to stick. This is a non-negotiable step!
- Sweep Away Debris: Use your broom to clear off all leaves, pine needles, and loose dirt.
- Apply Deck Cleaner: Mix your deck cleaner with water in a bucket according to the manufacturer’s instructions. Apply it liberally to the deck surfaces, working in small, manageable sections.
- Scrub: Use your stiff-bristled brush to scrub the deck boards. This will lift stubborn dirt and kill any mold or mildew. According to the U.S. Forest Service, removing mildew is crucial for wood longevity.
- Rinse Completely: Use your garden hose or a pressure washer on a low setting (stay below 1500 PSI to avoid damaging the wood) to rinse the deck thoroughly. Make sure no soapy residue is left behind.
- Let It Dry: Allow the deck to dry completely. This can take 24-48 hours, depending on the weather. Don’t rush this—painting on damp wood will trap moisture and cause the paint to fail.
Step 3: Scrape and Sand for Success
This is where you create the perfect surface for the primer to grab onto. It is the most important physical step in the process.
- Scrape Loose Stain: If your current stain is peeling or flaking anywhere, use a scraper to remove all the loose bits. You want a solid, stable surface.
- Sand the Entire Deck: Using your orbital sander or pole sander with 80- to 120-grit sandpaper, go over the entire deck. Your goal isn’t to remove all of the old stain down to bare wood. Instead, you just want to “scuff up” the surface, removing the glossy top layer and creating a microscopic texture for the primer to bond with. Pay extra attention to high-traffic areas and railings.
- Clean Up the Dust: After sanding, there will be a lot of dust. Sweep or use a leaf blower to remove it all. You can even wipe the surface down with a damp tack cloth to be extra sure.
Step 4: Choose and Apply the Right Primer
Primer is your secret weapon. It does two critical things: it sticks to the tricky old stain, and it provides a perfect, uniform surface for your paint to stick to. Do not skip primer!
Choosing the right one is key. Look for a high-quality exterior primer with these words on the label:
- Bonding Primer: This is designed specifically to adhere to slick or difficult surfaces.
- Stain-Blocking Primer: If you are painting over a dark or reddish stain (like cedar or redwood), a stain-blocking primer will prevent “tannin bleed,” where the old color leaches through your new paint.
If you identified your stain as oil-based, an oil-based primer is often the safest bet for maximum adhesion. However, many new water-based bonding primers are also formulated to work over old oil finishes.
Application:
- Apply the primer using your brush for corners and railings and a roller for the main deck boards.
- Apply a thin, even coat. You don’t need to completely hide the old stain—you just need a consistent layer of primer.
- Follow the manufacturer’s instructions for dry time. Don’t rush to the next step.
Step 5: Let’s Paint!
Now for the fun part—seeing your vision come to life! You’ve done all the hard work, and this step is your reward.
| Product Choice | Best For | Considerations |
|---|---|---|
| Acrylic Latex Porch & Floor Paint | Most DIY projects. Offers flexibility, easy cleanup, and good durability against foot traffic. | Dries faster, so work in sections. Requires at least two coats for best results. |
| Solid Color Deck Stain | A great alternative to paint. It behaves like paint but is formulated specifically for deck surfaces, offering better breathability. | Can still peel if prep is poor but is generally more forgiving on horizontal surfaces than standard house paint. |
Application Tips:
- Check the Weather: Don’t paint in direct, hot sunlight or if rain is in the forecast. Aim for a mild, overcast day.
- Cut In First: Use your brush to paint along the edges of the house, around railings, and in between boards (a technique called “cutting in”).
- Roll the Boards: Use your roller with the extension pole to paint the main deck surfaces. Maintain a wet edge to avoid lap marks.
- Apply a Second Coat: Let the first coat dry completely according to the can’s instructions. A second coat is almost always necessary for an even color and proper durability.
Step 6: Cure, Don’t Just Dry
Your deck might feel dry to the touch in a few hours, but it isn’t fully “cured.” Curing is the chemical process where the paint hardens to its maximum durability. This can take several days.
- Wait at least 24-48 hours before allowing light foot traffic.
- Wait up to 72 hours or more before moving heavy furniture back onto the deck.
- Protect it from rain during the curing period if possible.
Frequently Asked Questions (FAQ)
1. Do I absolutely have to sand before painting over stain?
Yes, 100%. Sanding is arguably the most critical step. It de-glosses the old finish and creates a rough texture that primer needs to mechanically bond to. Even a light scuff-sanding makes a world of difference. Skipping this step is the #1 reason paint peels off decks.
2. What’s the best primer for painting over an oil-based deck stain?
An exterior oil-based, stain-blocking primer will give you the best adhesion and prevent tannins from bleeding through. However, modern acrylic (water-based) bonding primers have come a long way and are also excellent choices, offering easier cleanup.
3. Can I use regular exterior house paint on my deck?
It’s not recommended. Wall paint isn’t formulated to withstand foot traffic, standing water, and the harsh abrasion that decks endure. Always use a product specifically labeled as “Porch & Floor Enamel,” “Deck Paint,” or a solid color deck stain.
4. How long does a painted deck last?
With proper preparation and high-quality products, a painted deck can look great for 3 to 5 years. High-traffic areas and horizontal surfaces (the floor) will show wear before vertical surfaces like railings. Expect to do minor touch-ups every year or two to keep it looking fresh.
5. My old stain is peeling badly. Should I still just paint over it?
No. If the stain is extensively peeling and flaking, painting over it will not solve the problem. The new paint will just stick to the unstable old stain, which will then peel off, taking your new paint with it. In cases of widespread failure, you must scrape and sand until you reach a solid, stable surface, or consider stripping the deck completely before priming and painting.
6. How long should I wait before painting a newly stained deck?
If the deck was recently stained, you must wait for the stain to fully cure before even thinking about painting. For oil-based stains, this can take anywhere from a few days to several weeks, depending on the product and weather. It must be completely dry and not feel oily to the touch. It’s always best to let new stain weather for at least a few months before painting.
Conclusion: Your Deck, Your Masterpiece
So, can you paint over deck stain? You bet you can! It’s not a shortcut, but it is a smart path to a fresh new look for your outdoor space. The secret isn’t in a magic paint or a special tool; it’s in the careful, methodical preparation you do before that first can of paint is even opened.
By cleaning, sanding, and priming correctly, you’re not just painting your deck—you’re creating a durable, long-lasting finish that you can be proud of. It takes a little patience, but the result is a beautiful transformation that will make your deck the star of your backyard. Now go enjoy your hard work. You’ve earned it!