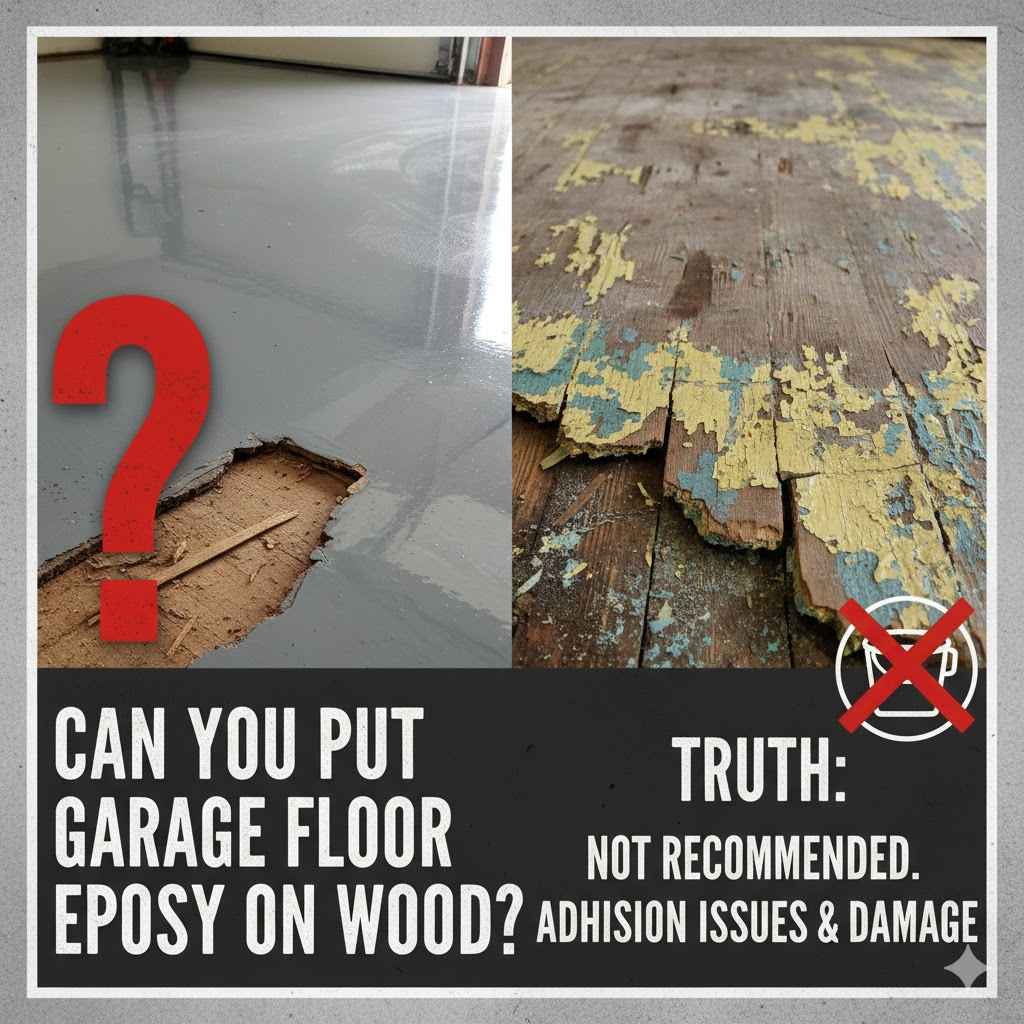
Can You Put Garage Floor Epoxy on Wood? Truth
Many people wonder, Can You Put Garage Floor Epoxy on Wood? Truth is often a tricky question for DIYers. It seems like a great idea to get that shiny, durable garage floor.
But wood is different from concrete, and you need to know the right way to do it. It can feel confusing, but don’t worry. This guide will show you exactly what to do, step by step, so you can get a great-looking garage floor without any fuss.
We’ll cover all the important parts you need to know.
Garage Floor Epoxy on Wood Yes Or No
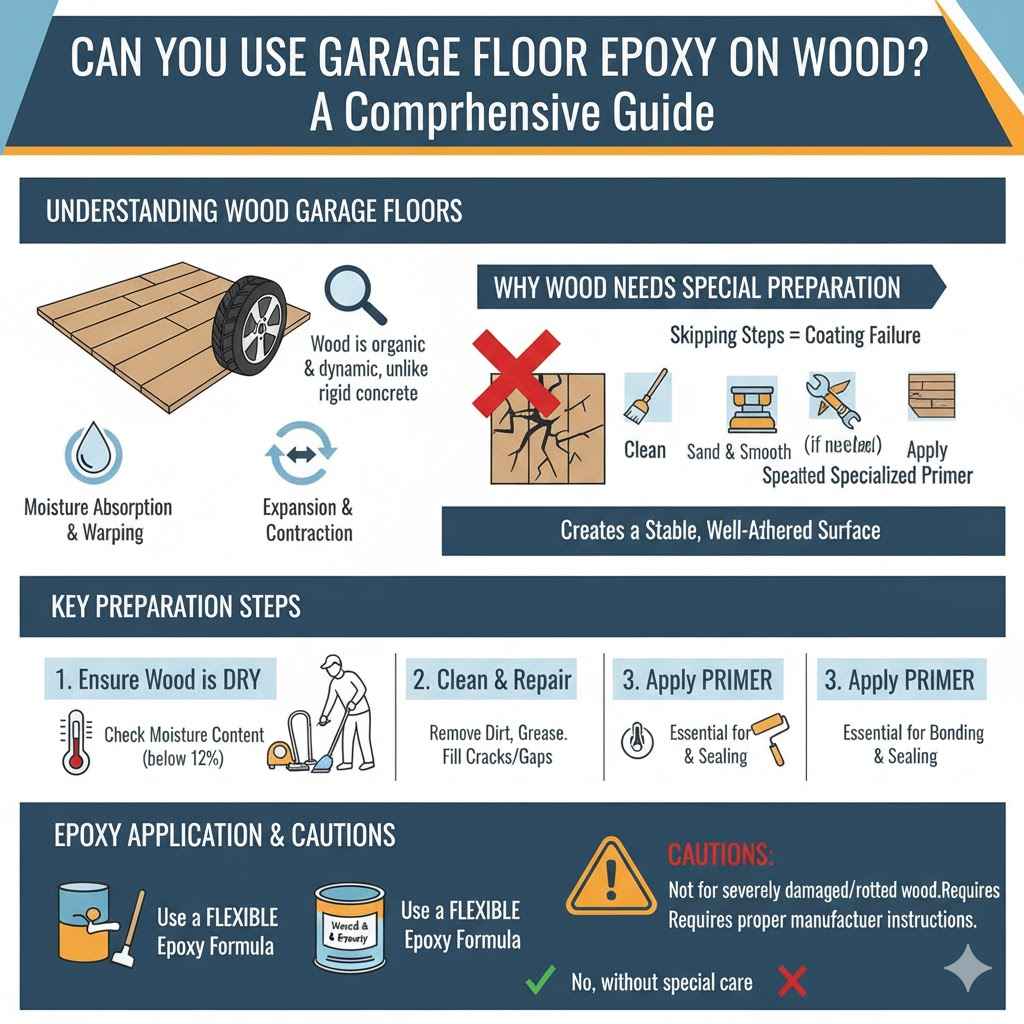
Deciding if you can put garage floor epoxy on wood is a common question. The answer isn’t a simple yes or no, but with the right preparation, it’s definitely possible. Wood floors in garages present unique challenges compared to concrete.
They can expand and contract with temperature and moisture changes, which can affect how the epoxy adheres. Also, wood might not be as strong or porous as concrete, meaning it needs special treatment. Getting this right ensures your epoxy coating lasts and looks good for a long time.
Understanding Wood Garage Floors
Garage floors made of wood are less common than concrete but still exist, especially in older homes or specific regions. These floors can be made of plywood, planks, or even particleboard. The main issues with wood are its natural tendency to absorb moisture and its flexibility.
Unlike concrete, which is rigid, wood can warp, sag, or even rot if not properly maintained and sealed. This means you can’t just treat a wood floor like a concrete one when it comes to coatings.
Moisture is a big enemy for wood floors in garages. Water from rain, snow melt, or even spills can seep into the wood. Over time, this leads to swelling, rot, and a weakened structure.
If the wood is not properly sealed, the epoxy might not stick well or could trap moisture underneath, causing it to peel or bubble.
Wood also expands and contracts with changes in humidity and temperature. This movement, though small, can create stress points for a rigid coating like epoxy. If the epoxy is too brittle, it might crack or chip as the wood moves.
Therefore, understanding these properties is key to a successful epoxy application on wood.
Why Wood Needs Special Care
Wood floors in garages require special preparation because they are organic and dynamic. They are more susceptible to damage from chemicals, oils, and heavy impacts than concrete. Also, the surface of wood can be uneven or contain splinters, which need to be addressed before any coating is applied.
Skipping these steps often leads to premature failure of the epoxy coating.
The primary goal when preparing a wood garage floor for epoxy is to create a stable, well-adhered surface. This involves ensuring the wood is dry, clean, and free from any contaminants. It also means reinforcing the wood if necessary and applying a primer that bonds well to both wood and epoxy.
Think of it like preparing a wall for paint. You wouldn’t just paint over dirt and holes. You’d clean it, sand it, and maybe even fill any cracks.
The same logic applies to your garage floor, but with added considerations for moisture and movement.
Preparing Wood For Epoxy Coating
Getting the wood surface ready is the most critical part of applying garage floor epoxy to wood. This phase involves several steps designed to ensure the epoxy sticks properly and lasts for years. You need to clean the wood thoroughly, repair any damage, and then seal it appropriately.
Rushing through preparation is the quickest way to end up with a failed epoxy job.
The goal here is to create a smooth, stable, and receptive surface. This means eliminating dust, grease, and moisture, and ensuring the wood itself is sound. Proper preparation also helps prevent issues like delamination, bubbling, or cracking later on.
We will walk through each step carefully. This includes cleaning, repairing, and priming. Following these instructions will give your epoxy the best chance to adhere well.
Cleaning the Wood Surface
Before you even think about applying any epoxy, the wood floor must be spotlessly clean. Grease, oil, dirt, and old paint can all prevent the epoxy from bonding. You’ll need to start with a thorough sweeping or vacuuming to remove loose debris.
After that, a good degreaser is essential for tackling any oily stains common in garages.
Use a heavy-duty degreaser specifically designed for concrete or garage floors. Apply it liberally and scrub the floor with a stiff brush or broom. Let the degreaser sit for a few minutes to break down the grease.
Then, rinse the floor thoroughly with clean water. You might need to repeat this process, especially if your garage floor has a lot of oil spots. Make sure all cleaning residues are washed away.
For stubborn stains, you might need a stronger cleaner or even a pressure washer, but be careful not to saturate the wood. The key is to remove all contaminants. After rinsing, allow the floor to dry completely.
This can take several days, depending on humidity and air circulation.
Moisture meters can be helpful here. You want to ensure the moisture content in the wood is below 15%, ideally even lower. Trapped moisture is a common cause of epoxy failure on wood.
Repairing Damage and Unevenness
Once the wood is clean and dry, inspect it for any damage. Look for loose boards, holes, cracks, or splintered areas. Loose boards need to be secured by screwing them down firmly to the joists.
Holes and larger cracks should be filled with a wood filler or epoxy-specific patching compound. Make sure the filler is designed for exterior or garage use and can withstand vehicle weight.
For significant damage or rot, you may need to
After filling, let the filler dry completely according to the manufacturer’s instructions. Then, sand the entire surface of the wood floor. Use a coarse-grit sandpaper (around 60-80 grit) to remove any roughness, old finishes, or dried filler.
Follow up with a finer grit (around 100-120 grit) for a smoother finish. This sanding helps to open up the wood pores, making it more receptive to primers and epoxy.
Always wear a dust mask and safety glasses when sanding. After sanding, vacuum up all the dust thoroughly. You can also wipe down the floor with a tack cloth or a damp (not wet) rag to pick up any remaining fine dust particles.
Sealing the Wood Floor
This is a crucial step for wood garage floors. Epoxy itself is not designed to penetrate wood deeply or to handle wood’s natural movement. Therefore, you need to apply a suitable primer or sealer first.
This primer acts as a barrier, preventing moisture from the wood from reaching the epoxy and providing a stable base for the epoxy to bond to.
Many experts recommend using a specialized moisture-curing urethane primer or a high-solids epoxy primer designed for wood. Some epoxy kits might offer specific wood primers, so check your product’s recommendations. Apply this primer in thin, even coats.
It’s often better to apply two thin coats than one thick coat. Ensure each coat dries completely before applying the next.
The primer should also help to seal the wood grain and create a smoother surface. It’s important to follow the drying times specified by the primer manufacturer. If you are using a 100% solids epoxy primer, you might have a specific window of time to apply the topcoat of epoxy.
Overlap your passes slightly when rolling to avoid gaps.
Some people also consider adding a layer of reinforcement before priming. For example, if you have plywood subflooring, you might add another layer of thinner plywood or a reinforcing mat. This can add strength and stability, but it’s usually only necessary for very old or questionable wood subfloors.
The goal of sealing is to lock down the wood and provide a consistent surface.
Can You Put Garage Floor Epoxy on Wood Truth Revealed
The truth is, putting garage floor epoxy directly onto untreated wood is generally not recommended. Wood is a flexible, porous material that reacts differently to moisture and temperature changes than concrete. However, with the correct preparation, you absolutely can achieve a durable and attractive epoxy-coated wood garage floor.
The key lies in treating the wood to make it stable and receptive to the epoxy.
This involves understanding the wood’s properties and using specific products designed to overcome its limitations. The process is more involved than applying epoxy to concrete, but the results can be just as rewarding. We will explore the specific types of epoxy and the essential steps that make this project a success.
Many DIYers try to skip the prep work or use the wrong materials, leading to disappointment. Following a structured approach, however, leads to a beautiful, long-lasting finish.
Choosing the Right Epoxy System for Wood
Not all epoxy floor coatings are created equal, and some are better suited for wood than others. For wood garage floors, it’s often best to use a high-solids epoxy or a 100% solids epoxy system. These coatings are thicker and more durable than water-based epoxies.
They also tend to be more flexible, which can help them accommodate the slight movement of wood.
Some epoxy manufacturers offer specific kits designed for wood substrates. If you can find one of these, it’s usually your best bet. These kits often include the appropriate primer and specific instructions for wood.
If a wood-specific kit isn’t available, look for a high-quality, two-part epoxy designed for garages that explicitly states it can be used over a properly primed wood surface.
Avoid single-part epoxy paints, as they are typically not as durable or chemically resistant as two-part systems. The two-part system involves mixing a resin and a hardener, which creates a chemical reaction to cure into a strong, protective layer. This reaction is what gives epoxy its renowned toughness.
When selecting a system, pay close attention to the product’s technical data sheet. This document will provide information on suitable substrates, surface preparation, and application temperatures. If wood is not mentioned, it’s safer to assume it’s not suitable or requires very specific primers.
Understanding Epoxy Components
Epoxy floor coatings are typically made of two main components: a resin and a hardener. When these two parts are mixed together, a chemical reaction called polymerization occurs. This reaction creates a hard, durable, and often glossy plastic-like material.
The quality and type of resin and hardener significantly impact the epoxy’s performance characteristics, such as its strength, flexibility, chemical resistance, and cure time.
Resin: The resin is usually a liquid polymer, often based on Bisphenol A diglycidyl ether (BADGE). It forms the bulk of the coating and provides many of its adhesive and protective properties. Different types of resins can be used to create epoxies with varying characteristics.
For example, some resins are modified to increase flexibility or UV resistance.
Hardener: The hardener, also known as a curing agent, is mixed with the resin to initiate the polymerization process. Hardeners come in various chemical families, such as amines (aliphatic, cycloaliphatic, aromatic), polyamides, and anhydrides. The choice of hardener dictates the cure speed, chemical resistance, and overall properties of the cured epoxy.
For instance, aliphatic amines often provide good color stability and UV resistance, while aromatic amines can offer superior chemical resistance.
When you mix the resin and hardener, you start a clock. This is called the pot life or working time. You must apply the mixed epoxy before it cures in the bucket.
High-solids epoxies have less solvent and thus a shorter pot life, but they offer a thicker, more durable film.
The Importance of a Proper Primer
As mentioned before, priming is absolutely essential when applying epoxy to wood. Wood is porous and can off-gas certain compounds. Moisture within the wood can also prevent proper adhesion.
A good primer seals the wood, creating a uniform surface that the epoxy can bond to effectively. It also acts as a bridge between the wood and the epoxy coating.
Look for primers that are specifically designed for wood or are known to adhere well to wood and are compatible with your chosen epoxy system. Moisture-curing urethane primers are often recommended because they offer excellent adhesion and some flexibility. High-solids epoxy primers are also a good choice, as they provide a strong, impermeable barrier.
Applying the primer correctly is just as important as choosing the right one. Follow the manufacturer’s instructions regarding application thickness, drying times, and recoat windows. Sometimes, a single coat is sufficient, while other times, two thin coats are recommended.
Ensure the primer is fully cured before you apply the epoxy topcoat.
A common mistake is thinking that the epoxy itself will seal the wood. While some epoxies can fill minor imperfections, they are not designed to penetrate and seal porous wood effectively. A dedicated primer ensures that the epoxy adheres to a stable, sealed surface, preventing future issues like peeling or bubbling.
For instance, a case study on a DIY forum highlighted a user who skipped priming a plywood garage floor. Within six months, they experienced significant peeling near the garage door where moisture ingress was highest. This was a direct result of the epoxy not bonding properly to the untreated, porous plywood.
Applying the Epoxy to Wood
Once your wood floor is thoroughly cleaned, repaired, and primed, you are ready to apply the epoxy. Mix the two parts of the epoxy according to the manufacturer’s instructions. It’s crucial to mix them in the correct ratio and to mix them thoroughly for the specified amount of time.
Inadequate mixing is a common cause of epoxy failure, leading to soft spots that never harden.
Work in manageable sections, especially if you are using a fast-curing epoxy. Pour a ribbon of mixed epoxy onto the floor in one section, then use a squeegee or roller to spread it evenly. Overlap your passes to ensure complete coverage and avoid creating lines or dry spots.
Maintain a wet edge so that the next section you pour blends seamlessly into the previously applied epoxy.
You can use a spiked roller to help release any trapped air bubbles. Roll gently in multiple directions. If you are adding decorative flakes, broadcast them into the wet epoxy immediately after application, according to your desired density.
The application temperature and humidity are also very important. Most epoxy systems have specific temperature ranges for application and curing. Avoid applying epoxy in extreme heat or cold, or in humid conditions, as this can affect the cure and the final finish.
Real-Life Application Scenarios
Let’s look at a couple of scenarios that illustrate the application process on wood:
Scenario 1: Plywood Subfloor in an Older Garage
Imagine a garage with a bare plywood subfloor that has some old oil stains and a few minor dents. The homeowner first cleans the floor thoroughly with a strong degreaser and rinses it well. After it dries for two days, they inspect it and fill a couple of small dents with a wood filler, sanding them smooth once dry.
Next, they apply two thin coats of a moisture-curing urethane primer, allowing each coat to cure overnight. Finally, they mix a 100% solids epoxy kit and apply it using a squeegee and roller, broadcasting decorative flakes as they go. The result is a hard, glossy floor that has held up well for over a year.
Scenario 2: Wooden Plank Floor in a Workshop
A homeowner using their garage as a workshop has a floor made of old wooden planks. The planks are generally in good shape but have some gaps between them and a few splintered edges. They begin by carefully sanding down all the splintered areas and filling the larger gaps with an epoxy putty designed for wood.
After thorough cleaning and vacuuming, they apply a high-solids epoxy primer, ensuring it covers the seams between the planks. Once the primer is cured, they apply a single coat of colored epoxy. The final floor is smooth and durable, making it easy to clean up sawdust and paint spills.
These scenarios highlight that while the basic principles are the same, the specific preparation steps might vary based on the type and condition of the wood floor.
Can You Put Garage Floor Epoxy on Wood Truth About Longevity
The longevity of epoxy on a wood garage floor depends heavily on the preparation, the quality of the materials used, and the environmental conditions. When done correctly, epoxy can last for many years, providing a durable and attractive surface. However, if the preparation is rushed or skipped, issues like peeling, cracking, or delamination can occur relatively quickly.
A well-applied epoxy coating over a properly prepared and sealed wood floor can withstand heavy foot traffic, vehicle parking, and exposure to common garage chemicals like oil and gasoline. The key is creating a strong bond between the wood and the epoxy, and ensuring the wood itself is stable enough to support the coating.
Understanding what affects the lifespan will help you ensure your investment pays off. We will look at the factors that contribute to a long-lasting epoxy floor.
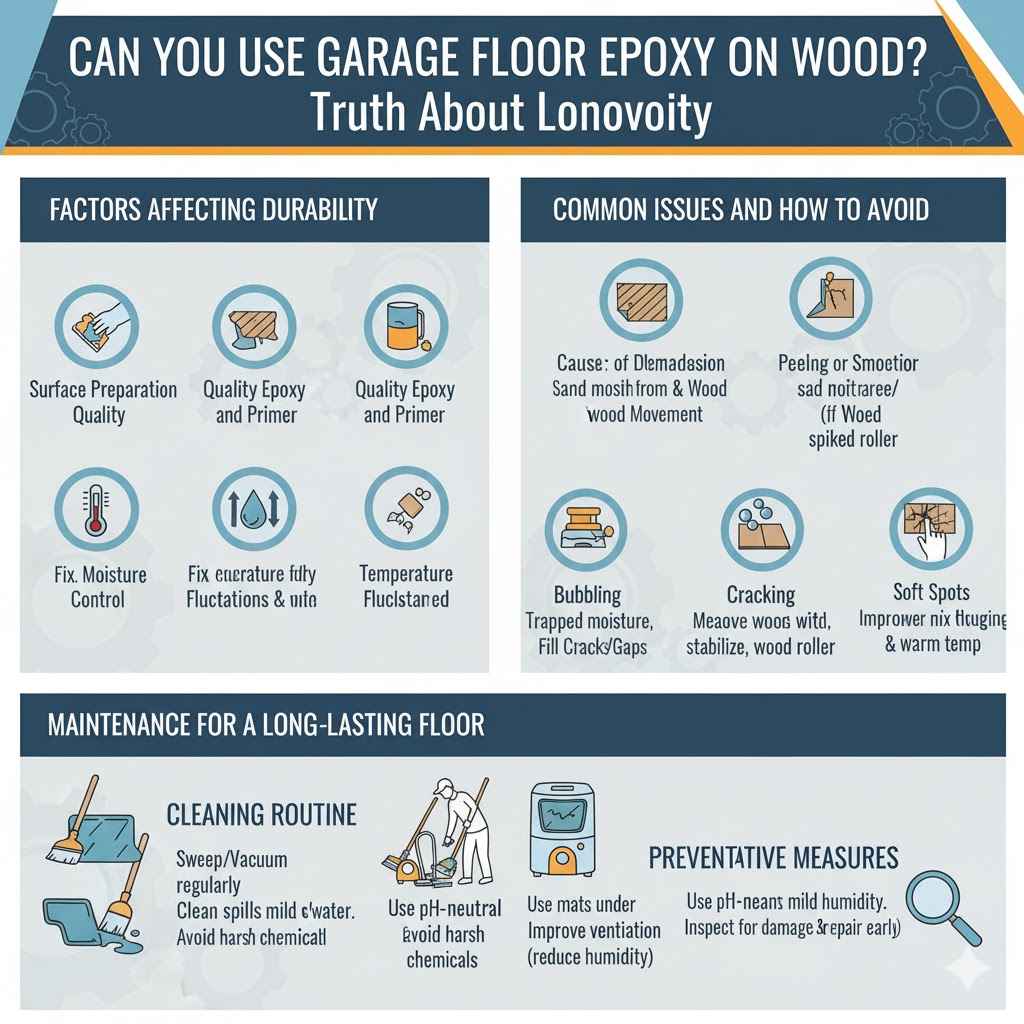
Factors Affecting Durability
Several factors play a significant role in how long your epoxy-coated wood garage floor will last:
- Surface Preparation Quality: This is arguably the most important factor. A clean, dry, smooth, and properly sealed surface is essential for strong adhesion. Any grease, dirt, or moisture left behind will compromise the bond.
- If the surface isn’t properly prepared, the epoxy won’t adhere well. This means that even minor stresses, like temperature fluctuations or the weight of a vehicle, can cause the epoxy to separate from the wood. Think of it like trying to stick a sticker to a dirty surface; it won’t stay on for long.
- Quality of Epoxy and Primer: Using a high-quality, two-part epoxy system designed for garage floors, along with a compatible primer specifically for wood, is crucial. Cheaper, low-solids, or single-part products may not offer the necessary durability or chemical resistance.
- Higher-quality products are formulated with better resins and hardeners that cure into a tougher, more resilient surface. They are also designed to withstand the harsh conditions often found in a garage, such as exposure to automotive fluids and heavy impacts. Investing in good materials upfront saves money and headaches in the long run.
- Moisture Control: Wood is hygroscopic, meaning it absorbs moisture. If moisture gets trapped between the wood and the epoxy, it can cause the epoxy to bubble, peel, or delaminate. Ensuring the wood is dry before application and preventing moisture ingress afterward is vital.
- This is where proper sealing and priming come in. A good primer creates a barrier, but it’s also important to address any underlying moisture issues in the garage itself. For example, if your garage is prone to flooding or high humidity, you might need to improve ventilation or install a dehumidifier.
- Temperature Fluctuations and Wood Movement: Wood expands and contracts with changes in temperature and humidity. If the epoxy is too brittle, it can crack as the wood moves. Using a slightly more flexible epoxy system or ensuring the wood is extremely stable can help mitigate this.
- While epoxy is a hard coating, some formulations have more inherent flexibility than others. This flexibility allows the coating to move slightly with the substrate without cracking. This is particularly important for wood floors, which are naturally more prone to movement than concrete.
- Impact and Abrasion Resistance: Dropping heavy tools or parking vehicles with sharp objects can damage the epoxy. While epoxy is tough, it’s not indestructible. Using a high-solids epoxy and considering a clear topcoat can enhance its resistance to scratches and impacts.
- The topcoat acts as an additional protective layer, absorbing minor impacts and abrasion before they reach the colored epoxy layer underneath. This extra layer can significantly extend the life of the floor coating, keeping it looking new for longer.
Common Issues and How to Avoid Them
When applying epoxy to wood, certain issues are more common. Understanding these problems and their causes can help you avoid them:
- Peeling or Delamination: This is usually caused by poor adhesion. It happens when the epoxy doesn’t bond properly to the wood surface.
- Causes include inadequate cleaning (grease, oil), insufficient or improper priming, or applying the epoxy to damp wood. To avoid this, follow the preparation steps meticulously and ensure the primer is fully cured before applying the epoxy. If you’re unsure about moisture, use a moisture meter.
- Bubbling: Small bubbles can appear in the epoxy layer. This is often due to moisture or solvents trapped beneath the coating.
- If moisture is trapped, it tries to escape as vapor, creating bubbles. Solvents from cleaners or paints not fully dried can also cause this. Proper ventilation during drying and application, along with a good primer to seal the surface, helps prevent this.
- Sometimes, trapped air during application can also cause bubbles; use a spiked roller to help release them.
- Cracking: Cracks can appear in the epoxy, especially if the wood underneath moves excessively or if the epoxy is too brittle.
- This can happen if the wood wasn’t properly secured or if it’s subjected to significant temperature swings. Using a slightly more flexible epoxy system and ensuring the wood is stable can reduce the risk. Also, significant structural movement of the garage floor itself can lead to cracks.
- Soft Spots: Areas that remain sticky or soft after the epoxy should have cured indicate improper mixing or application.
- This is almost always due to incorrect resin-to-hardener ratios or insufficient mixing. Make sure you measure accurately and mix thoroughly for the time recommended by the manufacturer. Temperature also plays a role; if it’s too cold, the epoxy might not cure properly.
By being aware of these potential problems and taking the right preventive measures during preparation and application, you can significantly increase the chances of a successful and long-lasting epoxy floor on your wood garage.
Maintenance for a Long-Lasting Floor
To ensure your epoxy-coated wood garage floor lasts as long as possible, regular maintenance is key. Simple cleaning routines can prevent damage and keep the floor looking its best. Avoid harsh abrasives or chemical cleaners that could dull the finish or damage the epoxy over time.
Sweep or vacuum your garage floor regularly to remove grit and debris that can scratch the surface. For spills of oil, gas, or other chemicals, clean them up immediately with a mild detergent and water. A soft cloth or mop is usually sufficient.
Periodically, you might want to do a more thorough cleaning. Use a pH-neutral cleaner designed for epoxy floors. Avoid using ammonia-based cleaners or strong solvents, as they can degrade the epoxy’s protective qualities.
A soft-bristled brush can help with tougher spots.
Protecting the floor from excessive moisture is also important. If you live in an area with high humidity or often track water into the garage, consider using mats under vehicles or improving ventilation to reduce moisture levels. This helps prevent moisture from affecting the wood underneath the epoxy.
Inspecting the floor for any signs of damage or wear periodically will allow you to address small issues before they become big problems. For example, if you notice a tiny chip, you might be able to repair it with a small amount of touch-up epoxy before it spreads.
Frequently Asked Questions
Question: Can I apply epoxy directly over existing paint on a wood garage floor
Answer: It’s generally not recommended to apply epoxy directly over existing paint on a wood garage floor. The paint layer may not be sufficiently adhered to the wood, or it might be too smooth for the epoxy to bond effectively. You would typically need to remove the old paint or scuff sand it thoroughly and then apply a compatible primer.
Always check the epoxy manufacturer’s guidelines for specific advice.
Question: How long does it take for garage floor epoxy on wood to cure
Answer: The cure time for garage floor epoxy on wood can vary significantly depending on the product used and environmental conditions like temperature and humidity. Typically, you can walk on the floor after 24-48 hours, but it takes about 5-7 days for the epoxy to fully cure and reach its maximum hardness and chemical resistance. Always follow the specific cure times recommended by the epoxy manufacturer.
Question: What is the difference between epoxy and polyurethane for garage floors
Answer: Epoxy is known for its exceptional adhesion, impact resistance, and chemical resistance, making it great for creating a strong base layer. Polyurethane, on the other hand, is often used as a topcoat. It provides excellent UV resistance, scratch resistance, and flexibility, which can protect the epoxy layer from wear and tear and prevent yellowing.
Some systems combine both for optimal performance.
Question: Do I need a vapor barrier on a wood subfloor before applying epoxy
Answer: A vapor barrier is not typically used directly under epoxy on a wood subfloor. Instead, a good quality primer that seals the wood and prevents moisture transmission is used. The goal is to seal the wood from below and create a stable surface for the epoxy, not to trap moisture.
If you have significant moisture issues from the ground, a different solution might be needed, but for standard wood subfloors, the focus is on a good primer.
Question: Can I use a water-based epoxy on a wood garage floor
Answer: While water-based epoxies are easier to use and clean up, they are generally not recommended for wood garage floors that will experience vehicle traffic or heavy use. They are less durable and less resistant to chemicals and abrasion compared to high-solids or 100% solids epoxy systems. For a long-lasting, durable finish on wood, a two-part, high-solids epoxy is a much better choice.
Summary
Can you put garage floor epoxy on wood? Yes, you can, but it requires careful preparation. Clean, repair, and prime the wood thoroughly.
Use a high-quality epoxy system designed for garage floors and a compatible primer. Proper application and regular maintenance are key for a durable, long-lasting finish. With the right approach, your wood garage floor can become a beautiful and functional space.