Can You Spray Minwax Polyurethane? Tips For Best Results
Yes, you can spray Minwax Polyurethane. It offers a way to get a smooth, even finish on your projects. However, it requires proper preparation, the right equipment, and careful application techniques to achieve the best results and avoid common issues like drips or uneven coverage.
Spraying Minwax Polyurethane: The Basics
So, can you spray Minwax Polyurethane? The short answer is yes. Many woodworkers and DIYers choose to spray polyurethane for a smoother, more even finish.
It can be faster than brushing. It also helps avoid brush strokes. This is especially true for larger or more intricate projects.
However, spraying isn’t just about pointing a sprayer and going. It needs more attention to detail than brushing. You need to think about the type of sprayer.
You also need to think about how to thin the product correctly. Safety is also a big part of spraying. You need to protect yourself and the area around you.
Think about the goal: a glass-like finish. Brushing can leave lines. It can also trap air bubbles.
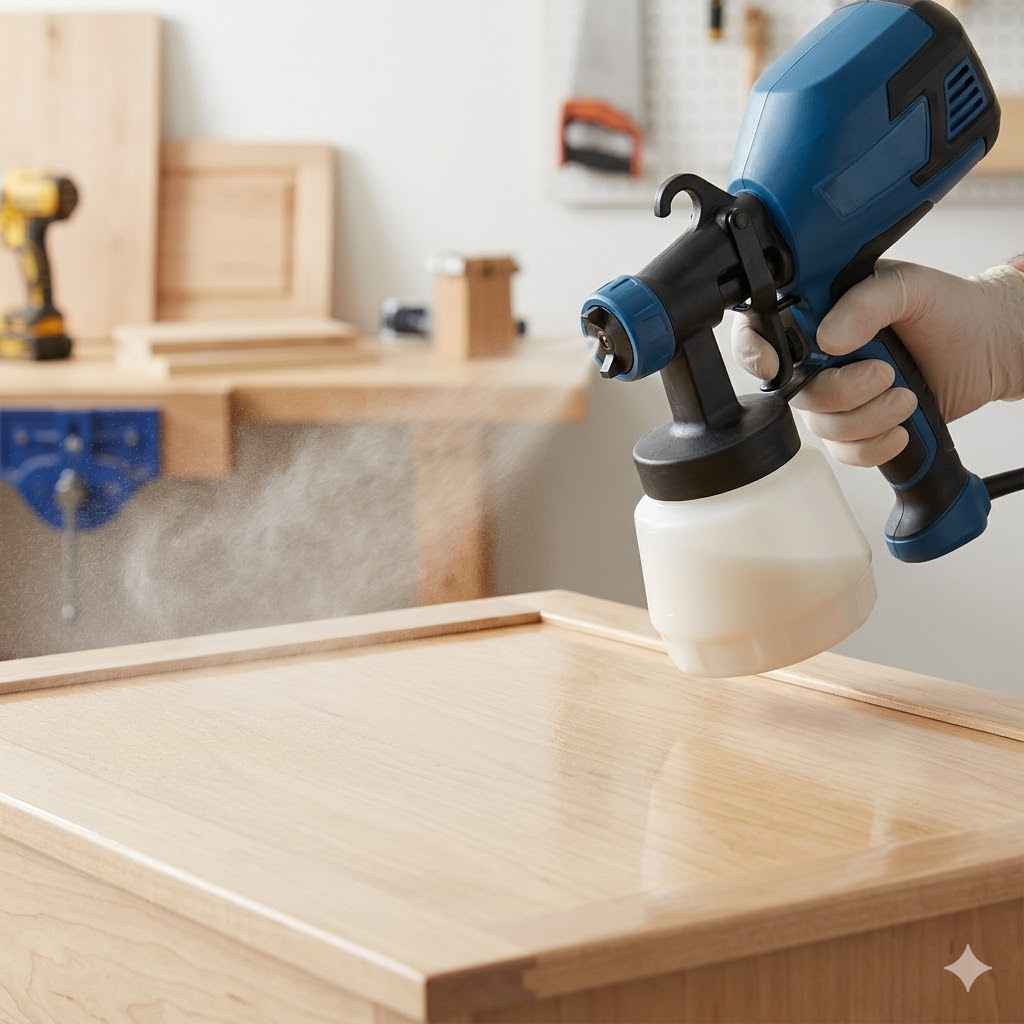
Spraying, when done right, lays down a fine mist. This mist dries evenly. It creates a uniform layer of protection.
It looks really professional. But it’s not magic. You still need to know what you’re doing.
The wrong setup can lead to a disaster. You might get runs and drips. Or the finish might be patchy.
It’s a skill that can be learned. And with practice, you can get fantastic results.
The key is understanding the product and the tools. Minwax offers different types of polyurethane. Some are better suited for spraying than others.
Water-based polyurethanes are generally easier to spray. They thin down nicely. Oil-based polyurethanes can also be sprayed.
But they often need more thinning. And they have stronger fumes. Knowing these differences helps you pick the right product.
It also helps you prepare it correctly. This preparation is vital for a good spray finish.
Let’s break down what makes spraying work. It’s about atomization. That means breaking the liquid into tiny droplets.
A sprayer does this. The tiny droplets float through the air. They land softly on your project’s surface.
This creates a thin, even coat. You can apply multiple thin coats. This is often better than one thick coat.
It reduces the chance of drips. It also helps the finish cure properly. It’s a technique that rewards patience and good setup.
Why Choose Spraying? The Advantages
Why would someone go through the trouble of setting up a spray system for Minwax Polyurethane? The main draw is the finish quality. Brushing can leave visible strokes.
These strokes can be annoying. They break up the smooth surface. Spraying creates a mist.
This mist settles gently. It dries to a very smooth finish. It’s hard to get this smoothness with a brush.
Especially on large, flat areas like tabletops. Or on pieces with lots of curves. Spraying covers these areas evenly.
Another big advantage is speed. Applying thin coats with a sprayer can be much faster than brushing. Especially for big items.
You can cover a lot of surface area quickly. This saves time. And saves your arm from getting tired from brushing!
Think about a large dresser or a wall paneling project. Brushing would take hours. Spraying can cut that time down significantly.
You still need to do multiple coats. But the application itself is faster.
Spraying also helps with even coverage. When you brush, it’s easy to miss spots. Or to put too much in one area.
This can lead to weak spots. Or to thick, drippy areas. A good spray pattern distributes the polyurethane evenly.
This means every part of your project gets the same protection. It creates a uniform look. This is crucial for durability too.
An even coat means the finish will wear evenly over time.
For intricate projects, spraying is a game-changer. Think about furniture with carvings or moldings. Brushes can get stuck in these details.
They can leave pools of finish. Or miss tiny nooks and crannies. A fine spray mist can get into all those tight spots.
It coats them evenly without pooling. This makes complex pieces look much better. The details stand out.
The finish looks professional.
Finally, there’s less dust pickup. When you brush, the surface is wet. Dust in the air lands in the wet finish.
It shows up as bumps. Spraying creates a fine mist. It can be done in a controlled environment.
This reduces the amount of dust that lands in the wet finish. You still need to work clean. But it’s generally easier to get a dust-free finish with spraying.
When to Be Cautious: Potential Downsides
While spraying sounds great, it’s not for every project. Or every person. There are definite downsides.
One of the biggest is the setup required. You need specialized equipment. This can be an HVLP (High Volume, Low Pressure) sprayer.
Or an airless sprayer. These aren’t cheap. They also need cleaning.
And maintenance. A simple brush and can of polyurethane are much less involved.
The overspray is another major issue. When you spray polyurethane, some of it doesn’t land on your project. It goes into the air.
This is overspray. It can get on everything. Your walls, your floors, your furniture.
You need a dedicated spray area. This area must be well-ventilated. You need to mask off everything you don’t want to spray.
This masking process can be time-consuming. And it has to be done perfectly.
Safety is a big concern with spraying. Polyurethane contains solvents. These solvents can be harmful to breathe.
Even water-based polyurethanes can irritate your lungs. You absolutely must wear a respirator. Not just a dust mask.
A proper organic vapor respirator. You also need eye protection. And gloves.
The fumes can also be flammable. So, no open flames or sparks nearby. This is more serious than just brushing.
Cost is also a factor. The sprayer itself is an investment. You also need thinning agents.
And cleaning solvents. Plus, good quality respirator filters. If you only have one small project, buying all this might not be worth it.
A brush and can of Minwax Polyurethane might be more economical. It’s important to weigh the cost against the benefits for your specific needs.
Finally, there’s a learning curve. Spraying polyurethane well takes practice. It’s easy to make mistakes.
Like applying the coats too thick. This leads to drips. Or holding the sprayer too close or too far.
This causes uneven patterns. Or not moving the sprayer smoothly. This results in lines.
It might take a few tries to get it right. This can be frustrating if you’re new to it.
Spraying vs. Brushing: Quick Comparison
Brushing
- Easier setup
- Lower initial cost
- Less overspray
- Good for small projects
- Can leave brush marks
- May trap dust
Spraying
- Smoother finish
- Faster application
- Even coverage
- Great for intricate parts
- Requires special equipment
- Needs significant prep and safety
- Generates overspray
Preparing Your Minwax Polyurethane for Spraying
Getting your Minwax Polyurethane ready for the sprayer is the most critical step. If you skip or mess this up, your spray job will likely fail. The goal is to make the finish thin enough to pass through the sprayer’s nozzle.
But not so thin that it loses its protective qualities. This is called thinning. The amount of thinning depends on the type of polyurethane.
It also depends on the type of sprayer you are using.
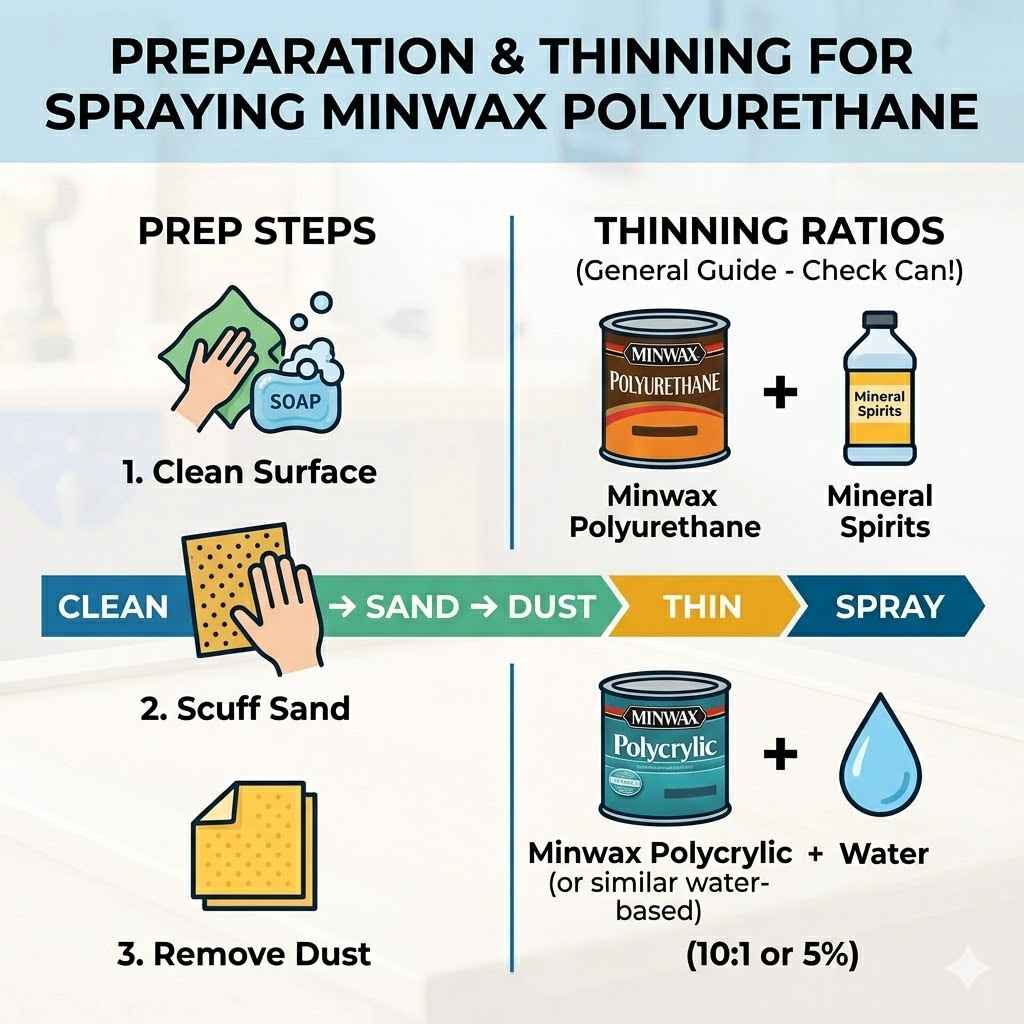
For water-based Minwax Polyurethane, you typically thin it with water. About 5-10% water is a good starting point. So, for every cup of polyurethane, add about 1-2 tablespoons of water.
Stir it gently. You don’t want to whip a lot of air into it. Too much water can weaken the finish.
It can also affect its clarity. Always check the product can for specific thinning recommendations. Some brands are designed to be sprayed right from the can.
For oil-based Minwax Polyurethane, you’ll need a mineral spirit. Again, start with a small amount. About 5-10% mineral spirits is typical.
So, for one cup of polyurethane, add 1-2 tablespoons of mineral spirits. Stir gently. Oil-based polyurethanes are thicker.
They might need a bit more thinning. But be careful. Over-thinning can cause the finish to sag.
It can also make it take much longer to dry.
The type of sprayer matters a lot. An HVLP sprayer works at lower pressure. It’s designed for high transfer efficiency.
This means more product lands on your project. Less is wasted as overspray. HVLP sprayers often require a bit more thinning than airless sprayers.
An airless sprayer uses high pressure to break up the finish. It can handle slightly thicker finishes. It might not need as much thinning.
A good rule of thumb is to test your thinning ratio. Use a viscosity cup. This is a small cup with a precise hole in the bottom.
You fill it with your thinned finish. Then you time how long it takes to empty. The sprayer manufacturer will provide a target viscosity.
Or you can find general guidelines online. For most HVLP systems, you want it to flow fairly freely. It should feel like thin cream.
For airless, it might be slightly thicker.
Always strain your thinned polyurethane. Pour it through a fine-mesh strainer or a paint filter sock. This catches any dried bits or debris.
These small particles can clog your sprayer. They can ruin your finish. Put the strained material into your sprayer’s cup.
Make sure it’s clean. Any residue from previous jobs can cause problems.
Key Tip: Always read the instructions on your specific Minwax Polyurethane can. And consult your sprayer’s manual. They often have specific advice for thinning and spraying.
Choosing the Right Sprayer
Selecting the correct sprayer is crucial for success when spraying Minwax Polyurethane. Not all sprayers are created equal. For most DIY projects with polyurethane, an HVLP sprayer is often the best choice.
HVLP stands for High Volume, Low Pressure. This means it uses a large volume of air at low pressure. This is gentle.
It atomizes the finish well. It also reduces overspray.
There are two main types of HVLP systems: turbine and compressed air. Turbine systems have their own motor. They generate the air.
They are self-contained. They are good for home use. Compressed air systems require an air compressor.
These are more powerful. They are often used by professionals. You need a compressor that can supply enough air volume (CFM) and pressure (PSI) for your spray gun.
For polyurethane, you’ll want a spray gun with a nozzle size that matches the viscosity. A 1.3mm to 1.8mm nozzle is generally good. This allows for a decent flow rate.
It can handle slightly thicker finishes like polyurethane. You also need to consider the spray pattern. You want an adjustable pattern.
This lets you control the width of the spray fan. You can adjust it for different project shapes.
Another option is an airless sprayer. These sprayers use very high pressure. They don’t use compressed air to atomize the finish.
The pressure itself breaks the liquid into a mist. Airless sprayers are very fast. They are good for large areas.
However, they produce more overspray than HVLP. They can also be harder to control for fine finishing. They might be overkill for smaller projects.
For beginners, a gravity-feed HVLP spray gun connected to a turbine system or a properly sized air compressor is often recommended. These offer a good balance of control, finish quality, and manageable overspray. Look for a system that comes with a decent quality gun.
And offers adjustable settings.
Pro Tip: Don’t buy the cheapest sprayer you can find. A better quality sprayer will give you better results. It will be more reliable.
And easier to use. Investing a little more upfront can save you a lot of frustration later.
Sprayer Types at a Glance
HVLP (High Volume, Low Pressure)
How it works: Uses a large volume of air at low pressure.
Pros: Less overspray, better control, good for fine finishes.
Cons: Can be slower than airless, requires proper thinning.
Best for: Furniture, cabinets, detailed work.
Airless Sprayer
How it works: Uses high pressure to atomize liquid.
Pros: Very fast, good for large areas, can handle thicker materials.
Cons: More overspray, less precise control, can be more expensive.
Best for: Walls, fences, large decks.
Setting Up Your Spray Area
Creating the right spray environment is just as important as preparing the finish. A clean, well-ventilated space makes a huge difference. This space needs to be protected from overspray.
And from dust. A garage is often a good choice. But you need to prepare it.
Make sure the floor is clean. You can lay down drop cloths. Or use old cardboard.
Cover everything you don’t want to spray. This includes walls, windows, and any tools or equipment.
Ventilation is critical. Polyurethane fumes are strong. And they can be flammable.
You need to be able to move air out of the space. Open windows and doors if possible. Use fans.
Position a fan to pull air out of the spray area. Do not use fans that blow air into the area. This can stir up dust.
And blow overspray around. Make sure your ventilation is adequate for the type of polyurethane you are using. Oil-based finishes need more ventilation.
Think about lighting. Good lighting helps you see what you’re doing. It helps you spot runs or thin spots.
Position lights so they don’t cast shadows on your workpiece. Natural light is great. But you might need supplemental lighting.
Especially if you’re working in a garage.
Consider a spray booth. You can buy portable spray booths. Or you can build a simple one.
A basic booth can be made with a large cardboard box. Or a frame covered in plastic sheeting. This helps contain the overspray.
And improves airflow. It creates a more controlled environment. It can make cleanup much easier.
The temperature and humidity also matter. Most polyurethanes dry best in moderate temperatures. Around 65-75°F (18-24°C) is ideal.
High humidity can slow drying. It can also cause clouding or blushing. Especially with water-based finishes.
Avoid spraying in direct sunlight. Or when it’s too cold or too hot.
Real-World Tip: I once tried to spray polyurethane in my basement workshop during a humid summer day. It was a disaster. The finish never really dried hard.
It felt gummy. And it was full of tiny white specks. I learned then that controlling the environment is key.
Safety First: Protecting Yourself
This cannot be stressed enough: safety is paramount when spraying polyurethane. You are dealing with chemicals. And fine mists.
These can be harmful if inhaled or if they get on your skin. Always wear appropriate personal protective equipment (PPE).
Respirator: This is non-negotiable. Use a respirator designed for organic vapors. A simple dust mask will not protect you from the solvents in polyurethane.
Make sure the respirator fits snugly. Check that the cartridges are new and appropriate for solvent fumes. A half-mask respirator is usually sufficient for DIY use.
If you’re concerned, an air-purifying respirator is a good investment.
Eye Protection: Wear safety glasses or goggles. These protect your eyes from mist and any stray particles. They are lightweight.
And they prevent irritation. Make sure they seal around your eyes.
Gloves: Wear chemical-resistant gloves. Nitrile gloves are a good option. They protect your skin from contact with the polyurethane.
And the thinning solvents. Wash your hands thoroughly after spraying, even if you wore gloves.
Clothing: Wear old clothes. Or a disposable coverall. This protects your regular clothes from overspray.
It also helps prevent skin contact.
Ventilation: As mentioned, ensure good ventilation. This clears the harmful fumes from your workspace. It reduces the risk of inhalation.
And the risk of fire or explosion.
No Ignition Sources: Keep any open flames, sparks, or heat sources far away from your spray area. Polyurethane fumes are flammable. Oil-based finishes especially.
This includes pilot lights on water heaters or furnaces. And even static electricity.
Clean Up: Clean your equipment thoroughly immediately after use. Use the recommended thinner. Dispose of waste materials properly.
Follow local regulations for hazardous waste disposal. Never pour solvents down the drain.
Know Your Product: Always read the Safety Data Sheet (SDS) for the specific Minwax Polyurethane you are using. It provides detailed information about hazards and precautions.
Your Safety Checklist
- Wear a respirator (organic vapor type)
- Use safety glasses or goggles
- Wear chemical-resistant gloves
- Protect your clothing
- Ensure excellent ventilation
- Remove all ignition sources
- Read the product SDS
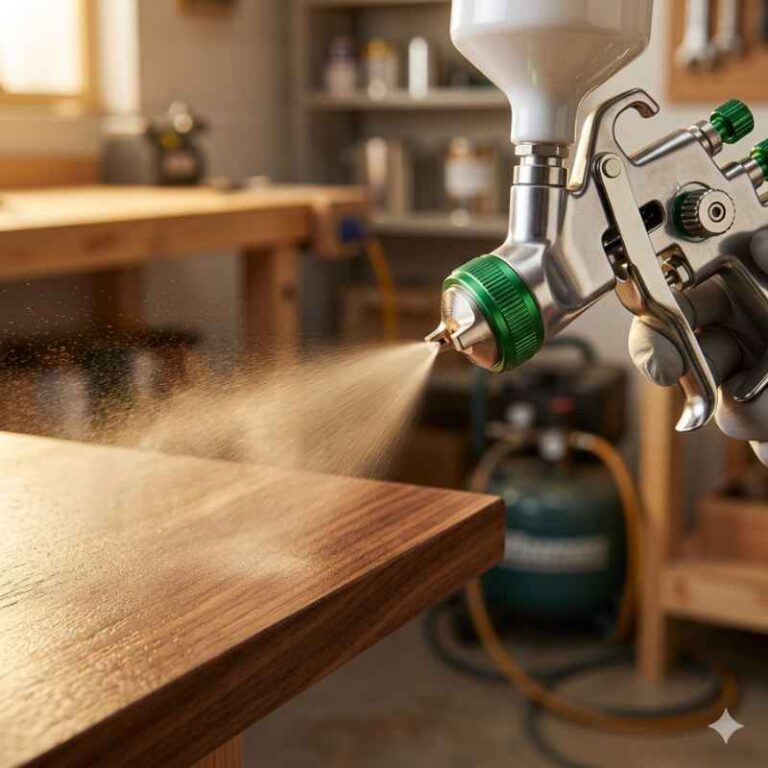
The Spraying Technique
Once everything is prepped, it’s time to spray. This is where technique really matters. A smooth, consistent application is key.
The goal is to lay down thin, even coats. Avoid stopping and starting on the surface. This causes heavy spots.
Trigger Control: Get comfortable with your sprayer’s trigger. You want to start moving the sprayer before you pull the trigger. And release the trigger after you have stopped moving.
This ensures the spray pattern starts and stops off the edge of your workpiece. Not on the surface itself. This prevents heavy spots at the beginning and end of your pass.
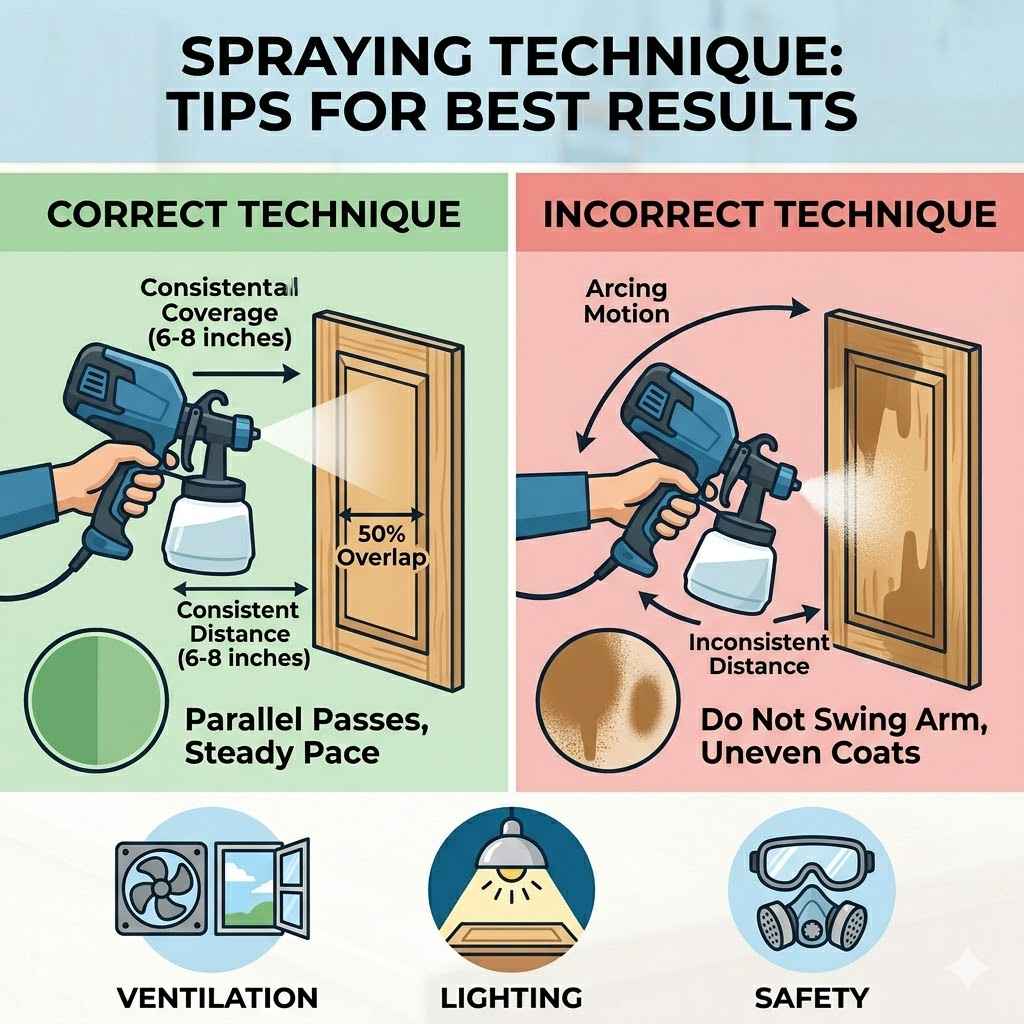
Distance: Maintain a consistent distance from the surface. Typically, this is 8-12 inches (20-30 cm). Too close, and you’ll get runs and drips.
Too far, and the finish will be dry and uneven. It will look like a dusty orange peel. Adjust your distance based on your sprayer and the viscosity.
Test this on scrap wood.
Speed: Move the sprayer at a steady, consistent speed. Too slow, and you’ll apply too much finish. Too fast, and you won’t get enough coverage.
The spray pattern should overlap by about 50% with the previous pass. This ensures even coverage. Think of it like painting a wall with a roller.
You overlap each stroke.
Spray Pattern: Adjust your spray pattern to match your workpiece. For flat surfaces, use a wide fan pattern. For edges or smaller areas, you might narrow it.
Keep the spray gun perpendicular to the surface as much as possible. Don’t arc your wrist. Move your whole arm.
This keeps the spray pattern consistent across the surface.
Coats: Apply multiple thin coats. This is much better than trying to get full coverage in one thick coat. Let each coat dry to the touch.
Or according to the product directions. Lightly sand between coats if recommended. Usually with very fine grit sandpaper (220-320).
Or with a synthetic steel wool pad (0000). This knocks down any dust nibs. And helps the next coat adhere.
Wipe away dust thoroughly after sanding.
Watch for Runs: If you see a run start to form, stop spraying. Leave it alone. You can often sand it down later.
Trying to fix it while it’s wet usually makes it worse. Runs happen when you apply too much finish. Or move too slowly.
Or hold the sprayer too close.
Test Before You Go: Always test your spray pattern and technique on scrap wood. Before you spray your actual project. Adjust your thinning, pressure, and technique until you get a smooth, even finish.
I remember the first time I tried spraying. I was so eager to get going. I didn’t test my setup.
I just started spraying my cabinet doors. The first few were okay. But then I got a huge drip on one.
I panicked. I tried to wipe it. It just smeared.
The whole door was ruined. I had to strip it and start over. That was a hard lesson in patience and testing.
What to Do After Spraying
The work isn’t done when the last coat is sprayed. Proper curing and handling are essential. Polyurethane needs time to harden completely.
This process is called curing. Drying is when the solvent evaporates. Curing is when the film chemically hardens.
This can take several days. Or even weeks for oil-based polyurethanes.
Drying Time: Follow the Minwax can instructions for drying times between coats. These are usually a few hours for water-based. And longer for oil-based.
Don’t rush it. If the surface feels tacky, it’s not ready for another coat.
Light Sanding: As mentioned, light sanding between coats is a good idea. Use 220-320 grit sandpaper. Or a synthetic steel wool pad.
This removes dust particles. And improves adhesion. Always wipe away all dust with a tack cloth or a damp (not wet) cloth.
Or a vacuum with a brush attachment.
Full Cure: This is the critical part for durability. Even if the finish feels hard to the touch after 24 hours, it’s still soft inside. Avoid heavy use of the project for at least 7 days.
For a tabletop or high-traffic surface, 30 days is even better. Placing heavy objects on a not-fully-cured surface can leave dents. Or damage the finish.
Handling: Be careful when moving pieces after spraying. Even if dry to the touch, the finish can still be soft. Handle edges and corners with care.
Avoid stacking pieces directly on top of each other. If you must, place a piece of cardboard or a soft cloth between them.
Cleanup: Clean your sprayer immediately after use. If you used water-based polyurethane, flush the system with water. Follow with a bit of soap and water.
If you used oil-based polyurethane, flush with mineral spirits. Then follow with soap and water. A dirty sprayer will cause problems next time.
And can ruin the sprayer itself.
Disposal: Dispose of any leftover polyurethane, thinners, and cleaning rags properly. Oil-soaked rags can spontaneously combust. Lay them flat to dry outdoors.
Or store them in a sealed metal container filled with water. Check your local regulations for hazardous waste disposal.
Post-Spray Care Timeline
Drying (Between Coats): Hours (water-based) to 24+ hours (oil-based).
Light Sanding: After each coat (if needed).
Full Cure: 7-30 days (depending on product and use).
Gentle Use: After 2-3 days.
Heavy Use: After full cure.
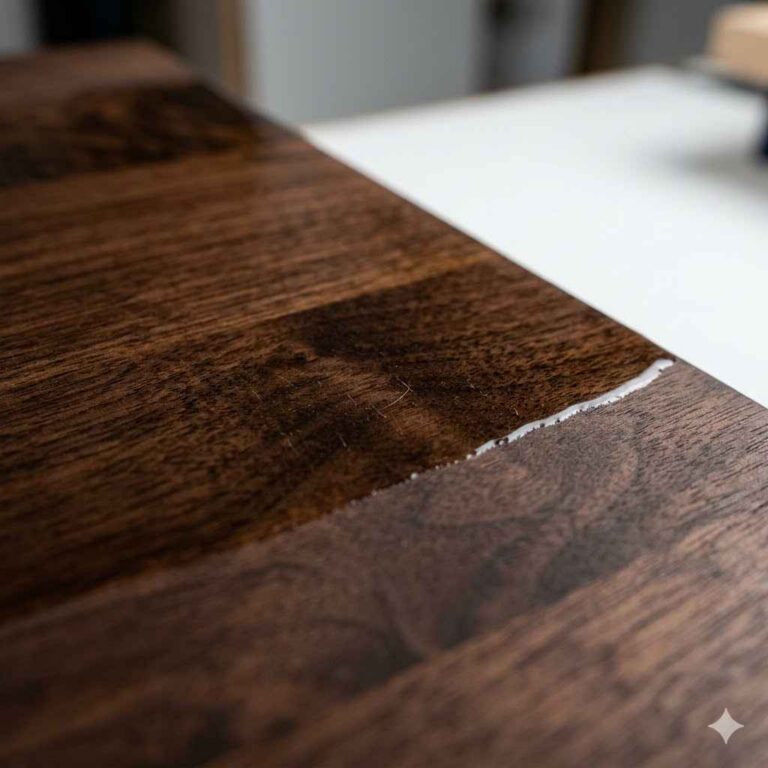
Troubleshooting Common Spraying Issues
Even with the best preparation, you might run into issues. It’s part of the learning process. Here are some common problems and how to fix them.
Runs and Drips: This is the most common problem. It means too much finish was applied in one spot. Or the sprayer was held too close.
Or moved too slowly. Fix: Let the run dry completely. Then gently sand it flat with fine-grit sandpaper (220-320).
Wipe clean. Apply a very light mist coat to blend it in. Or sand the entire area and re-coat.
Orange Peel: This looks like the skin of an orange. It happens when the finish dries too quickly. Or the sprayer is too far away.
Or the thinning is incorrect. Fix: For light orange peel, a bit of light sanding (220-320 grit) followed by another light coat might help. For heavy orange peel, you may need to let it cure.
Then sand it smooth and re-spray. Ensure proper thinning and distance on subsequent coats.
Fish Eyes: These are small, crater-like marks. They happen when the finish is repelled by a contaminated surface. Like oil or silicone.
Fix: Ensure your surface is perfectly clean. Degrease if necessary. Make sure your sprayer and polyurethane are free of contaminants.
If fish eyes appear, let it dry. Sand the area smooth. Clean thoroughly.
Re-spray. Adding a fisheye eliminator additive can help for future jobs.
Uneven Coverage: This looks like patchy spots. Or lines. It’s usually due to inconsistent spraying.
Not overlapping passes correctly. Or stopping and starting on the surface. Fix: Practice your trigger control and overlap.
Ensure a consistent spray pattern. Apply light, even coats.
Clogged Sprayer Tip: This stops the flow of finish. It’s usually caused by dried bits of polyurethane. Or debris in the material.
Fix: Immediately stop spraying. Clean the tip with the recommended solvent. Back-flush the sprayer if possible.
Strain your material thoroughly before putting it in the cup. Inspect your spray gun’s filter as well.
Poor Adhesion/Peeling: This happens if the surface wasn’t prepped right. Or if the finish wasn’t applied to a dry surface. Or if the temperature/humidity was wrong.
Fix: This is a serious problem. It may require stripping the finish. And starting over with proper prep and application conditions.
My Story: I once had a project where the finish just wouldn’t adhere properly in one spot. No matter how many coats I sprayed. It was like it was repelling the polyurethane.
I finally figured out there was a tiny bit of wax left from an old polish. I had to sand down to bare wood. Clean it with mineral spirits.
Then reapply the finish. It was a pain, but it taught me about surface contamination.
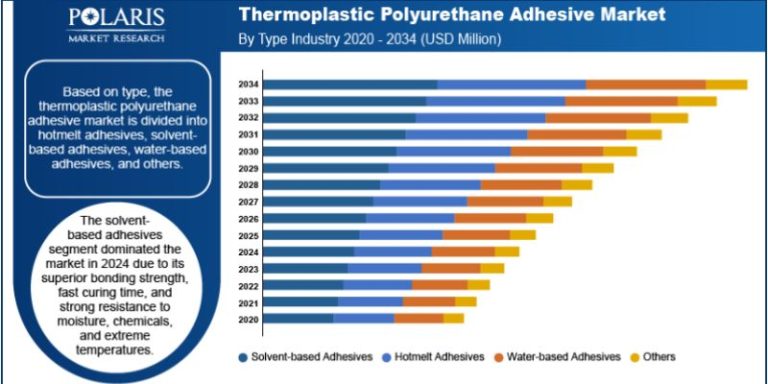
Water-Based vs. Oil-Based Polyurethane for Spraying
Minwax offers both water-based and oil-based polyurethanes. They have different properties that affect spraying. Understanding these differences helps you choose the right product for your project.
Water-Based Polyurethane:
Pros: Dries much faster. Low odor. Easy cleanup with water.
Less yellowing over time. Generally easier to spray because it thins well with water. Cons: Can be less durable than oil-based in some applications.
May raise the wood grain slightly. Can sometimes look a bit more plastic-like. * Spraying Notes: Needs about 5-10% water to thin.
Works well with HVLP sprayers. Watch for drying too quickly in warm conditions.
Oil-Based Polyurethane:
Pros: Very durable.
Builds a strong, protective finish. Has a warm, amber tone that many people like. Less prone to raising wood grain.
Cons: Strong odor. Slow drying time. Difficult cleanup (requires mineral spirits).
Can yellow over time, especially with multiple coats. Can be thicker, requiring more thinning. * Spraying Notes: Needs about 5-10% mineral spirits to thin.
The fumes are a significant safety concern. Requires very good ventilation. Can be challenging to get a perfectly clear finish if over-thinned or applied too heavily.
For most furniture and interior projects where speed and low odor are priorities, water-based polyurethane is a great choice for spraying. If you need maximum durability and a warm amber tone, and are prepared for the cleanup and fumes, oil-based can be a good option. Always check the Minwax product label for specific spraying recommendations.
Alternatives to Spraying Minwax Polyurethane
If spraying Minwax Polyurethane seems too daunting, or you don’t have the equipment, don’t worry. There are other excellent ways to get a great finish.
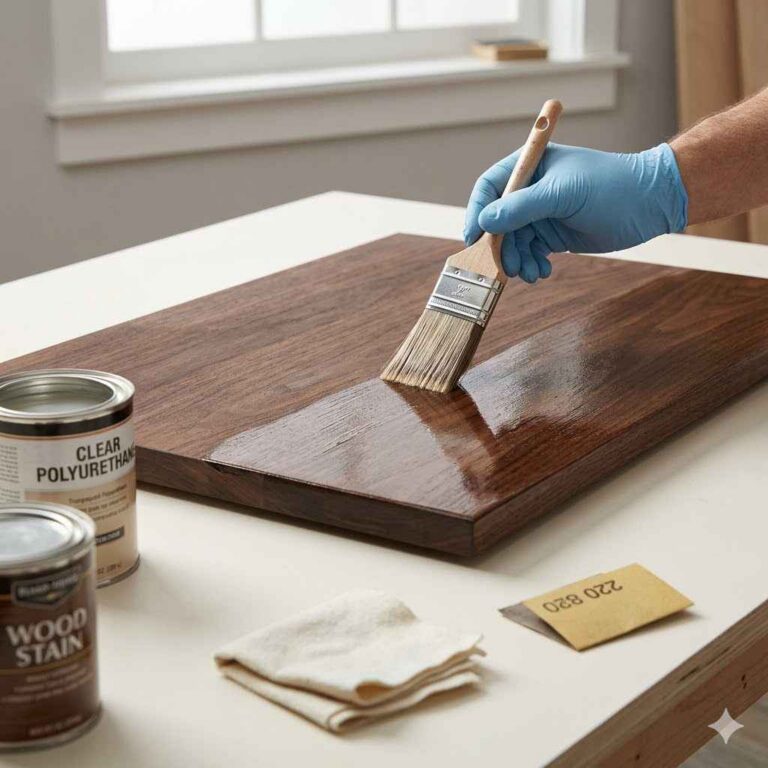
Brushing: This is the classic method. It’s accessible. You only need brushes, a can of polyurethane, and a clean workspace.
Tips for brushing:
Use high-quality synthetic brushes for water-based poly. Use natural bristle brushes for oil-based. Apply thin, even coats.
Brush in the direction of the wood grain. Avoid over-brushing. * Lightly sand between coats.
Wiping On Polyurethane: This involves thinning polyurethane significantly (sometimes 50/50 with mineral spirits or naphtha). And applying it with a lint-free cloth. This method is excellent for very intricate pieces.
Or for achieving a very thin, smooth finish. It requires patience. And many thin coats.
Minwax also makes wipe-on poly formulas. These are often pre-thinned.
Foam Brushes/Pads: For smaller projects or crafts, foam brushes can offer a smoother finish than bristle brushes. They are disposable. They reduce brush strokes.
However, they can be less durable. And may leave foam particles if not used carefully.
Pre-catalyzed or Conversion Varnishes: These are professional-grade finishes. They offer extreme durability. They often require specific spray equipment and techniques.
They are typically not used by casual DIYers.
Each method has its pros and cons. The best choice depends on your project, your skill level, your available tools, and your desired outcome. Brushing is always a solid option.
And for many projects, it yields perfectly acceptable, beautiful results.
What This Means For You
So, can you spray Minwax Polyurethane? Absolutely! It opens up possibilities for smoother finishes and faster application.
But it’s not a simple task. It requires investment in equipment. And a commitment to safety and preparation.
If you have a large project. Or want that super-smooth, professional look. And you’re willing to put in the effort.
Spraying is a fantastic option.
If you’re just starting out. Or have a small project. Or you don’t want the hassle of overspray and safety gear.
Brushing or wiping on the polyurethane is perfectly fine. You can still achieve beautiful, durable finishes with these methods. The key is to be patient.
And to prepare your surface well. And apply thin coats.
Consider the pros and cons. What is your project? What is your budget?
How much time do you have? What level of finish are you aiming for? Answering these questions will help you decide if spraying is the right path for you.
Or if a simpler method will meet your needs just as well.
Frequently Asked Questions
Can I spray Minwax Polycrylic (water-based) the same way I spray polyurethane?
Yes, you can spray Minwax Polycrylic. It is a water-based polyurethane. You will typically thin it with about 5-10% water.
Ensure your sprayer is clean. Use a well-ventilated area. And wear your safety gear.
Polycrylic is generally easier to spray than oil-based poly. Cleanup is also easier with just soap and water.
Do I need a special nozzle for spraying polyurethane?
For most HVLP sprayers, a nozzle size between 1.3mm and 1.8mm is suitable for polyurethane. This allows for adequate flow. You want a sprayer that allows you to adjust the fan pattern.
Check your sprayer’s manual for specific nozzle recommendations based on the material you’re spraying.
How many coats of sprayed polyurethane should I apply?
The number of coats depends on the project. For general furniture, 2-3 coats is common. For high-wear surfaces like tabletops, you might want 4-5 coats.
Always apply thin, even coats. And allow proper drying time between each one.
Can I spray Minwax Polyurethane directly from the can?
It depends on the specific product and your sprayer. Some newer formulas are designed for spraying with minimal thinning. However, most polyurethanes, especially oil-based, will require thinning to spray properly.
Always check the product label and your sprayer’s manual for specific guidance. It’s always best to test your thinned mixture for viscosity.
What if I get dust specks in my sprayed finish?
Dust specks are common, especially in a non-perfect environment. After the coat dries, lightly sand the affected area with very fine grit sandpaper (220-320). Then, wipe the surface clean with a tack cloth before applying the next coat.
For critical finishes, a dust-free spray booth is ideal. Sometimes, a final light sanding and buffing after full cure can help.
Is spraying polyurethane worth the effort for small projects?
For very small projects, the setup and cleanup for spraying might outweigh the benefits. Brushing or wiping on polyurethane can be faster and simpler. Spraying is generally more beneficial for larger pieces, intricate items, or when a perfectly smooth, brush-stroke-free finish is a high priority.
Conclusion
Spraying Minwax Polyurethane is a skill that can elevate your woodworking and DIY projects. It offers a path to incredibly smooth, even finishes. But it demands respect.
Proper thinning, the right sprayer, a safe environment, and careful technique are all essential. While it requires more investment and preparation than brushing, the results can be spectacular. Weigh the effort against your project’s needs.
With practice and attention to detail, you can master spraying polyurethane.