Best Spray Gun For Polyurethane Finishes (Top Picks 2025)
Polyurethane finishes require specific spray guns for best results. Top spray guns offer adjustable airflow and fluid control, and can handle thicker materials. Choosing the right gun depends on your project size and desired finish quality.
What Makes a Spray Gun Good for Polyurethane?
Polyurethane is a popular finish. It’s strong and looks great on wood. But it can be thick.
This thickness can clog up spray guns. It can also make it hard to get a smooth coat. So, what makes a spray gun right for the job?
It needs a few key things. First, it must be able to handle thicker liquids. This means it needs good power.
It also needs a nozzle that won’t get blocked easily. Another important part is control. You need to control how much paint comes out.
You also need to control the air flow. This helps you spray evenly.
Think about the nozzle size. Polyurethane is often thicker than, say, latex paint. A smaller nozzle might clog.
A larger nozzle lets more material through. This helps prevent clogs. It also helps push the thicker liquid out.
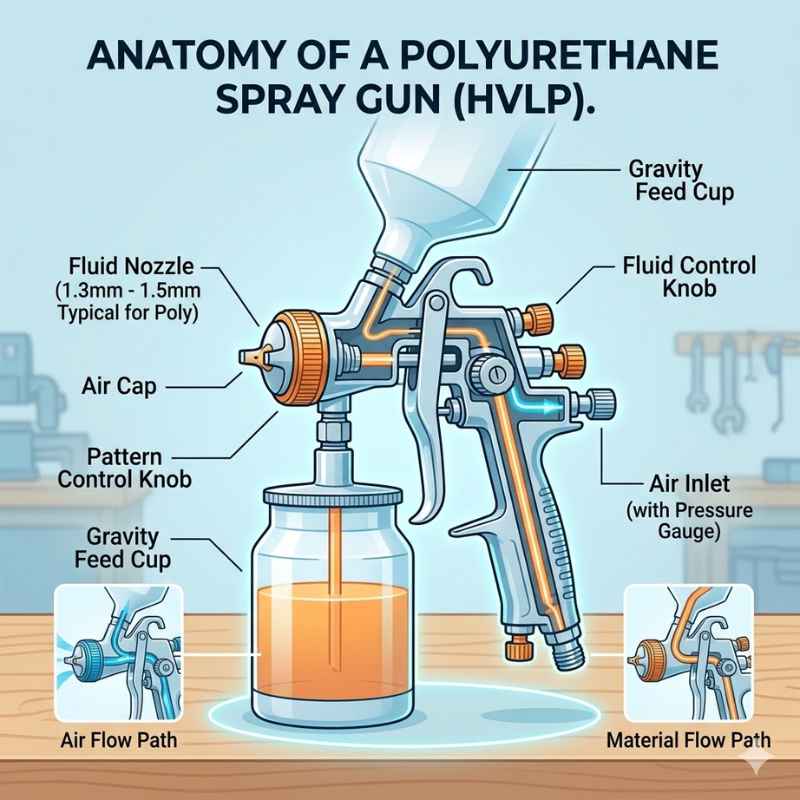
The air cap is also key. It shapes the spray pattern. A good air cap helps atomize the polyurethane.
Atomizing means breaking it into tiny droplets. This makes the finish smooth.
Then there’s pressure. Some spray guns use high pressure. Others use lower pressure.
For polyurethane, you often need a balance. Too much pressure can cause overspray. Too little pressure means the paint won’t spray well.
You need a gun that lets you adjust this. You can then find the sweet spot for your specific polyurethane and project.
Reliability matters too. You don’t want a gun that leaks or breaks mid-project. Good quality materials make a difference.
Metal parts are usually better than plastic for durability. Easy cleaning is also a big plus. Polyurethane can get sticky when it dries.
You want to clean your gun quickly after use. Otherwise, it can become a real pain.
Finally, consider the type of gun. There are different kinds. Some are gravity-fed.
The paint cup is on top. Others are siphon-fed. The cup is below.
Air pressure pulls the paint up. HVLP (High Volume Low Pressure) guns are very popular. They are known for efficiency.
They use a lot of air. But the pressure at the tip is low. This means less overspray and less wasted paint.
This can be great for polyurethane.
My Own Spray Finishing Fiasco
I remember one time, I was working on a beautiful walnut dresser. It was late at night. I had a new can of clear polyurethane.
I was so excited to put the finishing coat on. I grabbed my old, trusty airbrush. It had worked well for smaller crafts.
I figured it would be fine. I thinned the polyurethane a lot. I thought this would help it flow.
Then I hooked it up to my small air compressor. I pulled the trigger. Nothing much came out.
I turned the pressure up. Still just a weak dribble. I kept trying to adjust.
Then, a big glob of wet polyurethane shot out. It landed right on my nice, sanded drawer front. It looked like a tiny brown lake.
My heart sank. I felt this hot flush of panic. I had ruined hours of sanding.
I realized then my small airbrush just wasn’t built for this thick stuff. It was a costly lesson in using the right tool for the job. That night, I learned polyurethane needs a gun with some real power and control.
Understanding HVLP Spray Guns
What it means: HVLP stands for High Volume, Low Pressure. It uses a large volume of air to move the paint. But the air pressure at the spray gun tip is kept low.
This is different from older spray guns that use high pressure.
Why it’s good for polyurethane: The low pressure means less air escapes the spray gun. This makes more paint land on your project. It creates less overspray.
This is great for saving expensive polyurethane. It also means a smoother, more even coat. You get a professional look without a lot of waste.
HVLP guns are often the top choice for wood finishes.
The Top Spray Guns for Polyurethane (2025 Picks)
Finding the best spray gun can feel overwhelming. There are so many brands and models. We looked at what matters most for polyurethane.
This includes build quality, ease of use, control, and atomization. We also considered user reviews. Here are some top picks that stand out for handling polyurethane finishes.
1. Fuji Spray T-70 HVLP Spray Gun
The Fuji T-70 is a favorite among woodworkers. It’s known for its excellent performance and durability. This gun uses an HVLP system.
It gives you great control over your spray pattern. It handles thicker finishes like polyurethane very well. The stainless steel needle and nozzle are built to last.
It also has an adjustable fan pattern. You can go from a wide spray for large areas to a narrow spray for details. The air cap is also adjustable.
This lets you fine-tune the atomization.
Many users praise how smoothly it sprays. They say it lays down a beautiful, even coat. Cleaning is also reported to be straightforward.
This is a big deal when working with polyurethane. It comes with a 1.8mm needle and nozzle set. This size is good for many types of finishes.
You can buy other sizes if needed. It’s a mid-range price gun. But the quality you get is high.
It’s a solid investment for anyone serious about finishing.
Key Features:
- HVLP system for high transfer efficiency.
- Stainless steel needle and nozzle.
- Adjustable fan pattern and air flow.
- Comes with 1.8mm needle/nozzle.
- Durable build quality.
2. DeVilbiss StartingLine HVLP Spray Gun
DeVilbiss is a well-respected name in spray guns. Their StartingLine HVLP gun is a great option for DIYers. It offers good quality at a lower price point.
This gun is designed for ease of use. It’s a good entry into HVLP spraying. It comes with a decent nozzle size, often 1.8mm, which works well for polyurethane.
The gun is built to provide a nice atomization. This helps reduce runs and sags.
It’s not as fancy as some higher-end models. But it does the job effectively for many projects. The air cap is designed to give you a uniform spray pattern.
This means you can get a smooth finish. It’s also known for being relatively easy to clean. If you are just starting out with spray finishing polyurethane, this is a solid choice.
It won’t break the bank. Yet, it will give you much better results than a basic paint sprayer.
Key Features:
- Affordable HVLP option.
- Good for general-purpose finishing.
- Decent atomization for smooth coats.
- Easy to operate.
- Often includes a 1.8mm nozzle.
3. Graco Magnum SG2 Convertible Spray Gun
Graco is another big name. They make equipment for painting and finishing. The SG2 Convertible Spray Gun is interesting.
It’s not strictly an HVLP gun in the same way as the Fuji. It can be used with different pressure setups. This makes it quite versatile.
It’s known for being robust. It can handle thicker materials. Many find it good for working with lacquers and polyurethanes.
The conversion between different spray modes is usually simple.
The gun features a durable construction. It’s built to withstand demanding use. The tip sizes available can often accommodate thicker fluids.
This is crucial for polyurethane. It helps ensure consistent material flow. While it might require a bit more practice to dial in the perfect spray pattern compared to a dedicated HVLP, its power and versatility make it a strong contender.
It’s a good choice if you also plan to spray other types of coatings.
Key Features:
- Versatile, can be used in different configurations.
- Robust and durable design.
- Handles thicker materials well.
- Good for a variety of finishes.
- Reliable brand.
4. TCP Global HVLP Gravity Feed Spray Gun (Set)
TCP Global offers a good value set. This often includes multiple nozzle sizes. This is a big advantage for polyurethane.
You can switch between nozzles. You might use a larger one for the main coats. Then a smaller one for touch-ups or finer details.
The gravity feed design means paint flows down from the cup. This uses gravity to help push the paint. It’s efficient and often results in less waste.
These guns are typically designed to be HVLP compliant. This means good transfer efficiency. They are made to atomize paints well.
Many users find they perform surprisingly well for the price. The build quality is decent. They are made for general-purpose spraying.
This includes enamels, lacquers, and, of course, polyurethane. The set usually comes with cleaning brushes. This makes maintenance easier.
Key Features:
- Comes with multiple nozzle sizes (e.g., 1.4mm, 1.7mm, 2.0mm).
- HVLP design for efficiency.
- Gravity feed for ease of use.
- Good value for money.
- Includes cleaning tools.
5. Wagner Spraytech FlexiPINT Elite (Sprays Polyurethane)
Wagner is known for its consumer-friendly sprayers. The FlexiPINT Elite is an example. It’s designed for ease of use.
It’s a good option if you are new to spray finishing. It can spray polyurethane. These types of sprayers often use a different mechanism than traditional air sprayers.
They might use a turbine or a different pump system. The key is that they can handle thicker materials.
The FlexiPINT Elite is generally easy to set up. It’s also easy to clean. The spray pattern can often be adjusted.
This helps you get a more even application. While it might not offer the absolute finest atomization of a high-end professional gun, it’s a very capable tool for home use. If your projects are not massive and you prioritize simplicity, this is worth considering.
It can deliver a good polyurethane finish.
Key Features:
- User-friendly design, good for beginners.
- Capable of spraying polyurethane.
- Adjustable spray pattern.
- Relatively easy to clean.
- Convenient for various home projects.
Choosing the Right Nozzle Size
Nozzle Size Guide for Polyurethane:
1.4mm – 1.7mm: Good for thinned polyurethane or thinner types. Offers finer control.
1.8mm – 2.0mm: Ideal for standard or slightly thicker polyurethane. Prevents clogging and ensures good material flow.
2.0mm+: For very thick polyurethanes or specific industrial applications. Might require more air volume.
Tip: Always check your polyurethane can. It often recommends a nozzle size or thinning ratio for spraying.
Factors to Consider When Buying
When you are looking at spray guns for polyurethane, a few things really matter. It’s not just about the brand. It’s about what the gun can do for you.
Let’s break down the key points.
Material Viscosity
This is huge. Polyurethane can vary a lot. Some are thin and watery.
Others are thick and syrupy. Your spray gun needs to handle your specific polyurethane. A gun that works for thin latex paint might clog instantly with thick polyurethane.
Look for guns that are rated for thicker coatings. Check the manufacturer’s specs. They often list the types of materials the gun can spray.
If your polyurethane is very thick, you might need a larger nozzle. You might also need a gun with more power.
Project Size and Type
Are you spraying a small picture frame? Or a whole dining table? Or even a cabinet set?
For small items, a small touch-up gun might work. But for larger surfaces, you need something that covers a lot of area. You also need something that won’t overheat or clog quickly.
HVLP guns are great for this. They offer good coverage. They also help you work efficiently.
If you do a lot of finishing, investing in a more robust gun makes sense.
Your Skill Level
Are you a seasoned pro? Or just starting out? Some guns are very forgiving.
They have simple controls. They are easy to set up and clean. Others are more complex.
They offer more adjustments. These might be better for experienced users. But they can be intimidating for beginners.
Don’t be afraid to start with a simpler gun. You can always upgrade later. The most important thing is to learn how to use the gun you have well.
Budget
Spray guns range from under $50 to over $500. It’s easy to get lost in the price. A very cheap gun might be frustrating.
It might break quickly. It might not give good results. A very expensive gun isn’t always necessary.
For most home users and hobbyists, a good mid-range gun is the sweet spot. It offers a good balance of performance and price. Think about how often you will use it.
If it’s a lot, the investment in a better gun is worth it. If it’s just a couple of times a year, a more budget-friendly option might suffice.
Spray Gun Maintenance Basics
Clean After Every Use: This is the golden rule. Polyurethane dries fast and hard. Use the right solvent (usually mineral spirits or denatured alcohol, check your product).
Disassemble Carefully: Take apart the parts you need to clean. Keep them organized.
Needle and Nozzle: These are critical. Clean them thoroughly. Make sure no dried paint is left.
Air Cap: Ensure all holes are clear for a good spray pattern.
Storage: Store your gun in a clean, dry place. Protect it from dust and damage.
How to Prepare Your Polyurethane for Spraying
Getting the spray gun ready is only half the battle. Your polyurethane needs to be ready too. Proper preparation is key to avoiding problems.
It ensures your gun works its best. It also makes sure your finish looks smooth. Let’s cover the steps.
Thinning the Polyurethane
Most spray guns require you to thin the polyurethane. This makes it flow better through the gun. It also helps it atomize properly.
The amount of thinning depends on the product. It also depends on the spray gun you are using. Always check the polyurethane manufacturer’s instructions.
They will usually give a recommended thinning ratio. Common thinners include mineral spirits or denatured alcohol. Some water-based polyurethanes need water.
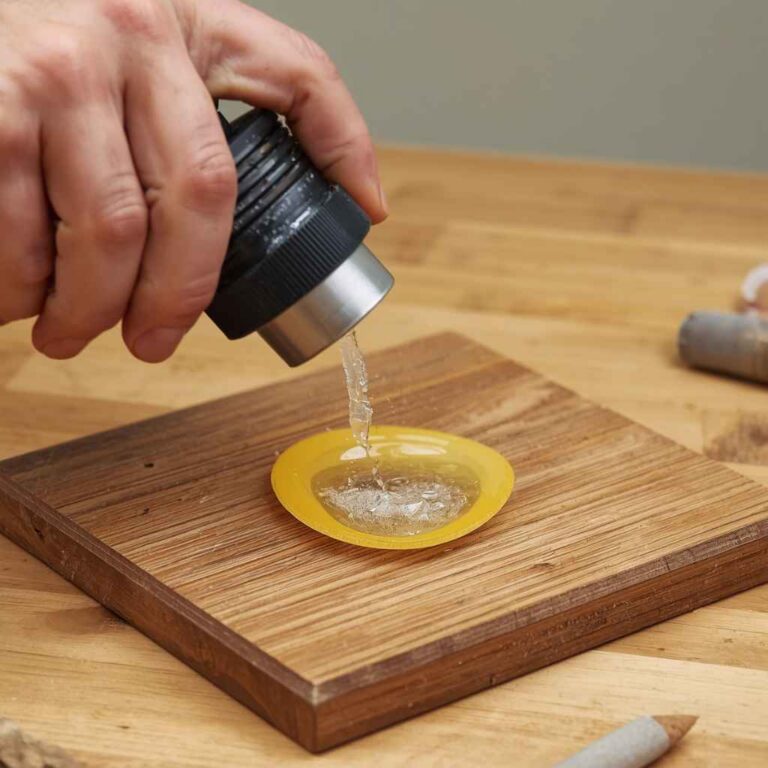
You can test the viscosity. A common way is to use a viscosity cup. This is a small cup with a hole in the bottom.
You fill it with your thinned finish. Then you time how long it takes to empty. Manufacturers give a target time.
If it empties too fast, it’s too thin. If it empties too slow, it’s too thick. Aim for the recommended time.
Don’t over-thin. This can weaken the finish.
Filtering the Polyurethane
Even new cans of polyurethane can have bits of dried paint or debris. These little bits are the enemy of a smooth finish. They can clog your gun.
They can also cause bumps or specks on your project. Always filter your polyurethane before you put it in the gun. You can buy disposable paint strainers.
These fit right into the paint cup. They catch any particles. It’s a small step.
But it makes a huge difference.
Testing Your Spray Pattern
Before you spray your actual project, test the gun. Find a piece of scrap cardboard. Spray a few passes on it.
Look at the pattern. Is it even? Are there heavy spots or light spots?
Is it a nice, oval shape? Adjust your gun’s settings. This might involve changing the air pressure.
It might involve adjusting the fluid needle. You might need to tweak the air cap. Keep spraying on the cardboard until you have a nice, consistent pattern.
This practice saves you from making mistakes on your project.
Quick Scan: Spraying Polyurethane Tips
- Thinning is Crucial: Check product label.
- Use a Viscosity Cup: Test your mix.
- Filter Everything: Catch debris before spraying.
- Test Spray Pattern: Use scrap material first.
- Clean Your Gun: Immediately after use.
Real-World Application: Spraying Cabinets
Let’s imagine you’re redoing your kitchen cabinets. They are made of solid wood. You want a durable, beautiful finish.
Polyurethane is a great choice. Spraying them is the best way to get a factory-like finish. It’s a big job.
But using the right spray gun makes it much easier.
Surface Preparation
First, you need to prep the cabinets. Remove all the hardware. Clean the surfaces thoroughly.
You’ll want to sand them smooth. Start with medium-grit sandpaper. Then move to a finer grit.
Wipe away all the dust. A tack cloth is perfect for this. Any dust left will show up in your finish.
Make sure the cabinets are in a well-ventilated area. You’ll also want to protect surrounding areas with drop cloths.
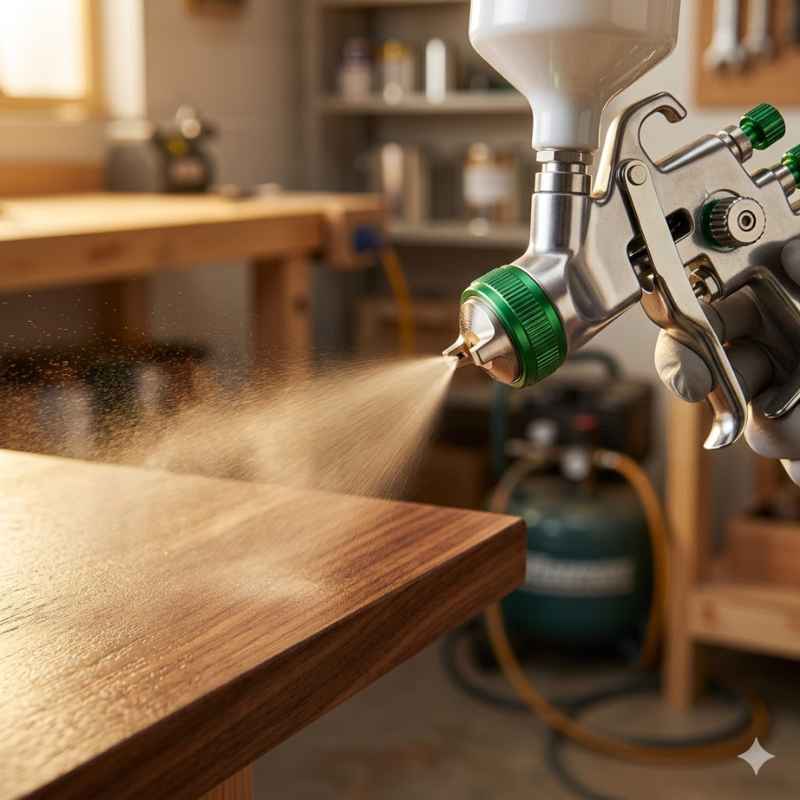
Spraying the Polyurethane
Now, it’s time for the spray gun. Prepare your polyurethane. Thin it as needed.
Filter it. Load it into your chosen spray gun. I’d recommend an HVLP gun here.
Like the Fuji T-70 or a TCP Global set with multiple nozzles. Set up your gun. Test your spray pattern on cardboard.
Start spraying the cabinets. Keep the gun moving at a steady speed. Overlap each pass by about 50%.
Don’t get too close to the surface. This can cause drips. Don’t spray too far away.
This can lead to a dry spray. Hold the gun perpendicular to the surface. Avoid tilting it.
This ensures an even coat.
Multiple Coats
You will likely need multiple coats of polyurethane. Allow each coat to dry according to the manufacturer’s instructions. Some polyurethanes require light sanding between coats.
Use a very fine grit sandpaper (like 320 or 400). This helps with adhesion. It also smooths out any imperfections.
Wipe away dust after sanding. Then apply the next coat. Two to three coats are common.
More might be needed for high-traffic areas.
Cabinet Spraying Workflow
Step 1: Disassemble & Clean: Remove hardware. Clean cabinets well.
Step 2: Sanding: Smooth surfaces with medium, then fine sandpaper.
Step 3: Dust Removal: Use a tack cloth to get all dust off.
Step 4: Masking: Protect areas you don’t want sprayed.
Step 5: Spray First Coat: Use your prepared polyurethane and spray gun.
Step 6: Dry & Light Sand: Let it dry. Lightly sand if needed.
Step 7: Repeat: Apply subsequent coats, sanding between if recommended.
What This Means for Your Projects
So, what’s the takeaway from all this? Having the right spray gun for polyurethane isn’t just about convenience. It directly impacts the final look of your work.
It also affects how long that finish will last.
When is a Spray Gun Justified?
If you are finishing small items like picture frames, a good brush might be fine. But for larger surfaces like furniture, doors, or cabinets, a spray gun is often the best choice. It gives you a smoother, more uniform finish.
It’s also faster for large areas. If you are aiming for a professional, showroom look, spraying is often the way to go. It’s especially true if your polyurethane is a brushing type that can show brush marks.
When to Worry About Your Spray Gun Choice
You should worry if your spray gun keeps clogging. Or if it’s creating an uneven finish. If you see lots of drips and runs.
Or if you are using way too much paint and making a mess. These are signs your gun might not be right for polyurethane. Or perhaps it’s not set up correctly.
It could be that it’s not powerful enough. Or the nozzle size is wrong. Don’t force a tool that isn’t suited for the job.
It will only lead to frustration.
Simple Checks Before You Start
Before you spray any polyurethane, do a quick check. Is your gun clean? Is the polyurethane properly thinned and filtered?
Is your air pressure set correctly? Is your nozzle size appropriate? Are you wearing protective gear like a respirator?
A few moments spent on these checks can save you a lot of heartache later on. They ensure your spray gun performs at its best.
Polyurethane Finish Quality: Quick Checks
Smoothness: Does the finish feel even to the touch? Or are there rough spots?
Evenness: Is the color and sheen consistent across the surface? Or are there dark/light patches?
Clarity: Can you see clearly through the finish to the wood below? Or is it hazy or cloudy?
Absence of Defects: Look for dust nibs, runs, sags, or orange peel texture. These indicate potential issues.
Quick Tips for Better Polyurethane Spraying
Here are some quick pointers to help you get a better spray finish. These are simple things that can make a big difference in your results. They are based on experience and what works well in practice.
- Work in a Clean Environment: Dust is the enemy of a smooth finish. Try to spray in a dust-free area. A temporary spray booth can help.
- Good Lighting is Key: You need to see what you are doing. Proper lighting helps you spot runs or dry spots.
- Proper Ventilation: Polyurethane fumes can be strong. Always work in a well-ventilated space. Wear a respirator with organic vapor cartridges.
- Steady Hand and Consistent Speed: This is vital for an even coat. Practice your movement before spraying the actual item.
- Don’t Rush the Drying Time: Let each coat dry fully. Rushing can lead to lifting or improper curing.
- Clean Your Gun Immediately: Seriously, do this. Dried polyurethane is very hard to remove.
- Read the Label: Always refer to the polyurethane manufacturer’s instructions. They know their product best.
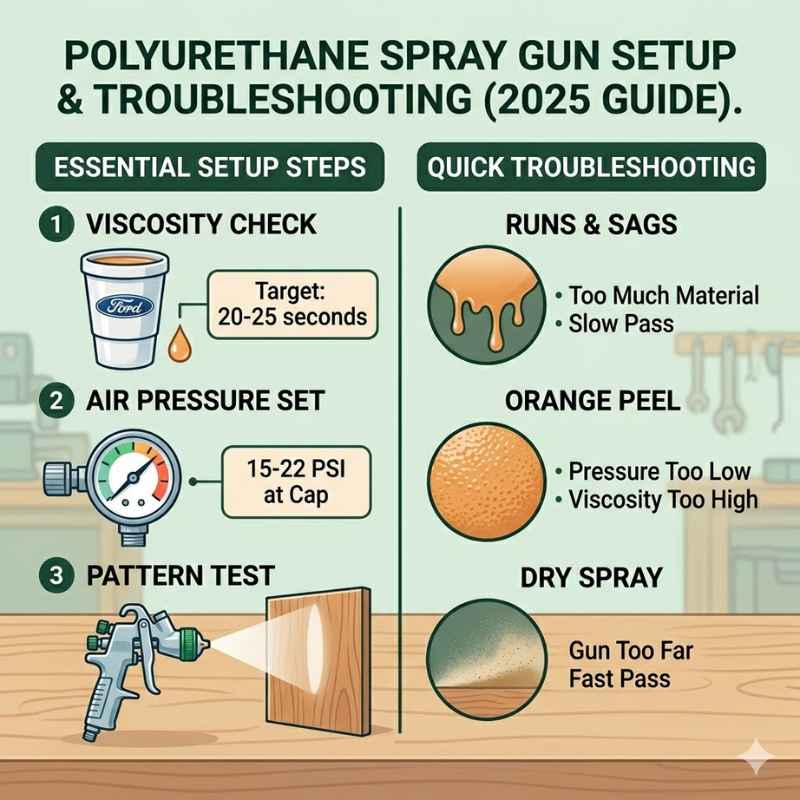
Spray Gun Setup Checklist
Air Pressure: Adjust for desired atomization and pattern. Check gun manual.
Fluid Control: Set for the right amount of material flow. Test on scrap.
Fan Pattern: Adjust for the width needed for your project.
Material Viscosity: Ensure it’s thinned correctly.
Nozzle Size: Match to the polyurethane being used.
Frequent Questions About Spraying Polyurethane
What is the best type of spray gun for polyurethane?
For polyurethane, an HVLP (High Volume Low Pressure) spray gun is generally the best choice. HVLP guns provide high transfer efficiency, meaning more paint lands on your surface and less is wasted as overspray. They also offer excellent control for applying smooth, even coats, which is crucial for polyurethane finishes.
Do I need to thin polyurethane before spraying?
Yes, almost always. Polyurethane is often too thick to spray directly from the can. Thinning helps it flow through the spray gun and atomize properly.
Check the polyurethane’s product label for recommended thinning ratios and the type of thinner to use (e.g., mineral spirits, denatured alcohol).
What nozzle size should I use for polyurethane?
The ideal nozzle size depends on the specific polyurethane’s viscosity. For most standard polyurethanes, a nozzle size between 1.8mm and 2.0mm is a good starting point. Thinner polyurethanes might work with 1.4mm or 1.7mm, while very thick ones may require 2.0mm or larger.
How do I prevent runs and drips when spraying polyurethane?
To prevent runs and drips, ensure your polyurethane is thinned correctly. Adjust your spray gun for the right amount of material flow and air pressure. Maintain a consistent spray pattern by moving your gun at a steady speed and overlapping each pass by about 50%.
Avoid getting too close to the surface, and don’t apply excessively thick coats. Test your spray pattern on scrap material before spraying your project.
Can I use a non-HVLP spray gun for polyurethane?
While you can technically use a non-HVLP spray gun, it is generally not recommended for polyurethane. High-pressure guns tend to create much more overspray, leading to wasted material and a less controlled finish. They can also be harder to get an even coat with, increasing the risk of runs.
HVLP guns are designed for better efficiency and finish quality with coatings like polyurethane.
How important is cleaning the spray gun after using polyurethane?
Cleaning the spray gun immediately after use is extremely important. Polyurethane dries very quickly and can harden into a solid mass, making it very difficult to remove. If not cleaned properly, dried polyurethane can clog the gun, ruin its performance, and make it unusable.
Thorough cleaning is essential for the longevity and proper function of your spray gun.
Conclusion: A Smoother Finish Awaits
Choosing the right spray gun for polyurethane makes a world of difference. It transforms a potentially frustrating job into a rewarding experience. With the right tool, proper preparation, and a little practice, you can achieve that smooth, professional finish you’ve been dreaming of.
Remember to consider your specific needs, like project size and the type of polyurethane. Invest wisely, maintain your equipment, and enjoy the beautiful results.