Best Way To Apply Poly To Wood For A Flawless Finish
Polyurethane is a clear protective coating. It forms a tough layer over wood. This layer shields the wood from water, scratches, and wear.
There are two main types: oil-based and water-based.
Oil-based poly dries slower. It gives a slightly amber tint to the wood. It’s very durable.
Water-based poly dries faster. It stays clear. It’s easier to clean up.
Choose the type that fits your project best. Your wood type also matters. Softwoods might soak up more finish.
Hardwoods might need a different approach. Knowing your wood helps you get a better result.
Prepping Your Wood: The Foundation for a Flawless Finish
This step is super important. You can’t skip it. Good prep means a good finish.
It really does.
First, make sure your wood is clean. Dust is your enemy. Wipe it down with a tack cloth.
A tack cloth is sticky. It picks up tiny dust bits. Do this right before you paint.
Or before you put on the poly. Also, check for any oils or grease. Wipe those off too.
You can use mineral spirits for this. Make sure the wood is dry after wiping.
Next, sand your wood smoothly. Start with a medium grit sandpaper. Maybe 120 or 150 grit.
This removes any roughness. Then, move to a finer grit. Use 220 grit.
This makes the surface very smooth. Smooth wood holds the finish better. It looks better too.
Always sand in the direction of the wood grain. Never sand against it. That leaves ugly marks.
After sanding, you must remove all the dust. Vacuum your project thoroughly. Then, wipe it down again with a tack cloth.
Some people even use a damp cloth. Just make sure it’s not too wet. Let the wood dry completely.
Any dust left behind will show up in your finish. It will look like little bumps. Or specks under the clear coat.
It’s like trying to paint a dusty car. It just won’t look perfect.
Check for any imperfections. Fill any holes or cracks. Use wood filler that matches your wood color.
Let the filler dry completely. Sand it smooth. Again, dust it off.
Your wood should feel like silk. That’s when you know you’re ready. It feels great to touch perfectly smooth wood.
You can almost see the finish already.
Essential Prep Checklist
- Clean Surface: Remove all dust, oil, and grease.
- Smooth Sanding: Use progressively finer grits (e.g., 120, 220).
- Grain Direction: Always sand with the wood grain.
- Dust Removal: Vacuum and use a tack cloth until spotless.
- Imperfection Fill: Patch holes and cracks with matching filler.
- Dry Time: Ensure wood is completely dry before applying finish.
Choosing Your Application Tool
The tool you use matters a lot. It affects how the poly goes on. And how it looks when dry.
For oil-based poly, a natural bristle brush is good. A high-quality one. It holds the thicker finish well.
For water-based poly, a synthetic brush is better. Synthetic bristles don’t swell up. They work well with water.
Look for brushes that are made for polyurethane. They have special bristles. They help spread the finish evenly.
Foam brushes are also an option. They are cheap. They don’t leave brush marks.
But they can also leave foam bits behind. So, be careful. You can also use a clean cotton rag.
This is good for wiping on the poly. Especially for thin coats. This method is called wiping or staining.
It works well for a more natural look.
A foam roller can be used for large, flat areas. Like tabletops or cabinet doors. Use a high-density foam roller.
It applies a smooth coat. Make sure it’s designed for finishes. Not for house paint.
For spray application, you need special equipment. Like a sprayer and a well-ventilated space. This is for more advanced users.
It gives a very smooth finish. But it’s tricky to get right. For most DIY projects, a good brush is fine.
I remember trying a cheap brush once. It shed bristles everywhere. I had to pick them out of the wet poly.
It was a nightmare. I learned my lesson. Now I always buy good brushes.
It’s worth the little extra cost. You want a tool that helps you, not hinders you.
Tool Talk: Which is Best?
Natural Bristle Brush: Best for oil-based poly. Good for thicker finishes.
Synthetic Bristle Brush: Ideal for water-based poly. Resists water damage.
Foam Brush: Affordable, can reduce brush marks. Watch for foam bits.
Clean Cotton Rag: Great for wiping on thin, even coats. Good for a natural look.
Foam Roller: Use for large flat areas. Ensure it’s high-density and finish-grade.
The Application Process: Step-by-Step
Now for the main event. Applying the poly. Take your time.
Don’t rush this part. It’s the key to a great finish.
First, open your can of polyurethane. Stir it gently. Do NOT shake it.
Shaking creates bubbles. Bubbles are bad. Stir until it’s mixed well.
Then, let it sit for a bit. This lets any small bubbles rise. And pop.
This is a crucial step. Tiny bubbles in the can mean tiny bubbles in your finish. Nobody wants that.
Dip your brush or applicator into the poly. Load it up, but not too much. You don’t want drips.
Scrape off any excess on the can rim. Or on a piece of scrap wood. Start applying the poly to your wood.
Always brush in the direction of the wood grain. Use long, smooth strokes. Try to cover a good section at once.
This helps avoid lap marks.
Lap marks happen when new strokes overlap old ones that have started to dry. It creates a visible line. So, work in sections.
And keep a wet edge. That means the area you just finished should still be wet. As you start the next section.
Overlap your strokes just a little. This blends them together.
Apply a thin, even coat. It’s better to do several thin coats. Than one thick one.
Thick coats can sag. They can run. They take longer to dry.
And they might not cure properly. Each coat should be a light layer. You should still be able to see the wood grain through it.
Especially with the first coat.
As you finish a stroke, gently pull the brush over the edge. This removes any heavy buildup. Or drips.
Check your work often. Look from different angles. Use a bright light.
This helps you spot any thin spots. Or areas that might run. If you see a drip starting, fix it right away.
Gently brush it out. Or wick it up with your brush.
Don’t overwork the finish. That means brushing back and forth too much. It can pull the finish apart.
Or create brush marks. Once you’ve laid it down, leave it. Let it dry.
Then you can sand it lightly. Between coats. This is important for smoothness.
And for good adhesion. We’ll talk more about sanding soon.
Sanding Between Coats: The Secret to Silkiness
This step is often overlooked. But it’s vital. Sanding between coats makes your finish super smooth.
It also helps the next coat stick better.
Wait for the coat of poly to dry completely. Check the can for drying times. They vary by product.
Usually, it’s a few hours. Or overnight. Once dry, take fine-grit sandpaper.
Use something like 220 or 320 grit. Or even a gray synthetic abrasive pad (like Scotch-Brite). These pads are great.
They don’t sand away much wood. They just smooth the surface.
Lightly sand the entire surface. Again, always sand with the wood grain. You’re not trying to remove the finish.
You’re just knocking down any tiny bumps. Or dust specks. Or imperfections.
The goal is to make it smooth as glass. When you run your hand over it, it should feel perfect. Not rough at all.
After sanding, you MUST remove all the dust. Vacuum. Then use a tack cloth.
This is critical. If you don’t remove the dust, you’re just putting new dust into your next coat. It defeats the whole purpose.
Make sure the surface is spotless again. Then you’re ready for the next coat of poly.
I once skipped sanding between coats on a small table. I just wanted it done. Big mistake.
The finished surface was okay. But it wasn’t smooth. It had a slight roughness.
You could feel it when you put your arm on it. It drove me crazy. Now, sanding between coats is a rule for me.
It’s non-negotiable.
Smoothness Secret: Sanding Between Coats
- Wait for Dry: Ensure the poly coat is fully dry.
- Use Fine Grit: 220-320 grit sandpaper or a synthetic abrasive pad.
- Lightly Sand: Gently smooth the surface, following the grain.
- Dust Removal: Vacuum thoroughly and use a tack cloth.
- Purpose: Knocks down imperfections, improves adhesion.
Applying Multiple Coats: Building for Durability
Most projects need more than one coat of poly. Usually, three coats is a good number. For basic protection.
For high-traffic items like tables or floors, you might need four or even five coats. More coats mean more protection. They also make the finish look deeper and richer.
Apply each coat thinly and evenly. Just like the first. Let each coat dry completely.
Then, sand it lightly. And dust it off before applying the next coat. This process builds up a strong, smooth surface.
The final coat is usually not sanded. Unless you want a very matte finish.
The drying time can be affected by humidity and temperature. In humid or cold weather, poly takes longer to dry. Make sure your work area is well-ventilated.
But also free of dust. Sometimes I set up a temporary clean room. Using plastic sheeting.
To keep dust out.
When applying the final coat, be extra careful. Try to make it as perfect as possible. This is the coat everyone will see.
And feel. If you notice a small flaw after it dries, you can sometimes fix it. Gently sand it smooth.
Then apply a touch-up coat. Or, if it’s a small area, you might be able to rub it out with polishing compounds. But it’s always best to get the last coat right the first time.
I once finished a dresser. The last coat looked good in the dim light. The next morning, in bright sun, I saw a tiny fly had landed in it.
It was a disaster. I had to lightly sand the whole top. And reapply the final coat.
It was a tough lesson in patience. And in working in good light.
Common Mistakes and How to Avoid Them
Many people run into problems when applying poly. Knowing these mistakes helps you avoid them. It makes your job easier.
Mistake 1: Not enough prep. We’ve covered this. But it’s worth repeating. Dust, grease, or rough wood will ruin your finish.
Always start with perfectly prepped wood. Sanding is key. Dust removal is vital.
Mistake 2: Shaking the can. This creates bubbles. Bubbles lead to a bumpy finish. Stir gently instead.
Let the can sit to let bubbles escape.
Mistake 3: Applying too thick. Thick coats sag. They run. They take forever to dry.
They might not harden properly. Apply thin, even coats. You can always add more.
It’s hard to fix a thick, runny mess.
Mistake 4: Over-brushing. Brushing back and forth too much stirs up bubbles. And creates brush marks. Lay the finish down with long, smooth strokes.
And leave it alone. Let it level itself out.
Mistake 5: Working in a dusty area. Dust is the enemy of a smooth finish. Dust settles into the wet poly. Leaving tiny specks.
Work in a clean, well-ventilated space. Consider a temporary dust barrier.
Mistake 6: Not sanding between coats. This is where that silky feel comes from. Skipping this step leaves a rougher finish. It also weakens adhesion for the next coat.
Mistake 7: Not enough coats. One coat isn’t enough. It won’t protect the wood well. And it won’t look deep or rich.
Build up thin coats for durability and beauty.
Mistake 8: Rushing the drying time. Poly needs time to dry. And cure. Trying to sand or apply the next coat too soon causes problems.
It can pull up the previous coat. Or cause wrinkles. Always respect the drying times.
They are there for a reason.
Common Pitfalls to Dodge
Problem: Rough, bumpy finish.
Cause: Dust, bubbles, thick coats, over-brushing.
Solution: Thorough prep, gentle stirring, thin coats, minimal brushing.
Problem: Streaks or lap marks.
Cause: Uneven application, working too slowly, poor overlap.
Solution: Work in sections with a wet edge, long smooth strokes.
Problem: Soft or sticky finish.
Cause: Not enough coats, not allowing proper curing time.
Solution: Apply multiple thin coats, let cure fully.
Different Wood Types and Polyurethane
How poly behaves can change based on the wood you’re using. This is good to know for a truly flawless look.
Softwoods (Pine, Fir): These woods are porous. They can soak up poly quickly. This might mean you need more coats.
Or you might need to seal them first. A thin seal coat helps prevent blotchiness. And ensures even absorption.
Hardwoods (Oak, Maple, Cherry): These are denser. They don’t soak up as much. They often take the finish very nicely.
Maple, especially, can be very smooth. Oak has open pores. You might want to fill those pores.
With a wood filler or pore filler. Before you apply poly. This gives a perfectly flat surface.
Exotic Woods: Some exotic woods have natural oils or resins. These can interfere with the drying and curing of polyurethane. Always test your poly on a scrap piece of the exotic wood first.
If it seems to be drying slowly or is sticky, you might need to use a different finish. Or clean the wood with a solvent.
Stained Wood: If you’ve stained your wood, make sure the stain is completely dry and cured. Some stains can stay “wet” for a long time. This can affect how the poly adheres.
And may cause color bleed. Always follow the stain manufacturer’s instructions for drying time before applying poly.
In my workshop, I’ve worked with knotty pine a lot. Those knots can be tricky. They can bleed through the finish.
Sometimes you need a good primer. Or a dewaxing solvent on the knots. Before you even start sanding.
It’s all about understanding the specific wood.
Wood Type Considerations
- Softwoods: Absorb more, may need extra coats or a seal coat.
- Hardwoods: Denser, take finish well. Oak may need pore filling.
- Exotic Woods: Test first due to natural oils. May require specific prep.
- Stained Wood: Ensure stain is fully dry and cured before applying poly.
Environment Matters: Where You Apply Your Poly
The place where you apply polyurethane is as important as your tools. Or your technique. A good environment helps you get that perfect finish.
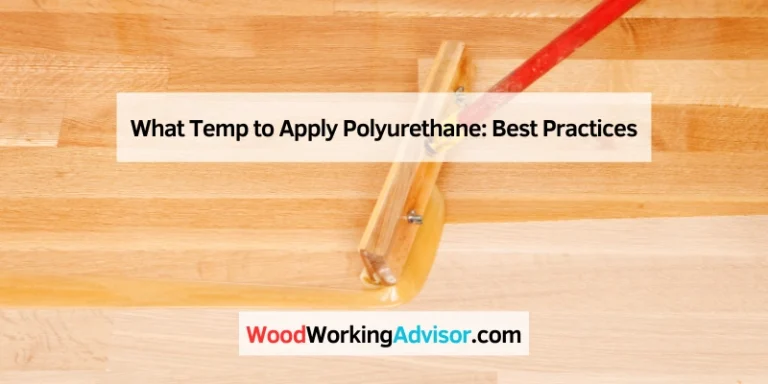
Temperature: Most polyurethanes work best in moderate temperatures. Usually between 65-75°F (18-24°C). If it’s too cold, the poly won’t flow well.
It can become gummy. And drying will be very slow. If it’s too hot, it can dry too fast.
Which leads to brush marks. And lap marks. Always check the product label for recommended temperatures.
Humidity: High humidity is bad for poly. It slows down drying. It can cause a cloudy or hazy finish.
Especially with water-based polys. Try to work in a dry space. If you live in a humid climate, use a dehumidifier.
In your workshop. Or choose a day with lower humidity.
Ventilation: You need good ventilation. For your safety. Poly fumes can be strong.
And harmful. Open windows and doors. Use fans to move air.
But be careful not to create a dust storm. Good airflow helps the finish dry evenly. And prevents fumes from building up.
Dust Control: This is a big one. Dust is the enemy. Find the cleanest space possible.
Seal off doorways. Turn off fans that blow dust around. Sweep or vacuum the floor.
And walls. Before you start. Wipe down your project with a tack cloth just before applying.
Some people use a pop-up spray tent. It creates a clean environment. It’s a great investment for serious finishing.
I once tried to finish a small shelf in my garage. It was late fall. It was a bit chilly.
And dusty. The finish came out okay. But not great.
There were tiny dust specks. And the sheen wasn’t as smooth as I wanted. Now I always try to finish indoors.
In a clean room. It makes a world of difference.
Your Finishing Zone: Key Factors
- Temperature: Aim for 65-75°F (18-24°C).
- Humidity: Keep it low for faster drying and clarity.
- Ventilation: Ensure good airflow for safety and even drying.
- Dust Control: Work in the cleanest space possible. Minimize air movement that blows dust.
Water-Based vs. Oil-Based Polyurethane: A Closer Look
Choosing between water-based and oil-based polyurethane is a common decision. Each has pros and cons. Your project goals will help you choose.
Water-Based Polyurethane:
- Dries Fast: Usually within 1-3 hours.
- Clear Finish: Does not yellow over time. Great for light woods or painted surfaces.
- Low Odor: Much less strong fumes.
- Easy Cleanup: Soap and water for brushes and tools.
- Less Durable (Historically): Modern formulas are much better. But some still find oil-based tougher for high-wear surfaces.
- Can Raise Grain: May require more sanding between coats, especially on softwoods.
Oil-Based Polyurethane:
- Dries Slow: Typically 6-12 hours.
- Ambers Over Time: Gives a warm, honey-like tone to wood. Beautiful on darker woods.
- Strong Odor: Requires excellent ventilation.
- Tougher Finish: Generally considered more durable and scratch-resistant.
- Easier to Apply Smoothly: Flows out better, fewer brush marks possible.
- Difficult Cleanup: Requires mineral spirits or paint thinner.
For projects where you want to preserve the natural color of light wood, like maple or birch, water-based is usually the way to go. If you’re finishing a rustic table and want a warm, aged look, oil-based might be your choice. I’ve used both extensively.
For quick projects or when I don’t want any color change, I reach for water-based. For a deep, rich finish on a wood that can handle a little warmth, I lean towards oil-based.
Poly Choice: Water vs. Oil
| Feature | Water-Based Poly | Oil-Based Poly |
|---|---|---|
| Dry Time | Fast (1-3 hrs) | Slow (6-12 hrs) |
| Color | Clear, no yellowing | Ambers, warm tone |
| Odor | Low | High |
| Cleanup | Soap & water | Mineral spirits |
| Durability | Good to very good | Excellent, very tough |
| Grain Raising | Can be more noticeable | Less noticeable |
Achieving a Matte, Satin, or Gloss Finish
Polyurethane comes in different sheens. The sheen affects the look and feel of your wood. Gloss finishes are shiny and reflective.
Satin finishes have a soft sheen. Matte finishes are very dull. They don’t reflect much light.
The sheen is determined by tiny flatting agents mixed into the poly. More flatting agents mean a duller finish. Less means a shinier finish.
Gloss: Very shiny. Shows imperfections easily. Best for surfaces where you want maximum shine.
Semi-Gloss: A noticeable shine, but not as reflective as gloss. A good balance for many projects.
Satin: The most popular choice for many. It offers a soft sheen. It hides minor imperfections well.
It feels smooth and natural.
Matte: Very dull. Almost no shine. Looks very natural, like the wood is unfinished.
Hides imperfections very well.
You can also create your own custom sheen. By mixing different sheens together. For example, mixing a satin with a matte.
Will give you a finish that’s less shiny than satin but more so than matte. Always test your mixture on scrap wood first.
The number of coats can also affect the final sheen. More coats, especially of a gloss finish, can sometimes make it look slightly more reflective. So, if you’re aiming for a very specific look, test it out.
I usually prefer satin. It’s forgiving and looks elegant.
Restoring and Maintaining Your Polyurethane Finish
Your beautiful finish won’t last forever without a little care. But it’s usually quite resilient.
Regular Cleaning: For most finishes, a soft, damp cloth is all you need. Wipe up spills immediately. Avoid harsh cleaners.
Or abrasive pads. They can dull or scratch the finish. Mild soap and water is usually safe.
Minor Scratches: If you get small surface scratches, you might be able to buff them out. For water-based finishes, try a non-abrasive cleaner. Or a paste wax.
For oil-based finishes, a good quality furniture polish can often hide minor scratches. If the scratch is deep, it might go through the finish. Then you’ll need to touch it up.
Deep Scratches or Damage: If the damage goes through the finish, you’ll need to repair it. This might involve light sanding of the damaged area. And then reapplying one or two thin coats of poly.
Make sure to feather the new finish into the old. So the repair is not obvious. This is where a good match in sheen is important.
Stripping and Refinishing: If the finish is severely damaged, or you want to change the look, you can strip it. Use a chemical stripper designed for poly. Follow safety precautions.
Once the old finish is gone, you’ll need to sand the wood smooth again. And reapply a new finish. From start to finish.
I have an old wooden desk. The finish was worn in places. I didn’t want to strip it all.
So I carefully sanded the worn areas. Lightly. Then I applied a couple of thin coats of matching poly.
Just to those spots. Blended them in. It worked perfectly.
It saved me a lot of work.
When to Worry: Signs Your Finish Isn’t Right
Most of the time, applying poly goes smoothly. But sometimes things don’t look right. Knowing what to look for helps.
Cloudy or Hazy Finish: This is often caused by humidity. Or applying the finish too thick. Or in too cold temperatures.
Water-based poly is more prone to this. If it happens, let it dry fully. Then you might be able to buff it out.
Or you may need to sand it off and start over.
Sticky or Soft Finish: This means the poly hasn’t cured properly. It could be from applying too thick a coat. Not enough coats.
Or not enough drying time between coats. Or it could be environmental. Like high humidity.
Or cold. If it’s still soft after days, it might be best to strip it. And reapply correctly.
Runs and Drips: These happen when too much poly is applied. Or the brush is loaded too heavily. Or the project is not level.
As soon as you see a run forming, try to fix it. Gently brush it out. Or wick it up with your brush.
If it dries, you’ll have to sand it off.
Brush Marks: These are visible lines from the brush. They come from over-brushing. Or using a poor-quality brush.
Or applying too thick. Or the poly drying too fast. Sanding between coats helps reduce them.
But the best way to avoid them is with good technique.
Surface Imperfections: Tiny specks of dust, hairs, or debris. These get into the wet finish. The key to avoiding them is dust control.
And a final tack cloth wipe. Before the last coat.
If you encounter these issues, don’t panic. Most can be fixed. Sometimes with patience.
And a little more sanding. The important thing is to identify the cause. So you don’t repeat the mistake.
Final Thoughts on Achieving a Flawless Poly Finish
Getting a flawless poly finish isn’t magic. It’s about careful steps. And attention to detail.
Start with perfectly prepped wood. Use the right tools. Apply thin, even coats.
Sand lightly between coats. And work in a clean environment. Be patient.
Rushing is your enemy. Every step builds on the last. And results in a beautiful, durable finish.
Your wood project will thank you for it. Enjoy the smooth, protective layer you’ve created!
Frequently Asked Questions
What is the best way to apply polyurethane to wood for a flawless finish?
The best way involves thorough preparation (sanding and dust removal), using the right applicator (quality brush or rag), applying thin, even coats, sanding lightly between each coat, and working in a clean, dust-free environment. Patience and attention to detail are key.
How many coats of polyurethane should I apply?
Generally, three thin coats are recommended for good protection. For high-wear surfaces like tabletops or floors, four to five coats may be necessary for maximum durability.
Should I sand between coats of polyurethane?
Yes, absolutely. Lightly sanding with fine-grit sandpaper (220-320 grit) or a synthetic abrasive pad between coats removes imperfections and improves adhesion for the next layer, resulting in a much smoother finish.
What’s the difference between water-based and oil-based polyurethane?
Water-based dries faster, stays clear, has low odor, and cleans up with soap and water. Oil-based dries slower, imparts a warm amber tone, has strong odors, and requires mineral spirits for cleanup. Oil-based is often considered tougher.
How do I avoid brush marks when applying poly?
Use a high-quality brush, load it with the right amount of poly, apply in long, smooth strokes with the wood grain, and avoid over-brushing. Work in sections with a wet edge to prevent lap marks.
My finish looks hazy. What caused it?
Hazing is often caused by high humidity, applying the poly too thick, or using it in temperatures that are too cold. Ensure proper environmental conditions and apply thin coats.