Can You Mix Stain And Polyurethane? Honest Answer Here
But here’s the thing: the answer isn’t a simple yes or no. It depends a lot on what you’re trying to achieve and the specific products you’re using. Mixing them directly can lead to a world of trouble.
This can ruin your project. It can also make finishing harder later on.
We’ll break down exactly what happens when you try to combine these two finishing steps. We’ll cover the risks. We’ll also explore safer, smarter ways to get a great look.
Stick around, and you’ll know for sure how to get the perfect finish without the headaches.
No, you generally cannot mix standard wood stain and polyurethane together and expect a good result. While some specialized “gel stains with poly” exist, mixing regular oil-based or water-based stains with regular polyurethane can lead to uneven color, poor adhesion, and a weak finish. It’s best to apply them separately.
Understanding Stain and Polyurethane
Before we dive into mixing, let’s get a feel for what stain and polyurethane do on their own. Think of them as two different jobs for your wood.
Wood stain is all about color. It sinks into the wood fibers. It changes the natural hue.
This brings out the grain’s beauty. Stains come in many colors. They can make pine look like cherry.
Or they can make oak look darker. Most stains don’t offer much protection. They are like a colored dye for the wood.
Polyurethane, on the other hand, is a protective coating. It sits on top of the wood. It forms a hard, durable film.
This film shields the wood from spills, scratches, and wear. Polyurethane adds a sheen, too. It can be matte, satin, semi-gloss, or high-gloss.
It’s the shield that keeps your wood looking good.
Why Mixing Stain and Polyurethane is Tricky
So, why is mixing these two so problematic? It boils down to their different natures and how they are designed to work.
Wood stains are thin liquids. They need to penetrate the wood. They contain pigments or dyes.
These colorants are suspended in a solvent. This solvent helps the color spread and dry. Polyurethane, however, is a thicker liquid.
It’s a type of varnish. It forms a surface film when it dries. It has resins and solvents that create that protective layer.
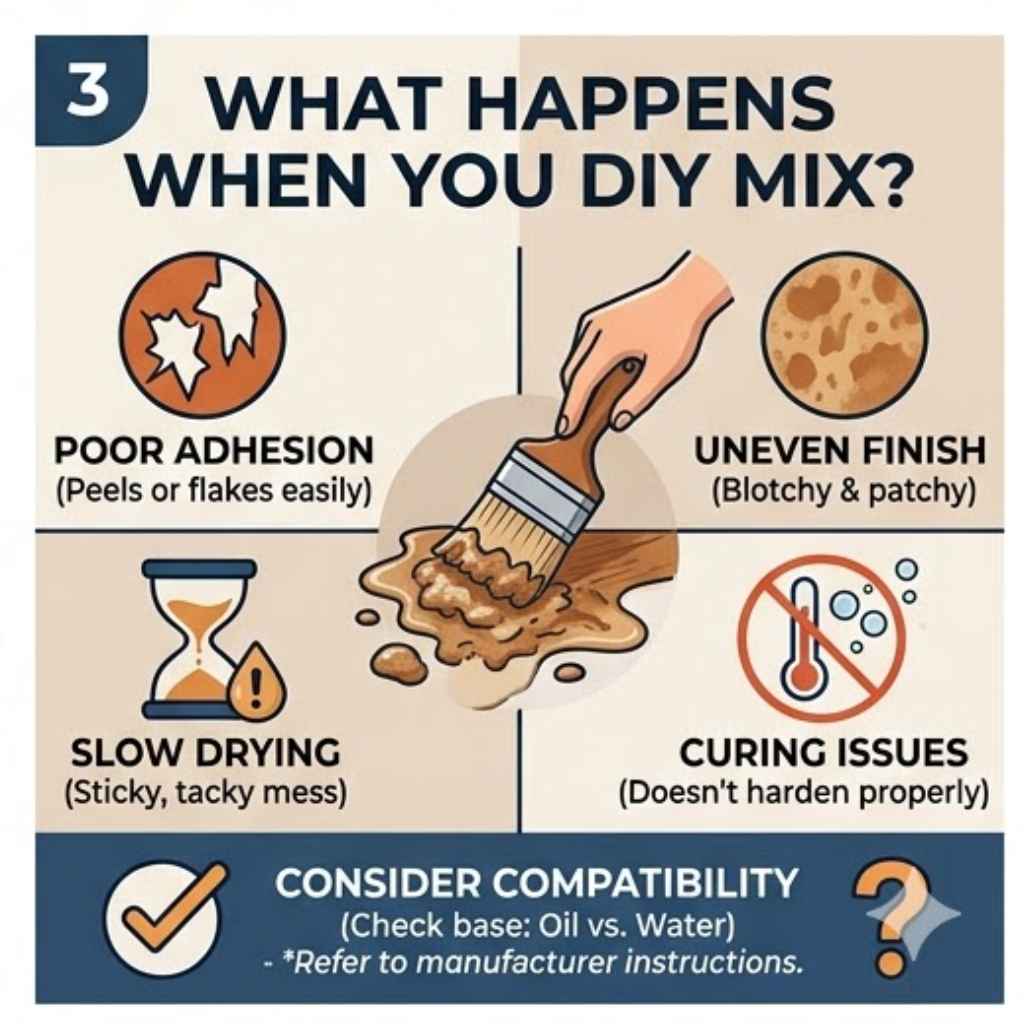
When you try to mix them, the chemistry gets messy. The solvent in the stain might not play well with the resins in the polyurethane. This can cause the polyurethane to break down.
It might not cure properly. You could end up with a finish that feels sticky. It might never get truly hard.
The color can also be affected. Pigments can clump. This leads to blotchy spots.
What Happens When You Mix Them?
Let’s talk about the actual results you might see if you ignore the advice and mix them. It’s usually not pretty. You’ll likely encounter several issues.
First, the color might be off. Stains need to soak into the wood evenly. When mixed with poly, the pigment might not spread right.
It can settle or clump. This means you won’t get the rich, consistent color you wanted. Instead, you might see streaks.
You could see dark spots or light patches.
Second, the finish might not be durable. Polyurethane’s job is protection. But if it’s mixed with stain, its ability to form a strong film is compromised.
The wood might look colored, but it won’t be well-protected. It could scratch easily. It might be susceptible to water damage.
This defeats the purpose of applying a finish.
Third, drying times can be unpredictable. Stains and polyurethanes have different drying schedules. Mixing them can make things confusing.
The finish might stay tacky for a long time. It may never fully harden. This makes the project unusable for days, or even weeks.
It’s a frustrating outcome.
Lastly, adhesion can be a major problem. The polyurethane needs to stick well to the wood. If it’s mixed with stain, it might not bond properly.
This can lead to peeling or flaking later on. This is especially true for surfaces that get a lot of use.
The Myth of the “All-in-One” Finish
There’s a persistent idea that you can find a single product that stains and seals. While some products come close, they aren’t the same as mixing your own.
Some companies offer “gel stains” that have a bit of polyurethane mixed in. These are engineered to work together. They offer a bit more body than traditional stains.
They can provide a light seal. But they are not a full substitute for a separate coat of polyurethane. They are meant to offer a slightly more durable color coat.
There are also “toning polyurethanes.” These are clear coats with a small amount of colorant added. They add a hint of color while sealing. But they are not true stains.
They won’t change the wood color deeply. They just give it a subtle tint. They also don’t offer the same depth of color as a standalone stain.
So, while options exist, they are specific products. They are not an invitation to mix any stain with any poly. Always read the product label carefully.
Understand what the product is designed to do.
Safer Ways to Combine Color and Protection
The good news is, you don’t have to live without a beautifully colored and protected wood surface. There are proven methods to achieve this. These methods ensure both aesthetics and durability.
The most common and reliable method is to apply your finishes in layers. First, apply your chosen wood stain. Let it dry completely.
Then, apply your polyurethane over the dry stain. This is the standard approach for good reason. It works.
You might also consider tinted polyurethanes or glazes. These can add subtle color. They also provide protection at the same time.
But again, these are specific products. They are not a DIY mix of regular stain and poly.
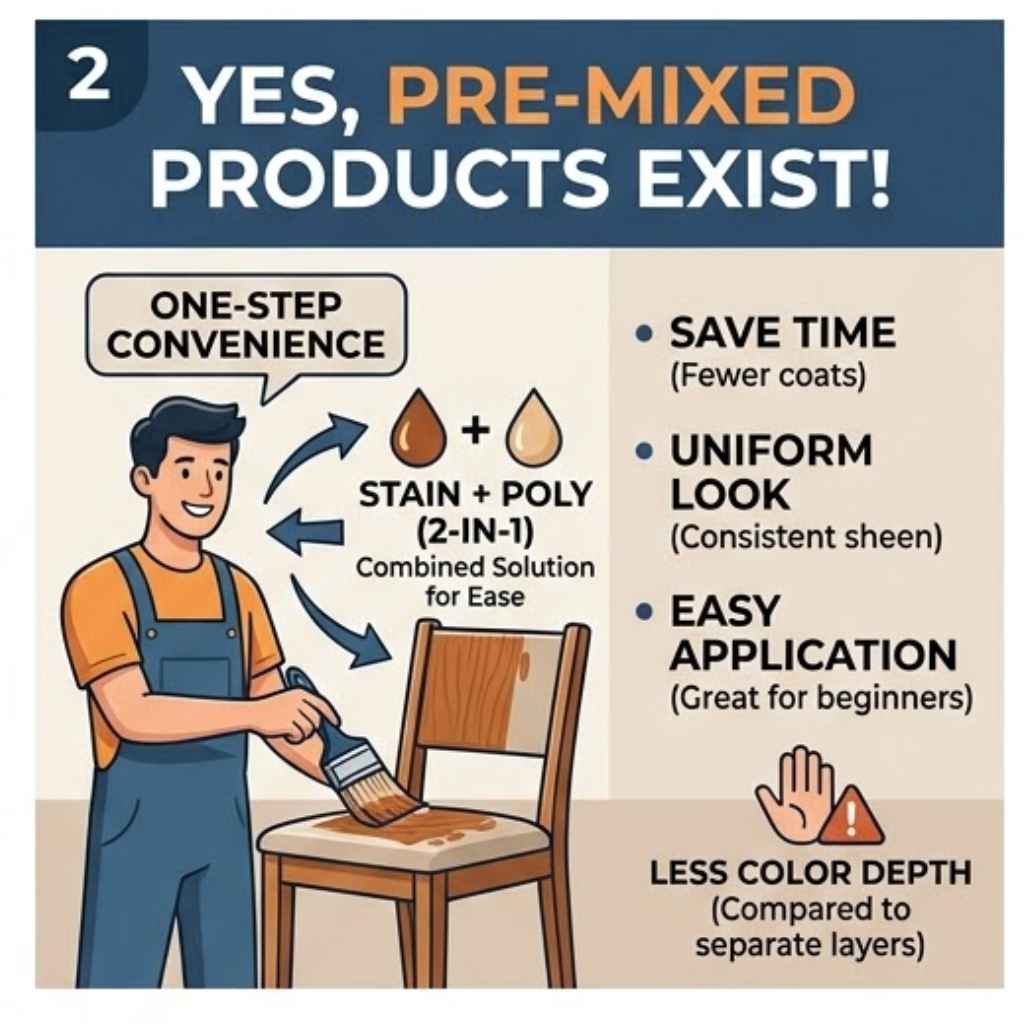
Another option is a pre-mixed product designed for both. Some brands offer “stain and poly” products. These are carefully formulated.
They are designed to work together. They are often gel stains. They offer some color depth.
They also provide a basic level of protection. But they might not be as robust as separate coats.
Applying Stain First, Then Polyurethane
This is the tried-and-true method. It’s what most professionals rely on. It gives you the best control over both color and protection.
Start with your wood. Make sure it’s smooth and clean. Then, apply your wood stain.
Use a brush, rag, or foam applicator. Work the stain into the wood. Wipe off any excess.
This is key. Wiping off excess stain is what allows the color to settle into the wood fibers. It prevents the finish from looking muddy.
Let the stain dry completely. Drying times vary. Follow the manufacturer’s instructions.
This can take several hours. It might even take a full day. Rushing this step is a mistake.
Once the stain is bone dry, you can apply the polyurethane. You can use a brush, foam brush, or even a spray gun. Apply thin coats.
Avoid putting it on too thick. Thin coats dry better. They also lead to a smoother finish.
You’ll likely need multiple coats of polyurethane. Two or three coats are common. Lightly sand between coats with fine-grit sandpaper.
This helps each new coat stick. It also makes the finish smoother. Always wipe away dust after sanding.
Understanding Different Types of Stains and Polyurethanes
The type of stain and polyurethane you use can also influence the outcome. There are several common types.
Oil-Based Stains: These penetrate wood well. They often have a rich color. They can take longer to dry.
They usually require mineral spirits for cleanup. They pair best with oil-based polyurethane. Mixing water-based products with oil-based stains is a recipe for disaster.
Water-Based Stains: These dry faster. They clean up with water. They can sometimes raise the wood grain more than oil-based stains.
They are best used with water-based polyurethane. They offer a more environmentally friendly option.
Oil-Based Polyurethane: This is very durable. It has a slight amber tint. This can deepen the color of your stain over time.
It cleans up with mineral spirits. It tends to be more forgiving for beginners.
Water-Based Polyurethane: This dries clear. It doesn’t yellow over time. It cures harder and faster than oil-based poly.
It cleans up with water. It’s a great choice for light-colored woods. It’s also good if you want a perfectly clear finish that won’t alter the stain color.
When combining them, always try to use the same base. Oil with oil. Water with water.
Mixing bases is a primary reason for finish failure.
What About Gel Stains?
Gel stains are a bit different. They sit more on the surface. They don’t penetrate as deeply as liquid stains.
This makes them great for tricky woods. Woods like maple or pine can be blotchy with liquid stains. Gel stains often provide more uniform color.
Some gel stains have a bit of polyurethane or sealer mixed in. These are designed to be a “one-step” process for color and light protection. However, they are still not a replacement for a full coat of polyurethane if you need heavy-duty protection.
They offer more than a basic stain but less than a dedicated poly coat.
If you are considering a gel stain, read the product description carefully. It will tell you what it does and what it doesn’t do. If it says it offers protection, it might be enough for low-traffic items.
For tables or floors, you will still want to add a clear topcoat.
Pre-Mixed “Stain and Poly” Products
You’ll find products on the shelves marketed as “stain and poly” or “one-step wood finish.” These are not something you should try to create yourself by mixing cans. They are specifically formulated in a lab.
These products combine coloring agents with a type of clear coat. Often, they use a gel stain base. The coloring agents are designed to suspend properly in the sealing compound.
This prevents the issues you’d see with a homemade mix. They offer convenience.
However, they often don’t provide the same depth of color as a separate stain. They also might not offer the same level of durability as multiple coats of pure polyurethane. If you choose this route, manage your expectations.
They are a compromise for speed and simplicity.
For critical projects, or pieces that will see heavy use, applying stain and then a dedicated polyurethane topcoat is still the superior method. It gives you more control and a better final result.
Always test these combined products on scrap wood first. See how the color looks. Check how it dries.
Test its durability. This ensures you’re happy before you commit to your main project.
The Best Approach: Layering for Success
To get the best result, think in layers. Each layer has a job. Stain colors the wood.
Polyurethane protects it.
Layer 1: Preparation
This is crucial. Sand your wood smooth. Start with a coarser grit.
Move to finer grits. Clean off all dust. A tack cloth works well for this.
Poor prep means a poor finish, no matter what you do.
Layer 2: Color (Stain)
Apply your chosen stain. Use a method that works for you. Rag, brush, or foam.
Work it in. Wipe off the excess. Let it dry fully.
This is non-negotiable.
Layer 3: Protection (Polyurethane)
Apply thin coats of polyurethane. Let each coat dry. Sand lightly between coats.
Clean off dust. Apply as many coats as needed for the desired protection. Two to four coats are common.
This layered approach ensures each component does its job perfectly. You get vibrant color. You get robust protection.
It takes a bit more time. But the results are worth it. Your project will look professional.
It will also last longer.
Personal Experience: The “Shortcut” That Backfired
I remember one project early in my woodworking journey. It was a small bookshelf for my office. I wanted a rich walnut color.
I also wanted it protected from coffee cups. I saw two cans on my shelf: a walnut stain and a can of polyurethane. “Why not mix them?” I thought.
“Save myself a step.”
I poured some stain into the poly. It looked weird. The color didn’t blend right.
It had a lumpy, uneven look. But I was impatient. I stirred it up as best I could.
I brushed it onto the bookshelf. The color went on patchy. Some spots were dark walnut.
Others were a muddy brown. It looked awful.
Worse, when it dried, it was sticky. It felt like dried glue. It never got hard.
I waited days. It remained tacky. I tried wiping it with a rag.
The color came off onto the rag. It was a complete mess. I had to scrape the whole thing down.
That meant starting over. I learned a valuable lesson that day. Some shortcuts aren’t shortcuts at all.
They are just longer routes to failure.
That experience taught me to respect the purpose of each product. Stain is for color. Polyurethane is for protection.
They have different jobs. They work best when they do their own jobs.
Quick Check: Stain vs. Poly
Stain:
- Adds color.
- Penetrates wood fibers.
- Offers little to no protection.
- Can be oil-based or water-based.
Polyurethane:
- Forms a protective film.
- Sits on top of the wood.
- Shields against damage.
- Comes in various sheens (matte to gloss).
- Can be oil-based or water-based.
Real-World Context: Why It Matters for Your Home
Think about the furniture and surfaces in your home. The dining table, your favorite end table, the wooden doors, even the floor. They all need protection.
They also often benefit from a nice color that complements your decor.
When you finish wood items correctly, they last longer. A properly stained and polyurethaned table can withstand years of family dinners. It can handle spills and daily wear.
A poorly finished piece might look good for a short while. But it will quickly show damage.
The environment matters too. In humid areas, wood can expand and contract. A good protective finish helps stabilize it.
In sunny rooms, UV rays can fade wood. While poly has some UV blockers, it’s not a complete shield. But it’s better than nothing.
User habits are also a factor. If you have young kids or pets, your surfaces take a beating. You need a finish that can handle it.
This means strong, durable protection. Relying on a mixed product, or a poorly applied finish, will lead to frustration. You’ll end up redoing the project sooner.
Contrast Matrix: Common Finishing Mistakes
Myth: Mixing stain and poly is a time-saver.
Reality: It often leads to a ruined finish and more work.
Myth: Any stain can be mixed with any poly.
Reality: Base types (oil vs. water) must match, and even then, it’s not recommended.
Myth: A single coat of finish is enough.
Reality: Most projects need 2-4 coats of poly for good protection.
Myth: Drying times are flexible.
Reality: Stains and poly need to cure fully between coats for proper adhesion.
What This Means For You: When is it Okay?
So, when could you consider a product that seems to combine stain and poly? And when should you definitely avoid it?
When it might be okay (with caveats):
- Commercial “One-Step” Products: If you buy a product specifically labeled as a “stain and poly,” “all-in-one finish,” or similar. These are formulated to work. They are not a DIY mix. Even then, test them first.
- Gel Stains with Added Sealers: Some gel stains offer a bit more durability than traditional stains. If your project is low-traffic (like decorative items), these might suffice. But for tables, chairs, or floors, you’ll still need a topcoat.
When to absolutely AVOID mixing:
- Mixing your own stain and poly: Never mix a standard can of wood stain with a standard can of polyurethane. The chemistry is wrong.
- Mixing oil-based and water-based products: This is a guaranteed failure. Oil and water don’t mix. Neither do oil-based and water-based finishes.
- Projects needing maximum durability: If you want a finish that will last for years under heavy use, use separate, high-quality stain and polyurethane coats.
The key takeaway is to use products as intended by the manufacturer. They invest a lot in getting the formulas right. Trust their expertise.
Quick Fixes & Tips for Better Finishing
Getting a good finish isn’t just about avoiding mistakes. It’s also about using smart techniques.
Top 5 Tips for a Flawless Finish
1. Test, Test, Test: Always test your stain and poly on scrap wood. See how the color looks.
Check how it dries. Make sure you like the final sheen.
2. Thin Coats are Best: Apply multiple thin coats of stain and polyurethane. This leads to a smoother, more durable finish.
Thick coats can trap solvent. They may never cure properly.
3. Sanding Between Coats: Lightly sanding with fine-grit sandpaper (220-320 grit) between polyurethane coats helps adhesion. It also smooths out any imperfections.
4. Work in Good Light: Make sure you can see what you’re doing. Good lighting helps you spot missed spots or drips.
5. Clean Up Properly: Use the right solvents for cleanup. For oil-based products, use mineral spirits.
For water-based, use soap and water. This keeps your tools in good shape.
These simple tips can make a big difference. They help ensure your project looks great. It also means the finish will hold up over time.
Frequently Asked Questions about Mixing Stain and Polyurethane
Can I mix wood dye with polyurethane?
Generally, no. Wood dyes are very concentrated colorants. Mixing them with polyurethane can cause the dye to clump or not disperse properly.
This results in an uneven color and can compromise the polyurethane’s film. It’s best to apply dye first, let it dry, and then apply polyurethane separately.
What happens if I mix oil stain and water-based poly?
This is a recipe for disaster. Oil and water-based products do not mix. The polyurethane will likely not cure properly.
It may appear milky or gummy. You might also see the oil stain repel the water-based poly, leading to adhesion problems and a patchy finish.
Are there products that are truly stain and poly in one?
Yes, there are commercial products designed this way. These are often gel stains with added sealing agents or specially formulated “one-step” finishes. They are not the same as mixing your own cans.
Always read the product label to understand its capabilities.
Can I add a little poly to my stain to make it tougher?
It’s still not recommended. Even adding a small amount of polyurethane to standard wood stain can alter the stain’s ability to penetrate the wood. It can also affect how the stain dries.
The polyurethane itself might not cure correctly when mixed with stain. Separate application is the safest bet.
How many coats of polyurethane should I apply over stain?
For most projects, two to four coats of polyurethane are recommended. The exact number depends on the type of poly used, the wood, and the expected wear. High-traffic surfaces like tabletops or floors benefit from more coats.
Always follow the manufacturer’s guidelines for the specific product.
What’s the difference between a glaze and a stain?
A stain penetrates the wood to change its color. A glaze is a thicker coating that sits on the surface. It’s often used to add depth or an antiqued look.
Glazes are typically wiped off. Stains are also wiped off, but they leave their color within the wood grain.
Conclusion: Respect the Process
Trying to mix stain and polyurethane is a shortcut that rarely pays off. The two products have different jobs. They are made with different chemistries.
Combining them usually leads to frustration and a poor finish. Stick to applying stain first. Let it dry.
Then, apply your polyurethane topcoat. This layered approach guarantees beautiful color and strong protection.