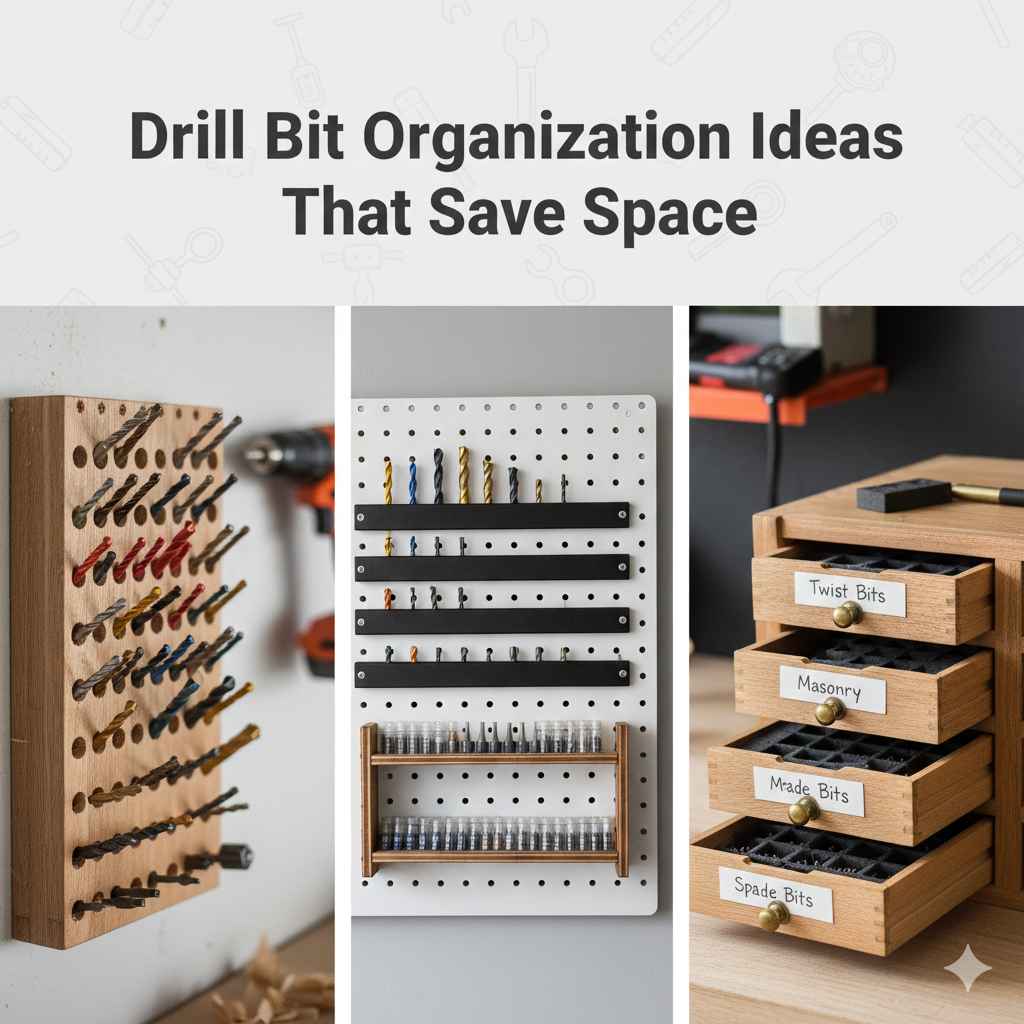
Drill Bit Organization Ideas That Save Space
Organizing your tools can sometimes feel like a puzzle. One area that often gets messy is your drill bits. Figuring out effective Drill Bit Organization Ideas That Save Space can be tricky for beginners. You might feel overwhelmed by all the different sizes and types. But don’t worry, it’s easier than you think! This post will walk you through simple steps to get your drill bits in order. Let’s explore some ways to make your workspace tidy and your projects easier. First, let’s explore the key steps for effective drill bit storage.
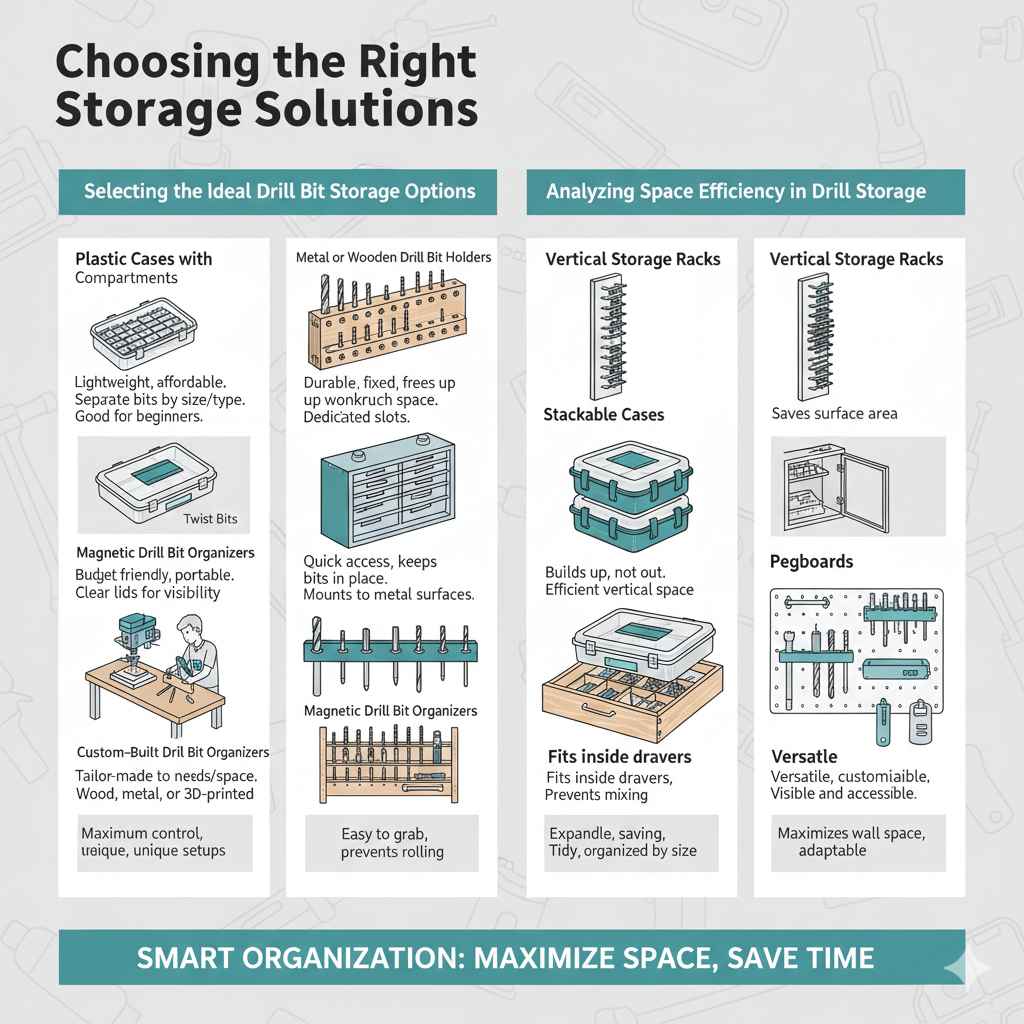
Choosing the Right Storage Solutions
The first step toward efficient drill bit organization is picking the storage solutions that work best for your needs and available space. There’s a wide range of options available, from simple cases to complex setups, and the best choice really depends on the number of drill bits you own, the size of your workspace, and how often you use your tools. Careful consideration of these elements is important. Think about portability and accessibility. Do you need a solution you can easily carry around, or will your storage be fixed in your workshop?
Accessibility matters – you want to quickly find the right bit when you need it. Consider the variety of bit sizes and types you have. Do you work with a limited set, or do you have a vast collection of drill bits? Matching the storage solution to your requirements saves you time and frustration.
Selecting the Ideal Drill Bit Storage Options
When selecting your drill bit storage options, think about the materials and features each offers. Plastic cases are common and affordable, but they may not be the most durable for heavier use. Metal cases or organizers offer greater durability, but they can be more expensive. Wooden organizers are also a good option for those seeking a stylish and potentially eco-friendly solution. Features such as labeled slots, magnetic holders, or built-in size gauges can greatly improve the functionality and usability of your storage solution. Magnetic holders can be useful for keeping bits in place, while size gauges prevent you from picking the wrong bit.
Plastic Cases with Compartments: These are the most common and basic. They are lightweight, affordable, and often come with sets of drill bits. The compartments help separate bits by size and type. These cases are great for beginners or those with a small collection of bits.
Plastic cases with compartments are a simple and cost-effective starting point. They’re typically lightweight and come standard with most drill bit sets. Individual compartments help to keep the various bits separate and organized by size or type. This is perfect for those who are just starting out or have a limited collection of drill bits. They are easy to find at most hardware stores or online, and often have a see-through lid to see what is inside without opening the case.
Metal or Wooden Drill Bit Holders: These are more durable than plastic. They come in various sizes and shapes, with dedicated slots for individual bits. Metal or wooden holders are usually mounted on a wall or workbench, freeing up space.
For something that’s built to last, metal or wooden drill bit holders are a great choice. They are stronger and more durable, perfect for heavier use or environments where tools are subject to rough handling. The slots are designed to hold each bit securely, preventing them from rolling around. Mounting these on a wall or workbench is a fantastic way to clear space and always have your bits within reach. Consider a wooden holder if you value aesthetics and want something more visually appealing in your workshop.
Magnetic Drill Bit Organizers: These use magnetic strips or holders to keep bits in place. This makes it easy to grab the right bit quickly. Magnetic organizers are good for quick access and are available in different forms, from small holders to larger racks.
Magnetic organizers offer a smart and convenient way to store your drill bits. They use magnetic strips or holders to firmly grip the bits, ensuring they stay put and are easy to see. These are ideal for quickly finding and swapping out bits. They come in various sizes, from small, portable holders to larger racks that can be mounted on your workbench or tool cabinet. The magnetic attraction also helps with tidiness, preventing your bits from tumbling around in a drawer. They are especially useful if you often switch bits during projects, saving valuable time.
Custom-Built Drill Bit Organizers: These allow you to design storage solutions that fit your specific drill bits and space. You can create organizers from wood, metal, or even 3D-printed parts. Custom-built solutions give you maximum control over your storage.
For those who love to customize, building your drill bit organizer is the ultimate approach. This allows you to create a storage solution perfectly fitted to your needs and available space. You can utilize wood, metal, or even 3D-printed parts to make an organizer that is tailor-made for your collection. This method offers the most flexibility to accommodate bits of various sizes, types, and numbers. It’s ideal for those with a unique workshop setup or a large collection of bits that standard solutions can’t handle. Consider your specific bit sizes and the dimensions of your workspace to maximize efficiency.
Analyzing Space Efficiency in Drill Bit Storage
Space efficiency in drill bit storage is a key factor, particularly in smaller workshops or limited spaces. The idea is to maximize storage in a compact way. Consider vertical storage solutions. Wall-mounted racks, pegboards, and magnetic strips use vertical space effectively, getting your bits off the workbench and out of drawers. For compact storage, drill bit cases should be stackable or designed to fit into narrow spaces. Using every available space is key. Think about the layout of your workspace and select solutions that best utilize that space.
Vertical Storage Racks: These are ideal for saving space. They mount on walls or inside cabinets, keeping bits within easy reach without taking up valuable surface area. This type of storage offers a great way to show all your bits at once.
Vertical storage racks are perfect for saving floor or workbench space. They are designed to mount on walls, doors, or inside cabinets. This allows you to keep your drill bits within easy reach, without cluttering the work surface. The rack design is often very efficient, utilizing a small footprint to house a large number of drill bits. This is a very efficient and space-saving solution. The bits are usually arranged in a way that makes it easy to quickly identify and select the one you need, improving productivity. Consider the height of your storage area and the number of bits you own when deciding on the size of the rack.
Stackable Cases: Stackable cases are perfect for storage. They let you build up rather than out, making use of vertical space in your workshop. Cases can be purchased with this function already, or they can be modified with clasps or simple DIY solutions.
Stackable cases are a great option if you need to store drill bits in a compact, organized manner. They can be stacked on top of one another, which greatly increases your storage capacity without expanding the footprint. This is an efficient use of vertical space in your workshop or storage area. You can find pre-made stackable cases, or you can modify standard cases with clasps or DIY solutions to make them stackable. This solution works best when you want to store your bits in a fixed location. You can readily expand your storage as your collection grows by adding more cases.
Drawer Organizers: These are designed to fit inside drawers. They help to separate and organize bits, preventing them from mixing together. Drawer organizers come in various sizes and styles and can be customized to suit your needs.
Drawer organizers provide an effective way to arrange drill bits. They are designed to fit neatly within drawers, keeping bits separated and orderly. This prevents bits from becoming mixed together and makes it easy to see and get the bit you need. The organizers come in many sizes and styles, including trays and dividers, which you can customize to hold your specific collection. They maximize the use of drawer space by arranging all your bits in a convenient and accessible manner. These are often made from plastic or metal and may include labelled compartments or dedicated slots for different bit sizes and types.
Pegboards: Pegboards are versatile and allow you to hang drill bits. They are a good solution if you want to customize your storage and have your drill bits visible. You can add hooks, shelves, and holders to store various tools.
Pegboards provide an extremely versatile way to store drill bits and other tools. You can customize your storage to fit your specific needs and have all your tools readily visible. By using hooks, shelves, and specialized holders, you can readily arrange your drill bits and other equipment on a pegboard. This setup lets you quickly select the appropriate bit. Pegboards are a good way to organize and keep track of your tools in your workspace.
You can make efficient use of wall space and adjust your storage as your tool collection changes. Pegboards are also convenient if you want to keep your tools visible, so you can easily spot them. This is an efficient option, especially in small workshops.
Methods for Organizing Drill Bits
Once you’ve chosen your storage solution, the next step is actually organizing your drill bits. This involves categorizing your bits by size, type, or both. Proper organization can save you time and make it much easier to locate the correct bit for any project. There are several ways to go about this, from using simple labels to creating more elaborate systems with size gauges.
By implementing a well-thought-out system, you’ll greatly improve the efficiency of your workspace. Keep your bits clean and well-maintained by wiping them down after each use. Remember, the goal is to make it easy to find what you need quickly.
Categorizing Drill Bits for Efficiency
Categorizing drill bits is key to organization. You can group them by size, type, or both. This helps to reduce clutter and speed up your workflow. Start by sorting your bits into categories like twist bits, masonry bits, and spade bits. Then, within each type, you can arrange them by size. Use size markings or gauges to ensure you pick the right bit. Clear labeling is also important. This is crucial for keeping everything well-ordered. Consider using a system that works best for the kind of projects you typically work on and the space you have available.
Categorizing by Size: Arrange drill bits by diameter, starting from the smallest to the largest. This way, you can easily find bits of a certain size without searching through the entire collection.
Arranging your drill bits by size is a simple, effective method. Start with the smallest drill bit and work your way up to the largest. This makes it easier to find bits of a specific size quickly. Use a drill bit gauge or markings to determine the diameter of each bit. This reduces the need to measure each bit. You can place the bits in numerical order, either in your storage case or on a storage rack. This organization makes your projects more efficient. It is also good for beginners, making it easier to select the right drill bit.
Categorizing by Type: Sort drill bits by their function. Group similar types, like twist bits, spade bits, and masonry bits. This enables quick access to the drill bits you need.
Sorting your drill bits by type helps you find the right tool for the job. Grouping bits with similar functions, like twist bits, spade bits, and masonry bits, makes it easy to select the right tool for a specific task. This method is especially helpful if you often switch between different types of bits, as it helps you quickly find what you need. Consider grouping specialty bits, such as countersink bits or step drill bits. You can label each group clearly to make it easier to find and select the proper bit. For instance, a box could be labeled “Wood Drilling Bits” or “Metal Drilling Bits.
Labeling Drill Bit Storage: Use labels to clearly mark each storage compartment or slot. This helps you easily identify the right drill bit, saving time and reducing errors. Label the bit sizes or types for easy identification.
Properly labeling your drill bit storage is a key part of an effective organization system. You can label the compartments or individual slots with the size or type of drill bit that should be stored there. This helps to make it easy to quickly find the right drill bit. Labels can be made using a label maker, marker, or printed labels. Consider placing a size chart or diagram on your storage unit for easy reference. Make sure the labels are clear and easy to read. Consistent labeling ensures that anyone using the drill bits can readily identify the correct tool. Make sure the labels are durable and resist wear and tear in the workshop environment.
Using Drill Bit Gauges: A drill bit gauge can help you quickly measure the diameter of your drill bits, making sure you select the correct size. Gauges are available in various forms, including pocket-sized tools and built-in features in storage cases.
Using a drill bit gauge makes it simple to measure and identify the size of your drill bits. This guarantees that you are selecting the correct size for any project. Gauges are available in various formats, including handheld, pocket-sized tools and built-in features within storage cases. A gauge typically has slots or holes of specific sizes. You simply insert the drill bit into the hole until it fits snugly. This way, you can quickly determine the diameter.
They often have both inch and metric measurements. Keep the gauge close to your drill bit storage area for ease of use. This can prevent errors. It will also assist you in keeping your drill bits arranged correctly.
Implementing a Clear Organization System
To implement an efficient organization system, consider your workflow and the frequency with which you use each type of drill bit. Put frequently used bits in easy-to-reach locations. Arrange your storage so it’s simple to see and get the bits. Decide how you will label each bit and its storage location, considering size, type, or both. Be consistent with your organization. This system should be easy to maintain and understand. You can adjust the system as needed. For example, add new labels or storage solutions as your needs change.
Assigning Dedicated Locations: Give each drill bit a specific spot in your storage. This prevents clutter and makes it easy to quickly find the bits. It is also important to return bits to their designated place after use.
Giving each drill bit its place in storage is an effective way to keep your workshop tidy and improve your workflow. It prevents your bits from getting jumbled together. Assigning each bit its own designated spot makes it much easier to grab the right tool quickly. Use a storage solution with specific compartments or slots for each drill bit. After each use, return the bits to their specific spot. This habit helps maintain the organization. It also helps you quickly spot any missing bits. If you are sharing a workspace, this system ensures that everyone can easily locate and return the drill bits.
Regular Cleaning and Maintenance: Clean your drill bits after each use to remove debris and prevent corrosion. This improves their performance and extends their life. Clean and maintain your storage solution as well.
Regular cleaning and maintenance of your drill bits ensures they stay in top condition. Cleaning removes debris, such as wood shavings or metal particles. This prevents rust and corrosion. You can clean the bits using a brush, cloth, or specialized cleaning solution. After each use, wipe down the bits with a clean cloth. For rust, use a wire brush and lubricant. To keep your storage solution in good order, clean it regularly. Keep the storage solution in a dry area. This will also help keep your drill bits in good shape. This reduces the risk of needing to purchase new drill bits.
Incorporating Color-Coding: Use color-coded labels or storage solutions to categorize your drill bits by type or size. Color-coding provides a quick visual reference for easier identification and organization.
Incorporating color-coding into your drill bit organization system can greatly improve the efficiency and ease of use. You can use different colored labels or storage containers. Color-coding can be used to categorize your bits by type (e.g., green for wood, red for metal). Alternatively, you could use different colors to identify size ranges (e.g., blue for small, yellow for medium). Color-coding helps you quickly spot the drill bit you need without reading labels.
This is especially helpful if you have many drill bits. Color-coding systems can be very customized. Experiment with different color schemes until you find one that works best for your needs. This makes for a more efficient and user-friendly workshop environment.
Creating a Visual Inventory: Taking a quick glance should tell you which drill bits you have. You can do this by organizing the bits so that their size or type is instantly visible.
Creating a visual inventory system lets you immediately identify what drill bits you have available. When organizing your drill bits, arrange them so that you can see all your bits at a glance. You might use a clear storage case or a rack with bits neatly arranged. You can also label each drill bit’s location clearly. This approach allows you to quickly assess your inventory before beginning a project. This helps in efficient selection and prevents the need to search through many drawers or containers. Regularly check your visual inventory. This will help you identify missing drill bits. This will also make sure that your inventory is up to date.
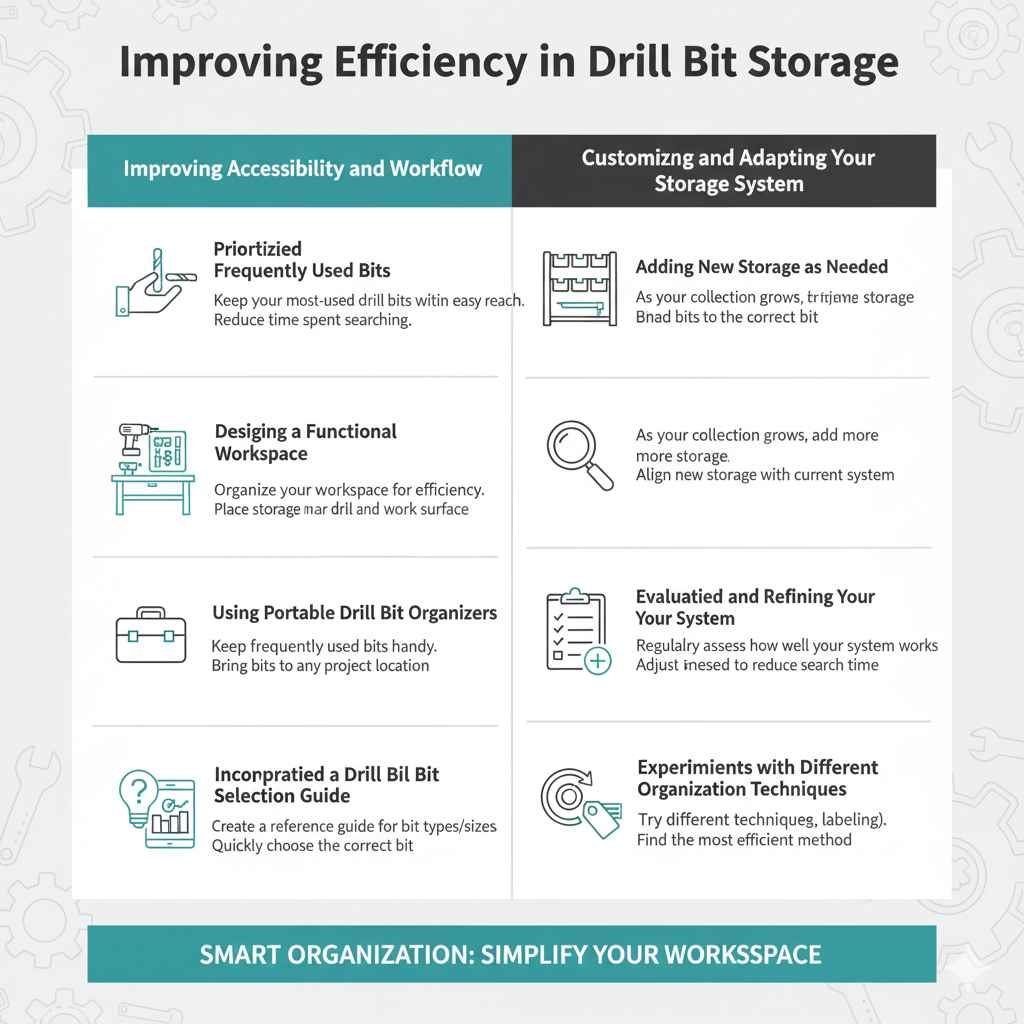
Improving Efficiency in Drill Bit Storage
Maximizing efficiency in drill bit storage is about making your system as user-friendly as possible. This means putting frequently used bits where they are easy to reach. Labeling clearly and precisely. Knowing your drill bit inventory is helpful, especially before starting any project. This way, you will be able to get your projects done faster. You can customize your storage system as needed. As you use your tools more often, you might find new ways to make them easier to locate. The goal is a system that simplifies your workspace and lets you concentrate on your tasks.
Improving Accessibility and Workflow
Improve accessibility and workflow by arranging your drill bits in a way that is easy to reach and use. Put your most-used bits close to your main work area. Consider the order in which you use your bits. Then arrange them accordingly. This might mean keeping your most popular sizes together. It may be helpful to have a separate, smaller organizer with the bits you use most often. This helps reduce clutter and saves time. It means less time searching and more time working.
Prioritizing Frequently Used Bits: Keep your most-used drill bits within easy reach. Place them in a designated spot that is readily accessible to you.
Keeping your most-used drill bits accessible is a quick way to improve your workflow. Locate these bits in a position that is immediately available. This helps you to reduce the time spent searching for tools. You might store these bits on a rack, in a drawer, or in a portable organizer. Place these bits near your primary work area, and always within arm’s reach. You can determine which bits are used most often. Then arrange these bits so that they are easy to access.
Regularly assess your drill bit usage. This ensures that your storage solution remains effective and that the most-needed bits are always readily available.
Designing a Functional Workspace: Organize your workspace for efficiency. Place your drill bit storage close to your drill and the primary work surface. This helps minimize movement and saves time.
When you have a functional workspace, you’ll be able to work more efficiently. Place your drill bit storage unit close to your drill and the work surface. This set up helps reduce the distance you have to move to find the correct drill bit. It also reduces the need to put down and pick up tools while you are working. Also, consider the layout of your workspace. Arrange everything in a way that complements your common tasks and workflow. Make sure there is enough light. This will make it easier to see and choose the drill bits. Taking the time to optimize your workspace will streamline your workflow. It also prevents time loss from tool-searching and the need to walk around the workshop.
Using Portable Drill Bit Organizers: Keep frequently used bits handy using a portable drill bit organizer. This allows you to bring your bits to any project. It’s a great choice if you work in multiple locations.
Using a portable drill bit organizer is an efficient way to make sure you have the drill bits you need, regardless of your work location. This is good if you regularly work on projects in multiple locations. These portable organizers come in many forms. They can include small cases, pouches, or even compact racks with handles. You can stock the organizer with a set of the drill bits you often need. This lets you move your drill bits easily from one place to another. Look for organizers that are compact, durable, and easy to carry. This also eliminates the need to return to your main storage unit often. It allows you to stay focused on your work. It’s also an easy way to move drill bits to project sites.
Incorporating a Drill Bit Selection Guide: To improve workflow, create a reference guide for different drill bit types and sizes. This helps you quickly choose the correct drill bit for any material.
To improve your workflow, create a drill bit selection guide to quickly pick the right bit. You can create the guide on paper, on a laminated card, or through a digital format. It should include the different types of drill bits and the materials they are suited for. Include a chart of commonly used drill bit sizes, especially those for screws and anchors. This guide ensures that you always have the right bit for the project at hand. Store the reference guide near your drill bit storage area. Having a drill bit selection guide is a valuable tool. It simplifies your work process by saving you time and preventing errors. This is very useful, especially for beginners or those working with various materials.
Customizing and Adapting Your Storage System
Your drill bit storage system doesn’t have to be fixed. You can change it as your needs and tools change. If you acquire new drill bits, you may want to add storage. Maybe you find a different method of organization is more helpful. You might even find your needs change over time. Being flexible with your system helps you manage your tools more effectively. Try new ideas and continue to refine your organization method until it’s the best fit for your projects.
Adding New Storage as Needed: As your collection grows, add more storage. This ensures you always have a place for your drill bits. It’s also important to make sure the new storage aligns with your current system.
As your drill bit collection expands, you’ll need to expand your storage to keep things organized. This might involve purchasing a larger storage case, adding drawers, or adding additional shelves. Ensure that any new storage aligns with your current organizational system. This can be done by using similar labeling methods or color-coding techniques. Consider the amount of space you have available and your budget. This helps with the ongoing maintenance of your workshop. Adding to your storage area also keeps your workshop tidy and easy to manage. Make sure you regularly assess your drill bit collection. Then adapt your storage as needed.
Evaluating and Refining Your System: Regularly assess how well your drill bit organization system is working. You can do this by noting the amount of time you spend searching for drill bits. Adjust your system as needed.
Regularly assessing your drill bit organization system is a great way to ensure that your workflow is as smooth as possible. Consider the amount of time you spend looking for the correct drill bits. Do you find yourself often searching through multiple containers or drawers? Are your bits consistently returned to the proper spot after use? If you encounter any problems, this is a sign that you might need to adjust your system.
You might rearrange the placement of frequently used bits, change your labeling system, or introduce new storage solutions. These regular assessments ensure that your workspace continues to work for you. They help to make sure that the drill bit storage system is efficient and reduces your time and stress.
Experimenting with Different Organization Techniques: Try different techniques to find the most efficient and helpful method. This might include using different labeling, color-coding, or storing methods.
Experimenting with different organization techniques can greatly improve your workflow and productivity. You might try color-coding drill bits to identify them quickly by type or size. Perhaps using labels to clearly mark each storage compartment or slot. This means creating a system that best suits your needs and the way you work. You might try various ways of arranging your drill bits. You can experiment with different organizational methods until you find the perfect setup. This will help you to optimize your workspace. It also ensures that your drill bit storage system is as efficient and helpful as possible.
Adapting to Changing Project Needs: Adapt your drill bit organization to fit the kind of projects you are working on. You can adjust your system as your projects or the types of tools change.
Make sure you have a system that adapts to your changing project needs. Your workshop may have to accommodate different types of projects, and your drill bit organization needs to be able to adapt to these changes. Consider adding new storage solutions or reorganizing existing ones as you work on different projects. Maybe you could create a separate kit for certain types of tasks. Make sure your drill bit organization stays efficient and helpful to your current needs. Being willing to adjust your organizational methods will keep your workspace and workflow at their most efficient.
Frequently Asked Questions
Question: What’s the best way to clean my drill bits?
Answer: Use a brush or cloth to remove debris after each use. For rust, use a wire brush and lubricant.
Question: How can I keep track of which drill bits I have?
Answer: Create a visual inventory by organizing your bits so their size or type is instantly visible.
Question: Is it okay to store drill bits in a damp place?
Answer: No, you should store your drill bits in a dry place to prevent rust and corrosion.
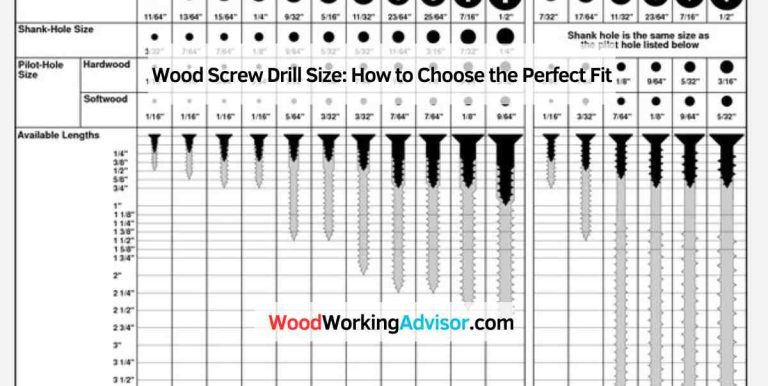
Question: How do I choose the right size drill bit for a screw?
Answer: The drill bit size should be slightly smaller than the screw’s major diameter.
Question: Can I use magnetic holders to store different tools?
Answer: Yes, magnetic holders are a great way to store various metal tools, not just drill bits.
Final Thoughts
You can see, there’s a lot of helpful Drill Bit Organization Ideas That Save Space. From choosing the correct storage solutions to categorizing your bits and implementing an efficient layout, you can create a workshop that is efficient. Start by evaluating your space and the types of projects you typically do. Then choose storage solutions that meet your needs. Categorize your bits, label them clearly, and choose a layout that suits your workflow. Regular maintenance, such as cleaning your bits and refining your system as your needs change, is important.
By following these steps, you can create a workspace that’s not only orderly but also helps improve your efficiency. Now, get started on these tips to enhance your workspace and streamline your project tasks.