
How Do You Cut Marble: Expert Techniques Unveiled
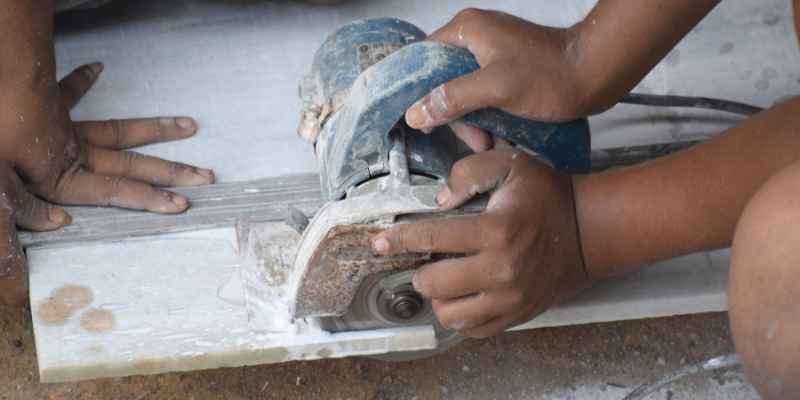
To cut marble, use a wet saw equipped with a diamond blade. This method prevents dust and ensures a clean cut.
Cutting marble requires precision and the right tools. Marble is a beautiful, durable stone often used for countertops, floors, and decorative features. However, its hardness can make cutting challenging. Using the appropriate tools and techniques is crucial for a successful project.
A wet saw, for example, cools the blade and reduces dust, providing a smoother finish. Safety gear, such as goggles and gloves, is essential to protect against flying debris. Understanding how to cut marble correctly can enhance your DIY skills, allowing you to create stunning home features while avoiding potential mistakes. With the right approach, anyone can achieve professional-looking results.
Introduction To Marble Cutting
Cutting marble is an art. It combines skill and precision. Marble is a beautiful material used in many projects. Understanding how to cut it is essential for any DIY enthusiast or professional.
The Allure Of Marble
Marble captivates many with its elegance. Its unique patterns and colors make it special. Here are some reasons why people love marble:
- Durability: Marble lasts for years.
- Versatility: It suits various designs and styles.
- Natural beauty: Each piece is one-of-a-kind.
- Value: Marble increases property value.
Basics Of Marble Cutting
Cutting marble requires specific tools and techniques. Follow these basic steps:
- Gather your tools. You need a diamond blade saw, safety goggles, and a measuring tape.
- Measure and mark your marble. Use a pencil for accuracy.
- Secure the marble. Clamp it down to prevent movement.
- Start cutting. Use steady pressure for clean edges.
- Finish the edges. Sand the cut for a smooth finish.
Always prioritize safety. Wear gloves and goggles to protect yourself. Cutting marble can create dust. Work in a well-ventilated area.
Understanding these basics makes marble cutting easier. Mastery comes with practice.
Tools Of The Trade
Cutting marble requires the right tools. Each tool serves a specific purpose. Choosing the right one ensures precision and safety. Here’s a look at the essential tools you need.
Manual Cutting Tools
Manual tools are perfect for smaller jobs. They offer precision and control. Here are some common manual cutting tools:
- Tile Cutter: Great for straight cuts.
- Chisel and Hammer: Ideal for shaping and trimming.
- Hand Saw: Useful for detailed work.
Using these tools requires skill and practice. Always wear safety gear to protect yourself.
Power Tools Essentials
Power tools make cutting marble faster and easier. They are essential for larger projects. Here are the must-have power tools:
| Tool | Purpose |
|---|---|
| Angle Grinder | Perfect for curved cuts. |
| Wet Saw | Ideal for straight cuts with minimal dust. |
| Router | Used for creating edges and grooves. |
Power tools save time and effort. Always follow safety guidelines. Use protective gear like goggles and gloves.
Preparing To Cut Marble
Cutting marble requires careful preparation. This ensures safety and precision. Follow these steps to get ready for a successful cut.
Safety First: Protective Gear
Wearing the right protective gear is crucial. It helps prevent injuries. Here are some essential items:
- Safety goggles: Protect your eyes from dust and debris.
- Dust mask: Prevent inhalation of harmful particles.
- Ear protection: Minimize noise exposure from cutting tools.
- Gloves: Protect your hands from sharp edges.
- Steel-toed boots: Guard your feet against heavy materials.
Setting Up Your Workspace
A well-organized workspace promotes safety and efficiency. Follow these steps to set up:
- Choose a spacious area with good lighting.
- Clear the workspace of any clutter.
- Secure the marble slab on a stable surface.
- Gather all necessary tools nearby.
Consider using a wet saw for cleaner cuts. Make sure to connect it to water supply for better results. Always read the manufacturer’s instructions before use.
Making The First Cut
Cutting marble requires precision and care. The first cut sets the tone for the entire project. Proper preparation is key. Follow these steps for a clean and effective cut.
Measuring And Marking
Accurate measurements prevent mistakes. Use these tools:
- Measuring tape
- Pencil or chalk
- Square or straight edge
Steps to measure and mark:
- Measure the area where you want to cut.
- Mark the dimensions clearly on the marble.
- Double-check your measurements.
Clear markings help guide your cut. Take your time. Precision is vital.
The Art Of Scoring Marble
Scoring is a technique to create a clean line. Use a diamond blade or manual tile cutter for best results. Here’s how to score:
- Align the tool with your marked line.
- Apply steady pressure while moving along the line.
- Score deeply but avoid cutting through.
Check the score line. It should be visible but not broken. This line guides the final cut.
Practice scoring on a scrap piece first. It builds confidence and skill.
Advanced Cutting Techniques
Cutting marble requires skill and precision. Advanced techniques enhance accuracy and creativity. Below are two effective methods for cutting marble.
Wet Cutting Methods
Wet cutting is a popular technique for marble cutting. It reduces dust and keeps the blade cool. This method uses water to lubricate the blade.
- Benefits of Wet Cutting:
- Reduces dust during cutting.
- Prevents overheating of the blade.
- Improves the quality of the cut.
To use this method:
- Set up a wet saw.
- Ensure water flows over the blade.
- Align the marble piece carefully.
- Start the cutting process.
Creating Intricate Designs
Creating intricate designs in marble enhances its beauty. Precision tools help achieve detailed patterns. Techniques like engraving and inlaying are common.
| Technique | Description | Tools Needed |
|---|---|---|
| Engraving | Carving designs onto the surface. | Engraving tools, water, and templates. |
| Inlaying | Inserting pieces of different materials. | Chisels, adhesive, and small tools. |
Follow these steps for intricate designs:
- Select the design and tools.
- Mark the marble surface.
- Carefully engrave or inlay.
Using advanced cutting techniques transforms marble into art. Master these methods for stunning results.
Finishing Touches
After cutting marble, the finishing touches make a big difference. These steps enhance the beauty and durability of your marble. Two main tasks are smoothing rough edges and polishing for a glossy finish.
Smoothing Rough Edges
Smoothing rough edges is essential for a clean look. Follow these steps:
- Use a diamond sanding pad.
- Attach it to a power sander.
- Start with a coarse grit to remove large bumps.
- Gradually switch to finer grits for a smooth surface.
Always keep the sander moving. This prevents scratches and gouges. Wear safety gear to protect yourself.
Polishing For A Glossy Finish
Polishing adds shine to your marble. It also protects the surface. Here’s how to achieve a glossy finish:
- Choose a marble polishing compound.
- Apply it with a soft cloth or buffing pad.
- Work in small sections for even results.
- Buff the surface in circular motions.
For best results, repeat the process. This ensures a radiant and durable shine. Always clean the surface before polishing to remove dust.
Maintenance And Care Of Tools
Proper maintenance of cutting tools ensures precision and durability. Regular care helps tools perform better. It also extends their lifespan. Follow these essential steps to keep your tools in top condition.
Cleaning Your Tools
Cleaning tools after each use is vital. Dirt and debris can damage the blades. Use the following steps:
- Rinse tools with water to remove dust.
- Use a soft brush to scrub any stuck debris.
- Wipe down with a clean cloth.
- Dry thoroughly to prevent rust.
Store tools in a dry place. This prevents moisture buildup. Regular cleaning will ensure tools last longer.
Sharpening Blades For Precision Cutting
Sharp blades are essential for clean cuts. Dull blades can lead to mistakes. Follow these tips for sharpening:
- Use a sharpening stone or file.
- Maintain a consistent angle while sharpening.
- Check for evenness after sharpening.
Regular sharpening is crucial. Aim to sharpen blades after 5-10 uses. This keeps your cuts precise and neat.
| Tool | Cleaning Frequency | Sharpening Frequency |
|---|---|---|
| Diamond Blade | After each use | Every 10 cuts |
| Wet Saw | Weekly | Monthly |
| Hand Tools | After each use | Every 5 uses |
Following these guidelines keeps your tools effective. Regular maintenance enhances performance. Invest time in caring for your tools for best results.
Common Mistakes And Solutions
Cutting marble can be tricky. Many beginners make mistakes. Understanding these common errors helps you achieve clean cuts. Let’s explore how to avoid problems and find solutions.
Avoiding Cracks And Chips
Cracks and chips can ruin your marble project. Follow these tips to prevent them:
- Use a proper blade: A diamond blade works best.
- Score the surface: Make a light cut first. This helps guide deeper cuts.
- Support the marble: Use a stable surface to avoid movement.
- Control the speed: Slow cutting prevents overheating and damage.
Always check the marble before cutting. Look for existing cracks. Cutting over these can worsen the damage.
Troubleshooting Poor Cuts
Poor cuts lead to uneven edges. Here are solutions to fix them:
- Inspect the blade: Ensure it’s sharp and appropriate for marble.
- Adjust the angle: Cutting at the wrong angle causes uneven edges.
- Check the speed: Too fast can lead to poor results. Slow down.
- Use water: Wet cutting reduces dust and cools the blade.
Keep practicing. Good cuts come with experience. Always measure twice before cutting. Take your time for the best results.
Frequently Asked Questions
How Do You Cut Marble Without Chipping It?
To cut marble without chipping, use a diamond blade saw. Ensure the blade is wet to minimize dust and reduce heat. Make slow, steady cuts to maintain control. Always use a guide to ensure straight lines. Safety gear is essential to protect against flying debris.
What Tools Do You Need To Cut Marble?
You need a wet saw, diamond blades, and a measuring tape. A straight edge or guide is useful for accuracy. Additionally, safety gear like goggles and gloves is essential. Consider using a chisel and hammer for smaller adjustments. These tools ensure clean and precise cuts.
Can You Cut Marble With A Regular Saw?
No, a regular saw is not suitable for marble. Marble is a hard material that requires specialized tools. A wet saw with a diamond blade is ideal for this task. Using the wrong saw can result in damage and poor cuts.
Invest in the right tools for best results.
Is It Hard To Cut Marble At Home?
Cutting marble at home can be challenging but manageable. Proper tools and techniques are crucial for success. Ensure you have a steady workspace and adequate safety gear. Practice on smaller pieces before attempting larger cuts. With patience and care, you can achieve great results.
Conclusion
Cutting marble requires precision and the right tools. Whether you’re a DIY enthusiast or a professional, mastering this skill is essential. Always prioritize safety and follow best practices. With the right techniques, you can create stunning marble pieces. Embrace the process and enjoy your beautiful results.
Happy cutting!