How Long Pva Glue Dries: Essential Guide
PVA glue typically dries to the touch in 30-60 minutes and cures fully within 24 hours, though this can vary based on humidity, temperature, application thickness, and wood type. For the strongest bond, allow 24 hours before stressing the joint.
Hey there, DIY friends! Md Meraj here. Have you ever found yourself staring at a newly glued joint, wondering, “Is this dry yet?” It’s a common question, especially when you’re just starting out in woodworking or any household repair. You want to know when you can move on to the next step or when your project is truly ready. Waiting too long can feel like wasted time, but not waiting long enough means a weak bond, which is definitely not what we want!
The good news is, understanding how long PVA glue takes to dry is pretty straightforward. We’ll break down all the factors that influence drying time, give you some realistic timelines, and share tips to help speed things up or ensure a rock-solid hold. Let’s get your projects moving forward with confidence!
Understanding PVA Glue Drying Times
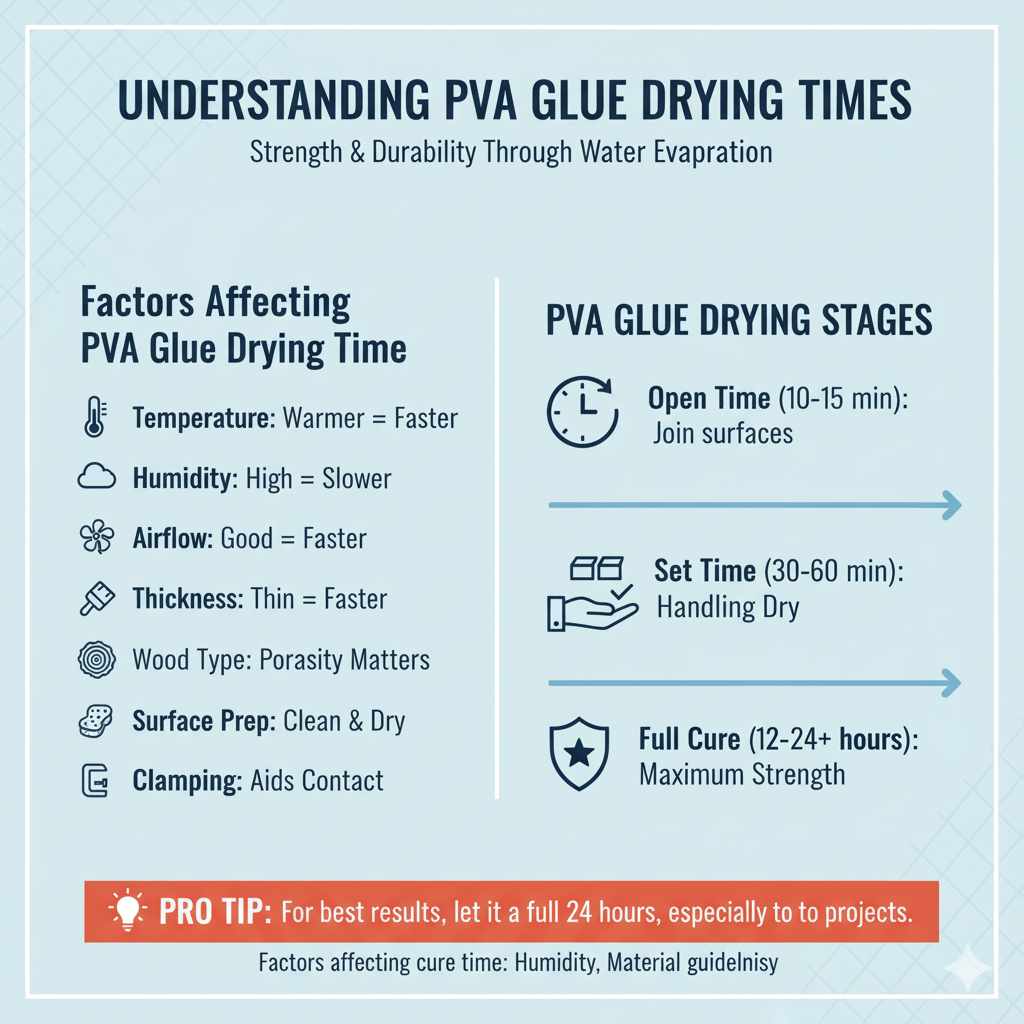
PVA glue, also known as polyvinyl acetate glue or commonly as white craft glue or wood glue, is a staple for a reason. It’s water-based, non-toxic, and easy to clean up. But its drying process isn’t always as simple as “slap it on and go.” The time it takes for PVA glue to reach its maximum strength involves a couple of stages.
First, there’s the initial drying or “set” time. This is when the glue becomes firm enough that you can carefully handle the glued pieces without them shifting. Then, there’s the full cure time. This is when the glue has reached its maximum possible strength and is no longer affected by moisture in the air. Understanding both is crucial for successful projects.
Factors Affecting PVA Glue Drying Time
Several elements can play a role in how quickly your PVA glue dries. Knowing these can help you estimate drying times more accurately for your specific situation.
- Temperature: Warmer temperatures generally speed up the evaporation of water from the glue, leading to faster drying. Cold temperatures will slow it down.
- Humidity: High humidity means there’s more moisture in the air. The glue needs the water to evaporate, so in humid conditions, this process takes longer. Low humidity can speed up drying.
- Airflow: Good ventilation helps moisture escape from the glue line. Stagnant air can trap moisture, prolonging drying.
- Glue Application Thickness: A thin, even layer of glue will dry much faster than a thick blob. Excess glue squeezed out from the joint will also take longer to dry.
- Wood Type and Porosity: Denser woods might absorb less moisture from the glue, potentially leading to a slightly longer drying time on the surface. More porous woods can absorb moisture more readily.
- Surface Preparation: Clean, dry surfaces allow the glue to bond effectively and dry without interference.
- Clamping Pressure: While clamping doesn’t directly dry the glue, proper clamping ensures tight contact, which helps the glue spread thinly and evenly, indirectly aiding the drying process and ensuring a strong bond.
PVA Glue Drying Stages Explained
Let’s break down what’s happening as your PVA glue dries.
Stage 1: Open Time
This is the period after you apply the glue during which the surfaces can be joined and still achieve a good bond. For most standard PVA glues, the open time is relatively short, usually around 10-15 minutes. It’s important to apply the glue and assemble your pieces within this window.
Stage 2: Set Time (Handling Dry)
This is when the glue has dried enough to hold the pieces together on their own if you were to remove the clamps, or if you needed to move the piece slightly. For most white or yellow PVA wood glues, this stage is typically reached within 30 to 60 minutes. The joint will feel firm to the touch.
Stage 3: Full Cure Time (Maximum Strength)
This is the final stage where the glue has completely dried and reached its maximum bond strength. This can take anywhere from a few hours to 24 hours or even longer. While the joint might feel solid earlier, waiting for the full cure is essential if the joint will be subjected to any stress, like sanding, painting, or bearing weight.
Typical Drying Times Chart for PVA Glue
To give you a clearer picture, here’s a general guide. Remember, these are estimates, and the factors we discussed earlier will influence them.
| Stage of Drying | Typical Time Range (Standard PVA Wood Glue) | Notes |
|---|---|---|
| Open Time | 5-15 minutes | Time to apply glue and assemble joints. |
| Set Time (Handling Dry) | 30-60 minutes | Joint is firm enough to handle carefully. |
| Drying to Sand/Paint | 2-4 hours | Surface is dry enough for light sanding or a first coat of paint. |
| Full Cure (Maximum Strength) | 24 hours | Maximum bond strength achieved. Avoid significant stress. |
It’s worth noting that different formulations of PVA glue exist. For instance, some specialized PVA glues, like those designed for high-frequency welding in manufacturing, might have different timings. Always check the manufacturer’s instructions on the bottle or packaging for the most accurate information.
How Long Does It Take for PVA Glue to Dry on Different Materials?
While PVA glue is most commonly associated with wood, it’s used on many other materials too. The type of material can sometimes influence how the glue interacts and dries.
Wood: As we’ve covered, wood typically takes 30-60 minutes to set and 24 hours to cure fully. The porous nature of wood allows it to absorb some moisture from the glue, aiding in the drying process. If you’re gluing two pieces of wood together, ensure they are clean and dry.
Paper and Cardboard: These absorbent materials will soak up the water from the PVA glue relatively quickly. You can often expect paper and light cardboard to be dry to the touch within 10-30 minutes, depending on how thinly you apply it. Full curing is usually achieved within a few hours.
Fabric: When used as a fabric stiffener or for bonding fabric, PVA glue can take longer to dry due to the nature of the material and how it might trap moisture. It can take anywhere from 1 to several hours to feel completely dry, and the fabric might remain slightly stiff until fully cured.
Craft Foam and Plastics: For less porous materials like craft foam or certain plastics, PVA glue might rely more on surface evaporation. This can mean a slightly longer drying time than on wood, potentially 1-2 hours to set and 8-12 hours to cure. Always test on a small, inconspicuous area first, as not all plastics are compatible. For bonding plastics, specific plastic cements or epoxy might be a better choice.
Glass and Ceramics: While PVA glue can bond these materials, it’s generally not the strongest or most durable option. The smooth, non-porous surface means the glue will rely entirely on surface evaporation. Expect longer drying times, and the bond might not withstand significant moisture or heat. For these, specialized adhesives like cyanoacrylate (super glue), epoxy, or silicone sealants are usually recommended.
Tips to Speed Up PVA Glue Drying
Sometimes, you just need that project finished! Here are a few ways to encourage your PVA glue to dry a little faster:
- Increase Airflow: Place the glued item near an open window, use a small fan (on a low setting, pointed slightly away so as not to disturb the joint), or work in a well-ventilated area. This helps carry away the evaporating moisture.
- Slightly Increase Temperature: Working in a room that is comfortably warm (but not hot) can help. Avoid direct heat sources like heaters or direct sunlight, which can sometimes cause certain types of PVA glue to become brittle too quickly, weakening the bond.
- Apply Thinly and Evenly: The less excess glue there is, the faster it can dry. Make sure you’re not applying a thick bead. A common piece of advice, especially for wood glue, is to apply a thin, even layer to both surfaces being joined.
- Wipe Away Excess Immediately: Any glue that squeezes out and sits on the surface will take longer to dry and can be messy. Wipe away excess with a damp cloth shortly after clamping. This also makes for a cleaner finished product.
- Use Waterproof PVA Glues for Specific Applications: If your project is going to be exposed to moisture, standard PVA won’t cut it. Look for “waterproof” or “water-resistant” PVA glues, which are formulated differently and may have slightly different drying characteristics while offering much better durability in damp conditions. For example, Titebond III is a popular waterproof wood glue option.
When to Worry: Signs of Improper Drying
It’s important to recognize when something isn’t going right with your glue bond. Here are a few signs that might indicate improper drying or a weak bond:
- Tacky or Sticky Surface After 24 Hours: If a joint is still noticeably tacky or sticky after a full day, especially in normal room conditions, it might be an indication that the glue was applied too thickly, the humidity is extremely high, or the glue itself is old or flawed.
- Joint Separates Easily: If your glued pieces come apart with minimal effort, even after what you thought was adequate drying time, the bond has failed. This could be due to insufficient clamping, not enough glue, glue applied to a dirty surface, or not waiting for adequate cure time before stressing the joint.
- White Residue or Streaking: Sometimes, if a surface is too wet or if the glue is spread very thinly and absorbs into porous material, you might see a slightly chalky or streaky residue. This usually isn’t a structural problem but can affect the appearance if it’s on a surface that will be visible.
- Glue Doesn’t Harden: If the glue remains liquid or very soft and rubbery even after extended periods, it could be a sign of incompatible materials, extreme cold, or a defective glue batch.
If you suspect an issue, don’t hesitate to gently try to separate the pieces. If they come apart, you can clean off the old glue and try again, ensuring you follow the best practices for application and clamping. For wood, the U.S. Forest Products Laboratory has extensive research on wood bonding and adhesives that you might find interesting.
Best Clamping Practices for Strong Bonds
Clamping is critical for achieving a strong PVA glue bond. It’s not just about holding the pieces together; it’s about ensuring the surfaces are in perfect contact and that the glue spreads thinly and evenly.
- Apply Enough Glue: You need enough glue to form a thin, continuous film between the surfaces. For wood, a common guideline is to aim for a thin, even layer on one or both surfaces. When squeezed, you should see a consistent bead of glue appear along the joint.
- Apply Consistent Pressure: Use clamps (bar clamps, pipe clamps, C-clamps, strap clamps, etc.) to apply firm, even pressure across the joint. Avoid over-tightening, which can squeeze out too much glue, creating a weak spot, or even damage the wood. You want the glue to bead slightly, not disappear completely.
- Use Clamps Strategically: Place clamps at regular intervals along the length of the joint to distribute pressure evenly. For edge joints, ensure clamps are placed on both sides.
- Protect the Surface: Use scrap wood or cardboard pieces under the clamp jaws to prevent them from marring the surface of your project.
- Check Contact: As you tighten the clamps, visually check that the joint surfaces are pulled tightly together without any gaps.
- Wipe Off Squeeze-Out: As mentioned, wipe away excess glue that squeezes out with a damp cloth immediately after clamping. Dried glue squeeze-out can be difficult to remove and may require scraping or sanding later.
- Maintain Clamping Pressure: Leave the clamps on for the recommended minimum time (usually at least 30-60 minutes for handling dry, but ideally longer for full cure, especially if the joint will be stressed).

Frequently Asked Questions about PVA Glue Drying Times
Q1: How long does white craft glue take to dry?
White craft glue (a type of PVA) usually takes about 30-60 minutes to become dry to the touch and handleable. Full strength, or cure, typically takes around 24 hours. Factors like how thickly you apply it, temperature, and humidity can affect this.
Q2: My PVA glue is still sticky after 4 hours. Is it bad?
If your PVA glue is still noticeably sticky after 4 hours under normal conditions (room temperature, average humidity), it might be taking longer than usual. This could be due to a thick application, high humidity, or potentially old glue. While it might still dry, it’s best to give it more time or try to increase airflow. If it’s a critical joint, you might need to re-glue if it doesn’t harden sufficiently within 24 hours.
Q3: Can I speed up how long PVA glue takes to dry with heat?
Yes, slightly increasing the temperature can help speed up PVA glue drying by encouraging water evaporation. However, avoid using direct, intense heat (like a heat gun or direct sunlight), as this can sometimes cause the glue to dry too quickly on the surface, potentially forming a brittle skin that hinders the rest of the glue from drying properly and weakening the overall bond.
Q4: How long should I leave clamps on for PVA glue?
For most standard PVA wood glues, you should leave clamps on for at least 30-60 minutes to allow the glue to set enough for careful handling. However, for the strongest possible bond, especially if the joint will be under significant stress, it’s best to leave clamps on for several hours or even up to 24 hours, allowing the glue to reach its full cure. Always refer to the glue manufacturer’s recommendations.
Q5: Is there a difference in drying time between white and yellow PVA glue?
White PVA glue (like Elmer’s School Glue) is generally less water-resistant and often used for lighter craft applications, paper, and cardboard. Yellow PVA glue (often labeled as wood glue, like Titebond original) is typically formulated for stronger, more durable wood joints and may have slightly different drying characteristics, though the general timelines for setting and curing are similar. Yellow glues are generally considered stronger for woodworking.
Q6: What is the difference between “drying time” and “cure time” for PVA glue?
“Drying time” usually refers to when the glue is no longer wet and is firm enough to touch or move. This is often called the set time. “Cure time” refers to the period it takes for the glue to reach its maximum adhesion strength and chemical properties. While a joint might be dry enough to handle after an hour, it often takes 24 hours to achieve its full, robust strength.
Q7: Can I use PVA glue on outdoor projects, and how does that affect drying time?
Standard white or yellow PVA glues are not recommended for outdoor projects because they are water-based and not designed to withstand moisture or extreme temperature fluctuations. If you need an outdoor glue, look for a waterproof PVA (like Titebond III) or a different type of adhesive like polyurethane glue or epoxy. For waterproof PVAs, drying times will be similar to interior use, but their performance against the elements is what makes them suitable for outdoors.
Conclusion
So, there you have it! Understanding how long PVA glue takes to dry is a key step in achieving strong, reliable bonds for your projects. While most PVA glues will feel dry and set within about 30 to 60 minutes, remember that this is just the beginning. For the ultimate strength, a full 24 hours of curing is your best bet. Keep those factors in mind – temperature, humidity, airflow, and how you apply the glue – and you’ll be able to predict and achieve excellent results every time.
Don’t be afraid to get your hands a little gluey; it’s all part of the learning process! With a little patience and this guide, you’ll be building and repairing with confidence, knowing your glued joints are as strong as can be. Happy crafting, and happy building!