How To Change The Drill Bit On A Dewalt Drill (Full Guide)
Most DeWalt drills use a chuck to hold the drill bit. This is the part that spins. There are a few main types of chucks you’ll find.
Some have jaws that you tighten with your fingers. Others need a key to get them snug. Knowing your chuck type is the first step.
The chuck’s job is important. It needs to grip the bit very tightly. This prevents slipping.
Slipping can damage the bit. It can also make the drilling uneven. A good grip means safer and cleaner work.
Your DeWalt drill’s chuck is designed for this.
Over time, chucks can get a bit dirty. Dust and debris can build up. This can make them harder to open or close.
Sometimes, the jaws might get a little stiff. Regular cleaning helps a lot. It keeps things working smoothly.
Let’s look at the common types.
Types of DeWalt Drill Chucks
DeWalt makes many drills. So, they use different chucks. The most common is the keyless chuck.
This means you can usually change bits by hand. You’ll see two rings on the chuck. One part stays still.
The other part spins to open and close the jaws.
Another type is the keyed chuck. These are less common on newer drills. They are often found on older models or high-power hammer drills.
These chucks have holes. You need a special key to turn a gear. This gear opens or closes the jaws.
Some professional DeWalt drills might have a quick-release chuck. These are very fast. You often just pull a collar.
This releases the bit. Then you push it back in to secure a new one. It’s designed for speed.
It’s great when you switch bits a lot.
Knowing your drill model helps. You can often find this information on the drill itself. It might be on a label near the handle or the battery.
If you’re not sure, check the manual. Your DeWalt manual is a great resource.
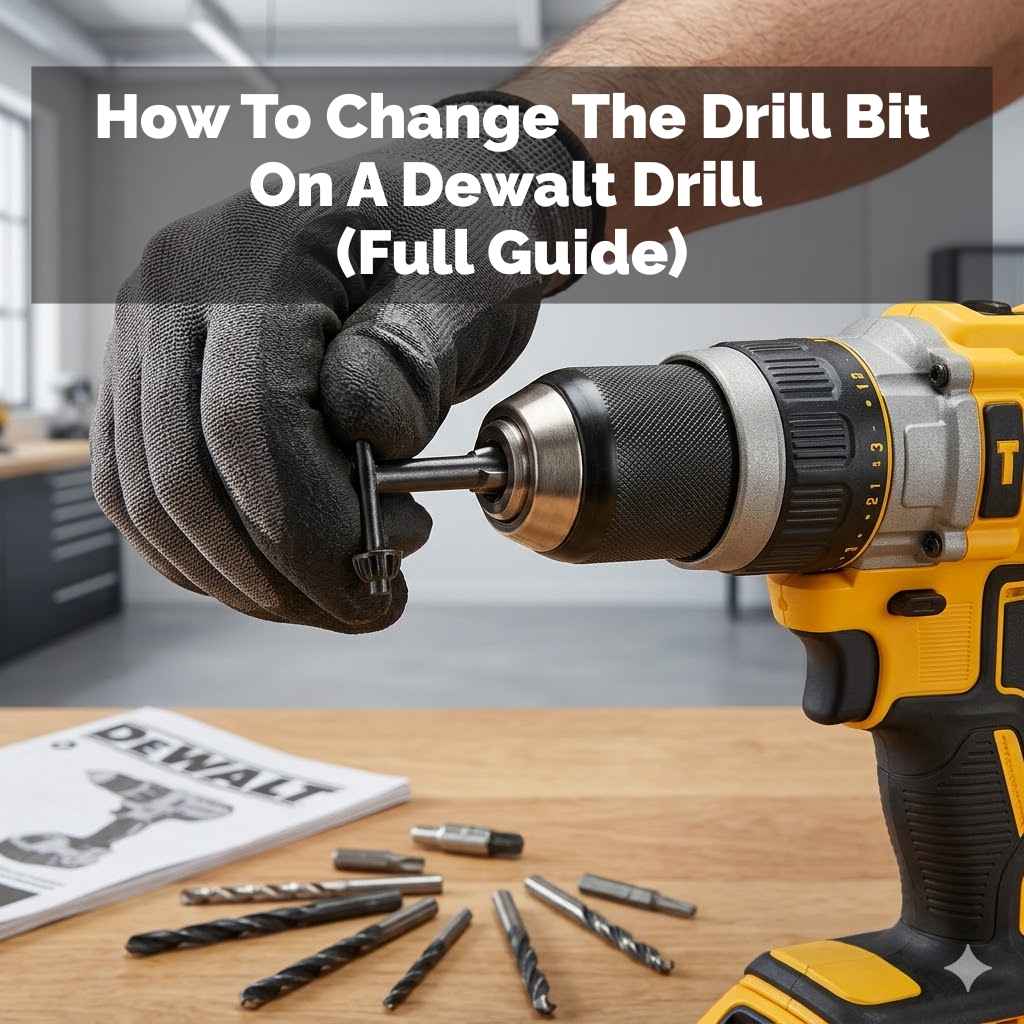
How to Change a Bit on a Keyless DeWalt Chuck
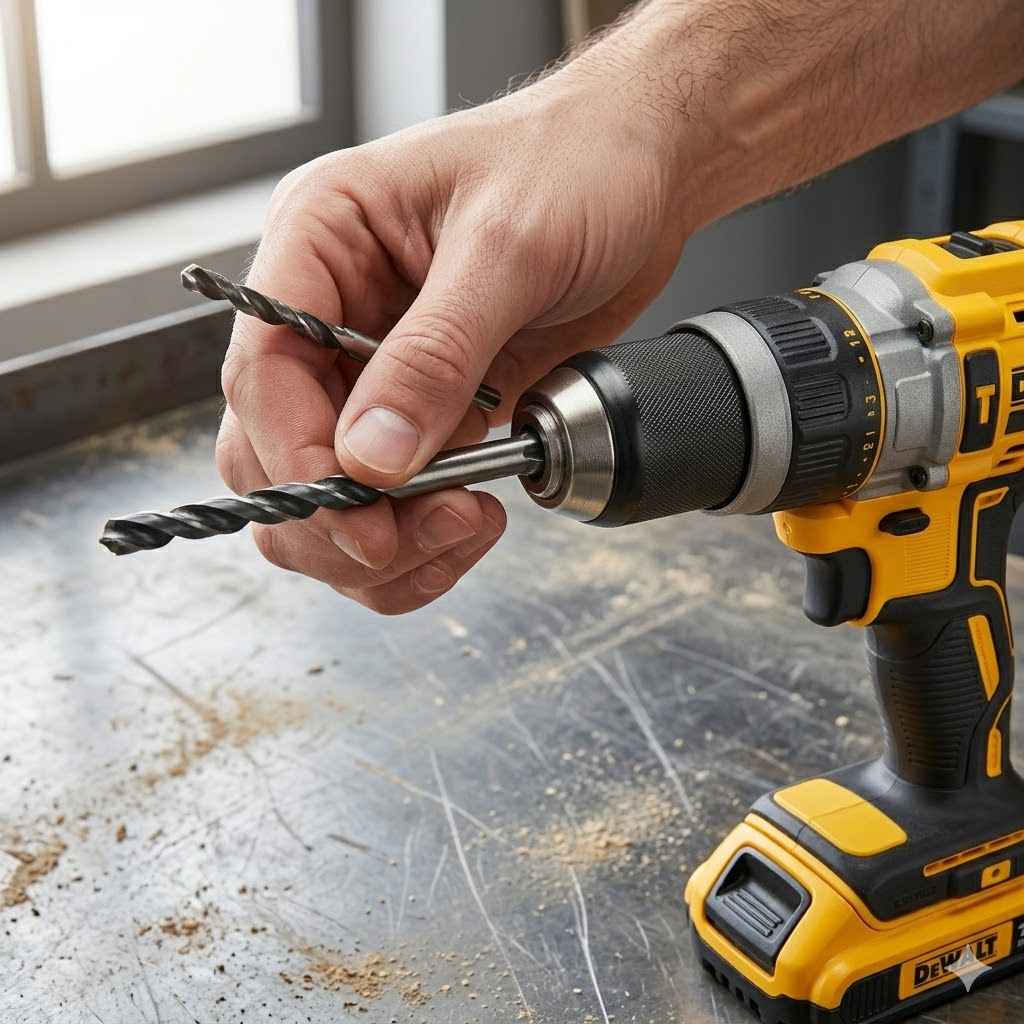
This is the most common scenario. For a keyless chuck, you don’t need any tools. Look at the chuck.
You’ll see two parts. One part might have DeWalt’s logo. This part usually stays put.
The other part is the sleeve that you turn.
To remove the old bit, you need to open the chuck jaws. You do this by turning the sleeve. Most of the time, you turn it counter-clockwise.
That’s the opposite of how you tighten a screw. You’ll feel it loosen. Keep turning until the jaws open wide enough.
This means the bit can slide out.
Sometimes, it might be a bit tight. If it doesn’t budge easily, try gripping it firmly. Make sure your hand is dry.
A good grip is key. You might need to twist and pull a little. The bit should then come free.
Be careful, the bit could be sharp.
Now, take your new drill bit. Look at the end of the bit. It’s usually smooth or has a shank.
Insert the shank into the open jaws of the chuck. Push it in as far as it will go. Make sure it feels seated properly.
You don’t want it sticking out too far.
Once the new bit is in place, you need to tighten the chuck. Turn the sleeve clockwise. That’s the same way you tighten a screw.
Tighten it until it feels very secure. You want a firm grip. Give the bit a gentle tug to make sure it’s not loose.
Many DeWalt keyless chucks have a ratcheting action. This means you can keep tightening. It gets tighter and tighter.
This is good. It gives you a really strong hold. You’ll hear a clicking sound as you tighten.
This is normal. Stop when it feels very snug. Don’t overtighten so much that you can’t get it off later.
How to Change a Bit on a Keyed DeWalt Chuck
If your DeWalt drill has a keyed chuck, you’ll need the chuck key. It’s a small metal L-shaped tool. It fits into the holes on the chuck.
There are usually three holes. The key engages with a gear inside. This gear controls the jaws.
To remove the old bit, insert the key into one of the holes. Turn the key counter-clockwise. This will open the jaws.
You’ll need to turn it quite a bit. Keep going until the jaws are fully open. Then you can pull the old bit out.
Be careful not to drop the key.
Sometimes, the chuck can be very stiff. If turning the key is hard, make sure you’re in the right hole. Try a different hole if one feels stuck.
Ensure the key is fully seated in the hole. Gentle but firm pressure is best.
When you have the old bit out, take your new bit. Insert its shank into the open chuck jaws. Make sure it goes in straight.
Push it in until it can’t go any further. It should sit well inside the chuck. You want it to be centered.
Now, insert the chuck key into a hole again. Turn the key clockwise. This will close the jaws.
Tighten it until the bit feels very secure. You want a strong grip. Give the bit a good tug to test it.
Make sure it doesn’t wiggle at all.
With keyed chucks, it’s important to tighten them well. Because you’re using a tool, you can apply more force. This ensures the bit won’t slip during use.
However, remember where you put the chuck key. Losing it can be a problem.
Dealing with Stuck Drill Bits
This is a common frustration. Sometimes, a drill bit just won’t come out. This happens for a few reasons.
The jaws might be dirty. Or the bit might have gotten really hot and expanded. Maybe it got wedged in.
Here’s what to try.
First, make sure you are turning the chuck in the right direction. For keyless chucks, it’s almost always counter-clockwise to loosen. For keyed chucks, the key turns counter-clockwise.
Double-check this. It’s an easy mistake.
Try using two hands for a keyless chuck. Grip the body of the drill firmly with one hand. Use your other hand to turn the sleeve.
A firm, steady grip helps. If your hands are sweaty, try using gloves or a cloth for better traction. This can make a big difference.
If it’s still stuck, a little bit of penetrating oil might help. You can spray a tiny amount around the chuck jaws. Let it sit for a few minutes.
This can help loosen any grime or rust. Then try turning the sleeve again. Wipe off any excess oil.
For really stubborn bits, you might need a bit more force. Some people use pliers gently on the chuck sleeve. This can give you extra grip.
Be very careful not to damage the chuck. You don’t want to bend or break the sleeve. Just enough extra grip to get it turning.
In rare cases, the chuck itself might be worn out. Or there might be internal damage. If you’ve tried everything and the bit is still stuck, it might be time to consult your DeWalt manual.
It might suggest a repair or replacement. For safety, never try to force it too hard. You don’t want to risk injury.
Quick Chuck Cleaning Tips
Keep it Clean: After each use, wipe down the chuck. Use a dry cloth. This removes dust.
Occasional Lubrication: Once in a while, a tiny drop of light oil can help. Put it only on the sleeve that turns. Wipe off any extra.
Don’t use too much. It can attract more dirt.
Check for Debris: Look inside the jaws. Are there wood shavings or metal bits stuck there? Use a small brush or compressed air to clear them out.
A toothpick can sometimes help get out lodged pieces.
Inspect Jaws: Are the jaws sharp and straight? If they look worn or damaged, it might be time for a new chuck. Worn jaws won’t grip well.
Inserting and Securing the New Bit
Putting the new bit in is just as important. Make sure you choose the right bit for the job. A drill bit that’s too long or too short won’t sit right.
It could be unstable.
When you insert the new bit, push it into the chuck jaws. Make sure it goes in straight and deep. You want the shank of the bit to be fully gripped by the jaws.
If it’s only held by one or two jaws, it might wobble.
For keyless chucks, spin the sleeve clockwise. Tighten it firmly. You should hear it click if it has a ratcheting feature.
Give the bit a good tug with your hand. It should not move at all. If it moves, tighten it more.
For keyed chucks, use the key to tighten. Turn it clockwise until it feels very secure. Again, test the bit by pulling on it.
It must feel completely solid. If it feels loose, tighten it more with the key. Make sure the key is firmly in the hole.
A secure bit is vital for accuracy. It also prevents bits from breaking. A loose bit can bend.
This can cause it to snap. So, take the time to make sure it’s tight. It’s a small step that prevents big problems.
Bit Insertion Checklist
- Correct Bit: Is it the right size and type for your task?
- Fully Inserted: Does the bit shank go deep into the chuck?
- Centered: Is the bit going in straight? Not angled?
- Tightened Firmly: Can you move the bit by hand? (It shouldn’t.)
- Visual Check: Does it look straight and secure?
Different DeWalt Drill Models and Chucks
DeWalt offers a wide range of drills. This means chuck types can vary. For example, the popular DeWalt DCD771C2 is a cordless drill.
It typically comes with a 1/2-inch keyless chuck. This is their standard workhorse drill.
Other models, like some of the DeWalt XR brushless models, might have more advanced chucks. Some might feature all-metal chucks. These are more durable.
They can handle tougher jobs. The process of changing bits is usually the same though: loosen, insert, tighten.
On the other hand, if you have an older DeWalt corded drill, you might find a keyed chuck. For example, some DeWalt DW511 models came with a keyed chuck. These are built for power and stability.
Even within keyless chucks, there can be slight differences. Some DeWalt models have a brake. This means the drill stops instantly when you release the trigger.
This can sometimes make bit removal easier. You don’t have to worry about the chuck spinning.
Always refer to your specific DeWalt drill’s manual if you are unsure. The model number is usually on the tool itself. A quick search online for your model number plus “chuck type” will tell you a lot.
Knowing your specific drill helps you understand its features.
When to Worry: Signs of Chuck Problems
Most of the time, changing a drill bit is straightforward. But sometimes, the chuck itself might have an issue. There are a few signs that something might be wrong.
These could mean your chuck needs attention or replacement.
Wobbly Bit: If you tighten the bit as much as you can, and it still wobbles when you spin the drill slowly by hand, the jaws might be worn. Or something might be bent. A wobbly bit leads to inaccurate holes and can break bits.
Difficulty Turning: If the keyless sleeve is very hard to turn, or the keyed chuck needs extreme force, there’s likely a problem. This could be dirt, rust, or internal damage. It’s especially a concern if it happens suddenly.
Chuck Won’t Tighten Properly: If you tighten the chuck, and then the bit slips out when you apply pressure, the jaws are not gripping. This is a major safety issue. The bit can fly out.
This is a sign the chuck needs repair or replacement.
Unusual Noises: While a ratcheting chuck makes noise when tightening, if the chuck makes grinding or scraping noises during normal use, even with a well-secured bit, something is likely wrong internally.
Visible Damage: If you see cracks, bends, or significant corrosion on the chuck body or sleeve, it’s time to have it checked. Do not use a damaged tool.
These issues aren’t super common. DeWalt tools are generally well-made. But if you notice any of these, it’s best to stop using the drill and investigate.
Your manual might have troubleshooting steps. Or you might need to contact DeWalt service.
Myths vs. Reality: Drill Bit Changes
Myth: You need a special tool for all DeWalt drills. Reality: Most modern DeWalt drills have keyless chucks that need no tools.
Myth: If a bit is stuck, just force it harder. Reality: Forcing can damage the chuck or cause injury. Try lubrication or gentle leverage first.
Myth: Any bit can be used in any DeWalt chuck. Reality: Ensure the bit shank fits the chuck jaws properly. Too small or too large a shank won’t grip well.
Myth: Chucks don’t need maintenance. Reality: Keeping the chuck clean and occasionally lubricating the sleeve helps it last longer and work better.
Quick Fixes and Tips for Bit Changes
Here are some final tips to make changing your DeWalt drill bits smoother.
Know your drill model. This is key. It tells you what kind of chuck you have. Look for the model number on the tool.
Always unplug or remove the battery. Safety first! Before you touch the chuck, make sure the drill cannot accidentally turn on. This is a must.
Clean the chuck regularly. A quick wipe down after use helps. Compressed air can blow out dust. This prevents build-up that causes sticking.
Use the right bit for the job. This isn’t about changing bits, but it affects how well the bit fits and stays secure. A bit that’s too small can slip.
Don’t overtighten keyed chucks. While you want a secure grip, extreme force can strip the gears inside the chuck. Tighten it until it feels very firm, not until you can’t turn it anymore.
Store chuck keys safely. If you have a keyed chuck, keep the key with your drill. A small pouch or a dedicated spot in your toolbox is good. Losing it is a hassle.
Listen to your drill. Unusual sounds during operation can signal a chuck problem. Address it before it gets worse.
When in doubt, check the manual. DeWalt manuals are designed to help. They have specific instructions for your model.

Frequently Asked Questions About DeWalt Drill Bits
How do I know if my DeWalt drill has a keyless chuck?
Most modern DeWalt drills have keyless chucks. You will see two rings on the chuck. One part usually stays still, often with the DeWalt logo.
The other part is a sleeve that you can spin by hand to open and close the jaws. You won’t see any holes for a key.
Can I use any brand of drill bit with my DeWalt drill?
Yes, you can use drill bits from other reputable brands. The most important thing is that the shank of the drill bit fits correctly into your DeWalt drill’s chuck. Ensure the bit is the right size and type for your material and task.
Make sure the chuck grips it securely.
Why is my DeWalt drill bit slipping after I tightened it?
A slipping bit usually means the chuck jaws aren’t gripping tightly enough, or the jaws themselves are worn. Ensure you are turning the keyless chuck sleeve clockwise until it is very snug, or tightening the keyed chuck firmly. If it continues to slip after proper tightening, the chuck may need service or replacement.
How often should I clean my DeWalt drill chuck?
It’s best to clean your DeWalt drill chuck after each use. A simple wipe down with a dry cloth removes most dust and debris. If you work in a very dusty environment, consider using compressed air occasionally to blow out any lodged particles from the chuck jaws.
This simple habit prevents future sticking issues.
What is the difference between a 1/2 inch and a 3/8 inch DeWalt chuck?
The size refers to the maximum diameter of the drill bit shank the chuck can securely hold. A 1/2 inch chuck can hold bits with shanks up to 1/2 inch in diameter. A 3/8 inch chuck can hold bits with shanks up to 3/8 inch in diameter.
Larger chucks can hold larger bits, offering more power and versatility.
My DeWalt drill chuck is hard to turn. What should I do?
If the chuck is hard to turn, first ensure you have removed the battery or unplugged the drill for safety. Try cleaning any visible debris. For keyless chucks, a dry cloth or a bit of penetrating oil applied sparingly can help.
For keyed chucks, ensure the key is fully inserted. If it remains stiff, it might indicate internal wear and could require professional attention.
Conclusion
Changing a drill bit on your DeWalt drill is a fundamental skill. Whether you have a keyless or keyed chuck, the process is designed to be manageable. By understanding your chuck type and following these simple steps, you can swap bits quickly and safely.
Remember to always prioritize safety by removing power before changing bits. A little care and attention will keep your DeWalt drill working perfectly for years to come.