How to Clean Cabinets After Sanding: Quick & Easy Tips
To clean cabinets after sanding, use a vacuum to remove dust, then wipe surfaces with a damp cloth. Ensure the cabinets dry completely before applying any finish.
Sanding cabinets prepares the surface for painting or staining, but it also creates a significant amount of dust. This dust can interfere with the finish and overall appearance. Proper cleaning is essential to achieve a smooth, professional look. Start by using a vacuum to eliminate loose particles.
Following this, a damp cloth will capture any remaining dust and debris. Ensure you let the cabinets dry thoroughly before moving on to the next step. By following these steps, you can ensure your cabinets look great and are ready for their new finish.
Introduction To Post-sanding Cabinet Care
Cleaning cabinets after sanding is very important. Proper cleaning helps prepare the surface for finishing. Dust and debris can affect the final look. A clean surface ensures a smooth application.
Follow this checklist for effective cleaning:
| Item | Purpose |
|---|---|
| Vacuum | Remove loose dust and particles. |
| Soft Cloth | Wipe surfaces gently. |
| Mineral Spirits | Clean stubborn residue. |
| Water | Rinse off cleaning agents. |
| Bucket | Hold water and cleaning solutions. |
Ensure all products are safe for cabinet materials. Use gentle motions to avoid damage.
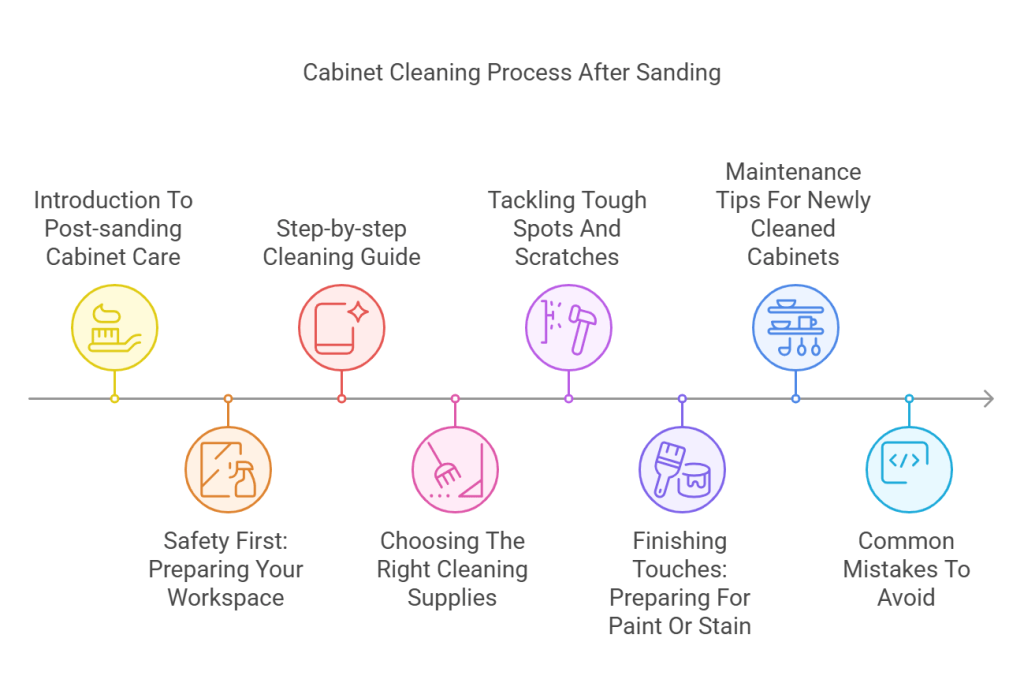
Safety First: Preparing Your Workspace
Ensure proper ventilation in your workspace. Open windows and use fans. This helps remove dust and fumes.
Wearing protective gear is essential. Use masks to avoid inhaling dust. Safety goggles protect your eyes from debris.
Clear your area before starting. Remove furniture and cover items with plastic sheets. This minimizes dust spread.
Use a damp cloth to wipe surfaces. This helps capture dust particles effectively. Change cloths often for best results.
Regularly check for dust buildup. Keeping the area clean ensures a safe environment. Safety should always come first.
Step-by-step Cleaning Guide
Start with a soft brush or a vacuum cleaner to remove dust. Be gentle to avoid damaging the surface. Use a microfiber cloth for wiping. This helps catch fine particles easily.
For deeper cleaning, mix warm water and mild soap. Dampen a cloth and wipe the cabinets. Rinse the cloth often to avoid spreading dirt. For stubborn spots, try a vinegar solution. Mix equal parts of vinegar and water. Apply it to the area and wipe clean.
Use a soft sponge for tough residues. Avoid abrasive pads that can scratch surfaces. After cleaning, dry the cabinets with a dry cloth. This prevents water spots and damage.
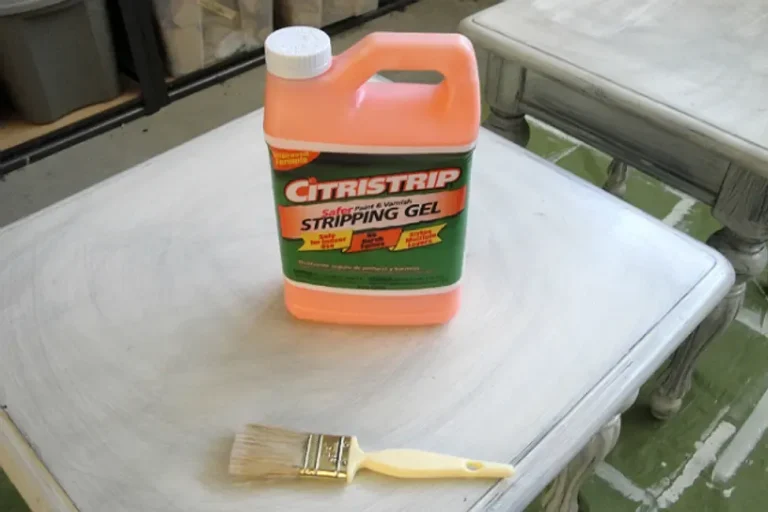
Choosing The Right Cleaning Supplies
Choosing the right cleaning supplies is important for effective cabinet cleaning. Natural cleaners are safer for the environment and health. They include vinegar, baking soda, and lemon juice. Chemical cleaners are stronger but can be harmful. Always wear gloves and a mask when using them.
Natural cleaners work well for light dust and residue. For tougher stains, chemical cleaners may be necessary. Test any cleaner on a small area first.
| Type | Pros | Cons |
|---|---|---|
| Natural Cleaners | Eco-friendly, safe to use | May not remove tough stains |
| Chemical Cleaners | Powerful, effective on stains | Can be harmful, strong fumes |
Tools of the trade are key for proper cleaning. Microfiber cloths are excellent for dusting and wiping. A soft brush helps get into crevices. A vacuum with a brush attachment removes loose particles easily.
Tackling Tough Spots And Scratches
Cleaning cabinets after sanding can reveal tough spots and scratches. Use gentle abrasives to avoid damaging the surface. Products like baking soda mixed with water can effectively remove scratches. Another option is using fine steel wool for minor imperfections.
For spot treatment, start by identifying the area needing attention. Apply the gentle abrasive with a soft cloth. Rub in a circular motion to lift the stains and scratches. Rinse the cloth and wipe away any residue left behind.
| Method | Material | Effectiveness |
|---|---|---|
| Baking Soda Paste | Baking Soda + Water | Good for scratches |
| Fine Steel Wool | Fine Grade Steel Wool | Excellent for minor scratches |
Finishing Touches: Preparing For Paint Or Stain
To clean cabinets after sanding, remove dust with a soft cloth. This step is crucial for a smooth finish. Wood conditioner helps prepare the surface for paint or stain. Apply it evenly, following the wood grain. Let it sit for the recommended time before proceeding.
For smoothing out imperfections, sanding again may be necessary. Use fine-grit sandpaper to gently go over the surface. This creates a more even texture for your finish. Always clean the surface again after sanding. This ensures no dust remains before painting or staining.
Maintenance Tips For Newly Cleaned Cabinets
Creating a regular cleaning schedule is essential for maintaining your cabinets. Clean them at least once a month to prevent dirt buildup. Use a soft cloth and mild soap for best results.
Protect surfaces from future damage by applying a protective finish. This helps seal the wood and keep it looking new. Avoid using harsh chemicals that can harm the finish.
Regularly check for scratches or dents. Address any damage quickly to prevent further issues. Treat your cabinets with care to ensure they last for years.
Common Mistakes To Avoid
Over-sanding can damage your cabinets. This makes them rough and uneven. It leads to more work later. Always check your progress while sanding.
Using the wrong cleaning products can also harm your cabinets. Avoid cleaners with harsh chemicals. These can strip the wood finish. Stick to gentle soaps or natural cleaners. Always test any product on a small area first.
Remember to use a damp cloth after sanding. This helps remove dust and debris. Let the cabinets dry completely before applying any finish.
Frequently Asked Questions
How Do I Prepare Cabinets For Cleaning After Sanding?
Before cleaning, ensure all dust settles. Use a vacuum with a brush attachment to remove particles. Then, wipe surfaces with a damp cloth. This helps avoid scratching and ensures a thorough clean. Make sure the cabinets are completely dry before applying any finishes.
What Cleaning Products Are Best For Cabinets?
Mild dish soap mixed with water is effective. Avoid harsh chemicals that can damage the wood finish. You can also use a mixture of vinegar and water for a natural solution. Always test any cleaner on a small area first to ensure compatibility.
How Often Should I Clean My Cabinets After Sanding?
After sanding, clean cabinets thoroughly before any finishing. Regular maintenance should follow every few months, depending on usage. If the cabinets are in a high-traffic area, consider cleaning them more frequently. This keeps the surfaces looking fresh and prolongs their lifespan.
Can I Use A Microfiber Cloth For Cleaning?
Yes, microfiber cloths are ideal for cleaning cabinets. They effectively capture dust and debris without scratching surfaces. Use a slightly dampened cloth for better results. This method is safe and ensures a gentle yet effective clean for your cabinets.
Conclusion
Cleaning cabinets after sanding is crucial for achieving a smooth finish. Properly removing dust and debris ensures better adhesion for paint or stain. Follow the steps outlined to maintain your cabinets’ integrity. A clean surface leads to stunning results, enhancing your home’s overall appearance.
Happy refinishing!