How to Make a Spear Out of Wood: Step-by-Step Guide
To make a wooden spear, select a straight hardwood branch or dowel 5–7 feet long and 1–1.5 inches in diameter — hickory, ash, and oak are the best choices for strength. Sharpen one end to a 4-sided point using a sharp knife (Mora or similar), harden the tip with fire if available, then optionally lash a carved or stone spearhead to the tip with paracord or rawhide. The full process takes 2–4 hours for a beginner with basic tools. This guide covers shaft selection, tip shaping, spearhead carving, lashing, and finishing.
Quick Answer
Best wood for a spear: hickory (strongest, shock-resistant), ash (traditional, lightweight), or oak (heavy but very durable). Cut to 5–7 feet, strip bark, sand smooth. Carve a 4-sided point at one end, harden with heat if possible, and wrap the grip with paracord. A fire-hardened wooden spear tip is strong enough for fishing and small game. For a two-piece spear with a removable head, carve a socket joint and lash the head with wet rawhide — it tightens as it dries.
Standard Wooden Spear Dimensions
- Overall length: 5–8 feet (6 ft is most common for a walking/hunting spear)
- Shaft diameter: 1–1.5 inches at center
- Tip length: 4–8 inches of carved taper
- Best diameter wood for carving: 1.25–1.5 inch straight-grained branch or sapling
Choosing The Right Wood
The wood species you choose determines the spear’s strength, weight, and workability. For a functional spear, avoid softwoods — they split and break under stress. The best options:
| Wood | Strength | Weight | Best For |
|---|---|---|---|
| Hickory | Excellent | Heavy | Hunting, throwing spears |
| Ash | Very Good | Medium | All-purpose, traditional spears |
| Oak | Excellent | Heavy | Thrusting spears, display |
| Bamboo | Good | Light | Fishing spears, quick builds |
| Pine/Fir | Poor | Light | Avoid — splits under impact |
Look for a branch or sapling that is straight with minimal bends or knots — bends affect balance and throwing accuracy. If using a live branch, let it dry (season) for 2–4 weeks before working it. Dry wood carves more cleanly, holds a sharper edge, and is significantly stronger than green wood. For other wood type comparisons by hardness and workability, see our wood species guide.
Best Wood for Making a Spear: Comparison Table
| Wood | Hardness | Flexibility | Weight | Best For |
|---|---|---|---|---|
| White Ash | High | Excellent | Medium | Best all-around spear shaft — used in traditional hunting spears |
| Hickory | Very High | Good | Heavy | Heavy-use spears, throwing spears — maximum durability |
| Oak | High | Moderate | Heavy | Display spears, practice weapons |
| Maple | High | Moderate | Medium | Lightweight spears for bushcraft projects |
| Bamboo | Medium | High | Light | Survival spears — fast to make, widely available |
| Pine/Fir | Low | Low | Light | Beginner practice only — not recommended for real-use spears |
Tools And Materials Needed
| Item | Purpose |
|---|---|
| Sharp fixed-blade knife (Mora or similar) | Carving the tip, stripping bark, notching for lashing |
| Saw or hatchet | Cutting shaft to length |
| 80/120/220-grit sandpaper | Smoothing shaft and spearhead |
| Paracord or rawhide lashing | Securing spearhead to shaft |
| Wood carving chisels / gouges (optional) | Carving a detailed spearhead shape |
| Fire source (optional) | Hardening the tip by charring |

How to Make a Spear: Step-by-Step
Step 1 — Select and Prepare the Shaft
Cut your chosen wood to 5–7 feet long using a saw or hatchet. Strip all bark using your knife — run the blade at a low angle along the shaft. Inspect for knots; small knots are acceptable, but knots in the tip area will cause the point to split. Sand the shaft with 80-grit to remove rough spots, then 120-grit for smoothness. If the shaft is slightly bent, heat it gently near a fire and flex it straight while warm, then hold until cool — wood is flexible when heated and sets straight as it cools.
Step 2 — Carve the Spear Tip
For a simple fire-hardened tip (no separate spearhead), carve a 4-sided point at one end of the shaft. Use the push cut method: brace the wood against a solid surface and push the knife forward in controlled strokes. Work each of the 4 sides alternately to maintain symmetry. The tip should taper gradually over 6–8 inches and terminate in a sharp point. Common mistakes: carving too fast (creates inconsistent angles) and carving too close to a knot (causes splitting).
Step 3 — Harden the Tip (Optional but Recommended)
Fire-hardening dramatically increases tip hardness by driving out moisture and partially charring the wood fibers. Hold the carved tip 4–6 inches above hot coals (not flame — flame creates uneven charring). Rotate constantly for even heating. The tip should darken to a medium brown — stop before it blackens or smokes heavily. Let cool completely before handling. Fire-hardened hickory or ash tips are hard enough for fishing and small game — and this technique was used by indigenous peoples worldwide for thousands of years.
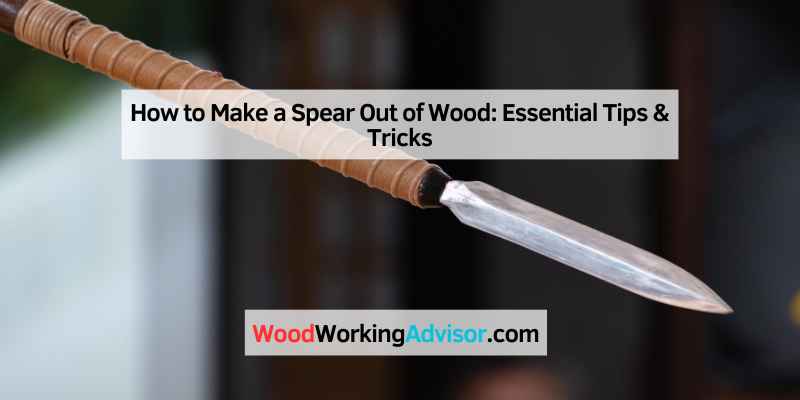
Step 4 — Carve and Attach a Spearhead (Optional)
A separate carved wood or stone spearhead makes a more effective tool. For a wood spearhead: use a dense hardwood like ironwood or hickory, carve a leaf or triangular shape, and create a tang (narrow base) that notches into a split at the tip of the shaft. Split the shaft end 2–3 inches, insert the spearhead tang, and lash tightly with paracord or wet rawhide. Rawhide shrinks as it dries, creating an extremely tight fit. Apply pine sap or epoxy behind the lashing for additional security.
Step 5 — Sand and Finish
Sand the full shaft progressively: 80-grit → 120-grit → 220-grit. Wipe clean between grits. Apply a protective finish — wood oil or stain works well for outdoor use and prevents moisture from warping the shaft. Wrap the grip area (the lower third of the shaft) with paracord — this provides both improved grip and protection for your palm during use.
How to Carve a DIY Wooden Spearhead
A carved wooden spearhead is a satisfying standalone project and is significantly stronger than just sharpening the shaft end. Here is the process:
- Choose the wood: Ironwood, dogwood, or dense hickory. Avoid grain that runs across the blade width — you want grain running lengthwise through the spearhead for strength.
- Rough cut the blank: Cut a piece approximately 8–12 inches long, 2 inches wide, and 1 inch thick. Draw your spearhead outline (leaf shape is easiest for beginners).
- Remove bulk material: Use a hatchet or coarse rasp to remove bulk material down to your outline. Work the bevel (the angled faces that form the cutting edges) using a knife in long push strokes.
- Refine the point and edges: Work the tip to a symmetrical point. Use a small carving gouge to cut the blood groove (center channel) if desired — it’s decorative on wood spearheads but traditional on many designs.
- Create the tang: Narrow the base of the spearhead to form a tang 3/4 inch wide and 2 inches long. This fits into a slot in the shaft end.
- Sand and harden: Sand progressively to 220-grit. Fire-harden the tip as described above.
Best Tool for Spear Making

Mora Carving Knife 120 — High Carbon Steel Fixed Blade
The go-to knife for spear tip carving and spearhead work. The high carbon steel blade takes and holds an edge that most stainless blades can’t match, and the thin blade geometry gives you precise control for push cuts.
- Best for: Carving the spear tip, stripping bark, notching the shaft for lashing — any fine control work
- Why we picked it: Mora blades come shaving-sharp out of the box; the scandi grind is ideal for carving wood versus thicker convex grinds
- Main drawback: High carbon steel requires oiling after use to prevent rust — stainless versions available if you prefer low maintenance
More spear making essentials
 Option 1 Fiskars X7 Hatchet — 14″ Handle, Carbon Steel
|
 Option 2 TITAN 550 Paracord 100ft — 7-Strand Type III MIL-SPEC
|
 Option 3 BeaverCraft Wood Carving Set S15 — 7 Tools with Leather Strop
|
As an Amazon Associate we earn from qualifying purchases.
Practical Tips For Spear Usage and Maintenance
To throw a spear effectively, stand with feet shoulder-width apart and grip the shaft at the balance point (roughly the rear third). Bring the spear back past your ear, step forward with the opposite foot, and release at roughly 45° for distance. Practice at 10 feet first, gradually increasing distance. A straight shaft is critical — even a slight bend will cause the spear to veer off target consistently.
For maintenance: inspect after each use for cracks, especially at the tip and lashing points. Re-tighten lashings if they loosen — apply a drop of super glue or epoxy to lock them in place. Apply wood oil to the shaft every 3–6 months to prevent drying and cracking. Store vertically or horizontally on a flat surface — storing leaning against a wall will warp the shaft over time.

Frequently Asked Questions
How do you start making a wooden spear?
Start by selecting a straight, dry hardwood branch or dowel 5–7 feet long and 1–1.5 inches in diameter — hickory, ash, or oak are the best choices. Strip the bark with a knife, sand smooth with 80-grit sandpaper, and check for bends (straighten by heating near fire). Then carve a 4-sided point at one end using a sharp fixed-blade knife, working each side alternately for a symmetrical tip.
What is the best wood for making a spear?
Hickory is the best overall wood for a spear — extremely strong, shock-resistant, and the traditional choice for tool handles and weapon shafts in North America. Ash is a close second: lighter than hickory, flexible enough to absorb impact, and the traditional wood for European spears and axes. Oak works well but is heavy. Bamboo is a fast option when you need a lightweight spear quickly. Avoid pine, cedar, and other softwoods — they split under impact.
How do you harden a wooden spear tip?
Fire-harden the carved tip by holding it 4–6 inches above hot coals (not direct flame). Rotate constantly for even heating — the wood should darken to a medium brown without blackening or smoking heavily. This drives out moisture and partially chars the surface fibers, increasing hardness significantly. Let cool completely before handling or using. Fire-hardened hickory or ash tips are hard enough for fishing and small game.
How long should a wooden spear be?
For a throwing spear, 5–6 feet is the sweet spot — long enough for reach and leverage, short enough to handle accurately. For a thrusting/hunting spear, 6–8 feet gives better reach. If you are building a survival spear from a single branch, aim for approximately your height plus 12 inches. Balance point should be about one-third from the rear — a front-heavy spear is harder to throw accurately.
How do you attach a spearhead to a wooden shaft?
Split the shaft end 2–3 inches with a knife. Cut a tang (narrow base) on your spearhead that fits the slot. Insert the tang, then wrap with wet rawhide or paracord in a figure-8 lashing pattern — pull very tight. Rawhide shrinks as it dries for an extremely secure fit. Optionally apply pine sap pitch or epoxy behind the lashing before wrapping to add adhesion. Let dry completely before use.