How To Remove Polyurethane: Essential Guide
To remove polyurethane, you’ll typically need to use chemical strippers or mechanical methods like sanding, depending on the surface and the finish. Always prioritize safety with proper ventilation and protective gear.
Ever stared at a piece of wood, perhaps a beloved table or a floor, and wished you could start fresh? Polyurethane is a fantastic protector, but sometimes, you need to remove it. Maybe it’s worn out, damaged, or you’re simply ready for a new look. It can seem like a daunting task, especially if you’re new to woodworking or DIY projects. But don’t worry! I’m here to guide you through this process, step-by-step. We’ll cover the safest and most effective ways to tackle polyurethane removal, so you can feel confident in bringing your woodworking visions to life. Let’s get your project ready for its next chapter!
Why Remove Polyurethane? Common Scenarios
There are several good reasons why you might find yourself needing to remove a polyurethane finish. Understanding these situations can help you determine the best approach for your specific project.
- Wear and Tear: Over time, especially on high-traffic surfaces like floors or tabletops, polyurethane can become scratched, chipped, or dull. Removing it allows you to reapply a fresh, protective coat.
- Damage: Water damage, heat marks, or deep scratches can penetrate the polyurethane layer. Removing the old finish is often the first step to repairing the underlying wood.
- Refinishing Projects: If you’re planning to change the look of your wood – like staining it a different color or applying a new type of finish – removing the old polyurethane is usually necessary for the new finish to adhere properly.
- Mistakes or Poor Application: Sometimes, the polyurethane might have been applied unevenly, leaving drips, brush marks, or an undesirable sheen.
- Preparing for a New Finish: Different finishes behave differently. If you’re switching from polyurethane to oil, wax, or another type of coating, removing the old polyurethane ensures compatibility and a smoother application.
Safety First! Essential Precautions
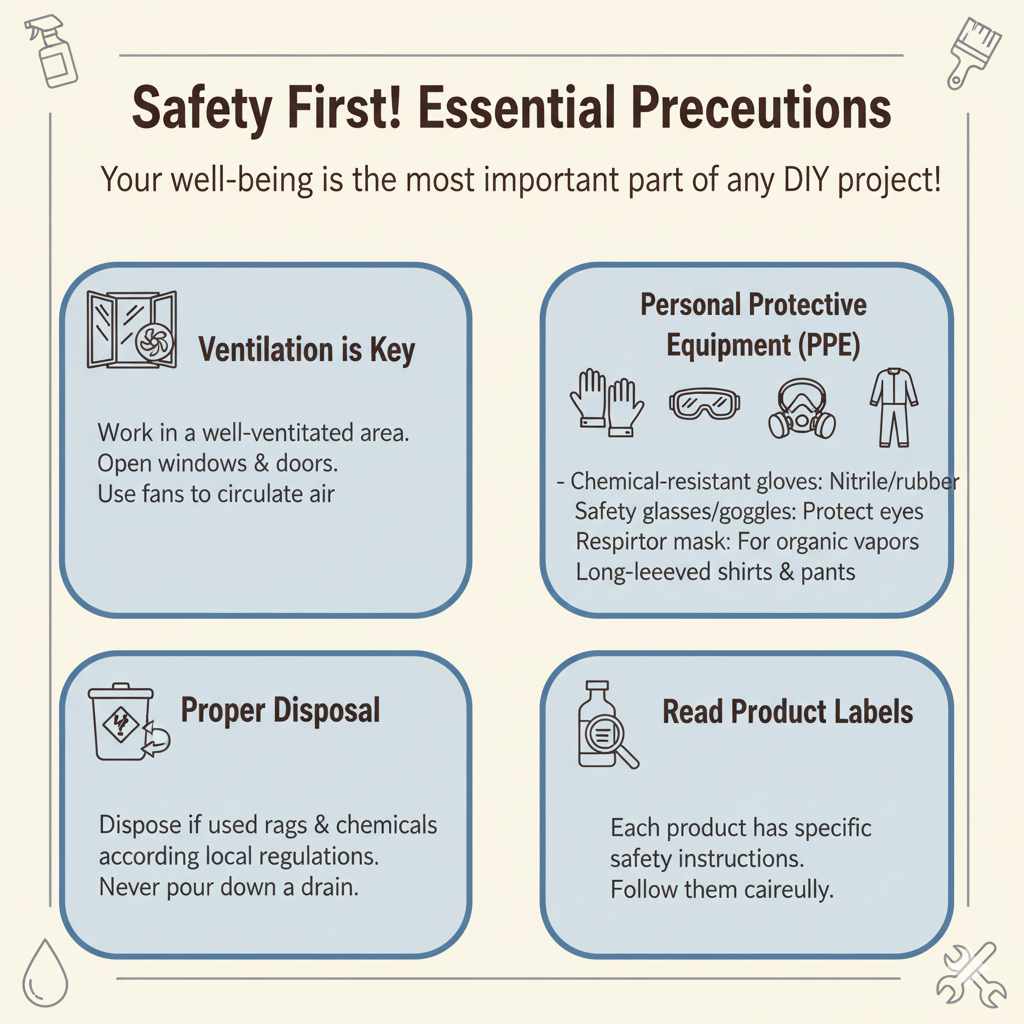
Before we dive into the “how-to,” let’s talk about safety. Working with chemicals and power tools requires respect. Following these essential precautions will ensure you have a positive and safe experience. Your well-being is the most important part of any DIY project!
Ventilation is Key
Many polyurethane removers, especially chemical strippers, emit strong fumes. Always work in a well-ventilated area. Open windows and doors, and consider using fans to circulate air. For indoor projects, especially in smaller rooms, it’s crucial to maximize airflow.
Personal Protective Equipment (PPE)
Your skin and eyes are vulnerable. Always wear:
- Chemical-resistant gloves: Nitrile or rubber gloves are recommended. Avoid latex as it can degrade.
- Safety glasses or goggles: Protect your eyes from splashes and dust.
- A respirator mask: Especially when using chemical strippers, a mask rated for organic vapors is essential to protect your lungs from harmful fumes.
- Long-sleeved shirts and long pants: This provides an extra layer of protection for your skin.
Proper Disposal
Dispose of used rags, chemicals, and waste materials according to local regulations. Some chemical waste requires special handling. Never pour paint strippers or their residue down the drain.
Read Product Labels
Each product will have specific instructions and safety warnings. Always read and follow them carefully.
Methods to Remove Polyurethane
There are two primary ways to remove polyurethane: using chemical strippers and using mechanical methods like sanding. The best method for you will depend on the size of the project, the condition of the finish, and your personal preference for tools.
Method 1: Using Chemical Strippers
Chemical strippers are very effective at dissolving polyurethane. They require less physical effort than heavy sanding but involve working with strong chemicals, so safety is paramount. This method is often preferred for intricate details, curved surfaces, or when you want to avoid creating dust.
Tools and Materials You’ll Need:
- Chemical polyurethane stripper (choose one designed for heavy-duty finishes)
- Stiff-bristled brush (natural bristles are often best for chemical strippers)
- Putty knife or scraper
- Sanding sponges or sandpaper (medium and fine grit)
- Clean rags
- Mineral spirits or denatured alcohol (for cleanup)
- Gloves, safety glasses, respirator mask
- Drop cloths or plastic sheeting
Step-by-Step Guide to Chemical Stripping:
- Prepare Your Workspace: Lay down drop cloths to protect surrounding areas from spills. Ensure excellent ventilation by opening windows and doors. Don your PPE: gloves, safety glasses, and respirator mask are a must.
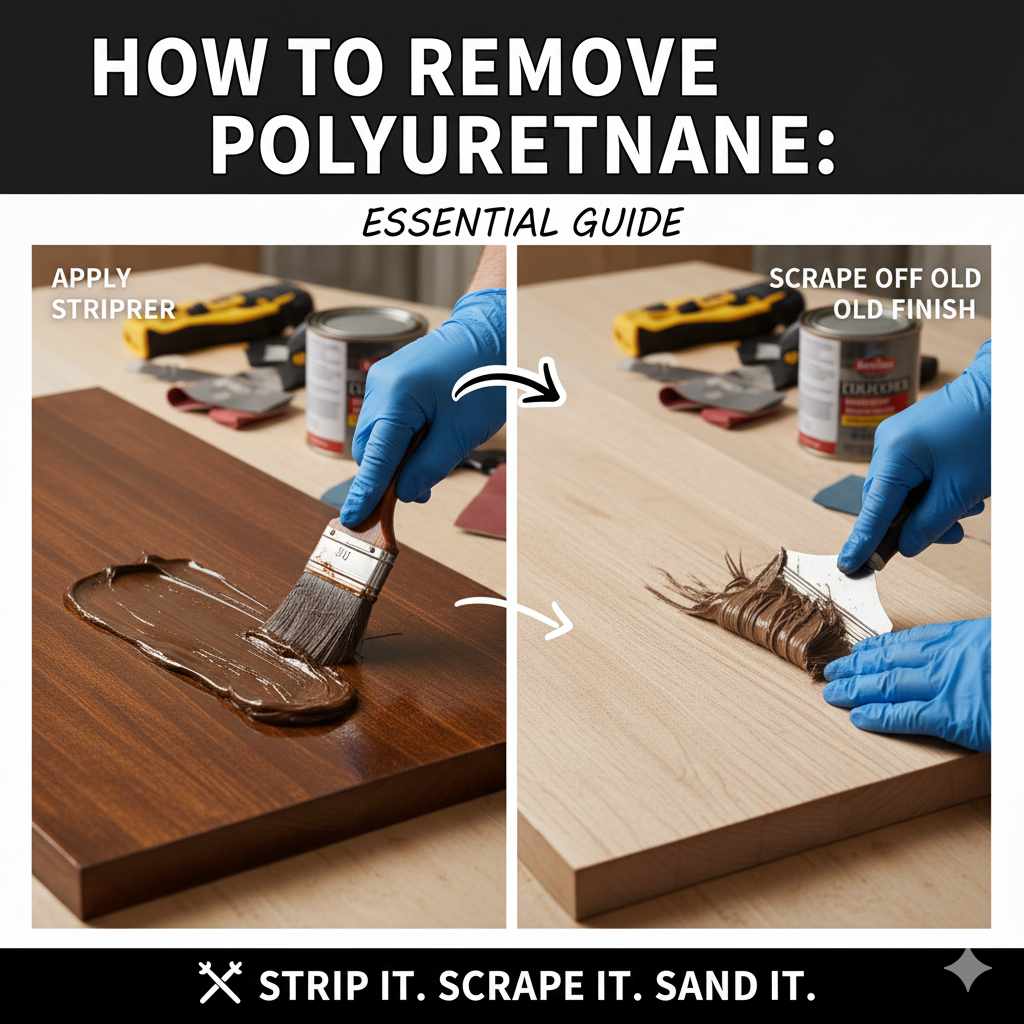
- Apply the Stripper: Using your brush, apply a liberal, even coat of the polyurethane stripper to the surface. Work in manageable sections. Don’t brush it back and forth too much; get good coverage and let it work.
- Let the Stripper Do Its Work: Read the product instructions for the recommended dwell time. The polyurethane should start to bubble, soften, or wrinkle. This can take anywhere from 15 minutes to an hour, depending on the product and the thickness of the finish.
- Scrape Off the Old Finish: Once the finish has softened, use your putty knife or scraper to gently lift and scrape away the softened polyurethane. Scrape in the direction of the wood grain. For detailed areas, a stiff-bristled brush can help loosen the residue.
- Clean Up Residue: Use clean rags to wipe away any remaining stripper and softened finish. You may need to apply more stripper to stubborn areas and repeat the scraping process.
- Rinse and Neutralize: After all the loosened polyurethane is removed, clean the surface with a rag dampened with mineral spirits or denatured alcohol. This removes any leftover stripper residue. Let the wood dry completely.
- Light Sanding: Once dry, lightly sand the surface with medium-grit sandpaper (around 120-grit) to remove any tiny remaining traces of polyurethane and to smooth the wood. Follow up with a fine-grit sandpaper (180-220 grit) for a smooth finish ready for recoating.
Method 2: Sanding to Remove Polyurethane
Sanding is a more physically demanding method but avoids harsh chemicals. It’s excellent for larger, flat surfaces like hardwood floors or tabletops where you can use power sanders. This method removes the finish and prepares the wood for a new coating all in one go.
Tools and Materials You’ll Need:
- Orbital sander or belt sander (for floors, a drum sander might be appropriate but is often rented)
- Hook-and-loop sandpaper discs or belts (start with 60-80 grit, then move to 100-120 grit, and finally 180-220 grit)
- Vacuum cleaner with a dust attachment
- Tack cloth
- Gloves, safety glasses, dust mask (N95 or better recommended for dust)
- Optional: Edge sander, corner sander for detailed areas
Step-by-Step Guide to Sanding:
- Prepare the Area: Clear the room of all furniture. Seal off vents and doorways with plastic sheeting and tape to prevent dust from spreading. Vacuum thoroughly to pick up any debris that could scratch the wood during sanding.
- Start with Coarse Grit: Attach a coarse-grit sandpaper (60-80 grit is common for removing finishes) to your sander. Begin sanding in large, sweeping motions, working with the direction of the wood grain. Overlap each pass by about 50%. A belt sander requires more careful technique; an orbital sander is more forgiving for beginners. For floors, it’s crucial to keep the sander moving to avoid creating divots.
- Progress to Medium Grit: Once you’ve removed the polyurethane with the coarse grit, switch to a medium-grit sandpaper (100-120 grit). Sand the entire surface again. This removes the scratches left by the coarser grit and further smooths the wood.
- Finish with Fine Grit: Finally, switch to a fine-grit sandpaper (180-220 grit). Sand the entire surface one last time. This creates a smooth, even surface that is ready for staining or a new topcoat.
- Clean Up Dust: This is extremely important! Vacuum the area thoroughly, paying close attention to corners and edges. Then, use a tack cloth to pick up any remaining fine dust particles. Repeat vacuuming and tack-cloth cleaning until the surface is completely dust-free.
- Inspect: Run your hand over the surface. It should feel smooth and clean. Check for any missed spots or deep scratches you might want to address with a little more sanding, always using the appropriate grit.
Choosing the Right Method for Your Project
Deciding between chemical stripping and sanding isn’t always straightforward. Here’s a breakdown to help you choose the best approach for your needs.
| Consideration | Chemical Stripper | Sanding |
|---|---|---|
| Surface Type | Good for intricate shapes, furniture with details, delicate wood. | Best for large, flat surfaces like floors, tabletops. |
| Effort Level | Less physical effort, more chemical handling. | Physically demanding, especially with power sanders. |
| Dust Factor | Minimal dust, but strong fumes. | Creates a lot of dust; requires excellent dust control. |
| Speed | Can be faster for small areas or detailed work. | Can be faster for large, open areas with power sanders. |
| Safety Concerns | Chemical fumes and skin contact. | Dust inhalation, noise, and operation of power tools. |
| Preparation for New Finish | May require more careful cleaning to ensure new finish adheres. | Leaves a consistent surface for staining/finishing. |
For hardwood floors, sanding is almost always the preferred method because it’s more efficient and creates a uniformly prepared surface. If you’re refinishing an antique chair with lots of curves and carvings, a chemical stripper might be a better choice to avoid damaging the wood with aggressive sanding.
Tips for Specific Surfaces
Different woodworking projects present unique challenges. Here’s how to adapt polyurethane removal for common surfaces:
Removing Polyurethane from Hardwood Floors
When tackling hardwood floors, especially for refinishing, sanding is your main technique. Renting a drum sander for the main area and an edger for the perimeter is common. Always run the drum sander with the grain, and for the final pass, consider running it diagonally or across the grain (depending on the desired effect of the new finish) with a finer grit. Ensure you overlap passes consistently to avoid swirl marks or missed spots. Proper dust containment is crucial for a whole-room project. You can find more detailed floor sanding guides from resources like This Old House, a trusted authority in home improvement.
Removing Polyurethane from Furniture
Furniture often has a mix of flat surfaces and intricate details. You might use a chemical stripper for carvings and around hardware, and then switch to sanding with an orbital sander for larger panels. For tight corners or detailed legs, you might use sanding sponges or even folded sandpaper. Always test your chosen method on an inconspicuous area first.
Removing Polyurethane from Cabinets
Cabinet doors and frames can be tricky. Because they are often smaller and have more detailed profiles than floors, chemical strippers can be very effective. You can apply the stripper, let it work, and then use small brushes, putty knives, and even old toothbrushes to get into the grooves and details. After scraping, a light sanding with fine-grit sandpaper or even sandpaper wrapped around a dowel can smooth out any remaining rough spots.
Dealing with Stubborn Polyurethane Spots
Sometimes, polyurethane can be incredibly stubborn, especially if it’s a thick application or an older, oil-based finish that has hardened considerably. Here are a few tricks:
- Repeat Applications: For chemical strippers, don’t hesitate to apply a second or even third coat if the first one doesn’t remove all the finish. Allow adequate dwell time for each application.
- Heat Gun (with caution): A heat gun can soften polyurethane, making it easier to scrape. Use it on a low setting and keep it moving to avoid scorching the wood. This method is best used in conjunction with scraping. Be aware that heating some finishes can release more noxious fumes, so ventilation and respiratory protection are still vital.
- Scraping Technique: Ensure your scraper blade is sharp and held at a low angle to the wood. Work with the grain. For very sticky residue, try chilling the area slightly (this is more effective for some adhesives, but can sometimes help with hardened finishes) before scraping.
- Alcohol/Acetone (for stubborn residue): After most of the polyurethane is removed, sometimes a bit of residue remains. A rag soaked in denatured alcohol or acetone can sometimes help lift these last traces more effectively than mineral spirits. Always test this in an inconspicuous spot first as it can affect bare wood.
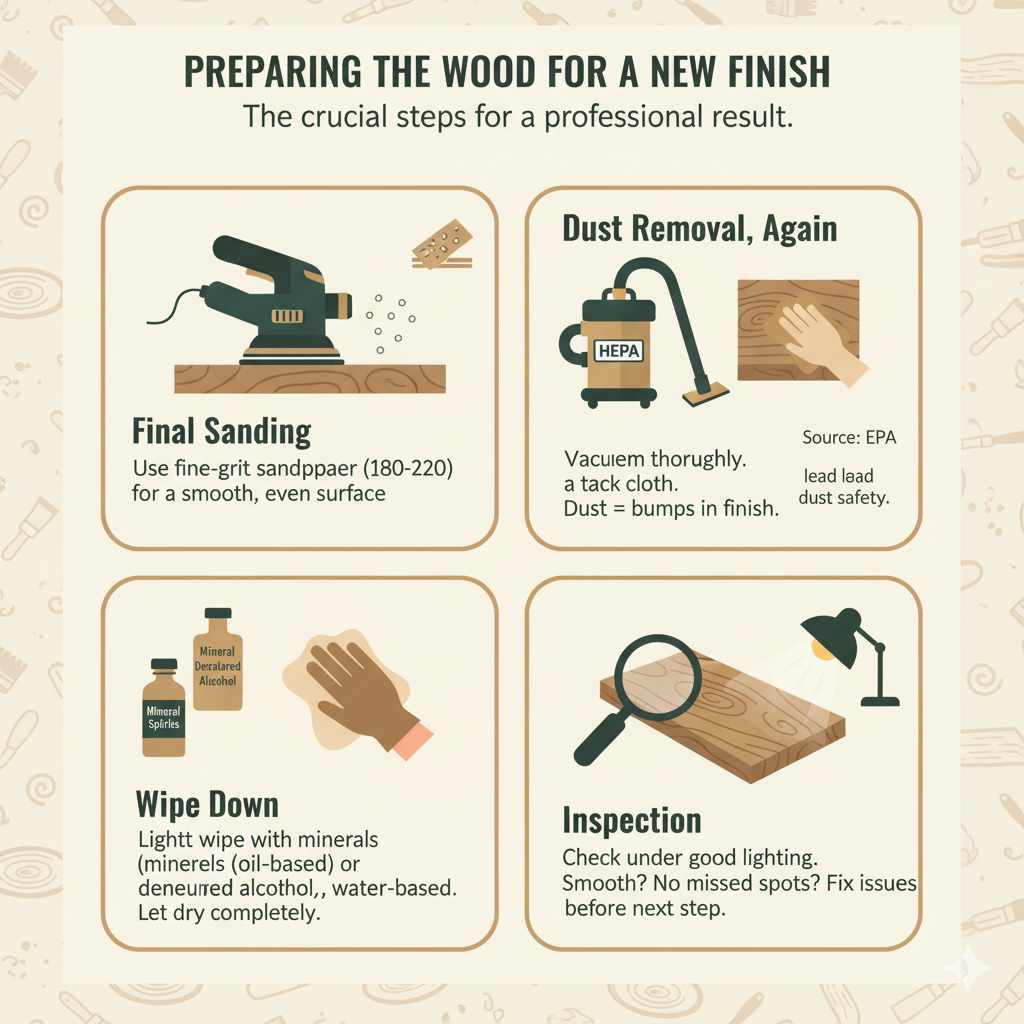
Preparing the Wood for a New Finish
Once the old polyurethane is gone, the wood needs to be clean and smooth for its new coating. This preparation step is crucial for a professional-looking result.
- Final Sanding: Ensure your final sanding pass is with a fine-grit sandpaper (180-220 grit). This creates a smooth surface that will accept stain or finish evenly.
- Dust Removal, Again: This is non-negotiable! Vacuum thoroughly, then use a tack cloth to wipe down the entire surface. Any dust left behind will show up as bumps or imperfections under your new finish. For floors, consider a shop vac with a HEPA filter for maximum dust capture. You can review guidance on dust control from the EPA, particularly regarding lead dust safety, which emphasizes thoroughness.
- Wipe Down: For an extra clean surface before staining, you can lightly wipe down with a rag slightly dampened with mineral spirits (for oil-based finishes) or denatured alcohol (for water-based finishes). Let it dry completely.
- Inspection: Look at the wood under good lighting. Does it feel smooth? Are there any dark spots or missed areas? Address any issues before proceeding.
Frequently Asked Questions (FAQ)
Q1: How do I know if I have polyurethane on my wood?
A: Polyurethane is typically a clear or slightly amber finish. It forms a hard film on the wood’s surface. If you notice gloss, semi-gloss, or satin sheen that doesn’t seem to be absorbed into the wood, it’s likely a surface coating like polyurethane. You can also try denatured alcohol on a small, hidden spot; it will usually affect other finishes like shellac or wax but not polyurethane.
Q2: Can I just paint over polyurethane?
A: While you can paint over polyurethane, the adhesion may not be ideal, and the paint could eventually peel or chip. For the best and most durable results, it’s always recommended to remove the polyurethane first. If you must paint over it, thoroughly scuff-sand the surface to create a better grip for the primer and paint.
Q3: Is it safe to use a chemical stripper indoors?
A: Yes, but only with extreme caution. Ensure the area is incredibly well-ventilated by opening all windows and doors, and using fans to blow air outwards. Always wear a respirator designed for organic vapors, chemical-resistant gloves, and eye protection. Choose low-VOC (volatile organic compound) strippers when possible.
Q4: What’s the best way to remove polyurethane from a table with a lot of detail or carvings?
A: For detailed surfaces, chemical strippers are usually more effective than sanding. Apply the stripper liberally, let it soften the finish, and then use stiff-bristled brushes, plastic scrapers, and even old toothbrushes to get into the crevices and remove the softened polyurethane.
Q5: How long does it take to remove polyurethane?
A: The time it takes varies greatly. For a small piece of furniture using chemical strippers, it might take a couple of hours, including cleanup. Refinishing an entire room of hardwood floors by sanding can take a full day or more, spread over several steps.