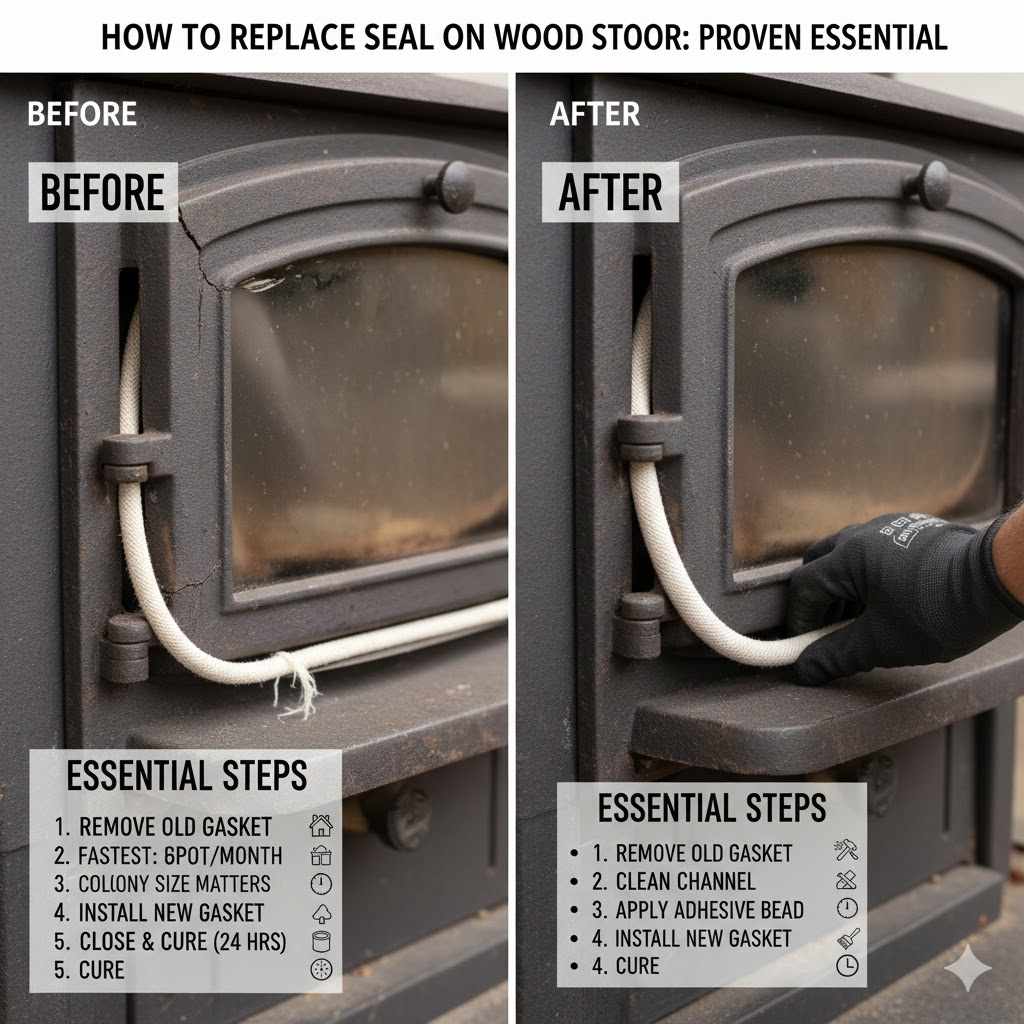
How To Replace Seal On Wood Stove Door: Proven Essential
Replacing your wood stove door seal is easy and essential for efficiency and safety. This guide provides proven, step-by-step instructions so you can confidently install new gasket rope, ensuring your stove burns hotter, saves wood, and keeps your home cozy, all without complicated tools.
Is your wood stove letting in more smoke than it should? Do you find yourself constantly stoking the fire because the heat seems to vanish too quickly? Chances are, the seal around your firebox door is worn out. This small piece of rope gasket prevents unburnt air from sneaking in, which steals heat and lowers efficiency. Fixing it is much easier than you think!
Don’t worry if you’ve never tackled this before. As your mentor here, I’ll walk you through every step. We’ll get your old stove working like new again using simple tools and techniques. Ready to seal up that heat leak? Let’s begin by gathering what we need.
Why a Good Door Seal Is Essential for Your Wood Stove
Think of the gasket rope on your wood stove door as the weather stripping around your front door. If it’s cracked, flat, or missing, you lose money and comfort. A proper seal creates an airtight barrier between the firebox (where the wood burns) and the room air.
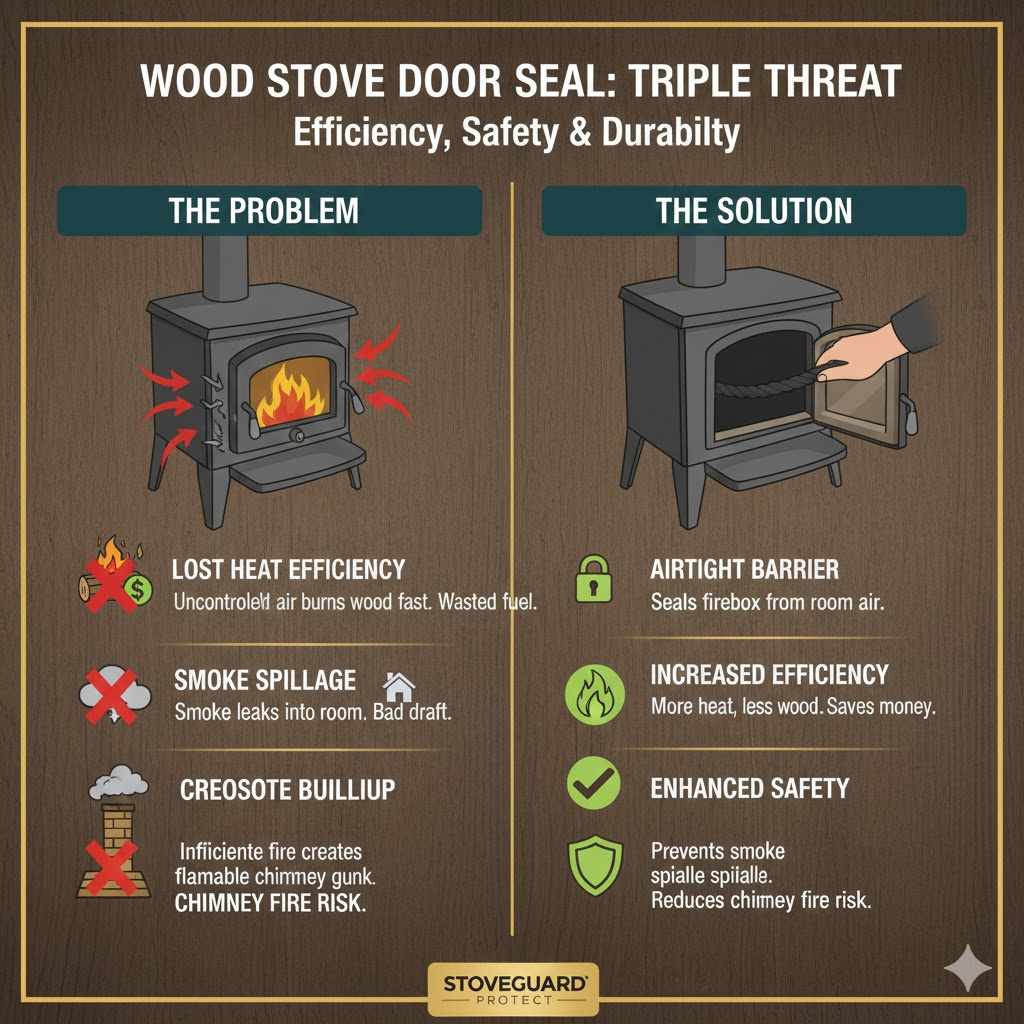
The Triple Threat: Efficiency, Safety, and Durability
When the seal fails, three main problems pop up:
- Lost Heat Efficiency: Uncontrolled air enters the stove through the gaps. This air feeds the fire more than you intend, causing it to burn fuel too fast. You burn more wood to get the same amount of heat, wasting your hard-earned savings.
- Smoke Spillage: Poor sealing can affect the natural draft of your chimney. If the wrong air is sucked in, it can push smoke back into your living space when you open the door or even while it’s closed.
- Creosote Buildup: A low-burning, inefficient fire due to air leaks produces more smoke and unburnt particles. These particles condense inside your chimney as creosote, which is highly flammable and significantly increases the risk of a chimney fire. This is a serious safety concern, which is why organizations like the National Fire Protection Association (NFPA) emphasize proper maintenance.
What You Need: Tools and Materials Checklist
You don’t need a full professional toolkit for this job. We focus on basic, safe repair using the correct replacement materials. Having everything ready makes the job go quickly.
Essential Materials for Door Seal Replacement
Always buy high-temperature fiberglass gasket rope made specifically for wood stoves. Do not substitute this with household weather stripping!
- New Gasket Rope: This comes in various diameters (usually 1/2″, 5/8″, or 3/4″). See the guide below on choosing the right size.
- High-Temperature Gasket Cement/Glue: This specialized adhesive secures the new rope firmly in place. Make sure the manufacturer lists it as suitable for wood stoves.
- High-Temp Wire/Tape: To hold the new rope in place while the cement cures.
Basic Tools You Will Need
Keep it simple! These tools should already be in any homeowner’s drawer:
- A stiff putty knife or paint scraper (for removing old material).
- A wire brush or old toothbrush (for cleaning the channel).
- Rags or shop towels.
- Safety glasses and work gloves (essential for protecting your eyes and hands from old debris and the rope material).
- Measuring tape.
Step 1: Preparation and Safety First
Before touching the stove, safety is the number one rule in my workshop. Working on a cold stove is crucial.
Cool Down and Disconnect
Ensure the stove has been completely cold for at least 12 to 24 hours. Never attempt to work on a stove that retains any warmth.
- Ensure Cooling: Wait a full day after the last burn, just to be certain.
- Safety Gear On: Put on your safety glasses and gloves. Even though the rope is low-risk, the old gasket material can be crumbly, and you don’t want fiberglass dust in your eyes.
- Remove the Door: For the absolute easiest access, it’s often best to remove the door completely. This allows you to work on a flat, sturdy surface (like a workbench or sturdy table protected with cardboard). Look for the hinge pins holding the door on; they usually lift straight out. If you prefer to leave it on, secure the door tightly so it won’t swing open accidentally.
Step 2: Measuring and Selecting the Correct Gasket Size
This is the most critical part of the replacement process. If the rope is too thin, air leaks; if it’s too thick, the door won’t close properly, crushing the rope too soon.
How to Measure for the Perfect Fit
The door frame usually has a slight groove or channel where the old rope sits. You need a new rope that is slightly larger than this groove to ensure a tight seal when compressed.
- Inspect the Channel: Look closely at the channel where the old gasket sits on the stove frame (or the door itself).
- Measure the Channel Depth/Width: Use your tape measure to see how wide the channel is. The new rope, once seated, should compress by about 20% to 25% when the door is closed.
- Reference Chart: Compare your findings to this general guideline. If your old rope was squashed nearly flat, you might need the next size up.
| Channel Appearance (Old Gasket) | Recommended New Rope Diameter | Notes |
|---|---|---|
| Old gasket compressed significantly; door shuts tightly. | Match the old diameter (e.g., 1/2″) | Ensure a snug fit, not a fight to close. |
| Old gasket was visibly too thin or mushy. | Size up one increment (e.g., move from 1/2″ to 5/8″) | This allows for proper compression seal. |
| Door latch seems loose or requires excessive force to seal. | Consult stove manual or go smaller. | An oversized rope can damage the latch mechanism over time. |
Pro Tip from the Workshop: If you are unsure between two sizes, go for the slightly smaller one first. A rope that is too big will stress your latch hinges immediately. You can always add a slightly thicker gasket to the door glass later if needed, but getting the main door seal wrong is more labor-intensive.
Step 3: Removing the Old, Worn-Out Gasket
Time to clean house! We need a completely clean surface for the new cement to adhere strongly.
- Peel Off the Old Rope: Start at one end. Most old gasket rope will peel off in long strands. Pull slowly and steadily. If the rope breaks, don’t worry—just grab the next piece.
- Scrape the Channel: Use your stiff putty knife or scraper to gently scrape away any remaining adhesive, burnt debris, or crumbling fiberglass residue from the metal channel. Hold the scraper at a shallow angle so you don’t gouge the metal.
- Wire Brush for Detail: Follow up the scraping with a wire brush. Scrubbing lightly ensures the metal surface is smooth and ready to bond with the new cement.
- Final Wipe Down: Use a clean, dry rag to wipe away all dust and debris. The channel must be totally clean and dry before proceeding. Contaminants will drastically reduce the life of your new seal.
Step 4: Applying the High-Temperature Gasket Cement
The cement is what locks your new rope in place and keeps it sealed against extreme heat cycles. It’s important to use the right amount.
- Prepare the Adhesive: If your gasket cement comes in a tube, sometimes piercing the seal on the nozzle requires a bit of muscle. Cut the tip of the nozzle slightly smaller than the width of your gasket channel for better control.
- Apply Evenly: Start at one end of the channel (usually opposite the hinge side). Squeeze a continuous bead of cement into the groove. You want enough so that when the rope is pressed in, the cement slightly oozes out when the door closes—this confirms you have a full seal. A line about as thick as a pencil lead is a good starting point.
- Avoid Gaps in Glue: Try to lay down the glue in one continuous path if the channel is short enough. If you have to stop and start, overlap the ends slightly.
Step 5: Installing the New Gasket Rope
This step requires a little patience to ensure the rope sits perfectly centered in the channel.
- Placement: Place the end of the new fiberglass rope firmly into the channel, starting where you placed the cement. Press it down into the cement using firm, consistent pressure.
- Press and Seat: Work your way around the door frame, pushing the rope firmly down into the cement bed. You want the rope to fill the channel completely but not bulge excessively on either side.
- Measure and Trim: When you get back to the beginning, overlap the new rope slightly (about 1/4 inch) over the starting point. This slight overlap ensures a complete seal at the join. Mark this point, pull the rope back slightly, and use sharp scissors or a utility knife to cut the excess cleanly.
- Secure the Seam: Apply a small extra dab of cement where the ends overlap to seal the seam thoroughly.
- Temporary Securing (Crucial for Curing): To hold the rope perfectly in place while the cement cures, you must apply compression.
- Method A (Recommended): Wrap thin strips of high-temperature masking tape or sturdy twine tightly around the closed door, perpendicular to the gasket line. You can also use clamps if you removed the door.
- Method B: If you left the door on, carefully close it. Use short lengths of high-temp wire wrapped around the door handle/hinge area to hold light, even pressure. You want compression, not crushing force!
Step 6: Curing Time—Patience Pays Off
If you rush this step, the new gasket will pull out the first time you fire up the stove. Curing is non-negotiable for a long-lasting, effective seal.
Always consult the gasket cement container for specific cure times, but generally:
- Allow the cement to set undisturbed for at least 12 to 24 hours. Keep the door completely closed during this period.
- Remove Securing Materials: After the minimum cure time, carefully remove all tape or wire. The seal should now be firm enough to hold its shape.
Step 7: Curing the Stove (First Burn)
The adhesive still needs to harden completely under heat—this is called “curing the glue.” This is usually the fastest cure process, but it must be done carefully to avoid curing the rope incorrectly or damaging the adhesive too quickly.
- Small, Cool Fire: After the initial 24-hour rest period, gently open the door, close it, and latch it. Start your first fire very small—just a few pieces of kindling, no large logs.
- Maintain Low Heat: Keep the stove operating at a low temperature (below 300°F if you have a stovepipe thermometer) for about 1 to 2 hours. This allows the cement to reach temperature slowly without shocking it. You may notice a slight, non-toxic odor as the solvents bake out of the glue—this is normal.
- Gradual Increase: Over the next hour, very slowly add slightly larger pieces of wood, allowing the temperature to climb gently toward normal operating levels (usually between 450°F and 550°F on the stovepipe gauge).
- Full Burn Test: Once the stove has run through a controlled, warm cycle, let it cool down completely. Inspect the door gasket. It should look firmly set, and when you close the door, you should feel definite resistance, ensuring that nice, tight seal we aimed for.
Troubleshooting Common Door Seal Issues
Even the simplest jobs can sometimes present unexpected snags. Here are quick fixes for common hiccups:
The Door Won’t Latch After New Gasket Installation
The Problem: The new rope is too thick, causing the door to bulge out, meaning the latch can’t grab the catch.
The Fix: You must relieve the pressure. Open the door, carefully peel back the offending section of the new gasket, remove the excess rope (trim it slightly shorter than you think you need), and re-cement it. When installing, ensure you do not press the rope down harder than necessary into the cement bed.
The Door Hisses or Leaks on the First Burn
The Problem: You see tiny smoke trails when the fire is hot, or the seal feels mushy.
The Fix: This is usually due to insufficient curing time or inadequate pressure during the initial cure. Let the stove cool completely. You can try applying the clamping/taping method again, leaving it clamped for another 12 hours, or add a thin layer of cement underneath the lifted areas if you can access them without removing the whole rope.
Old Cement Won’t Scrape Off
The Problem: The old adhesive has hardened like concrete and won’t budge.
The Fix: Safety first! Do not use an abrasive grinding wheel on your stove door! Instead, you can try softening the old glue using a heat gun on a low setting (aiming away from yourself and nearby combustibles). Heat softens adhesive. Once it softens slightly, immediately follow up with the scraper or wire brush. You may need repeated, short bursts of heat application.
Maintenance Schedule for Maximum Lifespan
A new rope seal should last anywhere from one to five years, depending on how hard you run your stove. A dedicated wood burner operating at high temps will need replacement sooner than someone using their stove occasionally during shoulder seasons.
Checklist for Yearly Stove Inspection
To maximize the life of your seal and ensure stove longevity, add these items to your annual pre-season checklist. Understanding where your stove air comes from is vital, referencing guides on proper air intake management is always wise.
| Item to Check | Frequency | What to Look For |
|---|---|---|
| Door Gasket Seal | Annually (Before first fire) | Check flexibility. Press on it—does it rebound slightly? If it’s hard, flat, or crumbling, replace it. |
| Door Latch/Hinges | Annually | Ensure the door pulls tightly against the frame without excessive slamming or sticking. |
| Damper and Air Vents | Annually | Make sure the primary and secondary air intakes open and close smoothly. Unrestricted air flow keeps your burn clean, aiding the seal. |
| Glass Gasket (If applicable) | As needed | Check the rope between the glass and the metal frame, often a smaller diameter rope is used here. |
By keeping your seals in top shape, you minimize stress on your chimney system. Check out resources from established safety bodies, like your local fire department or certified chimney sweeps, regarding the frequency of full system inspections to keep everything operating optimally.
FAQ: Beginner Questions About Wood Stove Seals
Q1: How often do I really need to replace the door gasket rope?
A: Typically, every 2 to 4 years. If you burn your stove heavily all winter long, check it annually. If you use it only occasionally, it might last five years or more. Look for signs of flatness or crumbling, not just time.
Q2: Can I use metal flashing instead of rope gasket?
A: No. Metal flashing is rigid and will scratch the frame or crack under the door’s heat expansion. The flexible rope gasket is essential because it compensates for the natural expansion and contraction of the cast iron or steel door as it heats and cools.
Q3: Why does my brand new gasket smell strongly when I first heat the stove?
A: A strong smell (often like burning chemicals or new plastic) usually comes from the adhesive curing out. As long as the odor is temporary and fades as the stove reaches operating temperature, it’s normal. If the smell is overwhelming or stays intense after an hour of heat, reduce the fire temporarily and check the cement manufacturer’s instructions.
Q4: What happens if I use the wrong diameter rope—one that is too thick?
A: The door will not latch properly, or you will have to force it shut, which puts immense strain on the hinge pins and the latch mechanism. Over time, this unnecessary pressure can cause metal fatigue, leading to costly repairs or misalignment.
Q5: Does the glass door use the same kind of rope seal as the main firebox door?
A: Often, yes, it uses fiberglass rope, but the diameter is usually smaller—typically 3/8 inch or 1/2 inch. The glass door gasket channel is shallower than the main door channel.
Q6: Is it necessary to remove the door completely to replace the seal?
A: It is highly recommended, especially for beginners. Working on the door when it’s securely resting on a workbench allows you to apply consistent pressure and check the alignment much easier than working on the stove body itself.
Conclusion: Enjoying Your Efficient, Sealed Stove
Congratulations! You have successfully tackled a crucial piece of wood stove maintenance. Replacing that tired old seal is one of the highest-impact, lowest-effort repairs you can perform on your heating appliance. Remember the goal: a tight seal means better control over your burn rate. You’ll use less wood, enjoy hotter fires, and reduce creosote buildup, making your chimney safer.
As your woodworking mentor, I want to reinforce the confidence you’ve gained today. This task required careful measurement, patience, and attention to simple instructions—all skills you already possess. Take pride in knowing you have improved your stove’s efficiency and safety through your own efforts. Now, step back, admire your clean work, wait for the final cure, and prepare for the best, warmest, most cost-effective heating season yet. Happy heating!