How to Wood Carving: Proven Essential Guide
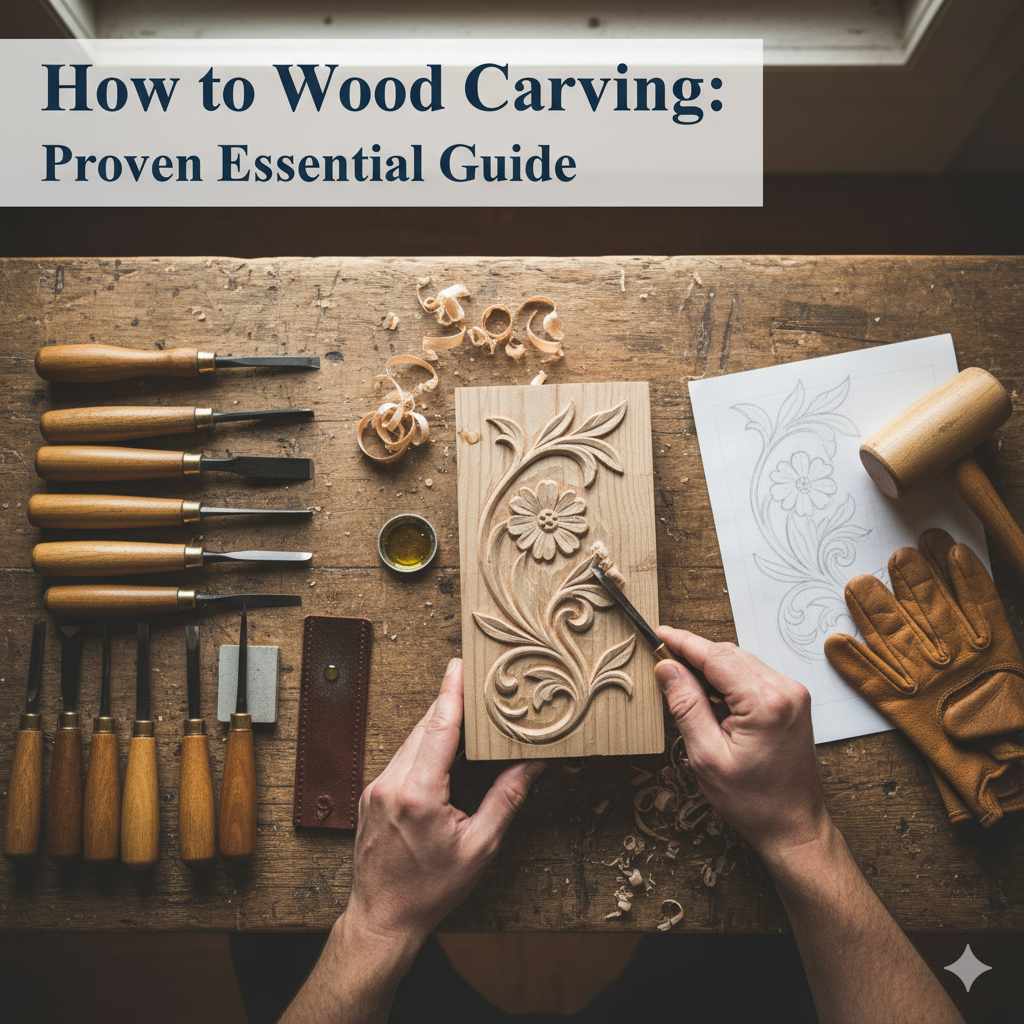
Wood carving is an accessible art form for beginners. This guide provides essential steps, tool recommendations, and safety tips to start your carving journey with confidence, transforming simple wood into beautiful creations.
Ever looked at a beautifully carved wooden figurine or a decorative piece of trim and thought, “I wish I could do that”? Many people feel intimidated by woodworking, especially carving, thinking it requires years of experience or a professional workshop. But the truth is, with the right approach, even a complete beginner can discover the joy and satisfaction of wood carving.
This guide is designed to demystify the process. We’ll break down everything you need to know, from choosing your first wood and tools to making your initial cuts. You’ll learn simple techniques that build confidence and lead to amazing results. Get ready; your creative journey into wood carving starts right here.
Why Start Wood Carving?
Wood carving is more than just a hobby; it’s a way to connect with a timeless craft, express your creativity, and create unique items. It’s a deeply satisfying activity that can reduce stress and improve focus. Imagine turning a plain block of wood into a decorative piece, a useful utensil, or even a gift that carries a personal touch. The possibilities are endless, and the sense of accomplishment is immense.
The Benefits of Wood Carving
- Stress Relief: The focused nature of carving can act as a meditative practice.
- Creativity and Self-Expression: Bring your ideas to life in three dimensions.
- Skill Development: Learn patience, precision, and an understanding of materials.
- Tangible Results: Create beautiful, functional, or decorative items you can keep or gift.
- Connection to Nature: Work with a natural, beautiful material.
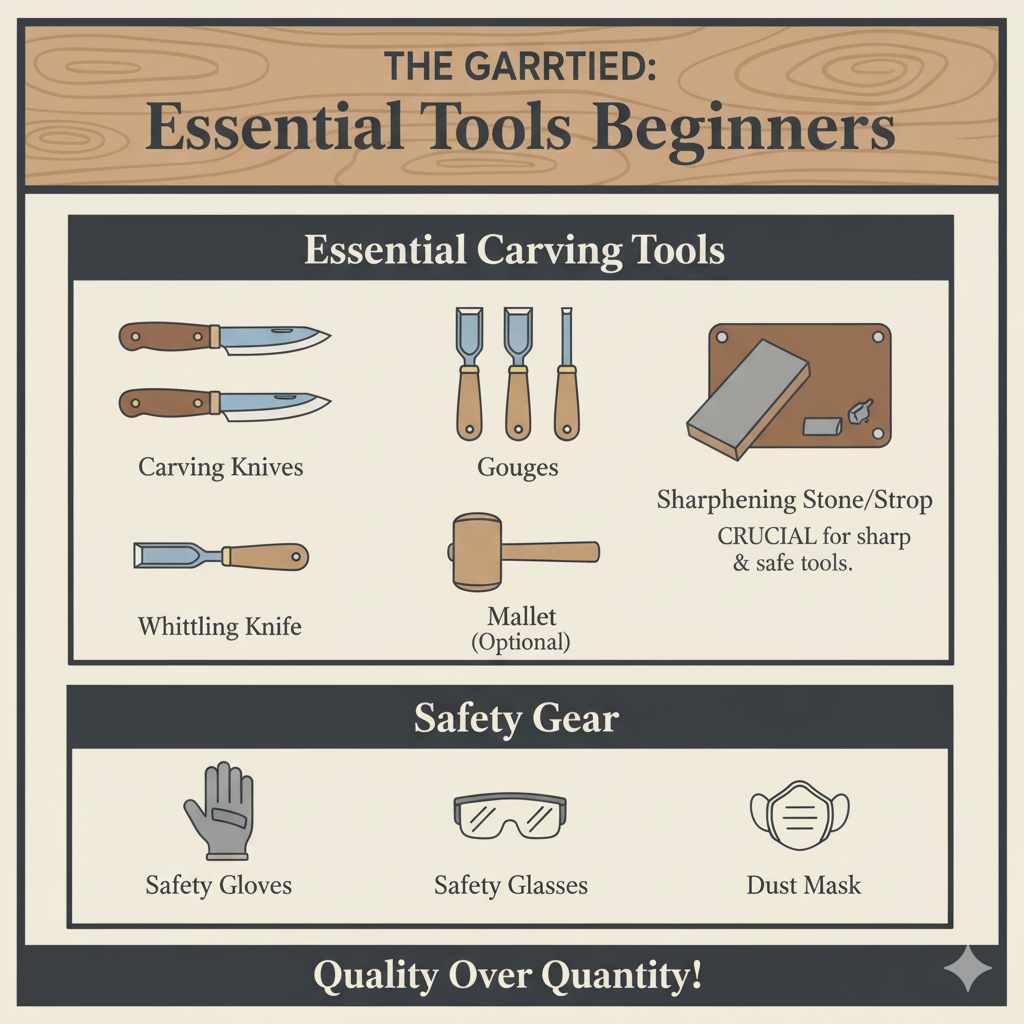
Getting Started: Essential Tools for Beginners
You don’t need a massive collection of expensive tools to start carving. A few basic, quality tools will get you going. Focusing on the right essentials will save you money and confusion. Think quality over quantity when you’re beginning.
Essential Carving Tools
Here are the must-have tools for any aspiring wood carver:
- Carving Knives: These are your primary tools for shaping wood. A general-purpose carving knife with a comfortable handle is a great starting point. Look for one with a fixed blade, as they are safer and more durable than folding knives for carving. Brands like Flexcut and BeaverCraft offer excellent beginner sets.
- Whittling Knives: Smaller than general carving knives, these are perfect for detailed work and smaller projects.
- Gouges: These have curved blades and are used for scooping out wood, creating contours, and adding texture. A small set with different depths and widths will be very useful.
- Mallet (Optional for beginners): If you plan to use chisels or larger gouges, a mallet is needed to strike them. For basic whittling, it’s not essential.
- Sharpening Stone/Strop: This is CRUCIAL. Sharp tools are safer and more effective. A sharpening stone (like a water stone or oil stone) and a leather strop with honing compound are vital for maintaining your blades. You can find comprehensive sharpening kits online.
- Safety Gloves: Always wear a protective glove on your non-dominant hand. This is your most important safety gear. Look for gloves made of cut-resistant material.
- Safety Glasses: Wood chips can fly. Protect your eyes from stray pieces.
- Dust Mask: Especially when sanding, fine wood dust can be harmful.
Choosing the Right Wood
The type of wood you choose can significantly impact your carving experience. For beginners, it’s best to start with soft woods that are easy to cut and don’t have a lot of knots. These woods are forgiving and allow you to practice your cuts without excessive effort.
Beginner-Friendly Wood Types
- Basswood (Tilia americana): This is the gold standard for beginner wood carving. It’s soft, has a fine, even grain, and is widely available. It carves cleanly and is easy to shape without splintering.
- Pine: Another soft wood option, pine is readily available and inexpensive. However, it can be a bit trickier due to knots and a less uniform grain compared to basswood.
- Sugar Pine: Similar to basswood, sugar pine is soft and carves well, though it might be harder to find.
Avoid very hard woods like oak or maple when you’re just starting out. They require more force, sharper tools, and can be frustrating for beginners.
Understanding Carving Techniques
Wood carving involves a series of basic cuts and movements. Mastering these foundational techniques will give you the control needed to create shapes and details.
Basic Carving Cuts
- Push/Pull Cuts: This is the most fundamental cut. You use your thumb or the palm of your hand to push the blade away from you, or you pull the blade towards you with steady control. Always position your hands so that your fingers are behind the blade’s cutting edge.
- Stop Cuts: A stop cut is a vertical cut made to stop a larger slicing cut. This helps define edges and prevent the wood from splitting in unwanted directions.
- Chip Carving: This involves making small, precise cuts to remove chips of wood, often creating geometric patterns.
- Surface Shaping: Using gouges and knives to create rounded, smooth surfaces and contours.
The key to all these cuts is to use sharp tools and let the tool do the work. Don’t force the wood; guide the blade smoothly.
Safety First: Essential Precautions
Wood carving involves sharp tools, so safety is paramount. Never compromise on safety; it is the most important aspect of this craft. Having a solid understanding of safety practices will prevent injuries and allow you to enjoy your carving sessions.
Key Safety Rules
- Always cut AWAY from yourself. This is the golden rule. Position your body and hands so that if the tool slips, it will not cut you.
- Wear protective gear. Use cut-resistant gloves on your guiding hand and safety glasses at all times. A thumb guard is also a wise addition.
- Keep your tools sharp. Dull tools require more force, making slips more likely and dangerous.
- Work in a well-lit area. Good lighting helps you see what you’re doing and reduces the risk of accidents.
- Take breaks. Fatigue leads to mistakes. If you feel tired, stop carving and rest.
- Secure your workpiece. For larger projects or when using mallets, consider a vise or clamps to hold the wood steady.
- Keep out of reach. Store sharp tools safely when not in use, away from children and pets.
The Occupational Safety and Health Administration (OSHA) provides valuable resources on woodworking safety that apply directly to carving.
Your First Wood Carving Project: A Simple Shape
Ready to make your first cut? Let’s start with a very simple project: a basic shape. This will help you get a feel for your tools and the wood.
Step-by-Step: Creating a Simple Shape
- Prepare Your Workspace: Ensure you have a clean, well-lit area. Place a piece of scrap wood or a mat underneath your work area to catch shavings.
- Select Your Wood: Choose a small block of basswood, about 4×4 inches.
- Sketch Your Design: With a pencil, draw a simple shape on the wood. A rounded shape like an oval or a simple teardrop is ideal for a first project.
- Secure the Wood: Hold the basswood block firmly in your non-dominant hand, wearing your protective glove. Ensure your fingers are positioned out of the path of the blade.
- Make Initial Cuts:
- Using your whittling knife, begin making shallow, controlled cuts to remove larger blocks of wood outside your drawn shape.
- For rounded edges, use a slicing motion, pulling the blade towards you or pushing it away while angling the blade slightly.
- Always make cuts that move away from your body and guiding hand.
- Shape the Form: Continue to pare away wood in small increments. Focus on rounding your edges and developing the basic form of your shape. Don’t try to do too much at once.
- Refine the Edges: Once you have the basic shape, you can use the tip of your knife or a small gouge to refine the edges and smooth out any rough areas.
- Sanding (Optional): If you want a smoother finish, you can lightly sand your carving with fine-grit sandpaper (around 120-220 grit). Sand in the direction of the wood grain.
This simple exercise will help you gain confidence with your tools and understand how the wood responds to your cuts.
Maintaining Your Tools: Sharpening is Key
You’ve heard it before, but it bears repeating: sharp tools are safe tools. Dull tools don’t cut; they tear and slip, leading to frustration and injury. Taking care of your carving tools ensures they perform optimally and last for years.
Sharpening Basics
Sharpening is a skill that improves with practice. Here’s a simple approach:
- Identify your sharpening tools: You’ll need a sharpening stone (water stones are popular for carving tools) and a leather strop.
- Learn the bevel: Each carving tool has a bevel – the angled surface that forms the cutting edge. You need to hone this bevel to a sharp point.
- Stone Sharpening:
- Wet your water stone according to its instructions.
- Hold your tool at a consistent angle against the stone (usually around 15-20 degrees).
- Make smooth, gliding strokes, moving the tool along the stone. You’re aiming to realign and polish the edge, not remove a lot of metal.
- Sharpen both sides of the blade.
- Stropping:
- Apply a small amount of honing compound to your leather strop.
- Hold the tool at the same angle as you did on the stone.
- Drag the blade along the strop, alternating sides. This removes the microscopic burr along the edge, making it incredibly sharp.
Regularly honing your tools during carving sessions will keep them slicing cleanly. Many carvers find resources like YouTube channels dedicated to sharpening very helpful, as seeing the technique in action is invaluable. Look for channels that demonstrate sharpening techniques for wood carving tools specifically.
Troubleshooting Common Beginner Issues
Even with the best guidance, you might encounter a few hiccups. Don’t get discouraged; these are common and easily overcome.
Common Problems and Solutions
| Problem | Cause | Solution |
|---|---|---|
| Wood Splitting Unpredictably | Dull tool, forcing the cut, or carving against the grain. | Ensure your tool is sharp. Make shallow, controlled cuts. Pay attention to the direction of the wood grain and carve with it whenever possible. |
| Rough or Jagged Cuts | Dull tool or not making a clean slicing motion. | Sharpen your tool. Focus on a smooth, consistent slicing action rather than jerky movements. |
| Difficulty Removing Wood | Dull tool or using the wrong tool for the job. | Sharpen your tool. Use a gouge for scooping and shaping curves, and a knife for paring and slicing. |
| Fatigue or Hand Cramps | Holding the tool too tightly or working for too long. | Relax your grip. Take frequent breaks. Ensure your tools have comfortable handles. |
| Feeling Overwhelmed | Trying to do too much too soon or not starting with simple projects. | Focus on mastering basic cuts and simple shapes first. Gradually increase complexity as your confidence and skills grow. Watch tutorial videos to see techniques demonstrated. |
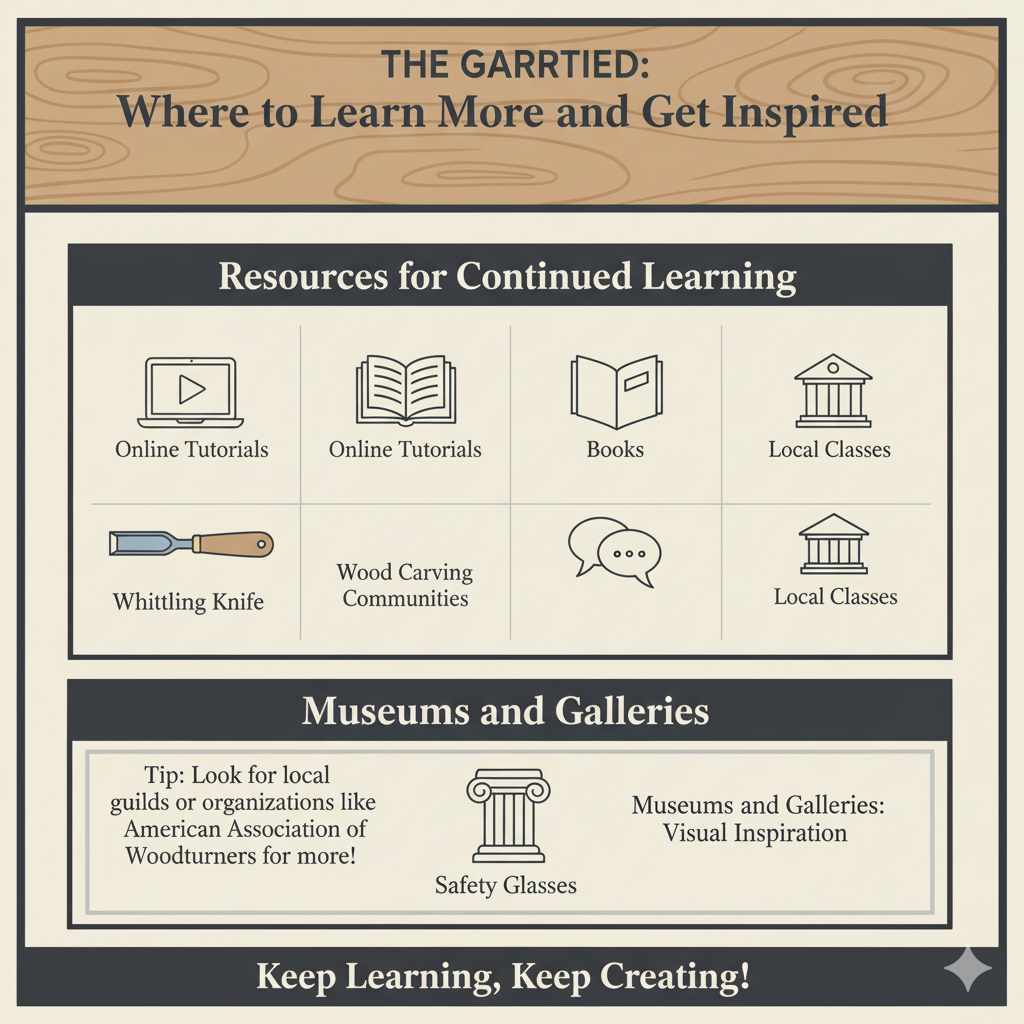
Where to Learn More and Get Inspired
The journey of a wood carver is one of continuous learning and inspiration. Don’t hesitate to seek out more knowledge and see what others are creating.
Resources for Continued Learning
- Online Tutorials: Websites and YouTube channels dedicated to wood carving offer countless free tutorials for all skill levels. Look for channels that focus on beginner projects and safety.
- Books: Many excellent books cover wood carving techniques, tool guides, and project ideas. Check your local library or online bookstores.
- Wood Carving Communities: Online woodworking forums and social media groups are great places to ask questions, share your progress, and get feedback from experienced carvers.
- Local Classes: If available, local woodworking guilds or community centers may offer introductory carving classes.
- Museums and Galleries: Visiting exhibits featuring carved wood can provide immense inspiration for patterns, styles, and artistic concepts.
For example, the American Association of Woodturners (while focused on turning, their members often have extensive carving knowledge and resources) is an example of a larger woodworking organization that can point you to regional groups and educational opportunities.
Frequently Asked Questions About Wood Carving
What is the safest way to start wood carving?
Wearing cut-resistant gloves on your guiding hand and safety glasses, and always cutting away from yourself, are the most important safety practices for beginners.
How often should I sharpen my carving tools?
You should sharpen your tools whenever they start to feel like they are not cutting cleanly or smoothly. Many carvers hone their tools with a strop after a few minutes of carving.
Can I use regular knives for wood carving?
While you can make very basic cuts with a sharp utility knife, dedicated carving knives are designed for better control, comfort, and safety, and they hold an edge much better for wood carving tasks.
Is wood carving expensive to start?
No, you can start wood carving with a few basic tools and a block of wood for a relatively low cost. The most significant initial investment might be a good sharpening system, which is crucial.
What kind of wood is easiest to carve for a beginner?
Basswood is widely considered the easiest wood for beginners because it’s soft, has an even grain, and carves very cleanly without splintering.
How long does it take to get good at wood carving?
Like any skill, it takes practice. You can achieve satisfying results with simple projects fairly quickly, but mastering intricate details and complex designs can take years of dedicated practice.
What are common mistakes beginners make?
Common mistakes include using dull tools, not paying attention to wood grain, forcing the tool, not wearing safety gear, and trying to carve too quickly or too complex designs too soon.
Conclusion
Embarking on your wood carving adventure is simpler than you might think. By gathering a few essential, quality tools, selecting beginner-friendly wood like basswood, and always prioritizing safety, you’re well on your way to creating beautiful wooden art. Remember to start with simple shapes, master your basic cuts, and keep those tools razor-sharp. Every seasoned carver began right where you are, with a desire to create and a willingness to learn.
Don’t be afraid to make mistakes – they are part of the learning process. Embrace the journey, enjoy the meditative rhythm of carving, and celebrate each finished piece. Before you know it, you’ll be transforming pieces of wood into treasures, with a newfound skill and a deep sense of satisfaction. Happy carving!