Can Tile Be Laid On Plywood? What You Need To Know
It’s a common question, especially for DIYers looking to refresh their homes. You’ve got this beautiful tile picked out. Now you’re wondering about the surface underneath.
Can tile be laid on plywood? It’s a puzzle many people face. Getting this part right is super important for your new floor.
Yes, tile can often be laid on plywood, but it requires specific preparation and often an additional layer to ensure a stable, crack-free surface. Plywood alone is usually not a sufficient subfloor for tile without proper reinforcement due to its tendency to flex and expand.
What Tile on Plywood Means for Your Floor
Putting tile directly on plywood can seem like a good shortcut. But it’s not always that simple. Tile needs a really solid base.
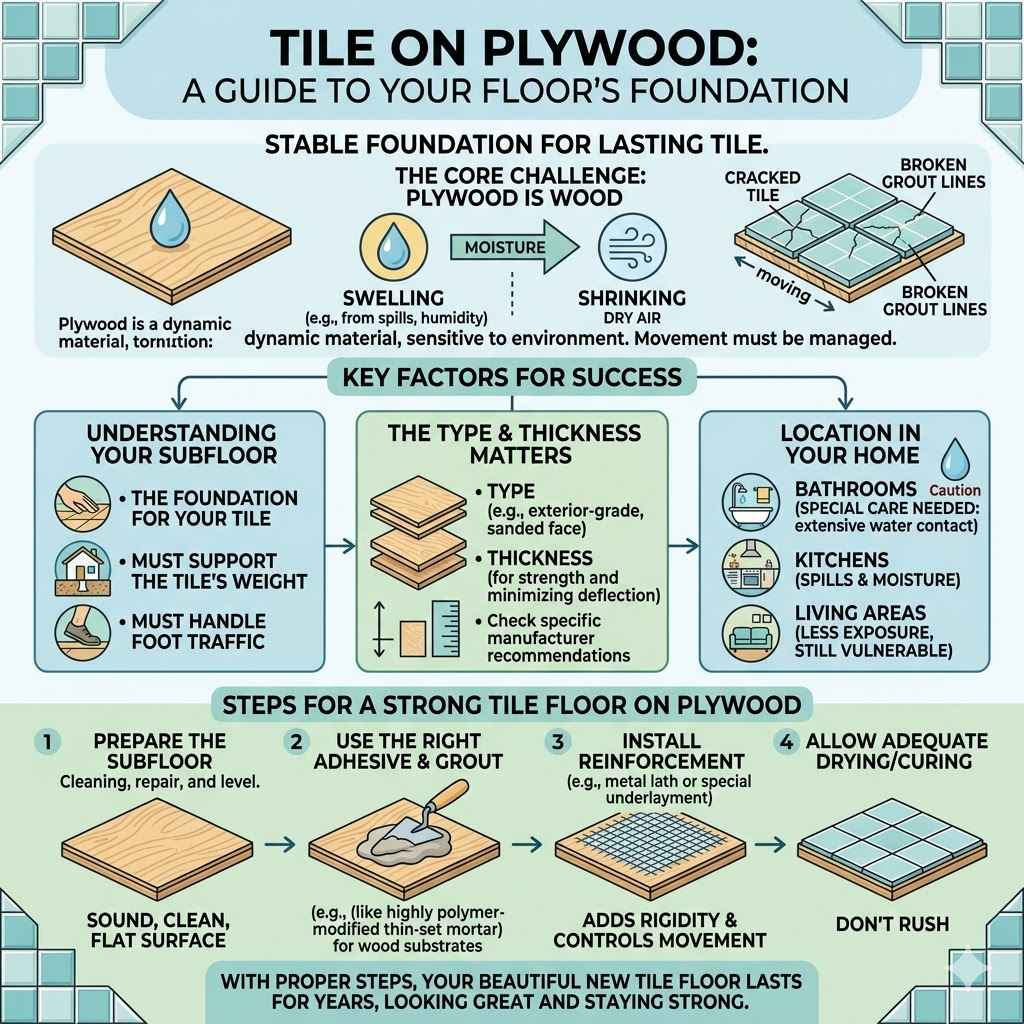
Plywood is wood. Wood moves. It can swell with moisture.
It can shrink with dry air. This movement can cause tile to crack. It can also make grout lines break apart.
So, the question really becomes: how do we make plywood a good home for tile?
Understanding your subfloor is key. Think of it as the foundation of a house. A weak foundation means trouble later.
We need to make sure that plywood can hold up. It needs to support the weight of the tile. It needs to handle foot traffic.
And it needs to resist changes in the weather or your home.
The type of plywood matters. Its thickness is a big deal. Where it’s located in your house also plays a role.
Bathrooms need special care because of water. Kitchens can also get wet. Even living rooms can see spills.
So, can you do it? Yes. But with important steps.
We will go over all of them. This way, your beautiful new tile floor lasts for years. You want it to look great and stay strong.
Let’s dive into the details.
My Own Plywood Tile Fiasco (and What I Learned)
I remember it so clearly. I was so excited to tile my small entryway. The old linoleum was peeling.
I ripped it up. Underneath was bare plywood. It looked pretty solid.
I thought, “Great! I can just tile right over this!” I had seen it done before, or so I thought. I laid down the thin-set.
I set the tiles. I grouted. It looked amazing for about two weeks.
Then it started. A tiny crack appeared in one tile. Then another.
The grout near the doorway looked crumbly. I was horrified. I had spent so much time and money.
I had visions of happy guests admiring my new floor. Instead, I had a mess. I called a friend who is a contractor.
He took one look and just shook his head. He explained why it failed.
He said plywood flexes too much. Even if it looks stiff, it bends under weight. Every step you take puts pressure on the floor.
This tiny bending is called deflection. Plywood alone doesn’t handle deflection well enough for tile. Tile is rigid.
When the base moves, the tile breaks. He explained that I needed more support.
He showed me what a proper installation looks like. It wasn’t just plywood. There was more involved.
That day taught me a valuable lesson. Never skip the subfloor prep for tile. It’s the most critical step.
It might seem like extra work. But it saves you from heartbreak later. And it makes your floor last.
Understanding Plywood’s Role
Plywood is a strong wood material. It is made of thin wood layers. These layers are glued together.
They are layered in opposite directions. This makes it quite strong. It’s used in many building projects.
But for tile, it has limits.
Key points:
- Flexibility: Plywood bends more than concrete or cement board.
- Moisture: It can absorb water. This causes it to swell or warp.
- Thickness: Thicker plywood is better, but still might need help.
- Bonding: Tile adhesive may not stick well long-term to just plywood.
The Real Problem: Plywood Deflection
So, what exactly is deflection? It’s how much a floor bends. When you walk on a floor, it dips a little.
For most flooring like carpet or vinyl, this is fine. They can handle a bit of bend. Tile and grout are different.
They are brittle. They don’t like to bend. They like a solid, unmoving surface.
If the plywood bends too much, the tile will crack. The grout will also crack. This happens because the floor is moving under the tile.
The tile is trying to stay still. The plywood is moving. Something has to give.
Usually, it’s the tile or the grout.
How do we know if the plywood is bending too much? Builders have ways to measure this. They use a ratio.
It looks at the distance between your floor joists. It also looks at the thickness of the plywood. For example, if joists are 16 inches apart, you need thicker plywood.
If they are 24 inches apart, you need even thicker plywood. Or you need to add more support.
A common recommendation is for joists spaced 16 inches on center. You might need at least 3/4-inch thick plywood. Even then, it might not be enough.
Especially in areas with more moisture, like bathrooms.
This is why simply laying tile on any plywood subfloor is a gamble. It’s a recipe for future problems. We want your floor to be a joy, not a headache.
Fixing cracked tiles and grout is frustrating. It costs money too.
Deflection Ratios Explained Simply
Think of a ruler. If you hold it at the ends and push in the middle, it bends. The floor joists are like the ends holding it up.
The plywood is the ruler. The gap between your joists matters. Thicker plywood is like a thicker ruler.
Common Ratios (T=Total Thickness of Subfloor Layers, L=Span between Joists):
- L/360: This is a general rule for rigid flooring like tile. It means the floor shouldn’t deflect more than 1/360th of the span.
- L/192: Some say this is okay for plywood alone, but it’s risky for tile.
- L/360 or better: This is the gold standard when using cement board or decoupling membranes.
This is why you often need more than just the plywood you see. You need to add layers to make it stiffer.
When Is Plywood Okay for Tile? (And When It’s Not)
So, when can we feel confident about tiling on plywood? It’s not an absolute no. But the conditions have to be just right.
And even then, extra steps are usually wise. Let’s break it down by situation.
First, consider the plywood itself. Is it exterior grade or rated for subflooring? These are made to handle moisture better. They are also made to be strong.
If you have older, thin plywood, it’s probably not suitable on its own. You’ll need to add to it.
Next, think about the joist spacing and plywood thickness. If your floor joists are close together (like 12 inches on center) and you have at least 3/4-inch thick plywood, you might be in a better position. But even this isn’t a guarantee. The TCNA (Tile Council of North America) has standards.
They often recommend an L/360 deflection rating. Plywood alone rarely meets this.
What about location? A dry basement or a laundry room that’s not prone to leaks might be less risky than a bathroom. But even in a dry area, temperature changes can affect wood. And accidents happen.
A small water leak can ruin a tiled floor if the subfloor isn’t ready.
Generally, it’s NOT okay if:
- The plywood is thin (under 5/8 inch).
- The joists are far apart (16 inches or more on center).
- The plywood shows signs of water damage, rot, or warping.
- The floor feels bouncy or flexible when you walk on it.
- It’s a high-moisture area like a shower floor or around a tub.
My own experience showed me this clearly. I had decent plywood, but the deflection was too much for tile. The most reliable way to tile over plywood is to add a stable layer on top.
Plywood Thickness Guide (General)
This is a simplified guide. Always check local building codes and manufacturer specs.
Joist Spacing
12 inches on center: Minimum 1/2 inch plywood needed. 5/8 inch is better.
Joist Spacing
16 inches on center: Minimum 5/8 inch plywood needed. 3/4 inch is strongly recommended.
Joist Spacing
24 inches on center: This is usually too much for plywood alone for tile. You’ll need thicker plywood AND additional support or a different subfloor.
Remember: These are MINIMUMS. For tile, thicker is always safer. And adding a layer like cement board is often the best bet.
The Best Way: Adding a Stable Layer
Okay, so we know plywood alone is risky. What’s the solution? The answer is to add a layer on top of the plywood.
This layer provides a stable, rigid surface. It prevents the plywood from flexing. It creates a solid base for your tile.
There are a few popular options for this extra layer. Each has its own benefits. The most common ones are cement board and an underlayment membrane.
Cement Board:
This is a very common choice. Cement board is made of cement and reinforcing fibers. It’s heavy.
It’s very rigid. And it doesn’t expand or contract much with moisture changes. It’s basically like a thin concrete slab.
You install cement board over the plywood. You screw it down securely. You also use thin-set mortar under it.
This creates a strong bond. It stops any movement between the plywood and the cement board. Many tile setters swear by cement board.
It’s a proven method.
Underlayment Membranes:
These are newer solutions. They are often made of plastic or foam. Some have a fabric surface.
They do a few things:
- Decoupling: This is the main benefit. They actually “decouple” the tile from the subfloor. This means they absorb the movement. If the plywood moves a little, the membrane takes it. The tile doesn’t feel it. This prevents cracks.
- Waterproofing: Some membranes also act as a waterproofing layer. This is great for bathrooms.
- Sound Dampening: They can also reduce noise from footsteps.
These membranes are lighter than cement board. They are often easier to install. Popular brands include Schluter-DITRA.
They are a bit more expensive per square foot than cement board. But many pros prefer them for their performance.
HardieBacker or Durock are common brand names for cement board. Look for products specifically designed as tile underlayment.
Choosing between these depends on your budget. It also depends on your comfort level with installation. Both will give you a much better result than plywood alone.
Quick Comparison: Cement Board vs. Membrane
Cement Board
Pros: Very rigid, proven track record, cost-effective.
Cons: Heavy, can be brittle during cutting, requires thin-set underlayment.
Best for: Most standard tile installations, budget-conscious projects.
Underlayment Membrane
Pros: Excellent crack isolation (decoupling), lightweight, often waterproofs, easier to cut.
Cons: Can be more expensive, new technology for some homeowners.
Best for: Areas prone to movement, bathrooms, luxury installations, DIYers seeking ease.
Preparing Your Plywood Subfloor: Step-by-Step
Alright, let’s get into the actual steps. Preparing your plywood subfloor is crucial. This isn’t just about laying down cement board.
It’s about making sure everything is perfect before you even start.
1. Inspect the Plywood:
First, look closely at your plywood. Is it warped? Are there any soft spots?
Does it feel damp? Any damaged areas need to be fixed or
2. Check for Sticking Out Nails/Screws:
Walk over the entire floor. Feel for any nails or screws sticking up. They can cause problems later.
Hammer them down flat. Or remove them and use new ones. You want a perfectly smooth surface.
3. Sand Down High Spots and Bumps:
Sometimes, edges of plywood sheets can be slightly higher. Or there might be old adhesive or paint. Use a floor sander or a belt sander to flatten these areas.
You want a smooth, even plane. This is super important for a good tile bond.
4. Fasten the Plywood Down:
Even if it looks solid, reinforce the plywood. Use screws specifically made for subflooring. Place them every 6 inches along the joists and every 12 inches in the field (the middle of the sheet).
This makes the plywood much stiffer and prevents squeaks.
5. Seal Gaps (Optional but Recommended):
Some pros like to seal the gaps between plywood sheets. You can use a flexible caulk or a specialized subfloor sealant. This adds a layer of protection against moisture.
It also helps prevent movement.
6. Clean, Clean, Clean:
Before you add anything on top, the floor must be spotless. Vacuum up all the dust. Then wipe it down with a damp cloth.
Any dirt or debris will compromise the bond of your next layer.
This prep work might seem tedious. But it’s the backbone of a lasting tile installation. Skipping these steps is like building a house on sand.
Tools for Subfloor Prep
Having the right tools makes the job much easier.
- Safety Gear: Dust mask, safety glasses, work gloves.
- Sander: Floor sander or belt sander for flattening.
- Screwdriver/Drill: For installing subfloor screws.
- Hammer: To pound down nails.
- Vacuum: To get rid of dust.
- Utility Knife: For cutting out damaged wood.
- Measuring Tape: To check joist spacing.
Installing Cement Board Over Plywood
This is a very common and effective method. Cement board gives you that rigid surface tile needs. Here’s how it’s typically done.
1. Lay Out the Cement Board:
Start in a corner. Place the first piece of cement board. You want to stagger the seams.
This means the edges of the cement board shouldn’t line up directly. Stagger them like bricks. This creates a stronger, more stable surface.
2. Apply Thin-Set Mortar:
Before placing a piece of cement board, spread a thin layer of modified thin-set mortar on the plywood. Use the notched side of your trowel. This fills any small voids and creates a strong bond between the plywood and the cement board.
Work in small sections so the mortar doesn’t dry out.
3. Secure the Cement Board:
Lay the cement board into the wet thin-set. Press it down firmly. Then, use screws made for cement board.
They are often coated to resist corrosion. Place them about 6-8 inches apart along the edges. And about 8-12 inches apart in the field.
Make sure the screw heads are just below the surface. Don’t over-tighten. You don’t want to crack the cement board.
4. Tape the Seams:
Use alkali-resistant fiberglass mesh tape. This tape is designed for use with thin-set mortar. Cover all the seams between the cement board pieces.
Then, embed the tape into a thin layer of thin-set mortar. Smooth it out with your trowel. This prevents cracks from forming at the joints.
5. Let it Cure:
Allow the thin-set and tape to dry completely. This usually takes at least 24 hours. Check the manufacturer’s instructions for the specific thin-set you are using.
This process turns your flexible plywood into a solid, stable base. It’s ready for tile. This is a robust method that stands the test of time.
Tips for Working with Cement Board
- Wear a mask: Cutting cement board creates fine dust.
- Use the right screws: Corrosion-resistant screws are a must.
- Stagger seams: Like laying bricks for strength.
- Thin-set under it: Creates a strong bond and smooth surface.
- Don’t over-tighten screws: You can crack the board.
Installing an Underlayment Membrane
These decoupling membranes are a bit different. They are often much easier to install. And they offer excellent protection against cracking.
1. Ensure a Clean, Dry Surface:
Start with your prepared plywood subfloor. It needs to be clean, dry, and free of dust. Just like with cement board, this is crucial for the adhesive to work.
2. Apply the Adhesive:
Follow the manufacturer’s specific instructions. Some membranes use a special adhesive. Others might use modified thin-set mortar.
Apply the adhesive to the plywood in sections. Use the recommended trowel size.
3. Roll Out the Membrane:
Carefully lay the membrane into the adhesive. Press it down firmly. Use a floor roller or a stiff piece of cardboard.
Ensure there are no air bubbles underneath. Work from the center outwards.
4. Cut and Fit as Needed:
You’ll need to cut the membrane to fit around corners or obstacles. Use a sharp utility knife. Make sure the pieces overlap correctly if required by the manufacturer.
Some membranes have specific overlap instructions or require sealing the seams.
5. Install Tile Directly Onto the Membrane:
Once the adhesive for the membrane is set (or if it’s a self-adhering type), you can install the tile directly on top. Use the recommended thin-set mortar for the membrane type. This is a big advantage – less waiting time!
The key here is to follow the brand’s instructions exactly. Brands like Schluter-DITRA have detailed guides and videos. They are designed for ease of use.
They provide fantastic results.
What is Decoupling?
Imagine two rugs on a hard floor. If you push one rug, the other one moves with it. Now, imagine putting a thin layer of sand between the rugs.
If you push one rug, the sand layer lets it slide a bit. The other rug doesn’t move as much.
A decoupling membrane works like that sand. It separates the tile from the subfloor. It absorbs the small movements of the subfloor.
This prevents those movements from reaching the tile. And stopping cracks before they start.
Real-World Scenarios: Where This Matters Most
Let’s think about where you might encounter plywood subfloors and why these steps are so important. These are places where tile is common, but also where moisture and traffic are concerns.
Kitchens:
Kitchens are prone to spills. Dropped drinks, water from washing dishes, or even leaks from the dishwasher can happen. A plywood subfloor without protection could absorb this moisture.
It can warp or rot over time. This will eventually damage your tile. Adding cement board or a membrane protects against this.
Bathrooms:
This is the big one. Bathrooms have high humidity. Splashing water is common.
Leaks from toilets or sinks can occur. Shower floors are almost always wet. You absolutely need a waterproof and stable subfloor.
Tiling directly on plywood in a bathroom is a recipe for disaster. A proper underlayment is non-negotiable here.
Laundry Rooms:
Washing machines can sometimes leak. Water can spill when moving wet clothes. Like kitchens and bathrooms, this area needs protection.
Plywood can soak up water and get damaged.
Entryways and High-Traffic Areas:
Even in dry areas, heavy foot traffic puts stress on a floor. Plywood alone might not be stiff enough to handle constant pressure. This can lead to premature tile cracking.
Adding a layer of cement board or a decoupling membrane provides the needed rigidity and stability.
These are the places where the effort of preparing your subfloor really pays off. It’s not just about looks; it’s about durability and preventing costly repairs down the line.
Moisture vs. Movement
Tile failures often come from two main issues:
- Moisture Damage: Wood subfloors can rot, warp, or expand when wet. This ruins the base for the tile.
- Subfloor Movement: Even in dry conditions, the floor can flex. This is called deflection. Brittle tile and grout can’t handle this movement.
Proper subfloor preparation addresses both. Cement board and membranes provide a stable, moisture-resistant barrier. This protects your tile investment.
What This Means for You: When to Worry
So, when should you start to worry about your plywood subfloor and tile? It boils down to the signs of instability and potential damage.
When it’s Normal:
If you have a well-prepared plywood subfloor, possibly with an added layer of cement board or membrane, and it’s installed correctly, it should feel solid. When you walk on it, there should be no noticeable flex or bounce. The tiles should feel firmly set.
Grout lines should be smooth and intact.
When to Worry:
- Cracked Tiles: This is the most obvious sign. If tiles are cracking, especially in multiple places, it’s a strong indicator of subfloor movement or failure.
- Crumbling Grout: If grout is flaking or breaking apart, it means the tiles are shifting.
- Loose Tiles: If tiles feel loose or hollow underfoot, they are not bonded properly to the subfloor.
- Warped or Sagging Floor: If you can see or feel any dips or humps in the floor, the plywood may be damaged by moisture or is simply not supported well.
- Squeaking Floors: While not always a tile issue, squeaks indicate movement between the plywood and the joists. This movement can stress tile over time.
- Water Stains or Dampness: If you notice any signs of moisture, especially around fixtures or at the edges of the room, the plywood is likely compromised.
Simple Checks:
To check for movement, try this: Stand on one leg in the center of the room. Wiggle your body slightly. Does the floor feel solid?
Now, try walking across the floor, especially over the joists. Does it feel springy or bounce?
If you suspect your subfloor is failing, it’s best to address it sooner rather than later. Trying to patch a few cracked tiles won’t fix the underlying problem. You may need to remove the tile and the underlayment to inspect and repair the plywood itself.
A Word on Older Homes
Older homes often have plywood subfloors. Sometimes, they are thinner or installed over wider joist spacing. If you’re renovating an older home, always assume your subfloor needs evaluation.
It’s better to be safe than to have to retile in a few years.
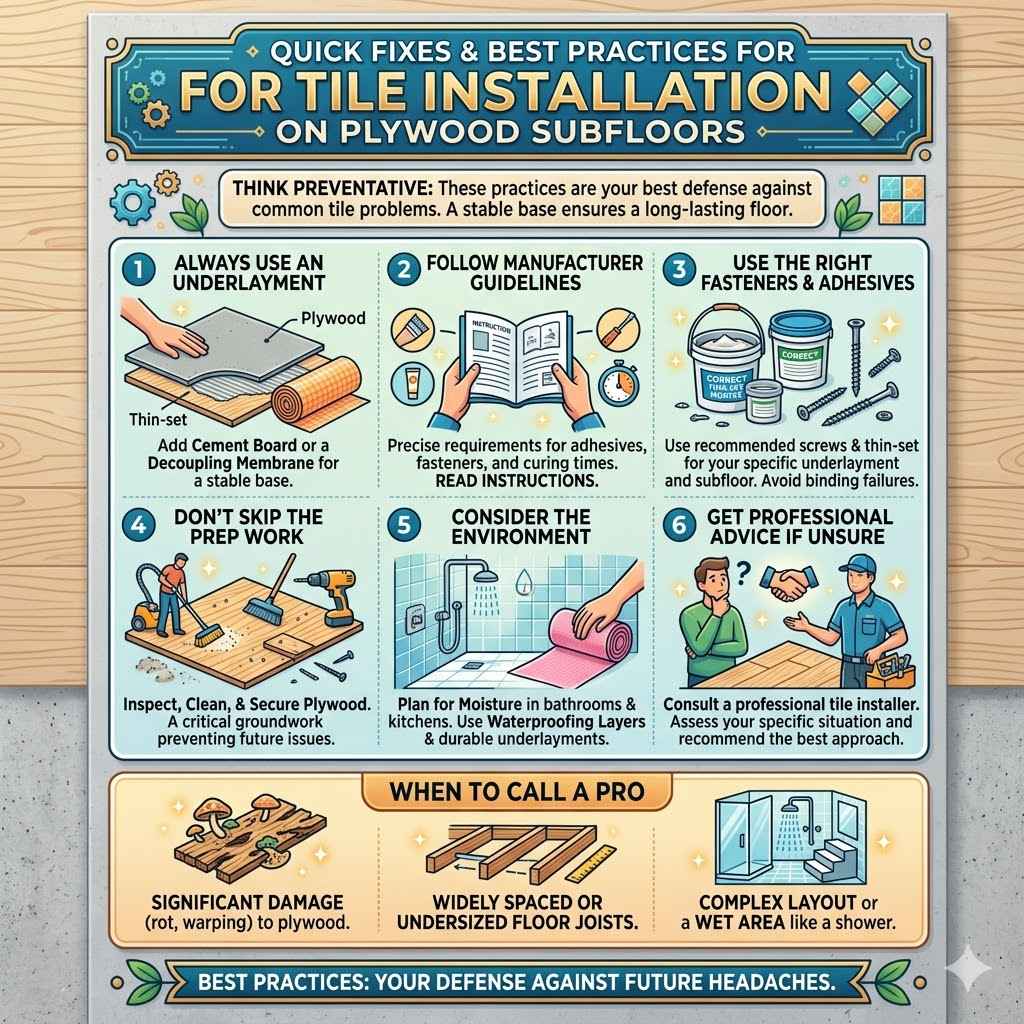
Quick Fixes and Best Practices
While there are no true “quick fixes” for a failing subfloor, there are best practices to ensure your tile installation is successful from the start. Think of these as preventative measures.
1. Always Use an Underlayment:
For almost any tile installation over plywood, adding cement board or a decoupling membrane is the smart move. It’s the best way to guarantee a stable base.
2. Follow Manufacturer Guidelines:
Whether you choose cement board or a membrane, read and follow the product instructions precisely. Different products have different installation requirements for adhesives, fasteners, and curing times.
3. Use the Right Fasteners and Adhesives:
Always use screws and thin-set mortar recommended for your specific underlayment and subfloor. Using the wrong products can lead to bonding failures.
4. Don’t Skip the Prep Work:
As we discussed, inspecting, cleaning, and securing the plywood is non-negotiable. This groundwork prevents future issues.
5. Consider the Environment:
If tiling a bathroom or kitchen, always plan for moisture. Waterproofing layers and durable underlayments are essential.
6. Get Professional Advice if Unsure:
If you’re new to tiling or unsure about your subfloor condition, consult a professional tile installer. They can assess your specific situation and recommend the best approach.
These practices are your best defense against common tile installation problems. They are the foundation of a beautiful, long-lasting floor.
When to Call a Pro
It’s always a good idea to get professional input if:
- You find significant damage to the plywood (rot, warping).
- Your floor joists are widely spaced or seem undersized.
- You’re dealing with a complex layout or a wet area like a shower.
- You’re feeling overwhelmed by the preparation steps.
A professional can save you time, money, and headaches in the long run.
Frequently Asked Questions
Can I lay tile directly on plywood without anything else?
Generally, no. While technically possible in some very specific, ideal situations, it’s highly discouraged. Plywood alone flexes too much, leading to cracked tiles and grout.
An additional layer like cement board or a decoupling membrane is almost always required for a durable tile floor.
What is the minimum thickness for plywood under tile?
The minimum thickness depends heavily on the spacing of your floor joists. For 16-inch joist spacing, 3/4-inch thick plywood is often recommended as a bare minimum, but even then, adding an underlayment is still best practice for tile.
How do I know if my plywood subfloor is strong enough?
You can check by walking on it. If it feels bouncy or flexes significantly, it’s likely not strong enough for tile. Builders use deflection ratios (like L/360) to determine suitability.
Adding an underlayment like cement board or a decoupling membrane usually makes the subfloor strong enough.
Is cement board necessary if I use a decoupling membrane?
No, you do not need cement board if you are using a decoupling membrane. The membrane itself provides the necessary stability and crack isolation. You install the membrane directly over the prepared plywood subfloor, and then tile over the membrane.
Can I tile over old plywood with a lot of knots?
If the plywood is structurally sound and the knots are flush with the surface, it might be okay to proceed after proper preparation. However, if the knots are loose or create an uneven surface, they should be addressed. Loose knots should be removed and the area filled.
Uneven surfaces need to be sanded smooth. It’s always better to err on the side of caution and ensure a perfectly flat surface.
What about moisture sealing the plywood before tiling?
Sealing the plywood with a moisture-resistant sealant or coating, especially between plywood sheets and along edges, can add an extra layer of protection. However, it is not a substitute for a proper underlayment like cement board or a decoupling membrane, which are designed to handle the stresses of tile installation.
Final Thoughts on Plywood and Tile
So, can you lay tile on plywood? The answer is a qualified yes. But it’s not a simple yes.
Plywood is a common subfloor. It needs careful preparation. Adding a layer of cement board or a decoupling membrane is usually required.
This creates a stable base. It stops movement. It protects your tile.
Don’t skip the prep work. Make sure your plywood is solid. Then add your chosen underlayment.
Follow the steps carefully. This ensures your beautiful new tile floor looks great for years to come. It’s an investment in your home.
And it’s worth doing right.